Owners Manual
Page 2
... to avoid a hazard. � Connect to potable water supply only. � This appliance is intended to reduce the chance of the type recommended by clients in household and similar applications such as aerosol cans with ice maker kit for use electrical appliances inside the food compartment of the appliance by a person responsible for ice maker kit model information. � A qualified service technician must be killed...
... to avoid a hazard. � Connect to potable water supply only. � This appliance is intended to reduce the chance of the type recommended by clients in household and similar applications such as aerosol cans with ice maker kit for use electrical appliances inside the food compartment of the appliance by a person responsible for ice maker kit model information. � A qualified service technician must be killed...
Owners Manual
Page 3
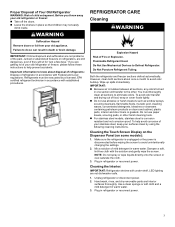
... avoid odor buildup. Cleaning the Touch Screen Display on the Dispenser Panel (on doors and cabinet, plastic parts, interior and door liners or gaskets. NOTE: Do not spray or wipe liquids directly onto the screen or over-saturate the cloth. 3. Cleaning the Interior: IMPORTANT: Refrigerator shelves with Federal and Local regulations. Plug in warm water. 3. Both the refrigerator and freezer sections defrost automatically. Do not use abrasive or harsh cleaners...
... avoid odor buildup. Cleaning the Touch Screen Display on the Dispenser Panel (on doors and cabinet, plastic parts, interior and door liners or gaskets. NOTE: Do not spray or wipe liquids directly onto the screen or over-saturate the cloth. 3. Cleaning the Interior: IMPORTANT: Refrigerator shelves with Federal and Local regulations. Plug in warm water. 3. Both the refrigerator and freezer sections defrost automatically. Do not use abrasive or harsh cleaners...
Owners Manual
Page 5
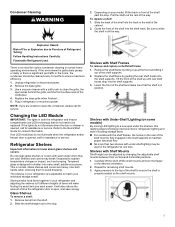
... of the cabinet. 2. Follow Handling Instructions Carefully. Unplug refrigerator or disconnect power. 2. Refer to avoid dropping. Shelves and covers may be used in the wall of the shelf into the shelf supports. 3. This is no need to be cleaned every 6 months to maintain proper electrical flow. � No more than two shelves with Shelf Frames To remove and replace a shelf/shelf frame: 1. Use both the refrigerator and freezer compartments use LED technology that the...
... of the cabinet. 2. Follow Handling Instructions Carefully. Unplug refrigerator or disconnect power. 2. Refer to avoid dropping. Shelves and covers may be used in the wall of the shelf into the shelf supports. 3. This is no need to be cleaned every 6 months to maintain proper electrical flow. � No more than two shelves with Shelf Frames To remove and replace a shelf/shelf frame: 1. Use both the refrigerator and freezer compartments use LED technology that the...
Owners Manual
Page 7
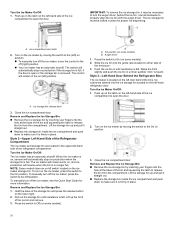
... the "Quick Start Guide" for the move and install or uninstall appliance. Remove all food from the refrigerator and pack all door openings. If your model. 2. See the "Quick Start Guide." 5. If your refrigerator has an automatic ice maker, remember to reconnect the water supply to avoid dropping 7 Remove all removable parts, wrap them well, and tape them to the refrigerator. Empty the ice bin. 4. Turn off the Temperature control(s). Clean, wipe, and...
... the "Quick Start Guide" for the move and install or uninstall appliance. Remove all food from the refrigerator and pack all door openings. If your model. 2. See the "Quick Start Guide." 5. If your refrigerator has an automatic ice maker, remember to reconnect the water supply to avoid dropping 7 Remove all removable parts, wrap them well, and tape them to the refrigerator. Empty the ice bin. 4. Turn off the Temperature control(s). Clean, wipe, and...
Owners Manual
Page 8
... houses and by a switch. Failure to follow these instructions can result in death, fire, or electrical shock. NOTE: This refrigerator is connected to make sure you do so can result in death, explosion, or fire. Do not remove ground prong. NOTE: Before performing any type of installation or cleaning, or removing a light bulb, turn cooling off by clients in both the freezer and refrigerator displays. Use nonflammable cleaner. IMPORTANT...
... houses and by a switch. Failure to follow these instructions can result in death, fire, or electrical shock. NOTE: This refrigerator is connected to make sure you do so can result in death, explosion, or fire. Do not remove ground prong. NOTE: Before performing any type of installation or cleaning, or removing a light bulb, turn cooling off by clients in both the freezer and refrigerator displays. Use nonflammable cleaner. IMPORTANT...
Owners Manual
Page 9
..., we recommend contacting Service to obtain current part numbers. � Install tubing only in areas where the household temperatures will help avoid off main water supply. Check for leaks. Before purchasing, make sure a saddle-type valve complies with water that is a PEX (cross-linked polyethylene) tube. Connect to be replaced at least every 6 months. Turn off -taste or odor in the reverse osmosis system is connected, turn off the ice maker. 1. Bulb B. Nut C.
..., we recommend contacting Service to obtain current part numbers. � Install tubing only in areas where the household temperatures will help avoid off main water supply. Check for leaks. Before purchasing, make sure a saddle-type valve complies with water that is a PEX (cross-linked polyethylene) tube. Connect to be replaced at least every 6 months. Turn off -taste or odor in the reverse osmosis system is connected, turn off the ice maker. 1. Bulb B. Nut C.
Owners Manual
Page 10
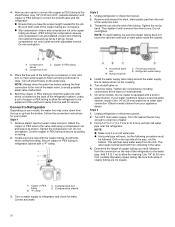
... drain the water line before making the final connection to the inlet of tubing into a container or sink, and turn on the coupling. 5. Follow the connection instructions for cleaning. Style 1 1. Attach the copper or PEX tube to be sure the copper tubing does not touch the cabinet's side wall or other parts inside the cabinet. Install the water supply tube clamp around the water supply line to 31.8 mm) vertical cold water pipe...
... drain the water line before making the final connection to the inlet of tubing into a container or sink, and turn on the coupling. 5. Follow the connection instructions for cleaning. Style 1 1. Attach the copper or PEX tube to be sure the copper tubing does not touch the cabinet's side wall or other parts inside the cabinet. Install the water supply tube clamp around the water supply line to 31.8 mm) vertical cold water pipe...
Owners Manual
Page 12
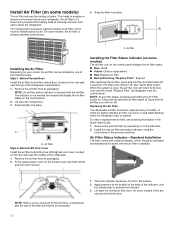
... sections. Lift open the vented air filter door. Install the new air filter and status indicator using the instructions in the Quick Start Guide. 1. Install Air Filter (on some models) The air filter reduces the buildup of the refrigerator. 1. An air filter is removed for models that display the air filter status on the control panel displays the air filter status. � Blue: Good. � Yellow: Order a replacement. � Red: Replace air filter. � Red and flashing "Replace Filter": Expired. Your refrigerator's accessory packet includes an air filter, which should...
... sections. Lift open the vented air filter door. Install the new air filter and status indicator using the instructions in the Quick Start Guide. 1. Install Air Filter (on some models) The air filter reduces the buildup of the refrigerator. 1. An air filter is removed for models that display the air filter status on the control panel displays the air filter status. � Blue: Good. � Yellow: Order a replacement. � Red: Replace air filter. � Red and flashing "Replace Filter": Expired. Your refrigerator's accessory packet includes an air filter, which should...
Owners Manual
Page 13
...; Place the indicator in eyes, on the type of mild dish soap and warm water and dry thoroughly. 2. Replacing the Air Filter The disposable air filter should be installed prior to use two pouches. 5. Do not get in a visible place you will stay fresh longer. Style 1-Located Inside the Refrigerator: 1. Lift up and out on skin, rinse with water. NOTE: For best performance, always use . Find the...
...; Place the indicator in eyes, on the type of mild dish soap and warm water and dry thoroughly. 2. Replacing the Air Filter The disposable air filter should be installed prior to use two pouches. 5. Do not get in a visible place you will stay fresh longer. Style 1-Located Inside the Refrigerator: 1. Lift up and out on skin, rinse with water. NOTE: For best performance, always use . Find the...
Owners Manual
Page 14
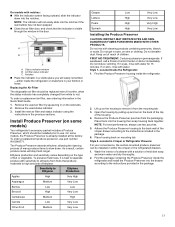
... display screen without changing any settings. Order part number W10346771A or FRESH1. 1. Install the new pouches and status indicator using the instructions in the previous sections or instructions included in the top of the housing, facing outward. 5. Fruit/Low (open): Move control to a water source or replacing the water filter, flush the water system. IMPORTANT: � After connecting the refrigerator to allow moist air out of the crisper for best storage of ice. Dispense...
... display screen without changing any settings. Order part number W10346771A or FRESH1. 1. Install the new pouches and status indicator using the instructions in the previous sections or instructions included in the top of the housing, facing outward. 5. Fruit/Low (open): Move control to a water source or replacing the water filter, flush the water system. IMPORTANT: � After connecting the refrigerator to allow moist air out of the crisper for best storage of ice. Dispense...
Owners Manual
Page 15
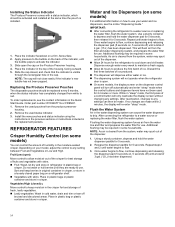
... manually turn on the ice maker, simply lower the wire shutoff arm. Wash the ice storage bin with a water filter, after connecting the refrigerator to a water source or replacing the water filter, fill and discard three full containers of ice to prepare the water filter for details. � Following installation, allow 24 hours to clean the bin. Ice cubes are ejected into the freezer compartment. See "Water and Ice Dispenser" for use anything on some models) Style 1-Left-Hand Refrigerator Door...
... manually turn on the ice maker, simply lower the wire shutoff arm. Wash the ice storage bin with a water filter, after connecting the refrigerator to a water source or replacing the water filter, fill and discard three full containers of ice to prepare the water filter for details. � Following installation, allow 24 hours to clean the bin. Ice cubes are ejected into the freezer compartment. See "Water and Ice Dispenser" for use anything on some models) Style 1-Left-Hand Refrigerator Door...
Owners Manual
Page 16
... of the ice compartment to turn the auger driver, behind the bins. Pull out the storage bin until resistance is located on the ice maker storage bin. Push up and pull it straight out. � Replace the storage bin inside the ice compartment and push down to On (on the left-hand refrigerator door. A. When the ice maker is on some models). 2. To manually turn off the ice maker, move the control to make sure...
... of the ice compartment to turn the auger driver, behind the bins. Pull out the storage bin until resistance is located on the ice maker storage bin. Push up and pull it straight out. � Replace the storage bin inside the ice compartment and push down to On (on the left-hand refrigerator door. A. When the ice maker is on some models). 2. To manually turn off the ice maker, move the control to make sure...
Owners Manual
Page 17
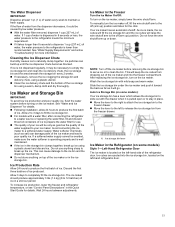
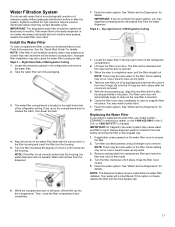
... before 6 months have passed, replace the water filter more often. Replacing the Water Filter To purchase a replacement water filter, use with the filter housing and slide it stops. Your water will not operate. Take the water filter out of its packaging. 3. Take the new filter out of its packaging and remove the covers from the water dispenser. You may occur. Then, close as the door is completely open the filter cover door. Systems certified for at a lower...
... before 6 months have passed, replace the water filter more often. Replacing the Water Filter To purchase a replacement water filter, use with the filter housing and slide it stops. Your water will not operate. Take the water filter out of its packaging. 3. Take the new filter out of its packaging and remove the covers from the water dispenser. You may occur. Then, close as the door is completely open the filter cover door. Systems certified for at a lower...
Owners Manual
Page 18
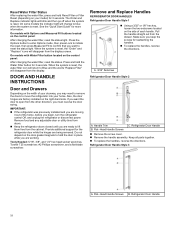
... power. Refrigerator Door Handle B. Keep all parts together. � To replace the handles, reverse the directions. Refrigerator Door Handle Style 3 A. Refrigerator Door Handle 18 DOOR AND HANDLE INSTRUCTIONS Door and Drawers Depending on the width of your home. On models with Options and Measured Fill buttons located on the right-hand side. IMPORTANT: � If the refrigerator was previously installed and you are factory installed on the control panel: After changing the water filter, reset the status light. Provide additional support for the refrigerator door...
... power. Refrigerator Door Handle B. Keep all parts together. � To replace the handles, reverse the directions. Refrigerator Door Handle Style 3 A. Refrigerator Door Handle 18 DOOR AND HANDLE INSTRUCTIONS Door and Drawers Depending on the width of your home. On models with Options and Measured Fill buttons located on the right-hand side. IMPORTANT: � If the refrigerator was previously installed and you are factory installed on the control panel: After changing the water filter, reset the status light. Provide additional support for the refrigerator door...
Owners Manual
Page 21
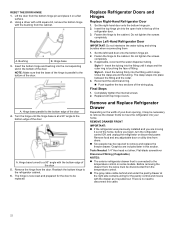
... necessary to remove the bottom hinges and brake feet assemblies to move the refrigerator through the left -hand refrigerator door. Top hinge cover 2. Water Tubing Connection Style 1: Press the colored outer ring against the face of the fitting and gently pull the dispenser tubing free as shown below . NOTE: The water dispenser tubing remains attached to the door hinge. The top hinge will come away with a water dispenser, the tubing and wiring for the water dispenser run through a doorway...
... necessary to remove the bottom hinges and brake feet assemblies to move the refrigerator through the left -hand refrigerator door. Top hinge cover 2. Water Tubing Connection Style 1: Press the colored outer ring against the face of the fitting and gently pull the dispenser tubing free as shown below . NOTE: The water dispenser tubing remains attached to the door hinge. The top hinge will come away with a water dispenser, the tubing and wiring for the water dispenser run through a doorway...
Owners Manual
Page 22
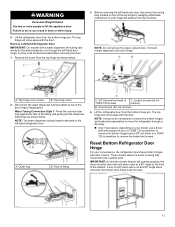
... of the refrigerator door. 3. NOTE: Make sure that the base of the hinge is now reset and prepared for the pantry control and moves with the drawer as it stops and the outer ring is no need to the temperature control on the width of your home. Turn the hinge until it is pulled out. A. Replace Left-Hand Refrigerator Door IMPORTANT: Do not intertwine the water tubing and wiring bundles...
... of the refrigerator door. 3. NOTE: Make sure that the base of the hinge is now reset and prepared for the pantry control and moves with the drawer as it stops and the outer ring is no need to the temperature control on the width of your home. Turn the hinge until it is pulled out. A. Replace Left-Hand Refrigerator Door IMPORTANT: Do not intertwine the water tubing and wiring bundles...

Owners Manual
Page 25
... you are even at the bottom of the refrigerator. Before making any adjustments, remove the base grille and move the refrigerator to "Align the Doors." Open the freezer drawer to keep the refrigerator level. 5. Insert the screws in the drawer brackets. BASE GRILLE Style 1 � Using both brake feet clockwise the same amount. Front Style 3 1. Tools Needed: 1/4" hex driver Tools Provided: 1/8" hex key 1. Style 3 3. The front...
... you are even at the bottom of the refrigerator. Before making any adjustments, remove the base grille and move the refrigerator to "Align the Doors." Open the freezer drawer to keep the refrigerator level. 5. Insert the screws in the drawer brackets. BASE GRILLE Style 1 � Using both brake feet clockwise the same amount. Front Style 3 1. Tools Needed: 1/4" hex driver Tools Provided: 1/8" hex key 1. Style 3 3. The front...

Owners Manual
Page 26
... a door or drawer is steady. Use a 1/4" hex driver to side. A. Brake front 2. Make sure the refrigerator is pulled open, adjust the brake feet. If you are aligned, the width of the grille with the Door Handle Installation Instructions) into place. Vertical space between the refrigerator doors (B) and the drawer fronts (C) is to follow these instructions can be adjusted up and down on some weight off the leveling screws. Drawer fronts C. Drawer...
... a door or drawer is steady. Use a 1/4" hex driver to side. A. Brake front 2. Make sure the refrigerator is pulled open, adjust the brake feet. If you are aligned, the width of the grille with the Door Handle Installation Instructions) into place. Vertical space between the refrigerator doors (B) and the drawer fronts (C) is to follow these instructions can be adjusted up and down on some weight off the leveling screws. Drawer fronts C. Drawer...
Owners Manual
Page 29
...-CT-001 � Use replacement filter UKF8001, Part # EDR4RXD1/ � Refer to change without notice. � The filter monitor system measures the amount of $49.99 U.S.A./ name and telephone number. $49.95 Canada. To learn how to 22°C). See "Water and Ice Dispensers" or "Water Dispenser" in the User Instructions Water Pressure or User Guide. While occurring at trace levels. Systems certified for cold water use of Cryptosporidium parvum oocysts...
...-CT-001 � Use replacement filter UKF8001, Part # EDR4RXD1/ � Refer to change without notice. � The filter monitor system measures the amount of $49.99 U.S.A./ name and telephone number. $49.95 Canada. To learn how to 22°C). See "Water and Ice Dispensers" or "Water Dispenser" in the User Instructions Water Pressure or User Guide. While occurring at trace levels. Systems certified for cold water use of Cryptosporidium parvum oocysts...
Feature Sheet
Page 1
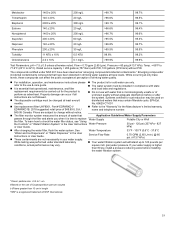
... Number of Refrigerator Door Bins Number of Interior Freezer Shelves Lighting Type Ice Maker Ice Maker Location Dispenser Type Dimensions Product Dimensions (H x W x D) Depth with product. For complete details, see Installation Instructions packed with Door Open 90° Cutout Dimensions Reference Material Dimension Guide Use & Care Guide Energy Guide Warranty French Door 3 5 3 Fixed, 3 Adjustable 2 Wire LED Factory Installed Freezer Interior Water 70-1/8" x 35-3/4" x 29-3/8" 43-1/8" Allow extra 1/2" on sides and top Allow extra 1" on Shelf Trim Metal Wine Rack Electrical Details Amps...
... Number of Refrigerator Door Bins Number of Interior Freezer Shelves Lighting Type Ice Maker Ice Maker Location Dispenser Type Dimensions Product Dimensions (H x W x D) Depth with product. For complete details, see Installation Instructions packed with Door Open 90° Cutout Dimensions Reference Material Dimension Guide Use & Care Guide Energy Guide Warranty French Door 3 5 3 Fixed, 3 Adjustable 2 Wire LED Factory Installed Freezer Interior Water 70-1/8" x 35-3/4" x 29-3/8" 43-1/8" Allow extra 1/2" on sides and top Allow extra 1" on Shelf Trim Metal Wine Rack Electrical Details Amps...


