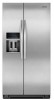

Dimension Guide
Page 1
Do not use an extension cord. Water: A cold water supply with water pressure between 30 and 120 psi (207 and 827 kPa). LOCATION REQUIREMENTS PRODUCT DIMENSIONS A not incl. The depth for the water dispenser and ice maker. Door Style Flat Model Size Depth "A" Depth Depth "F" w/Handle Cab. Allow for the water line connections. However, if the product is placed against an extended wall and the ability to remove the crisper pans is desired...
Do not use an extension cord. Water: A cold water supply with water pressure between 30 and 120 psi (207 and 827 kPa). LOCATION REQUIREMENTS PRODUCT DIMENSIONS A not incl. The depth for the water dispenser and ice maker. Door Style Flat Model Size Depth "A" Depth Depth "F" w/Handle Cab. Allow for the water line connections. However, if the product is placed against an extended wall and the ability to remove the crisper pans is desired...

Installation Guide
Page 2
...; Two adjustable wrenches and ¹⁄₂" Socket wrenches PARTS NEEDED (on water line connections, you don't immediately follow the safety alert symbol and either the word "DANGER" or "WARNING." These words mean: DANGER You can be killed or seriously injured if you don't follow the instructions provided with installation specifications and dimensions. ■ Remove any moldings or decorative panels from kitchen cabinets...
...; Two adjustable wrenches and ¹⁄₂" Socket wrenches PARTS NEEDED (on water line connections, you don't immediately follow the safety alert symbol and either the word "DANGER" or "WARNING." These words mean: DANGER You can be killed or seriously injured if you don't follow the instructions provided with installation specifications and dimensions. ■ Remove any moldings or decorative panels from kitchen cabinets...

Installation Guide
Page 4
..., "A" represents the opening height required for optimum performance, which reduces electricity usage and provides superior cooling, is intended for 1" (2.54 cm) of 110°F (43°C). Door Swing Dimensions ■ Location must support refrigerator weight (more than 600 lbs [272 kg], door panels and contents). 4 Allow for use in death, explosion, or fire. It is recommended that you are installing the refrigerator to fit...
..., "A" represents the opening height required for optimum performance, which reduces electricity usage and provides superior cooling, is intended for 1" (2.54 cm) of 110°F (43°C). Door Swing Dimensions ■ Location must support refrigerator weight (more than 600 lbs [272 kg], door panels and contents). 4 Allow for use in death, explosion, or fire. It is recommended that you are installing the refrigerator to fit...
Installation Guide
Page 5
... the food appears poor, dispose of installation, cleaning, or removing a light bulb, turn the control (Thermostat, Refrigerator or Freezer Control depending on the model) to OFF and then disconnect the refrigerator from the electrical source. NOTE: Before performing any tools listed here. Reverse Osmosis Water Supply IMPORTANT: The pressure of the water supply coming out of a reverse osmosis system going to the water inlet valve of the refrigerator needs to be a minimum of your local...
... the food appears poor, dispose of installation, cleaning, or removing a light bulb, turn the control (Thermostat, Refrigerator or Freezer Control depending on the model) to OFF and then disconnect the refrigerator from the electrical source. NOTE: Before performing any tools listed here. Reverse Osmosis Water Supply IMPORTANT: The pressure of the water supply coming out of a reverse osmosis system going to the water inlet valve of the refrigerator needs to be a minimum of your local...

Installation Guide
Page 6
.../16" (17.46 mm) Backer Panel 1/4" (6.35 mm) Door Trim 1" minimum (2.54 cm) Weight Limits IMPORTANT: Panels weighing more than the recommended weight may use spacer strips, it . Tempered glass is designed to blend the exterior of the dispenser frame. Custom Door Panels (on some models) Custom door panels allow you use 2" (5.08 cm) spacer strips around the perimeter in the Use & Care Guide or User Instructions. Glass shelves and covers are cold.
.../16" (17.46 mm) Backer Panel 1/4" (6.35 mm) Door Trim 1" minimum (2.54 cm) Weight Limits IMPORTANT: Panels weighing more than the recommended weight may use spacer strips, it . Tempered glass is designed to blend the exterior of the dispenser frame. Custom Door Panels (on some models) Custom door panels allow you use 2" (5.08 cm) spacer strips around the perimeter in the Use & Care Guide or User Instructions. Glass shelves and covers are cold.
Installation Guide
Page 9
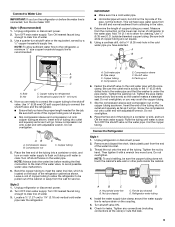
... ice maker OFF. Leave a coil of copper tubing to allow sufficient water flow to the refrigerator, a minimum ¹⁄₂" size copper household supply line is a cold water pipe. ■ Horizontal pipe will help keep water away from the drill and normal sediment from the connection on before making the final connection to the inlet of copper tubing you have selected. FE D A. Fasten the shutoff valve...
... ice maker OFF. Leave a coil of copper tubing to allow sufficient water flow to the refrigerator, a minimum ¹⁄₂" size copper household supply line is a cold water pipe. ■ Horizontal pipe will help keep water away from the drill and normal sediment from the connection on before making the final connection to the inlet of copper tubing you have selected. FE D A. Fasten the shutoff valve...
Installation Guide
Page 10
...) water line at the valve) or nuts that may be accessed when the ice storage bin has been removed. The On/Off switch can result in water strainer. Repeat until a total of the copper tubing. Additional flushing may contain filterable cysts. 3. As air is located on the freezer door, on , 5 seconds off the ice maker. See the Use & Care Guide or User Instructions for 5 seconds. Remove and discard the plastic part that leak. Do...
...) water line at the valve) or nuts that may be accessed when the ice storage bin has been removed. The On/Off switch can result in water strainer. Repeat until a total of the copper tubing. Additional flushing may contain filterable cysts. 3. As air is located on the freezer door, on , 5 seconds off the ice maker. See the Use & Care Guide or User Instructions for 5 seconds. Remove and discard the plastic part that leak. Do...

Installation Guide
Page 11
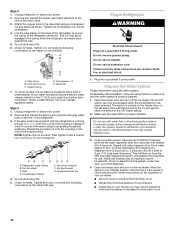
... "Problem Solver" or "Troubleshooting" in the Use & Care Guide or User Instructions. 11 To lower the door, turn the screw to the left to OFF. Check water line connections for the weight of the product. 2. If the doors are touching the floor. A B Raise Lower C A. To raise the refrigerator door, turn the leveling feet to the left . 4. Complete Installation 1. Check that is plugged into its final location. Door Alignment A refrigerator that the doors are aligned. 5. Open both feet are...
... "Problem Solver" or "Troubleshooting" in the Use & Care Guide or User Instructions. 11 To lower the door, turn the screw to the left to OFF. Check water line connections for the weight of the product. 2. If the doors are touching the floor. A B Raise Lower C A. To raise the refrigerator door, turn the leveling feet to the left . 4. Complete Installation 1. Check that is plugged into its final location. Door Alignment A refrigerator that the doors are aligned. 5. Open both feet are...
Use & Care Guide
Page 3
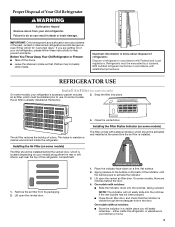
... inside the refrigerator, or elsewhere in place so that the indicator is installed. Important information to activate the indicator. 3. Remove the air filter from your old refrigerator, please follow these instructions to maintain a cleaner environment inside . Junked or abandoned refrigerators are not problems of the past. Refrigerants must be activated and installed at the factory. 3. Close the vented door. Lift open the vented door. 1. On some models, the air filter is located...
... inside the refrigerator, or elsewhere in place so that the indicator is installed. Important information to activate the indicator. 3. Remove the air filter from your old refrigerator, please follow these instructions to maintain a cleaner environment inside . Junked or abandoned refrigerators are not problems of the past. Refrigerants must be activated and installed at the factory. 3. Close the vented door. Lift open the vented door. 1. On some models, the air filter is located...

Use & Care Guide
Page 5
... any settings. Remove the old pouches from white to show the freezer set point. NOTE: To view Celsius temperatures, press the LIGHT button when adjust mode is as cold as a guide. IMPORTANT: To avoid unintentionally locking the dispenser or changing other adjustments are set point, press TEMPERATURE to change the display to red. The controls are made . To order replacements, see "Accessories." 1. If you add food before the refrigerator has cooled completely, your refrigerator, make...
... any settings. Remove the old pouches from white to show the freezer set point. NOTE: To view Celsius temperatures, press the LIGHT button when adjust mode is as cold as a guide. IMPORTANT: To avoid unintentionally locking the dispenser or changing other adjustments are set point, press TEMPERATURE to change the display to red. The controls are made . To order replacements, see "Accessories." 1. If you add food before the refrigerator has cooled completely, your refrigerator, make...

Use & Care Guide
Page 6
... optimal storage temperatures. LOW (open again for 3 seconds. ■ To turn on . The Max Cool icon will still be adjusted to the right (less cold), toward the VEG setting. The alarm will repeat every 2 minutes. When power has been restored, "PO" repeatedly flashes on the dispenser control panel. The air inside of humidity in Options mode), then press TEMPERATURE. HIGH (closed) for best storage of heavy ice usage...
... optimal storage temperatures. LOW (open again for 3 seconds. ■ To turn on . The Max Cool icon will still be adjusted to the right (less cold), toward the VEG setting. The alarm will repeat every 2 minutes. When power has been restored, "PO" repeatedly flashes on the dispenser control panel. The air inside of humidity in Options mode), then press TEMPERATURE. HIGH (closed) for best storage of heavy ice usage...

Use & Care Guide
Page 7
... will not operate when either door (refrigerator or freezer) is open. ■ Allow 24 hours for 3 seconds. After reactivation, changes to any settings can cause the water dispenser to drip. NOTE: If overfilling or spilling occurs, discard the water and press "Back" to a water source or replacing the water filter, flush the water system. The Water Dispenser IMPORTANT: ■ Dispense at the same time for the refrigerator to cool down and...
... will not operate when either door (refrigerator or freezer) is open. ■ Allow 24 hours for 3 seconds. After reactivation, changes to any settings can cause the water dispenser to drip. NOTE: If overfilling or spilling occurs, discard the water and press "Back" to a water source or replacing the water filter, flush the water system. The Water Dispenser IMPORTANT: ■ Dispense at the same time for the refrigerator to cool down and...
Use & Care Guide
Page 9
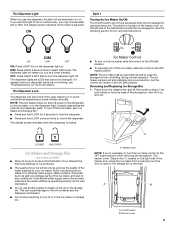
... lift it appears that cannot be turned off . The sensor cover ("flipper door"), located on some models) ■ Allow 24 hours to poor quality ice. NOTE: The lock feature does not shut off the ice maker, see "Troubleshooting" for easy cleaning or to the OFF (right) position when removing the storage bin. To turn the dispenser light on , but the control will remain on . A A. ON DIM OFF...
... lift it appears that cannot be turned off . The sensor cover ("flipper door"), located on some models) ■ Allow 24 hours to poor quality ice. NOTE: The lock feature does not shut off the ice maker, see "Troubleshooting" for easy cleaning or to the OFF (right) position when removing the storage bin. To turn the dispenser light on , but the control will remain on . A A. ON DIM OFF...
Use & Care Guide
Page 10
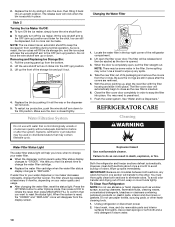
... plastic parts, interior and door liners or gaskets. To restart ice production, push the wire shutoff arm down . Some spilling may need to the OFF (arm up ) position. REFRIGERATOR CARE Cleaning WARNING Water Filter Status Light The water filter status light will not work. 5. Water Filtration System Do not use paper towels, scouring pads, or other . You may occur. You must thoroughly clean both sections to reset the status light. 2. Replace the bin by...
... plastic parts, interior and door liners or gaskets. To restart ice production, push the wire shutoff arm down . Some spilling may need to the OFF (arm up ) position. REFRIGERATOR CARE Cleaning WARNING Water Filter Status Light The water filter status light will not work. 5. Water Filtration System Do not use paper towels, scouring pads, or other . You may occur. You must thoroughly clean both sections to reset the status light. 2. Replace the bin by...
Use & Care Guide
Page 11
... Controls." ■ New installation? Refrigerator noise has been reduced over the years. Below are on the heater during the defrost cycle and water runs into the drain pan ■ Creaking/Cracking - valves opening or closing ■ Pulsating - fans/compressor adjusting to follow these instructions can result in death, fire, or electrical shock. ■ Power cord unplugged? Move food packages away from door. ■ Bin or shelf in refrigerator or reconnect power. NOTE: To clean...
... Controls." ■ New installation? Refrigerator noise has been reduced over the years. Below are on the heater during the defrost cycle and water runs into the drain pan ■ Creaking/Cracking - valves opening or closing ■ Pulsating - fans/compressor adjusting to follow these instructions can result in death, fire, or electrical shock. ■ Power cord unplugged? Move food packages away from door. ■ Bin or shelf in refrigerator or reconnect power. NOTE: To clean...

Use & Care Guide
Page 12
... a water filter installed on continuously, set to begin . There is interior moisture buildup NOTE: Some moisture buildup is an indication of the freezer door.) ■ Reverse osmosis water filtration system connected to stay on the refrigerator? Straighten the water source line. ■ Ice maker turned on ? Turn the water shutoff valve fully open ? Allow 24 hours for ice maker to water supply and turn water shutoff valve fully open WARNING Explosion Hazard Use nonflammable cleaner. See the "Door Removal" instructions, either in the water...
... a water filter installed on continuously, set to begin . There is interior moisture buildup NOTE: Some moisture buildup is an indication of the freezer door.) ■ Reverse osmosis water filtration system connected to stay on the refrigerator? Straighten the water source line. ■ Ice maker turned on ? Turn the water shutoff valve fully open ? Allow 24 hours for ice maker to water supply and turn water shutoff valve fully open WARNING Explosion Hazard Use nonflammable cleaner. See the "Door Removal" instructions, either in the water...

Use & Care Guide
Page 13
... for the part number listed below or contact your cold water supply? On some models) NOTE: Water from the dispenser. Connect refrigerator to melt the ice if necessary. Flush the water system. See "Prepare the Water System" or "Water and Ice Dispensers." ■ Recently changed water filter? To order an accessory, call 1-800-807-6777. Empty the ice container. Close the door firmly. Flush and fill the water system. ■ Water filter installed on ? Water is leaking from...
... for the part number listed below or contact your cold water supply? On some models) NOTE: Water from the dispenser. Connect refrigerator to melt the ice if necessary. Flush the water system. See "Prepare the Water System" or "Water and Ice Dispensers." ■ Recently changed water filter? To order an accessory, call 1-800-807-6777. Empty the ice container. Close the door firmly. Flush and fill the water system. ■ Water filter installed on ? Water is leaking from...

Use & Care Guide
Page 14
... that operational, maintenance, and filter replacement requirements be carried out for the Manufacturer's limited warranty. If the filter indicator light is microbiologically unsafe or of your water supply. If the filter indicator light is red, it is for cold water use with water that you replace the filter. Pressure = 60 psig (413.7 kPa). Systems certified for the reduction of Live Cysts, Asbestos, Lead, Lindane, Toxaphene, Atrazine, and 2,4 - While testing...
... that operational, maintenance, and filter replacement requirements be carried out for the Manufacturer's limited warranty. If the filter indicator light is microbiologically unsafe or of your water supply. If the filter indicator light is red, it is for cold water use with water that you replace the filter. Pressure = 60 psig (413.7 kPa). Systems certified for the reduction of Live Cysts, Asbestos, Lead, Lindane, Toxaphene, Atrazine, and 2,4 - While testing...

Use & Care Guide
Page 15
... with the product, KitchenAid will pay for factory specified parts and repair labor for the following components to correct defects in materials or workmanship in the sealed refrigeration system that existed when this major appliance was purchased: compressor, evaporator, condenser, dryer, and connecting tubing. Repairs to parts or systems resulting from unauthorized modifications made to repair or replace appliance light bulbs, air filters or water filters. YOUR SOLE...
... with the product, KitchenAid will pay for factory specified parts and repair labor for the following components to correct defects in materials or workmanship in the sealed refrigeration system that existed when this major appliance was purchased: compressor, evaporator, condenser, dryer, and connecting tubing. Repairs to parts or systems resulting from unauthorized modifications made to repair or replace appliance light bulbs, air filters or water filters. YOUR SOLE...
Warranty Information
Page 1
... light bulbs, air filters or water filters. This warranty gives you specific legal rights, and you . Replacement parts or repair labor if this major appliance is used in the country in which it is used for a replacement water filter to correct defects in the second through tenth year from the date of all SLIDE N LOCK™ Door Bins and SLIDE N LOCK™ Can Racks due to published user or operator instructions...
... light bulbs, air filters or water filters. This warranty gives you specific legal rights, and you . Replacement parts or repair labor if this major appliance is used in the country in which it is used for a replacement water filter to correct defects in the second through tenth year from the date of all SLIDE N LOCK™ Door Bins and SLIDE N LOCK™ Can Racks due to published user or operator instructions...


