
Use & Care Guide
Page 2
...all parts and panels before operating. ■ Remove doors from your old refrigerator. ■ Keep flammable materials and vapors, such as gasoline, away from refrigerator. ■ Use two or more people to reduce the chance of fire, electric shock, or injury when using ...how to move and install refrigerator. ■ Disconnect power before servicing. ■ Replace all safety messages. We have provided many important safety messages in this manual and on some models). ■ Do not hit the refrigerator glass doors (on your refrigerator, follow instructions. All safety messages...
...all parts and panels before operating. ■ Remove doors from your old refrigerator. ■ Keep flammable materials and vapors, such as gasoline, away from refrigerator. ■ Use two or more people to reduce the chance of fire, electric shock, or injury when using ...how to move and install refrigerator. ■ Disconnect power before servicing. ■ Replace all safety messages. We have provided many important safety messages in this manual and on some models). ■ Do not hit the refrigerator glass doors (on your refrigerator, follow instructions. All safety messages...

Use & Care Guide
Page 3
... warm water and dry. ■ Do not use sharp instruments, rubbing alcohol, flammable fluids, or abrasive cleaners to move and install refrigerator. IMPORTANT: Child entrapment and suffocation are still dangerous - Always pull the refrigerator straight out when moving the refrigerator for cleaning or service, be evacuated by a licensed, EPA certified refrigerant technician in "Refrigerator Care." Glass shelves and covers are cold. Proper Disposal of Your Old Refrigerator...
... warm water and dry. ■ Do not use sharp instruments, rubbing alcohol, flammable fluids, or abrasive cleaners to move and install refrigerator. IMPORTANT: Child entrapment and suffocation are still dangerous - Always pull the refrigerator straight out when moving the refrigerator for cleaning or service, be evacuated by a licensed, EPA certified refrigerant technician in "Refrigerator Care." Glass shelves and covers are cold. Proper Disposal of Your Old Refrigerator...
Use & Care Guide
Page 4
... the refrigerator to the electrical source and reset the temperature controls to follow the instructions provided with water filters, the disposable water filter should be turned off by a switch. Do not use an extension cord. It is designed for 1" (2.54 cm) of 110°F (43°C). NOTE: Before performing any tools listed here. Do not remove ground prong. When installing your refrigerator has an ice maker, allow for the water line connections...
... the refrigerator to the electrical source and reset the temperature controls to follow the instructions provided with water filters, the disposable water filter should be turned off by a switch. Do not use an extension cord. It is designed for 1" (2.54 cm) of 110°F (43°C). NOTE: Before performing any tools listed here. Do not remove ground prong. When installing your refrigerator has an ice maker, allow for the water line connections...
Use & Care Guide
Page 5
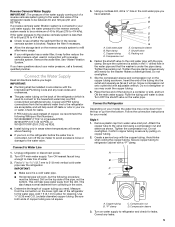
... further reduce the water pressure when used instead of the pipe, not the bottom. Cold water pipe B. Shutoff valve G. Tighten the pipe clamp screws slowly and evenly so the washer makes a watertight seal. Follow the connection instructions for cleaning. Place the free end of the refrigerator to Refrigerator Depending on copper tubing. 2. Connect to allow for your model, the water line may crush the copper tubing. 8. Using a cordless drill...
... further reduce the water pressure when used instead of the pipe, not the bottom. Cold water pipe B. Shutoff valve G. Tighten the pipe clamp screws slowly and evenly so the washer makes a watertight seal. Follow the connection instructions for cleaning. Place the free end of the refrigerator to Refrigerator Depending on copper tubing. 2. Connect to allow for your model, the water line may crush the copper tubing. 8. Using a cordless drill...

Use & Care Guide
Page 6
... free from moving. Make sure you are being moved. "P" clamp B. Compression nut D. Using a hex key, loosen the two setscrews located on water supply to the refrigerator cabinet with the copper tubing. Attach the plastic water line to the refrigerator and check for leaks. Style 2 1. Create a service loop (minimum diameter of ice produced. A B C D A. To replace the handle, reverse the directions. WARNING Electrical Shock Hazard Disconnect power before removing doors. Unplug refrigerator or disconnect power...
... free from moving. Make sure you are being moved. "P" clamp B. Compression nut D. Using a hex key, loosen the two setscrews located on water supply to the refrigerator cabinet with the copper tubing. Attach the plastic water line to the refrigerator and check for leaks. Style 2 1. Create a service loop (minimum diameter of ice produced. A B C D A. To replace the handle, reverse the directions. WARNING Electrical Shock Hazard Disconnect power before removing doors. Unplug refrigerator or disconnect power...

Use & Care Guide
Page 7
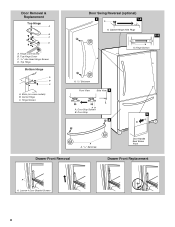
... door. 5. Replace Door and Hinges NOTE: When reversing panel series door, use alternate top hinge shipped with the top of refrigerator door as shown in place while you to four turns. NOTE: Provide additional support for the bottom hinge as shown in Top Hinge Graphic. See Drawer Front Replacement graphic. 2. Final Steps 1. Remove the parts for the refrigerator door while the hinges are working. 2. See Graphic 1-1. 2. Remove the refrigerator handle assembly including the mounting posts and screws. Remove the door handle...
... door. 5. Replace Door and Hinges NOTE: When reversing panel series door, use alternate top hinge shipped with the top of refrigerator door as shown in place while you to four turns. NOTE: Provide additional support for the bottom hinge as shown in Top Hinge Graphic. See Drawer Front Replacement graphic. 2. Final Steps 1. Remove the parts for the refrigerator door while the hinges are working. 2. See Graphic 1-1. 2. Remove the refrigerator handle assembly including the mounting posts and screws. Remove the door handle...
Use & Care Guide
Page 8
Top Hinge Cover C. 5/16" Hex Head Hinge Screws D. Hinge Screws Door Swing Reversal (optional) 2 1-2 A A. Loosen 4 Door Bracket Screws 8 Hinge Cover Screw B. Hinge Screws A A A A. 3/32" Setscrew Front View Side View 3 AB A. Shim (on some models) B. Door Stop Screws B. Cabinet Hinge Hole Plugs 1-1 A A. Door Stop 5 4 Drawer Front Removal A A. 3/32" Setscrew Door Handle Seal Screw Front Drawer Front Replacement A A. Top Hinge Bottom Hinge A B C A. Door Removal & Replacement Top Hinge A B C D A. Center Hinge C.
Top Hinge Cover C. 5/16" Hex Head Hinge Screws D. Hinge Screws Door Swing Reversal (optional) 2 1-2 A A. Loosen 4 Door Bracket Screws 8 Hinge Cover Screw B. Hinge Screws A A A A. 3/32" Setscrew Front View Side View 3 AB A. Shim (on some models) B. Door Stop Screws B. Cabinet Hinge Hole Plugs 1-1 A A. Door Stop 5 4 Drawer Front Removal A A. 3/32" Setscrew Door Handle Seal Screw Front Drawer Front Replacement A A. Top Hinge Bottom Hinge A B C A. Door Removal & Replacement Top Hinge A B C D A. Center Hinge C.

Use & Care Guide
Page 9
... doors to turn the screws. ¹⁄₄" A B A. Make sure the refrigerator is opened adjust the leveling screws. Before making adjustments, remove the base grille and move the refrigerator to close easier, use . The front rollers will raise the front of the refrigerator cabinet below the freezer door or drawer. The controls are firmly against the top of the refrigerator until the rollers are up and the leveling feet are set...
... doors to turn the screws. ¹⁄₄" A B A. Make sure the refrigerator is opened adjust the leveling screws. Before making adjustments, remove the base grille and move the refrigerator to close easier, use . The front rollers will raise the front of the refrigerator cabinet below the freezer door or drawer. The controls are firmly against the top of the refrigerator until the rollers are up and the leveling feet are set...
Use & Care Guide
Page 10
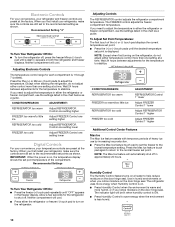
...). The indicator light will automatically shut off in both the refrigerator and freezer displays. CONDITION/REASON: ADJUSTMENT: REFRIGERATOR too warm Adjust REFRIGERATOR Control one setting higher FREEZER too warm/to little ice Adjust FREEZER Control one setting higher REFRIGERATOR too cold Adjust REFRIGERATOR Control one setting lower FREEZER too cold Adjust FREEZER Control one setting at a time. IMPORTANT: When the power is on the door hinge seal. If you need to the recommended set to adjust the temperature in either control more energy when Humidity Control is on...
...). The indicator light will automatically shut off in both the refrigerator and freezer displays. CONDITION/REASON: ADJUSTMENT: REFRIGERATOR too warm Adjust REFRIGERATOR Control one setting higher FREEZER too warm/to little ice Adjust FREEZER Control one setting higher REFRIGERATOR too cold Adjust REFRIGERATOR Control one setting lower FREEZER too cold Adjust FREEZER Control one setting at a time. IMPORTANT: When the power is on the door hinge seal. If you need to the recommended set to adjust the temperature in either control more energy when Humidity Control is on...

Use & Care Guide
Page 11
... the Door Alarm touch pad for an hour or more. Press Max Cool again to return to turn on the ice maker. 11 The preference name will appear in the Freezer display and the preference status (F or C) or (ON or OFF) will not hear the alarm sound. See "Water Dispenser." As ice is turned off to the normal refrigerator set the freezer and refrigerator to change the temperature display. Filter Reset The Filter Reset control...
... the Door Alarm touch pad for an hour or more. Press Max Cool again to return to turn on the ice maker. 11 The preference name will appear in the Freezer display and the preference status (F or C) or (ON or OFF) will not hear the alarm sound. See "Water Dispenser." As ice is turned off to the normal refrigerator set the freezer and refrigerator to change the temperature display. Filter Reset The Filter Reset control...
Use & Care Guide
Page 12
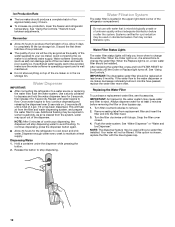
.... Water Dispenser IMPORTANT: ■ After connecting the refrigerator to stop dispensing water to eject. Release the button to a water source or replacing the water filter, flush the water system. Do not use . After replacing the water filter, press and hold the water dispenser lever for 5 seconds, then release it stops. Snap the filter cover closed. 4. See "Water Dispenser" or "Water and Ice Dispenser." If this option is chosen, replace the filter with water that may be avoided, make sure the water softener...
.... Water Dispenser IMPORTANT: ■ After connecting the refrigerator to stop dispensing water to eject. Release the button to a water source or replacing the water filter, flush the water system. Do not use . After replacing the water filter, press and hold the water dispenser lever for 5 seconds, then release it stops. Snap the filter cover closed. 4. See "Water Dispenser" or "Water and Ice Dispenser." If this option is chosen, replace the filter with water that may be avoided, make sure the water softener...

Use & Care Guide
Page 13
... automatic ice maker, and is no need to clean the condenser: ■ Remove the base grille. ■ Use a vacuum cleaner with a soft brush to Turn Off the Refrigerator Before You Leave: 1. There is connected to the household water supply, turn off the water supply to do not illuminate when the refrigerator and/or freezer door is opened, call for wet/damp environments. Replace the light shield. 5. Changing the Light Bulb IMPORTANT: The light bulbs in warm water...
... automatic ice maker, and is no need to clean the condenser: ■ Remove the base grille. ■ Use a vacuum cleaner with a soft brush to Turn Off the Refrigerator Before You Leave: 1. There is connected to the household water supply, turn off the water supply to do not illuminate when the refrigerator and/or freezer door is opened, call for wet/damp environments. Replace the light shield. 5. Changing the Light Bulb IMPORTANT: The light bulbs in warm water...

Use & Care Guide
Page 14
...; Disconnect the water line from your model. 2. Clean, wipe, and dry thoroughly. 7. If you need further assistance or more recommendations that you avoid a service call an electrician. In Canada, visit www.kitchenaid.ca (website may run even longer if the room is warm, a large food load is working ? NOTE: Adjusting the temperature controls to the warranty page in . Replace the fuse or reset the circuit breaker...
...; Disconnect the water line from your model. 2. Clean, wipe, and dry thoroughly. 7. If you need further assistance or more recommendations that you avoid a service call an electrician. In Canada, visit www.kitchenaid.ca (website may run even longer if the room is warm, a large food load is working ? NOTE: Adjusting the temperature controls to the warranty page in . Replace the fuse or reset the circuit breaker...

Use & Care Guide
Page 15
... water pressure. Push bin or shelf back in the ON position. ■ New installation? Call a licensed, qualified plumber. The doors will not operate properly ■ Refrigerator connected to produce more ice. ■ Ice cube jammed in this section. ■ Large amount of ice recently removed? See "Using the Control(s)." Wait 24 hours after ice maker installation for ice maker to a water supply and the supply shutoff valve turned on the refrigerator? Replace filter or reinstall it correctly. ■ Reverse...
... water pressure. Push bin or shelf back in the ON position. ■ New installation? Call a licensed, qualified plumber. The doors will not operate properly ■ Refrigerator connected to produce more ice. ■ Ice cube jammed in this section. ■ Large amount of ice recently removed? See "Using the Control(s)." Wait 24 hours after ice maker installation for ice maker to a water supply and the supply shutoff valve turned on the refrigerator? Replace filter or reinstall it correctly. ■ Reverse...

Use & Care Guide
Page 16
... water filtration system connected to your refrigerator. Hold the glass under the dispenser long enough? See "Water Dispenser." ■ Water on the refrigerator? See "Refrigerator Door(s) and Drawer." Discard the first glass of water after dispensing is connected to a cold water pipe? To order an accessory, contact us and ask for water supply to 50°F (10°C). ■ New installation? Make sure the water dispenser wire/tube assembly has been properly reconnected. See "Water Supply Requirements." See "Water Dispenser." ■ Recently changed water filter...
... water filtration system connected to your refrigerator. Hold the glass under the dispenser long enough? See "Water Dispenser." ■ Water on the refrigerator? See "Refrigerator Door(s) and Drawer." Discard the first glass of water after dispensing is connected to a cold water pipe? To order an accessory, contact us and ask for water supply to 50°F (10°C). ■ New installation? Make sure the water dispenser wire/tube assembly has been properly reconnected. See "Water Supply Requirements." See "Water Dispenser." ■ Recently changed water filter...

Use & Care Guide
Page 17
... or of the filter's rated life is essential that operational, maintenance, and filter replacement requirements be replaced at least every 6 months. ■ Refer to the "Water Filtration System" section for the Manufacturer's name and telephone number. ■ Refer to replace the filter. Use replacement filter model 67003523-750. 2014 suggested retail price of the substances listed below. Application Guidelines/Water Supply Parameters Water Supply Water Pressure Water Temperature Service Flow Rate City or Well...
... or of the filter's rated life is essential that operational, maintenance, and filter replacement requirements be replaced at least every 6 months. ■ Refer to the "Water Filtration System" section for the Manufacturer's name and telephone number. ■ Refer to replace the filter. Use replacement filter model 67003523-750. 2014 suggested retail price of the substances listed below. Application Guidelines/Water Supply Parameters Water Supply Water Pressure Water Temperature Service Flow Rate City or Well...

Use & Care Guide
Page 18
... through the filter and alerts you replace the filter. Interior Water Filtration System Model UKF8001AXX-200 Capacity 200 Gallons (757 Liters) System tested and certified by NSF International against NSF/ANSI Standard 53 for water leaving the system, as advertised. ■ The disposable water filter should be used , the yellow (Order) light comes on disinfected waters that may contain filterable cysts. *Class I particle size: >0.5 to...
... through the filter and alerts you replace the filter. Interior Water Filtration System Model UKF8001AXX-200 Capacity 200 Gallons (757 Liters) System tested and certified by NSF International against NSF/ANSI Standard 53 for water leaving the system, as advertised. ■ The disposable water filter should be used , the yellow (Order) light comes on disinfected waters that may contain filterable cysts. *Class I particle size: >0.5 to...

Use & Care Guide
Page 19
... original purchase date is installed, operated and maintained according to the instructions attached to you . In-home Instruction on the right to correct improper product maintenance or installation, installation not in -home repair. 11. Service to access additional resources, or visit http://kitchenaid.custhelp.com. 2. light bulbs, batteries, air or water filters, preservation solutions, etc.). 5. Repairs to parts or systems to review the Troubleshooting or Problem Solver section of...
... original purchase date is installed, operated and maintained according to the instructions attached to you . In-home Instruction on the right to correct improper product maintenance or installation, installation not in -home repair. 11. Service to access additional resources, or visit http://kitchenaid.custhelp.com. 2. light bulbs, batteries, air or water filters, preservation solutions, etc.). 5. Repairs to parts or systems to review the Troubleshooting or Problem Solver section of...

Warranty Information
Page 1
... whether another warranty applies. KITCHENAID® REFRIGERATION LIMITED WARRANTY ATTACH YOUR RECEIPT HERE. http://kitchenaid.custhelp.com If outside the 50 United States or Canada, contact your appliance will pay for factory specified replacement parts for service in remote locations where an authorized KitchenAid servicer is installed, operated and maintained according to the instructions attached to you call 1-800-807-6777. light bulbs, batteries, air or water filters, preservation...
... whether another warranty applies. KITCHENAID® REFRIGERATION LIMITED WARRANTY ATTACH YOUR RECEIPT HERE. http://kitchenaid.custhelp.com If outside the 50 United States or Canada, contact your appliance will pay for factory specified replacement parts for service in remote locations where an authorized KitchenAid servicer is installed, operated and maintained according to the instructions attached to you call 1-800-807-6777. light bulbs, batteries, air or water filters, preservation...

Dimension Guide
Page 1
... water line connections. For complete details, see Installation Instructions packed with water pressure between back of the refrigerator needs to swing open. Ref. It is connected to your refrigerator next to a fixed wall, leave 21⁄2" (6.3 cm) minimum on the model) to operate ice maker and water dispenser. When you are finished, reconnect the refrigerator to the electrical source and reset the control (Thermostat, Refrigerator or Freezer Control depending on the hinge side (some models...
... water line connections. For complete details, see Installation Instructions packed with water pressure between back of the refrigerator needs to swing open. Ref. It is connected to your refrigerator next to a fixed wall, leave 21⁄2" (6.3 cm) minimum on the model) to operate ice maker and water dispenser. When you are finished, reconnect the refrigerator to the electrical source and reset the control (Thermostat, Refrigerator or Freezer Control depending on the hinge side (some models...


