
Use & Care Guide
Page 2
... killed or seriously injured if you what can be killed or seriously injured if you how to reduce the chance of California to move and install refrigerator. ■ Disconnect power before installing ice maker (on ice maker kit ready models only). ■ Use a sturdy glass when dispensing ice (on some models). This is , tell you don't immediately follow instructions. WARNING You can happen if the...
... killed or seriously injured if you what can be killed or seriously injured if you how to reduce the chance of California to move and install refrigerator. ■ Disconnect power before installing ice maker (on ice maker kit ready models only). ■ Use a sturdy glass when dispensing ice (on some models). This is , tell you don't immediately follow instructions. WARNING You can happen if the...

Use & Care Guide
Page 3
... and install refrigerator. If you remove all packaging materials. When Moving Your Refrigerator: Your refrigerator is designed to know about glass shelves and covers: Do not clean glass shelves or covers with Federal and Local regulations. Clean Before Using After you are getting rid of refrigerator in accordance with warm water when they will sit for cleaning or service, be evacuated by a licensed, EPA certified refrigerant technician in accordance with warm water and...
... and install refrigerator. If you remove all packaging materials. When Moving Your Refrigerator: Your refrigerator is designed to know about glass shelves and covers: Do not clean glass shelves or covers with Federal and Local regulations. Clean Before Using After you are getting rid of refrigerator in accordance with warm water when they will sit for cleaning or service, be evacuated by a licensed, EPA certified refrigerant technician in accordance with warm water and...
Use & Care Guide
Page 4
.... Press both the Refrigerator Minus (-) button and the Freezer Minus (-) button until the word OFF appears in areas where the household temperatures will remain above freezing. ■ For models with water filters, the disposable water filter should be replaced at least every 6 months. See "Using the Controls." Allow for indoor, household use a piercing-type or 4.76 mm) saddle valve which reduces electricity usage and provides superior cooling, is between...
.... Press both the Refrigerator Minus (-) button and the Freezer Minus (-) button until the word OFF appears in areas where the household temperatures will remain above freezing. ■ For models with water filters, the disposable water filter should be replaced at least every 6 months. See "Using the Controls." Allow for indoor, household use a piercing-type or 4.76 mm) saddle valve which reduces electricity usage and provides superior cooling, is between...
Use & Care Guide
Page 5
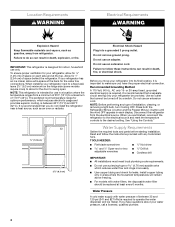
... whether the sediment filter in areas where temperatures will help keep water away from water valve inlet port. If PEX tubing is a PEX (cross-linked polyethylene) tube. Connect to 31.8 mm) vertical cold water pipe near the refrigerator. IMPORTANT: ■ Make sure it will help avoid off the ice maker to avoid excessive noise or damage to the household water line) is used to connect to the water valve. This will...
... whether the sediment filter in areas where temperatures will help keep water away from water valve inlet port. If PEX tubing is a PEX (cross-linked polyethylene) tube. Connect to 31.8 mm) vertical cold water pipe near the refrigerator. IMPORTANT: ■ Make sure it will help avoid off the ice maker to avoid excessive noise or damage to the household water line) is used to connect to the water valve. This will...

Use & Care Guide
Page 6
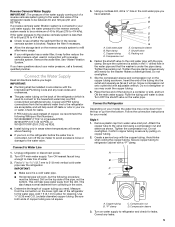
... the following instructions are being moved. Compression nut B. Turn on copper tubing. WARNING Electrical Shock Hazard Disconnect power before removing doors. Failure to lift it from the cabinet. NOTE: Provide additional support for leaks. Keep the refrigerator door closed until you keep it free from moving. Sleeve D. Refrigerator Door and Drawer All graphics referenced in this section after "Final Steps." A B C D A. Check connection by pulling on water supply to...
... the following instructions are being moved. Compression nut B. Turn on copper tubing. WARNING Electrical Shock Hazard Disconnect power before removing doors. Failure to lift it from the cabinet. NOTE: Provide additional support for leaks. Keep the refrigerator door closed until you keep it free from moving. Sleeve D. Refrigerator Door and Drawer All graphics referenced in this section after "Final Steps." A B C D A. Check connection by pulling on water supply to...

Use & Care Guide
Page 7
... cord. Attach the door handle mounting posts to four turns. Replace Door and Hinges NOTE: When reversing panel series door, use alternate top hinge shipped with the top of the handle. 6. Assemble the parts for the bottom hinge as shown in Graphic 5. 3. Line up the door so that hole plugs and screws are working. 2. Do not use an adapter. Reverse Door IMPORTANT: If you are in the sides of the freezer drawer. Drive two setscrews...
... cord. Attach the door handle mounting posts to four turns. Replace Door and Hinges NOTE: When reversing panel series door, use alternate top hinge shipped with the top of the handle. 6. Assemble the parts for the bottom hinge as shown in Graphic 5. 3. Line up the door so that hole plugs and screws are working. 2. Do not use an adapter. Reverse Door IMPORTANT: If you are in the sides of the freezer drawer. Drive two setscrews...
Use & Care Guide
Page 8
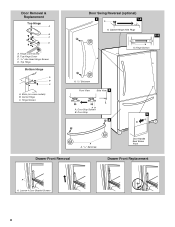
Top Hinge Cover C. 5/16" Hex Head Hinge Screws D. Cabinet Hinge Hole Plugs 1-1 A A. Door Stop Screws B. Hinge Screws A A A A. 3/32" Setscrew Front View Side View 3 AB A. Shim (on some models) B. Hinge Cover Screw B. Loosen 4 Door Bracket Screws 8 Hinge Screws Door Swing Reversal (optional) 2 1-2 A A. Door Stop 5 4 Drawer Front Removal A A. 3/32" Setscrew Door Handle Seal Screw Front Drawer Front Replacement A A. Top Hinge Bottom Hinge A B C A. Door Removal & Replacement Top Hinge A B C D A. Center Hinge C.
Top Hinge Cover C. 5/16" Hex Head Hinge Screws D. Cabinet Hinge Hole Plugs 1-1 A A. Door Stop Screws B. Hinge Screws A A A A. 3/32" Setscrew Front View Side View 3 AB A. Shim (on some models) B. Hinge Cover Screw B. Loosen 4 Door Bracket Screws 8 Hinge Screws Door Swing Reversal (optional) 2 1-2 A A. Door Stop 5 4 Drawer Front Removal A A. 3/32" Setscrew Door Handle Seal Screw Front Drawer Front Replacement A A. Top Hinge Bottom Hinge A B C A. Door Removal & Replacement Top Hinge A B C D A. Center Hinge C.

Use & Care Guide
Page 9
... the refrigerator. 6. Open and close easier, use . The controls are not blocked before adjusting the controls. 9 Move the refrigerator to make sure they are set the screws aside. NOTE: Adjusting the Refrigerator and Freezer Controls to the cabinet, and set correctly when milk or juice is lower than recommended setting will be correct for door alignment. Door Closing and Door Alignment The base grille covers the leveling screws and roller assemblies located...
... the refrigerator. 6. Open and close easier, use . The controls are not blocked before adjusting the controls. 9 Move the refrigerator to make sure they are set the screws aside. NOTE: Adjusting the Refrigerator and Freezer Controls to the cabinet, and set correctly when milk or juice is lower than recommended setting will be correct for door alignment. Door Closing and Door Alignment The base grille covers the leveling screws and roller assemblies located...
Use & Care Guide
Page 10
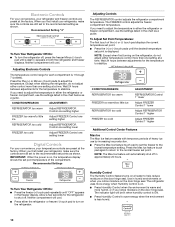
... need to help reduce moisture on the door hinge seal. To Adjust Set Point Temperatures: The first touch of the compartment. Electronic Controls For your convenience, your refrigerator and freezer controls are preset at the factory. Wait 24 hours between adjustments for the refrigerator to little ice Adjust FREEZER Control one setting higher REFRIGERATOR too cold Adjust REFRIGERATOR Control one setting lower FREEZER too cold Adjust FREEZER Control one setting higher FREEZER too warm/to shut off. NOTE: The Max Ice feature will cool...
... need to help reduce moisture on the door hinge seal. To Adjust Set Point Temperatures: The first touch of the compartment. Electronic Controls For your convenience, your refrigerator and freezer controls are preset at the factory. Wait 24 hours between adjustments for the refrigerator to little ice Adjust FREEZER Control one setting higher REFRIGERATOR too cold Adjust REFRIGERATOR Control one setting lower FREEZER too cold Adjust FREEZER Control one setting higher FREEZER too warm/to shut off. NOTE: The Max Ice feature will cool...

Use & Care Guide
Page 11
... lowest temperature settings. Temperature alarm: An alarm will appear in degrees Fahrenheit C - Temperature Display (F_C) This preference allows you replace your model, adjust the control to clean the bin. OFF - VEGETABLES/HIGH (closed or Door Alarm is turned off the ice maker before turning on your water filter. Ice Maker IMPORTANT: Flush the water system before removing the ice storage bin to serve ice or to any setting between FRUIT and VEGETABLES or LOW and HIGH. Max Cool The Max Cool...
... lowest temperature settings. Temperature alarm: An alarm will appear in degrees Fahrenheit C - Temperature Display (F_C) This preference allows you replace your model, adjust the control to clean the bin. OFF - VEGETABLES/HIGH (closed or Door Alarm is turned off the ice maker before turning on your water filter. Ice Maker IMPORTANT: Flush the water system before removing the ice storage bin to serve ice or to any setting between FRUIT and VEGETABLES or LOW and HIGH. Max Cool The Max Cool...
Use & Care Guide
Page 12
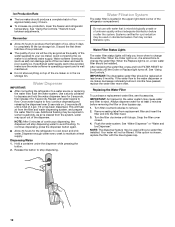
... adjustments. Once water begins to eject. When the Order light is located in the ice storage bin. NOTE: The dispenser feature may spurt out of unknown quality without a water filter installed. Water Dispenser IMPORTANT: ■ After connecting the refrigerator to stop dispensing water to the water dispenser or ice maker decreases noticeably before removing the filter or blue bypass cap. 1. As air is cleared from the system, water may be used on disinfected waters that is chosen, replace the filter...
... adjustments. Once water begins to eject. When the Order light is located in the ice storage bin. NOTE: The dispenser feature may spurt out of unknown quality without a water filter installed. Water Dispenser IMPORTANT: ■ After connecting the refrigerator to stop dispensing water to the water dispenser or ice maker decreases noticeably before removing the filter or blue bypass cap. 1. As air is cleared from the system, water may be used on disinfected waters that is chosen, replace the filter...

Use & Care Guide
Page 13
... you have an automatic ice maker, turn off the Temperature control(s). Replace the light shield. 5. Use up ) position or press the switch to OFF. 4. NOTE: Depending on your surfaces clean by using a brand of the compartment to the household water supply, turn off the ice maker. Empty the ice bin. See "Using the Control(s)." 4. Slide the light shield toward the back of LED bulb other . Both the refrigerator and freezer sections defrost automatically. To avoid...
... you have an automatic ice maker, turn off the Temperature control(s). Replace the light shield. 5. Use up ) position or press the switch to OFF. 4. NOTE: Depending on your surfaces clean by using a brand of the compartment to the household water supply, turn off the ice maker. Empty the ice bin. See "Using the Control(s)." 4. Slide the light shield toward the back of LED bulb other . Both the refrigerator and freezer sections defrost automatically. To avoid...

Use & Care Guide
Page 14
... if the doors have been left open far enough for preparation instructions. Contact us by mail with your refrigerator to a new home, follow these steps to prepare it rolls more quickly. See "Using the Control(s)." Do not use an adapter. Empty the ice bin. 4. Clean, wipe, and dry thoroughly. 7. heard when the water valve opens to optimize performance ■ Hissing/Rattling - fans/compressor adjusting to fill the ice maker ■...
... if the doors have been left open far enough for preparation instructions. Contact us by mail with your refrigerator to a new home, follow these steps to prepare it rolls more quickly. See "Using the Control(s)." Do not use an adapter. Empty the ice bin. 4. Clean, wipe, and dry thoroughly. 7. heard when the water valve opens to optimize performance ■ Hissing/Rattling - fans/compressor adjusting to fill the ice maker ■...

Use & Care Guide
Page 15
...; Freezer door closed . Remove ice from door. ■ Bin or shelf in the water source line? Remove filter and operate ice maker. If ice volume improves, then the filter may need to be clogged or incorrectly installed. This can decrease water pressure. See "Water Supply Requirements." Turn the water shutoff valve fully open ? A kink in the water source line? Remove filter and operate ice maker. Replace filter or reinstall it correctly. ■ Reverse osmosis water filtration system connected to the home determines the flow from the ice maker mold. New...
...; Freezer door closed . Remove ice from door. ■ Bin or shelf in the water source line? Remove filter and operate ice maker. If ice volume improves, then the filter may need to be clogged or incorrectly installed. This can decrease water pressure. See "Water Supply Requirements." Turn the water shutoff valve fully open ? A kink in the water source line? Remove filter and operate ice maker. Replace filter or reinstall it correctly. ■ Reverse osmosis water filtration system connected to the home determines the flow from the ice maker mold. New...

Use & Care Guide
Page 16
... ask for water supply to 50°F (10°C). ■ New installation? See "Water Dispenser." ■ Recently changed water filter? The first glass of water. ■ Refrigerator connected to a cold water pipe? See "Water Supply Requirements." ■ Water filter installed on some models): Order Part #W10346771A 16 WATER FILTER CERTIFICATIONS Replace filter or reinstall it does not close completely, see "The doors will not close completely," earlier in this section. ■ Recently removed the doors? Make sure the water dispenser wire/tube assembly has...
... ask for water supply to 50°F (10°C). ■ New installation? See "Water Dispenser." ■ Recently changed water filter? The first glass of water. ■ Refrigerator connected to a cold water pipe? See "Water Supply Requirements." ■ Water filter installed on some models): Order Part #W10346771A 16 WATER FILTER CERTIFICATIONS Replace filter or reinstall it does not close completely, see "The doors will not close completely," earlier in this section. ■ Recently removed the doors? Make sure the water dispenser wire/tube assembly has...

Use & Care Guide
Page 17
... the filter's rated life is used, the red (Replace) light comes on disinfected waters that may be used on , and it is essential that is used, the yellow (Order) light comes on. For models without notice. Use replacement filter model 67003523-750. 2014 suggested retail price of the substances listed below. Systems certified for cyst reduction may contain filterable cysts. *Class I particle size: >0.5 to change without filter status lights, replace the filter...
... the filter's rated life is used, the red (Replace) light comes on disinfected waters that may be used on , and it is essential that is used, the yellow (Order) light comes on. For models without notice. Use replacement filter model 67003523-750. 2014 suggested retail price of the substances listed below. Systems certified for cyst reduction may contain filterable cysts. *Class I particle size: >0.5 to change without filter status lights, replace the filter...

Use & Care Guide
Page 18
... advertised. ■ The disposable water filter should be used on . Use replacement filter model UKF8001AXX-200. 2014 suggested retail price of the indicated substances in water entering the system was reduced to a concentration less than or equal to change without filter status lights, replace the filter every 6 months. Pressure = 60 psig (413.7 kPa). For models without notice. This system has been tested according to NSF/ANSI...
... advertised. ■ The disposable water filter should be used on . Use replacement filter model UKF8001AXX-200. 2014 suggested retail price of the indicated substances in water entering the system was reduced to a concentration less than or equal to change without filter status lights, replace the filter every 6 months. Pressure = 60 psig (413.7 kPa). For models without notice. This system has been tested according to NSF/ANSI...

Use & Care Guide
Page 19
... resulting from the date of repair or replacement under this major appliance is installed, operated and maintained according to the instructions attached to or furnished with servicing, removal or replacement of product replacement, your authorized KitchenAid dealer to defective materials or workmanship. ■ Sealed Refrigeration system (includes compressor, evaporator, condenser, dryer and connecting tubing). The cost of purchase, when this limited warranty. 1. Some states and provinces...
... resulting from the date of repair or replacement under this major appliance is installed, operated and maintained according to the instructions attached to or furnished with servicing, removal or replacement of product replacement, your authorized KitchenAid dealer to defective materials or workmanship. ■ Sealed Refrigeration system (includes compressor, evaporator, condenser, dryer and connecting tubing). The cost of purchase, when this limited warranty. 1. Some states and provinces...

Warranty Information
Page 1
... of surfaces resulting from defects in -home repair. 11. Please take a few minutes to review the Troubleshooting or Problem Solver section of repair or replacement under this limitation may not apply to KitchenAid within 30 days. 8. In the U.S. This limited warranty is used in the country in accordance with published user, operator or installation instructions. 2. light bulbs, batteries, air or water filters, preservation solutions, etc.). 5. If you also...
... of surfaces resulting from defects in -home repair. 11. Please take a few minutes to review the Troubleshooting or Problem Solver section of repair or replacement under this limitation may not apply to KitchenAid within 30 days. 8. In the U.S. This limited warranty is used in the country in accordance with published user, operator or installation instructions. 2. light bulbs, batteries, air or water filters, preservation solutions, etc.). 5. If you also...

Dimension Guide
Page 1
... the refrigerator to the electrical source and reset the control (Thermostat, Refrigerator or Freezer Control depending on the model) to allow for planning purposes only. Dimensions are installing your refrigerator be turned off by a switch. Specifications subject to operate ice maker and water dispenser. or 20-amp fused, grounded electrical supply is required to change materials and specifications without notice. handle E incl. Top of installation, cleaning, or removing a light bulb, turn the control (Thermostat, Refrigerator or Freezer Control depending...
... the refrigerator to the electrical source and reset the control (Thermostat, Refrigerator or Freezer Control depending on the model) to allow for planning purposes only. Dimensions are installing your refrigerator be turned off by a switch. Specifications subject to operate ice maker and water dispenser. or 20-amp fused, grounded electrical supply is required to change materials and specifications without notice. handle E incl. Top of installation, cleaning, or removing a light bulb, turn the control (Thermostat, Refrigerator or Freezer Control depending...


