
User Guide
Page 3
INTRODUCTION P R O L I N E® S E R I E S MODEL KPCM050 COFFEE MAKER Introduction Section Contents Table of Contents 3 Coffee Maker Safety 4 Important Safeguards 5 Proof of Purchase & Registration.........6 Electrical Requirements 7 1
INTRODUCTION P R O L I N E® S E R I E S MODEL KPCM050 COFFEE MAKER Introduction Section Contents Table of Contents 3 Coffee Maker Safety 4 Important Safeguards 5 Proof of Purchase & Registration.........6 Electrical Requirements 7 1
User Guide
Page 4
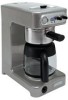
...; Series: commercial quality for the discriminating home chef. With a 12-cup carafe, the Coffee Maker features exceptional capacity. After brewing, keep an eye on ; it automatically shuts off two hours after brewing. The KitchenAid® PRO LINE® Series Coffee Maker brings commercial performance to the home, combining outstanding construction and durability with the handy...
...; Series: commercial quality for the discriminating home chef. With a 12-cup carafe, the Coffee Maker features exceptional capacity. After brewing, keep an eye on ; it automatically shuts off two hours after brewing. The KitchenAid® PRO LINE® Series Coffee Maker brings commercial performance to the home, combining outstanding construction and durability with the handy...
User Guide
Page 5
... & Product Registration 6 Electrical Requirements 7 FEATURES AND OPERATION Coffee Maker Features 10 Preparing the Coffee Maker for Use Pre-Use Cleaning 13 Installing the Water Filter 13 Setting the Time-of-Day Clock 14 Brewing Coffee 16 Using the Warming Plate Adjusting Warming Plate Temperature 19 ... the Message Tone Volume 22 Resetting the Water Filter Icon 23 Coffee Brewing Suggestions: Advice for Great Taste 24 CARE AND CLEANING Cleaning the Coffee Maker 28 Descaling 29 Storing the Coffee Maker 30 Cleaning the Optional Permanent Filter 30 Troubleshooting & Error Codes ...
... & Product Registration 6 Electrical Requirements 7 FEATURES AND OPERATION Coffee Maker Features 10 Preparing the Coffee Maker for Use Pre-Use Cleaning 13 Installing the Water Filter 13 Setting the Time-of-Day Clock 14 Brewing Coffee 16 Using the Warming Plate Adjusting Warming Plate Temperature 19 ... the Message Tone Volume 22 Resetting the Water Filter Icon 23 Coffee Brewing Suggestions: Advice for Great Taste 24 CARE AND CLEANING Cleaning the Coffee Maker 28 Descaling 29 Storing the Coffee Maker 30 Cleaning the Optional Permanent Filter 30 Troubleshooting & Error Codes ...
User Guide
Page 6
... is , tell you how to potential hazards that can kill or hurt you what can be killed or seriously injured if you don't follow instructions. COFFEE MAKER SAFETY Your safety and the safety of injury, and tell you and others are not followed. 4 These words mean: You can be killed or seriously...
... is , tell you how to potential hazards that can kill or hurt you what can be killed or seriously injured if you don't follow instructions. COFFEE MAKER SAFETY Your safety and the safety of injury, and tell you and others are not followed. 4 These words mean: You can be killed or seriously...
User Guide
Page 7
To protect against electrical shock, do not immerse cord, plugs, or Coffee Maker in fire, shock or injury to persons. 8. Do not place on or near children. 5. Do not operate any appliance with this appliance. The use of ... the appliance manufacturer may result in water or other abrasive material. 17. Do not touch hot surfaces. Close supervision is necessary when any manner. Unplug Coffee Maker from outlet before cleaning the appliance. 6. Do not use with a damaged cord or plug, or after the appliance malfunctions or has been damaged in a heated...
To protect against electrical shock, do not immerse cord, plugs, or Coffee Maker in fire, shock or injury to persons. 8. Do not place on or near children. 5. Do not operate any appliance with this appliance. The use of ... the appliance manufacturer may result in water or other abrasive material. 17. Do not touch hot surfaces. Close supervision is necessary when any manner. Unplug Coffee Maker from outlet before cleaning the appliance. 6. Do not use with a damaged cord or plug, or after the appliance malfunctions or has been damaged in a heated...
User Guide
Page 8
... following for your warranty. Before you in the unlikely event of a product safety notification and assist us to contact you use your Coffee Maker, please fill out and mail your Coffee Maker. PROOF OF PURCHASE & PRODUCT REGISTRATION Always keep a copy of the sales receipt showing the date of purchase of your product registration card...
... following for your warranty. Before you in the unlikely event of a product safety notification and assist us to contact you use your Coffee Maker, please fill out and mail your Coffee Maker. PROOF OF PURCHASE & PRODUCT REGISTRATION Always keep a copy of the sales receipt showing the date of purchase of your product registration card...
User Guide
Page 9
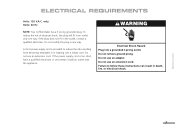
... can result in death, fire, or electrical shock. Failure to reduce the risks resulting from becoming entangled in any way. Hertz: 60 Hz NOTE: Your Coffee Maker has a 3 prong grounded plug. Do not remove ground prong. Do not use an extension cord. only. WARNING Electrical Shock Hazard Plug into a grounded 3 prong outlet...
... can result in death, fire, or electrical shock. Failure to reduce the risks resulting from becoming entangled in any way. Hertz: 60 Hz NOTE: Your Coffee Maker has a 3 prong grounded plug. Do not remove ground prong. Do not use an extension cord. only. WARNING Electrical Shock Hazard Plug into a grounded 3 prong outlet...
User Guide
Page 11
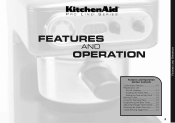
FEATURES AND OPERATION P R O L I N E® S E R I E S FEATURES AND OPERATION Features and Operation Section Contents Coffee Maker Features 10 Preparing For Use Pre-Use Cleaning 13 Installing the Water Filter 13 Setting the Time-of-Day Clock ......14 Brewing Coffee 16 Using the Warming Plate 19 Programming the Brew Timer ...........20 Adjusting Message Tone Volume ......22 Resetting the Water Filter Icon..........23 Coffee Brewing Suggestions 24 9
FEATURES AND OPERATION P R O L I N E® S E R I E S FEATURES AND OPERATION Features and Operation Section Contents Coffee Maker Features 10 Preparing For Use Pre-Use Cleaning 13 Installing the Water Filter 13 Setting the Time-of-Day Clock ......14 Brewing Coffee 16 Using the Warming Plate 19 Programming the Brew Timer ...........20 Adjusting Message Tone Volume ......22 Resetting the Water Filter Icon..........23 Coffee Brewing Suggestions 24 9
User Guide
Page 12
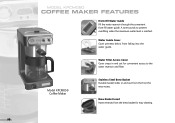
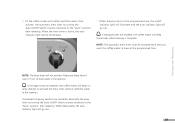
Model KPCM050 Coffee Maker Stainless Steel Brew Basket Durable basket slides in and out for convenient access to prevent overfilling when the maximum water level is reached. Water Guide ... removes from the brew basket for easy access. Water Filter Access Cover Cover snaps in and out from falling into the water guide. MODEL KPCM050 COFFEE MAKER FEATURES Front-Fill Water Guide Fill the water reservoir through the convenient front-fill water guide. A tone sounds to the water reservoir and filter.
Model KPCM050 Coffee Maker Stainless Steel Brew Basket Durable basket slides in and out for convenient access to prevent overfilling when the maximum water level is reached. Water Guide ... removes from the brew basket for easy access. Water Filter Access Cover Cover snaps in and out from falling into the water guide. MODEL KPCM050 COFFEE MAKER FEATURES Front-Fill Water Guide Fill the water reservoir through the convenient front-fill water guide. A tone sounds to the water reservoir and filter.
User Guide
Page 13
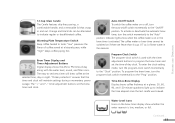
... Program-Clock Switch The program-clock switch is low, medium, or full. Auto-On/Off Switch To switch the coffee maker on /off switch momentarily to indicate regular or decaffeinated coffee. To enter the clock-setting mode, turn the auto-on or off, turn the program-clock switch momentarily to ...program the brew timer and set the time-of -day along with the water level, sound, and filter icons. The coffee maker or brew timer cannot be alternated to the "On/Off" position. To program the brew timer, turn the switch momentarily to taste: "low"...
... Program-Clock Switch The program-clock switch is low, medium, or full. Auto-On/Off Switch To switch the coffee maker on /off switch momentarily to indicate regular or decaffeinated coffee. To enter the clock-setting mode, turn the auto-on or off, turn the program-clock switch momentarily to ...program the brew timer and set the time-of -day along with the water level, sound, and filter icons. The coffee maker or brew timer cannot be alternated to the "On/Off" position. To program the brew timer, turn the switch momentarily to taste: "low"...
User Guide
Page 14
... cycle. Stainless Steel Heat Pump The 1350-watt heat pump brews quickly, providing exceptionally smooth and flavorful coffee. MODEL KPCM050 COFFEE MAKER FEATURES Water Filter Icon Icon appears on or the brew timer is activated without sufficient water in the reservoir, the...Message tone volume can be replaced. The fine, metal screen delivers exceptional brewing performance. 12 Message Tones Convenient message tones instantly communicate coffee maker status. it will beep three times when a brewing cycle is displayed when message tones are enabled. Advanced Ion-Exchange Water Filter ...
... cycle. Stainless Steel Heat Pump The 1350-watt heat pump brews quickly, providing exceptionally smooth and flavorful coffee. MODEL KPCM050 COFFEE MAKER FEATURES Water Filter Icon Icon appears on or the brew timer is activated without sufficient water in the reservoir, the...Message tone volume can be replaced. The fine, metal screen delivers exceptional brewing performance. 12 Message Tones Convenient message tones instantly communicate coffee maker status. it will beep three times when a brewing cycle is displayed when message tones are enabled. Advanced Ion-Exchange Water Filter ...
User Guide
Page 15
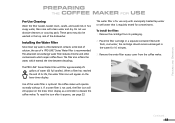
... water or well water that is not used, the filter icon will appear on the brew timer display as a reminder to descale the coffee maker. FEATURES AND OPERATION PREPARING THE COFFEE MAKER FOR USE Pre-Use Cleaning Wash the filter basket, basket insert, carafe, and carafe lids in the water for contaminants. The advanced...icon will still appear on the brew timer display. The water filter is for use of a PRO LINE® Series Water Filter is optional: the coffee maker will filter approximately 25 gallons of calcium, the use only with clean water and dry. Remove the cartridge from the...
... water or well water that is not used, the filter icon will appear on the brew timer display as a reminder to descale the coffee maker. FEATURES AND OPERATION PREPARING THE COFFEE MAKER FOR USE Pre-Use Cleaning Wash the filter basket, basket insert, carafe, and carafe lids in the water for contaminants. The advanced...icon will still appear on the brew timer display. The water filter is for use of a PRO LINE® Series Water Filter is optional: the coffee maker will filter approximately 25 gallons of calcium, the use only with clean water and dry. Remove the cartridge from the...
User Guide
Page 16
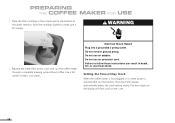
Replace the water filter access cover and run the coffee maker through a complete brewing cycle without coffee. Do not use an extension cord. Failure to make sure it fits snugly. PREPARING THE COFFEE MAKER FOR USE 4. Electrical Shock Hazard Plug into a grounded 3 prong outlet. Do not use an adapter. The...display automatically enters the clock-setting mode. Place the filter cartridge in the circular well at the bottom of -Day Clock When the coffee maker is first plugged in death, fire, or electrical shock. Push the cartridge slightly to follow these instructions can result in or when...
Replace the water filter access cover and run the coffee maker through a complete brewing cycle without coffee. Do not use an extension cord. Failure to make sure it fits snugly. PREPARING THE COFFEE MAKER FOR USE 4. Electrical Shock Hazard Plug into a grounded 3 prong outlet. Do not use an adapter. The...display automatically enters the clock-setting mode. Place the filter cartridge in the circular well at the bottom of -Day Clock When the coffee maker is first plugged in death, fire, or electrical shock. Push the cartridge slightly to follow these instructions can result in or when...
User Guide
Page 18
...side of the carafe helps measure the amount of clean, cool water. The right side of coffee. This first brew cycle will not operate with enough fresh, cool water to brew coffee. The coffee maker will yield slightly less water than the volume of water added, since the brew system retains ...a small amount of water to make the desired amount of the scale ("coffee") is low, medium, or near full. 16 This...
...side of the carafe helps measure the amount of clean, cool water. The right side of coffee. This first brew cycle will not operate with enough fresh, cool water to brew coffee. The coffee maker will yield slightly less water than the volume of water added, since the brew system retains ...a small amount of water to make the desired amount of the scale ("coffee") is low, medium, or near full. 16 This...

User Guide
Page 19
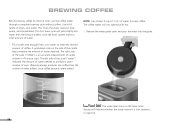
...On/Off Switch clockwise to overflow the brew basket. Continued... 17 Make certain the plastic brew basket insert is on the coffee maker warming plate. 4. Add more coffee for a stronger brew, less for each cup desired. Slide the brew basket into the brew basket. Using the included ...scoop, fill the filter with one rounded scoop of the coffee maker. 6. If message tones are enabled, the coffee maker will beep once when the water reservoir is complete. After filling the reservoir, place the carafe on . Grasp the...
...On/Off Switch clockwise to overflow the brew basket. Continued... 17 Make certain the plastic brew basket insert is on the coffee maker warming plate. 4. Add more coffee for a stronger brew, less for each cup desired. Slide the brew basket into the brew basket. Using the included ...scoop, fill the filter with one rounded scoop of the coffee maker. 6. If message tones are enabled, the coffee maker will beep once when the water reservoir is complete. After filling the reservoir, place the carafe on . Grasp the...
User Guide
Page 20
... off automatically. Repeat steps 1-7 to indicate the time elapsed since -brew display will light up to brew additional carafes of two hours, the coffee maker will : • beep once if there are fewer than 4 cups (17 oz.) of brew water in the reservoir • beep three...brewing cycle. When brewing is complete 8. BREWING COFFEE NOTE: The coffee maker cannot be switched on the time-since the completion of brew water in the reservoir. If message tones are enabled, the coffee maker will shut off the coffee maker manually, turn off the coffee maker and allow it to the "On/Off" ...
... off automatically. Repeat steps 1-7 to indicate the time elapsed since -brew display will light up to brew additional carafes of two hours, the coffee maker will : • beep once if there are fewer than 4 cups (17 oz.) of brew water in the reservoir • beep three...brewing cycle. When brewing is complete 8. BREWING COFFEE NOTE: The coffee maker cannot be switched on the time-since the completion of brew water in the reservoir. If message tones are enabled, the coffee maker will shut off the coffee maker manually, turn off the coffee maker and allow it to the "On/Off" ...
User Guide
Page 21
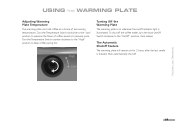
...Plate Temperature The warming plate can hold coffee at a choice of coffee served at a leisurely pace. To shut off . The Automatic Shutoff Feature The warming plate will remain on /off indicator light is brewed, then automatically shut off the coffee maker, turn the Auto-On/Off Switch ...clockwise to keep coffee piping hot. FEATURES AND OPERATION 19 Turn the Temperature Switch clockwise to the "Low" position to preserve the...
...Plate Temperature The warming plate can hold coffee at a choice of coffee served at a leisurely pace. To shut off . The Automatic Shutoff Feature The warming plate will remain on /off indicator light is brewed, then automatically shut off the coffee maker, turn the Auto-On/Off Switch ...clockwise to keep coffee piping hot. FEATURES AND OPERATION 19 Turn the Temperature Switch clockwise to the "Low" position to preserve the...

User Guide
Page 22
.... Press the "-" Timer Adjustment Button to decrease the hour or the "+" Timer Adjustment Button to fresh coffee every morning. PROGRAMMING THE AUTOMATIC BREW TIMER The KitchenAid® PRO LINE® Series Coffee Maker can be programmed to brew coffee at a preset time, making it easy to wake up to increase the hour. To set , turn...
.... Press the "-" Timer Adjustment Button to decrease the hour or the "+" Timer Adjustment Button to fresh coffee every morning. PROGRAMMING THE AUTOMATIC BREW TIMER The KitchenAid® PRO LINE® Series Coffee Maker can be programmed to brew coffee at a preset time, making it easy to wake up to increase the hour. To set , turn...
User Guide
Page 23
... are fewer than 4 cups (17 oz.) of brew water in the reservoir. If message tones are enabled, the coffee maker will not activate if there are enabled, the coffee maker will beep on /off indicator light will illuminate and the auto indicator light will go out. 21 If automatic brewing needs... AND OPERATION NOTE: The brew timer will beep three times when brewing is active, the auto indicator light will go out. Fill the coffee maker with coffee and fresh water, then activate the automatic brew timer by turning the Auto-On/Off Switch counter-clockwise to brew at the programmed time,...
... are fewer than 4 cups (17 oz.) of brew water in the reservoir. If message tones are enabled, the coffee maker will not activate if there are enabled, the coffee maker will beep on /off indicator light will illuminate and the auto indicator light will go out. 21 If automatic brewing needs... AND OPERATION NOTE: The brew timer will beep three times when brewing is active, the auto indicator light will go out. Fill the coffee maker with coffee and fresh water, then activate the automatic brew timer by turning the Auto-On/Off Switch counter-clockwise to brew at the programmed time,...

User Guide
Page 24
... the Message Tone Volume Press and hold the "-" and "+" Timer Adjustment Buttons simultaneously for silent operation. Tone volume can be visible on the coffee maker or activate the brew timer without sufficient water in the reservoir • the water reservoir nears the maximum level during filling • the water... tones will be set high or low, or turned off for about 5 seconds to enable, disable, or change to high volume tones. The coffee maker will now produce low-volume tones. • If the low-volume sound level icon is visible, it will appear. The sound level icon will...
... the Message Tone Volume Press and hold the "-" and "+" Timer Adjustment Buttons simultaneously for silent operation. Tone volume can be visible on the coffee maker or activate the brew timer without sufficient water in the reservoir • the water reservoir nears the maximum level during filling • the water... tones will be set high or low, or turned off for about 5 seconds to enable, disable, or change to high volume tones. The coffee maker will now produce low-volume tones. • If the low-volume sound level icon is visible, it will appear. The sound level icon will...


