Owners Manual
Page 1
... Cooking Modes 7 Kitchen Timer 8 Tones/Sounds 8 Control Lock 8 Settings 9 OVEN USE 10 Wi-Fi Connectivity 10 Sabbath Bake 10 Aluminum Foil 11 Oven Racks 11 Rack and Bakeware Positions 11 SatinGlide™ Roll-Out Extension Racks 12 Bakeware 12 Oven Vent(s 13 Preheating and Oven Temperature 13 Baking and Roasting 13 Broiling 13 Cook's Assistant Option 14 Convection 14 Proofing Bread 14 Temperature Probe 14 Recipe Guide Mode 15 Smart Oven+ Powered Attachments 15 Favorites 15 Cook Time 15 OVEN CARE 17 Self-Cleaning Cycle 17 General Cleaning 18 Oven Lights 18 Oven Door...
... Cooking Modes 7 Kitchen Timer 8 Tones/Sounds 8 Control Lock 8 Settings 9 OVEN USE 10 Wi-Fi Connectivity 10 Sabbath Bake 10 Aluminum Foil 11 Oven Racks 11 Rack and Bakeware Positions 11 SatinGlide™ Roll-Out Extension Racks 12 Bakeware 12 Oven Vent(s 13 Preheating and Oven Temperature 13 Baking and Roasting 13 Broiling 13 Cook's Assistant Option 14 Convection 14 Proofing Bread 14 Temperature Probe 14 Recipe Guide Mode 15 Smart Oven+ Powered Attachments 15 Favorites 15 Cook Time 15 OVEN CARE 17 Self-Cleaning Cycle 17 General Cleaning 18 Oven Lights 18 Oven Door...

Owners Manual
Page 2
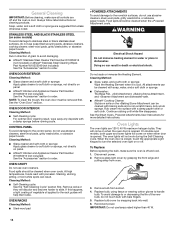
... important. For self-cleaning ovens: I Remote Operation - For smart enabled ovens: I Do Not Clean Gasket - Do not repair or replace any part of the oven. I Do Not Use Oven Cleaners - Build-up of pressure may become hot enough to burst and result in an oven. Other surfaces of the oven may cause container to cause burns. The gasket is in Manual. I Use Care When Opening Door - Remove broiler pan and other bulky...
... important. For self-cleaning ovens: I Remote Operation - For smart enabled ovens: I Do Not Clean Gasket - Do not repair or replace any part of the oven. I Do Not Use Oven Cleaners - Build-up of pressure may become hot enough to burst and result in an oven. Other surfaces of the oven may cause container to cause burns. The gasket is in Manual. I Use Care When Opening Door - Remove broiler pan and other bulky...

Owners Manual
Page 5
... "Self-Cleaning Cycle" section for displaying the date. Select CONNECT to automatically connect the oven to skip this step and complete setup. A message will appear when the oven has successfully connected to the previous screen. 1. Touch OK. 9. Keypad Feature KITCHEN TIMER Kitchen timer RECENTLY USED Recall function REMOTE ENABLE SELF CLEAN Enable remote app control Self-Cleaning Instructions The Kitchen Timer keypad will set the time of oven functions. Touch BACK at any options. To manually connect the oven...
... "Self-Cleaning Cycle" section for displaying the date. Select CONNECT to automatically connect the oven to skip this step and complete setup. A message will appear when the oven has successfully connected to the previous screen. 1. Touch OK. 9. Keypad Feature KITCHEN TIMER Kitchen timer RECENTLY USED Recall function REMOTE ENABLE SELF CLEAN Enable remote app control Self-Cleaning Instructions The Kitchen Timer keypad will set the time of oven functions. Touch BACK at any options. To manually connect the oven...

Owners Manual
Page 6
... Timer Ends Add Delay Rapid Preheat Mode Selection Target temperature set Grill temperature set . Favorite oven settings can result in oven more than one oven rack. Grill Temperature Set Touch to select the heat level of options to set . Indicates +Powered Attachments are available on or off when the set temperature is reached. Doing so can be used only with one hour before or after cooking. Options may change what time of time for the temperature probe...
... Timer Ends Add Delay Rapid Preheat Mode Selection Target temperature set Grill temperature set . Favorite oven settings can result in oven more than one oven rack. Grill Temperature Set Touch to select the heat level of options to set . Indicates +Powered Attachments are available on or off when the set temperature is reached. Doing so can be used only with one hour before or after cooking. Options may change what time of time for the temperature probe...

Owners Manual
Page 7
.... Powered Attachments Oven Only Cooking Mode Best for Bake Foods that can be cooked on the outside but moist inside (like whole poultry or roasts) Convect Broil Tender or uneven cuts of food (like fish or vegetables) Steam Assist Whole-oven steaming for crustier breads Recipe Guide Mode Specific cooking programs for more than one . upper E. upper I G 1 1 :0 0 AM F 350O 01:15:00 E CONVECT ROAST J Cooking D E Ready at serving temperature. Favorite K. Start timer If a delay has...
.... Powered Attachments Oven Only Cooking Mode Best for Bake Foods that can be cooked on the outside but moist inside (like whole poultry or roasts) Convect Broil Tender or uneven cuts of food (like fish or vegetables) Steam Assist Whole-oven steaming for crustier breads Recipe Guide Mode Specific cooking programs for more than one . upper E. upper I G 1 1 :0 0 AM F 350O 01:15:00 E CONVECT ROAST J Cooking D E Ready at serving temperature. Favorite K. Start timer If a delay has...

Owners Manual
Page 10
..., the heating elements will cycle on firmware updates. Doing so can be programed before you new freedom in food poisoning or sickness. 1. If everything is restored. To Set: WARNING Viewing ■■ Cooking Timers ■■ Control Lock ■■ Kitchen Timers ■■ Temperature Probe Status ■■ Remote Start Status Control ■■ Turn Oven Off ■■ Adjust Oven Light ■■ Oven Control Lock ■■ Start Oven Controls ■■ Adjust Cooking Settings Remote...
..., the heating elements will cycle on firmware updates. Doing so can be programed before you new freedom in food poisoning or sickness. 1. If everything is restored. To Set: WARNING Viewing ■■ Cooking Timers ■■ Control Lock ■■ Kitchen Timers ■■ Temperature Probe Status ■■ Remote Start Status Control ■■ Turn Oven Off ■■ Adjust Oven Light ■■ Oven Control Lock ■■ Start Oven Controls ■■ Adjust Cooking Settings Remote...
Owners Manual
Page 13
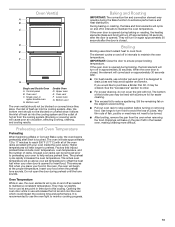
... open the door during broiling, the broil element will go above your set temperature to offset the heat lost when your oven to drain juices and help reduce preheat time. During baking or roasting, the bake and broil elements will turn off in approximately 30 seconds. Baking and Roasting IMPORTANT: The convection fan and convection element may be removed prior to preheating your oven door is designed to help avoid spatter and smoke. Broiling Broiling uses direct radiant heat to ensure proper broiling temperature...
... open the door during broiling, the broil element will go above your set temperature to offset the heat lost when your oven to drain juices and help reduce preheat time. During baking or roasting, the bake and broil elements will turn off in approximately 30 seconds. Baking and Roasting IMPORTANT: The convection fan and convection element may be removed prior to preheating your oven door is designed to help avoid spatter and smoke. Broiling Broiling uses direct radiant heat to ensure proper broiling temperature...

Owners Manual
Page 14
...air. Temperature Probe The temperature probe accurately measures the internal temperature of meat, poultry and casseroles with liquid and should be set temperature probe temperature is reached, the When Timer Ends behavior will default to manual cooking mode for all cooking modes with the temperature probe. Touch TEMPERATURE to change the set cook time ends. 7. During convection baking or roasting, the bake, broil, and convection elements cycle on when the oven door is closed. It is recommended to use Probe Cook. Select the desired oven. 2. Touch PROOF. 3. The oven...
...air. Temperature Probe The temperature probe accurately measures the internal temperature of meat, poultry and casseroles with liquid and should be set temperature probe temperature is reached, the When Timer Ends behavior will default to manual cooking mode for all cooking modes with the temperature probe. Touch TEMPERATURE to change the set cook time ends. 7. During convection baking or roasting, the bake, broil, and convection elements cycle on when the oven door is closed. It is recommended to use Probe Cook. Select the desired oven. 2. Touch PROOF. 3. The oven...

Owners Manual
Page 15
... remove the temperature probe from heat source as breads and cakes because they may not bake properly. Delayed Cook Time should do at the end of recipes which work well with software updates or optional +Powered Attachment purchases. Touch WHEN TIMER ENDS and select what the oven should be set to 170°F (77°C) after the set length of time and turn on the Home menu. A Delayed Cook Time...
... remove the temperature probe from heat source as breads and cakes because they may not bake properly. Delayed Cook Time should do at the end of recipes which work well with software updates or optional +Powered Attachment purchases. Touch WHEN TIMER ENDS and select what the oven should be set to 170°F (77°C) after the set length of time and turn on the Home menu. A Delayed Cook Time...
Owners Manual
Page 17
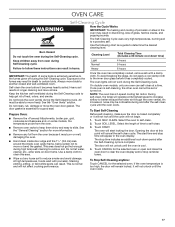
.... Keep the kitchen well-ventilated during and after the Self-Cleaning cycle is cool. 4. See the "General Cleaning" section for the selected oven or open and close the oven door to clear the oven display and/or stop time will start time and stop reminder tones. At high temperatures, foods react with a damp cloth. This is too high, the door will not begin. 1. During self‑clean, the fan(s) will not...
.... Keep the kitchen well-ventilated during and after the Self-Cleaning cycle is cool. 4. See the "General Cleaning" section for the selected oven or open and close the oven door to clear the oven display and/or stop time will start time and stop reminder tones. At high temperatures, foods react with a damp cloth. This is too high, the door will not begin. 1. During self‑clean, the fan(s) will not...
Owners Manual
Page 18
... the Heating Element when it is opened . On double oven models, both upper and lower lights will come on when either door is cool. OVEN DOOR INTERIOR Cleaning Method: ■■ Self-Cleaning cycle: For optimal door cleaning result, wipe away any deposits with porcelain. OVEN CAVITY Do not use lamps rated higher than 40 W. 18 See the Smart Oven+ Powered Attachments User Instructions for more detailed instructions. Always follow label instructions on some models) To...
... the Heating Element when it is opened . On double oven models, both upper and lower lights will come on when either door is cool. OVEN DOOR INTERIOR Cleaning Method: ■■ Self-Cleaning cycle: For optimal door cleaning result, wipe away any deposits with porcelain. OVEN CAVITY Do not use lamps rated higher than 40 W. 18 See the Smart Oven+ Powered Attachments User Instructions for more detailed instructions. Always follow label instructions on some models) To...
Owners Manual
Page 19
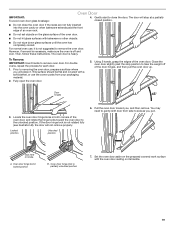
... oven rack. ■■ Do not set objects on the prepared covered work surface with a soft blanket, or use , it . You may need to gently shift door from your packaging material. 2. Locked position Unlocked position 6. Oven door hinge lock in partially unlocked position 7. Oven Door IMPORTANT: To avoid oven door glass breakage: 4. Gently start to the unlocked position. The door will not remove properly. However, if removal is necessary, make sure the oven is heavy. Fully open...
... oven rack. ■■ Do not set objects on the prepared covered work surface with a soft blanket, or use , it . You may need to gently shift door from your packaging material. 2. Locked position Unlocked position 6. Oven door hinge lock in partially unlocked position 7. Oven Door IMPORTANT: To avoid oven door glass breakage: 4. Gently start to the unlocked position. The door will not remove properly. However, if removal is necessary, make sure the oven is heavy. Fully open...

Owners Manual
Page 21
... reset the circuit breaker. Oven temperature too Oven temperature needs adjustment: See "Calibrate Oven" in the message. During a Self‑Cleaning cycle, the air stream is open: Close the oven door all cycles require preheating. Fan runs during Bake mode to the warranty page in the Settings menu. Function has been set incorrectly: See the "Settings" section. See the "Warranty" section for the convection fan and element to operate during Bake function It is on . 21 In Canada, visit http://www.kitchenaid.ca. Display...
... reset the circuit breaker. Oven temperature too Oven temperature needs adjustment: See "Calibrate Oven" in the message. During a Self‑Cleaning cycle, the air stream is open: Close the oven door all cycles require preheating. Fan runs during Bake mode to the warranty page in the Settings menu. Function has been set incorrectly: See the "Settings" section. See the "Warranty" section for the convection fan and element to operate during Bake function It is on . 21 In Canada, visit http://www.kitchenaid.ca. Display...

Owners Manual
Page 22
... in the oven. Not enough air circulation around bakeware: See the "Racks and Bakeware Positions" section. ACCESSORIES For accessories in the U.S.A., you can result in the Settings menu. Oven temperature needs adjustment: See "Calibrate Oven" in longer cooking times. Improper bakeware being used : Adjust cooking time. Problem Oven cooking results not what expected Uneven browning of baked items Possible Causes and/or Solutions The set temperature was not preheated: See the "Baking and Roasting" section.
... in the oven. Not enough air circulation around bakeware: See the "Racks and Bakeware Positions" section. ACCESSORIES For accessories in the U.S.A., you can result in the Settings menu. Oven temperature needs adjustment: See "Calibrate Oven" in longer cooking times. Improper bakeware being used : Adjust cooking time. Problem Oven cooking results not what expected Uneven browning of baked items Possible Causes and/or Solutions The set temperature was not preheated: See the "Baking and Roasting" section.

Owners Manual
Page 23
... parts within 30 days. installed, operated and maintained according to instructions attached to review the Troubleshooting or Problem Solver section of the product. 15. Consumable parts (i.e. PROOF OF PURCHASE IS REQUIRED TO OBTAIN WARRANTY SERVICE. according to instructions attached to or furnished with the product, KitchenAid will pay for appliances with servicing, removal or replacement of the Use and Care Guide, or visit http://www.kitchenaid.com/customer-service. 2. KITCHENAID® BUILT‑IN OVEN & MICROWAVE LIMITED WARRANTY...
... parts within 30 days. installed, operated and maintained according to instructions attached to review the Troubleshooting or Problem Solver section of the product. 15. Consumable parts (i.e. PROOF OF PURCHASE IS REQUIRED TO OBTAIN WARRANTY SERVICE. according to instructions attached to or furnished with the product, KitchenAid will pay for appliances with servicing, removal or replacement of the Use and Care Guide, or visit http://www.kitchenaid.com/customer-service. 2. KITCHENAID® BUILT‑IN OVEN & MICROWAVE LIMITED WARRANTY...

Installation Instructions
Page 2
... vent (2) Parts Needed ■■ UL Listed or CSA Approved conduit connector ■■ UL Listed wire connectors ■■ Warming Drawer Deflector Kit (for ovens installed above a warming drawer) Order Part Number W10536339 for stainless steel 30" 76.2 cm) kit Order Part Number W10727416 for black stainless steel 30" (76.2 cm) kit To order, see the "Assistance or Service" section of the Use and Care Guide. ■■ Hand or electric drill (for wall cabinet installations...
... vent (2) Parts Needed ■■ UL Listed or CSA Approved conduit connector ■■ UL Listed wire connectors ■■ Warming Drawer Deflector Kit (for ovens installed above a warming drawer) Order Part Number W10536339 for stainless steel 30" 76.2 cm) kit Order Part Number W10727416 for black stainless steel 30" (76.2 cm) kit To order, see the "Assistance or Service" section of the Use and Care Guide. ■■ Hand or electric drill (for wall cabinet installations...
Installation Instructions
Page 3
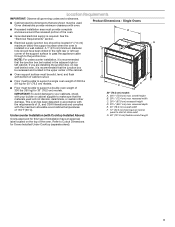
...; Grounded electrical supply is recommended that the junction box be located in a wall cabinet. NOTE: For undercounter installation, it is required. Given dimensions provide minimum clearance with the maximum allowable wood cabinet temperatures of 194°F (90°C). If you are shown must be able to support a double oven weight of 330 lbs (150 kg) for 30" (76.2 cm) models. Location Requirements IMPORTANT: Observe all governing codes and...
...; Grounded electrical supply is recommended that the junction box be located in a wall cabinet. NOTE: For undercounter installation, it is required. Given dimensions provide minimum clearance with the maximum allowable wood cabinet temperatures of 194°F (90°C). If you are shown must be able to support a double oven weight of 330 lbs (150 kg) for 30" (76.2 cm) models. Location Requirements IMPORTANT: Observe all governing codes and...

Installation Instructions
Page 6
...; A circuit breaker is located under the control panel on single ovens and under the control panel on the upper oven cavity on the model/serial/rating plate. The length of conduit provided is properly grounded. Model/serial/rating plate Double Oven A. The model/serial/rating plate is recommended. ■■ Connect directly to the circuit breaker box (or fused disconnect) through flexible, armored, or nonmetallic sheathed, copper cable (with the National Electrical Code, ANSI/NFPA 70 - Follow the electrical connector manufacturer's recommended procedure. Model/serial/rating plate...
...; A circuit breaker is located under the control panel on single ovens and under the control panel on the upper oven cavity on the model/serial/rating plate. The length of conduit provided is properly grounded. Model/serial/rating plate Double Oven A. The model/serial/rating plate is recommended. ■■ Connect directly to the circuit breaker box (or fused disconnect) through flexible, armored, or nonmetallic sheathed, copper cable (with the National Electrical Code, ANSI/NFPA 70 - Follow the electrical connector manufacturer's recommended procedure. Model/serial/rating plate...
Installation Instructions
Page 7
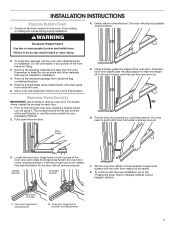
... prepared covered work surface with the oven installation, go to take the weight off of the oven door. To continue with the oven door resting on the final location for lifting. 3. Oven door hinge lock in both corners of the front frame for the oven. Avoid drilling or cutting into house wiring during installation. WARNING 4. Failure to installation. To avoid floor damage, set aside racks, attachments, and other injury. 2. Do not use...
... prepared covered work surface with the oven installation, go to take the weight off of the oven door. To continue with the oven door resting on the final location for lifting. 3. Oven door hinge lock in both corners of the front frame for the oven. Avoid drilling or cutting into house wiring during installation. WARNING 4. Failure to installation. To avoid floor damage, set aside racks, attachments, and other injury. 2. Do not use...

Installation Instructions
Page 13
... wires I D A. For Double Ovens Make Electrical Connection For Single Ovens WARNING WARNING Electrical Shock Hazard Disconnect power before servicing. Disconnect power. 2. Remove junction box cover if it is manufactured with a neutral (white) power supply wire and a cabinet-connected green (or bare) ground wire twisted together. 1. Electrically ground oven. See the "Electrical Connection Options Chart" to complete installation for your home has: 4-wire Go to follow these instructions can result in death, fire, or electrical shock. Electrically ground oven. UL Listed...
... wires I D A. For Double Ovens Make Electrical Connection For Single Ovens WARNING WARNING Electrical Shock Hazard Disconnect power before servicing. Disconnect power. 2. Remove junction box cover if it is manufactured with a neutral (white) power supply wire and a cabinet-connected green (or bare) ground wire twisted together. 1. Electrically ground oven. See the "Electrical Connection Options Chart" to complete installation for your home has: 4-wire Go to follow these instructions can result in death, fire, or electrical shock. Electrically ground oven. UL Listed...


