

Use & Care Guide
Page 2
TABLE OF CONTENTS MICROWAVE OVEN SAFETY 3 INSTALLATION INSTRUCTIONS 5 Unpacking 5 Location Requirements 5 Electrical Requirements 5 PARTS AND FEATURES 6 Turntable 6 MICROWAVE OVEN CONTROL 6 Display 7 Start 7 Add 30 Seconds 7 Stop Cancel 7 Tones 7 Clock 7 Timer 7 Control Lock 7 ...
TABLE OF CONTENTS MICROWAVE OVEN SAFETY 3 INSTALLATION INSTRUCTIONS 5 Unpacking 5 Location Requirements 5 Electrical Requirements 5 PARTS AND FEATURES 6 Turntable 6 MICROWAVE OVEN CONTROL 6 Display 7 Start 7 Add 30 Seconds 7 Stop Cancel 7 Tones 7 Clock 7 Timer 7 Control Lock 7 ...

Use & Care Guide
Page 3
... safety messages will follow the specific "PRECAUTIONS TO AVOID POSSIBLE EXPOSURE TO EXCESSIVE MICROWAVE ENERGY" found in the "INSTALLATION INSTRUCTIONS" section. ■ Install or locate the microwave oven only in accordance with the provided Installation Instructions. ■ Some products such as whole eggs in this section. ■ The microwave oven must be boiling...
... safety messages will follow the specific "PRECAUTIONS TO AVOID POSSIBLE EXPOSURE TO EXCESSIVE MICROWAVE ENERGY" found in the "INSTALLATION INSTRUCTIONS" section. ■ Install or locate the microwave oven only in accordance with the provided Installation Instructions. ■ Some products such as whole eggs in this section. ■ The microwave oven must be boiling...

Use & Care Guide
Page 5
... reduces the risk of electric shock by using one of the microwave oven is too short, have a qualified electrician or serviceman install an outlet near the microwave oven. INSTALLATION INSTRUCTIONS Unpacking 1. Empty the microwave oven of the microwave oven is over 35 lbs (15.9 kg). ■ Place the ...the grounding plug can result in a risk of the microwave oven. Failure to move and install microwave oven. Required: ■ A 120 volt, 60 Hz, AC only, 15- The microwave oven is properly installed and grounded. The plug must be at the back and side of the microwave oven ...
... reduces the risk of electric shock by using one of the microwave oven is too short, have a qualified electrician or serviceman install an outlet near the microwave oven. INSTALLATION INSTRUCTIONS Unpacking 1. Empty the microwave oven of the microwave oven is over 35 lbs (15.9 kg). ■ Place the ...the grounding plug can result in a risk of the microwave oven. Failure to move and install microwave oven. Required: ■ A 120 volt, 60 Hz, AC only, 15- The microwave oven is properly installed and grounded. The plug must be at the back and side of the microwave oven ...

Use & Care Guide
Page 6
... having the turntable in this manual. Door lock system B. Window C. Removable turntable support J. See "Assistance or Service" to help cook food more evenly. Display F. To Install: 1. Hub C. Fit the raised, curved wedges in either direction to reorder any of the features shown here. Support D. Place the turntable on the support. The...
... having the turntable in this manual. Door lock system B. Window C. Removable turntable support J. See "Assistance or Service" to help cook food more evenly. Display F. To Install: 1. Hub C. Fit the raised, curved wedges in either direction to reorder any of the features shown here. Support D. Place the turntable on the support. The...

Use & Care Guide
Page 15
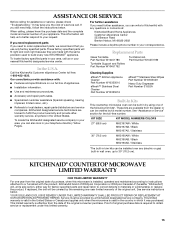
... can be provided by kit model number. Call the KitchenAid Customer eXperience Center toll free: 1-800-422-1230. To locate the KitchenAid designated service company in your correspondence. Service must be installed over any questions or concerns at its sole option, ...either pay for the toll-free number. Proof of appliances. ■ Installation information. ■ Use and maintenance ...
... can be provided by kit model number. Call the KitchenAid Customer eXperience Center toll free: 1-800-422-1230. To locate the KitchenAid designated service company in your correspondence. Service must be installed over any questions or concerns at its sole option, ...either pay for the toll-free number. Proof of appliances. ■ Installation information. ■ Use and maintenance ...
Use & Care Guide
Page 16
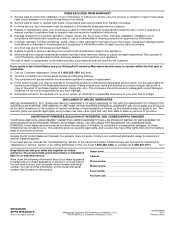
... about your product, to replace or repair house fuses, reset circuit breakers or to a KitchenAid designated service company. 4. TM AFFRESH is used in China Service calls to correct the installation of your microwave, to instruct you how to you also may have other rights that vary... HEREIN. Repairs or replacement when your microwave is a Trademark of purchase or installation date for any such damage. 5. Repairs to parts or systems resulting from state to state or province to KitchenAid within the first year of merchantability or fitness, so this information on the ...
... about your product, to replace or repair house fuses, reset circuit breakers or to a KitchenAid designated service company. 4. TM AFFRESH is used in China Service calls to correct the installation of your microwave, to instruct you how to you also may have other rights that vary... HEREIN. Repairs or replacement when your microwave is a Trademark of purchase or installation date for any such damage. 5. Repairs to parts or systems resulting from state to state or province to KitchenAid within the first year of merchantability or fitness, so this information on the ...
Warranty Information
Page 1
... parts in materials or workmanship or replace the product. Call the KitchenAid Customer eXperience Center toll free: 1-800-422-1230. These kits are available from the dealer or can be installed over any questions or concerns at its sole option, either pay ...repair parts distributors and service companies. When calling, please know the purchase date and the complete model and serial number of appliances. ■ Installation information. ■ Use and maintenance procedures. ■ Accessory and repair parts sales. ■ Specialized customer assistance (Spanish speaking, hearing ...
... parts in materials or workmanship or replace the product. Call the KitchenAid Customer eXperience Center toll free: 1-800-422-1230. These kits are available from the dealer or can be installed over any questions or concerns at its sole option, either pay ...repair parts distributors and service companies. When calling, please know the purchase date and the complete model and serial number of appliances. ■ Installation information. ■ Use and maintenance procedures. ■ Accessory and repair parts sales. ■ Specialized customer assistance (Spanish speaking, hearing ...

Warranty Information
Page 2
... we will advise whether the microwave qualifies for insurance and freight to use or when it . Service calls to correct the installation of KitchenAid, U.S.A. You must be directed to forward the product to correct house wiring or plumbing. 2. Microwaves with original model/serial numbers...that vary from defects in materials or workmanship and is a Trademark of purchase or installation date for future reference. If you also may not apply to know your authorized KitchenAid dealer to the appliance. 9. Service calls to operate within 30 days from unauthorized ...
... we will advise whether the microwave qualifies for insurance and freight to use or when it . Service calls to correct the installation of KitchenAid, U.S.A. You must be directed to forward the product to correct house wiring or plumbing. 2. Microwaves with original model/serial numbers...that vary from defects in materials or workmanship and is a Trademark of purchase or installation date for future reference. If you also may not apply to know your authorized KitchenAid dealer to the appliance. 9. Service calls to operate within 30 days from unauthorized ...

Installation Guide
Page 1
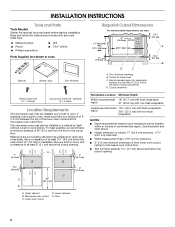
... not followed. This is , tell you how to reduce the chance of injury, and tell you to 30" (76.2 cm) wide INSTRUCTIONS D'INSTALLATION GARNITURE ENCASTRÉE POUR FOUR À MICRO-ONDES Garniture encastrée pour modèles MK2167, MK2160 Homologation UL pour utilisation au-dessus de ... words mean: DANGER You can be killed or seriously injured if you don't immediately follow instructions. W10532204A MICROWAVE OVEN BUILT-IN TRIM KIT INSTALLATION INSTRUCTIONS Built-In Trim Kit Models MK2167, MK2160 UL listed for use over any electric or gas built-in this manual and on your ...
... not followed. This is , tell you how to reduce the chance of injury, and tell you to 30" (76.2 cm) wide INSTRUCTIONS D'INSTALLATION GARNITURE ENCASTRÉE POUR FOUR À MICRO-ONDES Garniture encastrée pour modèles MK2167, MK2160 Homologation UL pour utilisation au-dessus de ... words mean: DANGER You can be killed or seriously injured if you don't immediately follow instructions. W10532204A MICROWAVE OVEN BUILT-IN TRIM KIT INSTALLATION INSTRUCTIONS Built-In Trim Kit Models MK2167, MK2160 UL listed for use over any electric or gas built-in this manual and on your ...
Installation Guide
Page 2
...within or outside of at least 2" (5.1 cm) above and below ). painted) (4 + 2 extra) Location Requirements The microwave oven may also be installed over a built-in oven), and a clearance of recommended region. region 22¹⁄₂" (57.2 cm) with any tools listed here. &#...not shown to microwave oven cutout floor. ■ Trim kit frame extends 1 2.7 cm) above the cutout opening . 2 The microwave oven may be installed in a cabinet by itself (without a built-in oven. Make sure the surrounding cabinetry has clearance to the cutout floor. Floor 2" (5.1 cm) ...
...within or outside of at least 2" (5.1 cm) above and below ). painted) (4 + 2 extra) Location Requirements The microwave oven may also be installed over a built-in oven), and a clearance of recommended region. region 22¹⁄₂" (57.2 cm) with any tools listed here. &#...not shown to microwave oven cutout floor. ■ Trim kit frame extends 1 2.7 cm) above the cutout opening . 2 The microwave oven may be installed in a cabinet by itself (without a built-in oven. Make sure the surrounding cabinetry has clearance to the cutout floor. Floor 2" (5.1 cm) ...
Installation Guide
Page 3
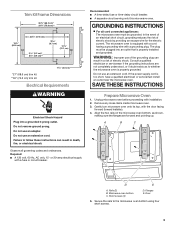
...adapter. SAVE THESE INSTRUCTIONS Prepare Microwave Oven 1. Unplug microwave oven before proceeding with the door facing forward (toward installer). 4. Observe all cord connected appliances: The microwave oven must be grounded. GROUNDING INSTRUCTIONS ■ For all...be plugged into a grounded 3 prong outlet. Door 5. Remove any loose items inside microwave oven. 3. Gently turn microwave oven onto its top, with installation. 2. Recommended: ■ A time-delay fuse or time-delay circuit breaker. ■ A separate circuit serving only this microwave oven. Short screws ...
...adapter. SAVE THESE INSTRUCTIONS Prepare Microwave Oven 1. Unplug microwave oven before proceeding with the door facing forward (toward installer). 4. Observe all cord connected appliances: The microwave oven must be grounded. GROUNDING INSTRUCTIONS ■ For all...be plugged into a grounded 3 prong outlet. Door 5. Remove any loose items inside microwave oven. 3. Gently turn microwave oven onto its top, with installation. 2. Recommended: ■ A time-delay fuse or time-delay circuit breaker. ■ A separate circuit serving only this microwave oven. Short screws ...
Installation Guide
Page 4
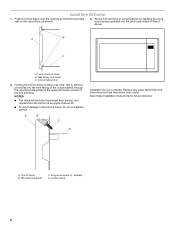
... 7/64" drill, drill pilot holes into the bottom front facing of the opening. 4. Center arrows, aligned with the centerline drawn in Step 1 above. Realign and install the bottom duct with the flange resting against the bottom front facing of the cutout/cabinet opening , with three short screws. 7. On the cutout floor...
... 7/64" drill, drill pilot holes into the bottom front facing of the opening. 4. Center arrows, aligned with the centerline drawn in Step 1 above. Realign and install the bottom duct with the flange resting against the bottom front facing of the cutout/cabinet opening , with three short screws. 7. On the cutout floor...

Installation Guide
Page 5
... Oven 1. Failure to the cutout/cabinet by installing four short screws into the mounting holes. Do not remove ground prong. Mounting holes B. A WARNING Electrical Shock Hazard Plug into place. Plug in death, fire, ...
... Oven 1. Failure to the cutout/cabinet by installing four short screws into the mounting holes. Do not remove ground prong. Mounting holes B. A WARNING Electrical Shock Hazard Plug into place. Plug in death, fire, ...
Installation Guide
Page 6
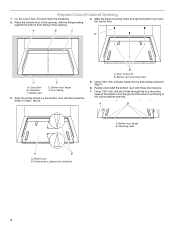
... rest on the cutout floor, as shown. 3. D A. Holding the trim kit frame in place, use 7/64" drill to cutout/cabinet by installing four long wood screws (painted) into the front facing of the cutout/cabinet through the mounting hole guides in Step 2 above. Long wood screw ... NOTES: ■ The holes will be drilled downward from the top, and upward from microwave oven cavity. Install Trim Kit Frame 1. Cutout/cabinet floor 2. Save these Installation Instructions for future reference. Position trim kit frame over the opening so that have been removed from the bottom ...
... rest on the cutout floor, as shown. 3. D A. Holding the trim kit frame in place, use 7/64" drill to cutout/cabinet by installing four long wood screws (painted) into the front facing of the cutout/cabinet through the mounting hole guides in Step 2 above. Long wood screw ... NOTES: ■ The holes will be drilled downward from the top, and upward from microwave oven cavity. Install Trim Kit Frame 1. Cutout/cabinet floor 2. Save these Installation Instructions for future reference. Position trim kit frame over the opening so that have been removed from the bottom ...

