

Warranty Information
Page 1
... Troubleshooting or Problem Solver section of the Use and Care Guide, scan the QR code on the duration of implied warranties of purchase (register receipt, charge slip, etc.). Please take a few minutes to a KitchenAid designated service center. Service calls to correct the installation of your microwave, to instruct you should ask KitchenAid or your KitchenAid® Countertop Microwave should be responsible for service or repair of repair or replacement under this microwave...
... Troubleshooting or Problem Solver section of the Use and Care Guide, scan the QR code on the duration of implied warranties of purchase (register receipt, charge slip, etc.). Please take a few minutes to a KitchenAid designated service center. Service calls to correct the installation of your microwave, to instruct you should ask KitchenAid or your KitchenAid® Countertop Microwave should be responsible for service or repair of repair or replacement under this microwave...

Use & Care Guide
Page 1
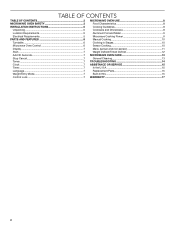
Table of Contents 2 Model KMCS3022G W11083574A MICROWAVE OVEN Use & Care Guide For questions about features, operation/performance, parts, accessories or service, call: 1-800-422-1230, or visit our website at www.kitchenaid.com.
Table of Contents 2 Model KMCS3022G W11083574A MICROWAVE OVEN Use & Care Guide For questions about features, operation/performance, parts, accessories or service, call: 1-800-422-1230, or visit our website at www.kitchenaid.com.
Use & Care Guide
Page 2
... Turntable 6 Microwave Oven Control 6 Display 7 Start 7 Add 30 Seconds 7 Stop Cancel 7 Tones 7 Clock 7 Timer 7 Language 7 Weight Entry Mode 7 Control Lock 7 MICROWAVE OVEN USE 8 Food Characteristics 8 Cooking Guidelines 8 Cookware and Dinnerware 8 Aluminum Foil and Metal 9 Microwave Cooking Power 9 Manual Cooking 10 Cooking in Stages 10 Sensor Cooking 10 Menu (sensor and non-sensor 11 Weight Defrost/Timed Defrost 12 MICROWAVE OVEN CARE 13 General Cleaning 13 TROUBLESHOOTING 14 ASSISTANCE OR SERVICE 15 In the U.S.A 15 Replacement Parts 15 Built-In Kits 15 WARRANTY...
... Turntable 6 Microwave Oven Control 6 Display 7 Start 7 Add 30 Seconds 7 Stop Cancel 7 Tones 7 Clock 7 Timer 7 Language 7 Weight Entry Mode 7 Control Lock 7 MICROWAVE OVEN USE 8 Food Characteristics 8 Cooking Guidelines 8 Cookware and Dinnerware 8 Aluminum Foil and Metal 9 Microwave Cooking Power 9 Manual Cooking 10 Cooking in Stages 10 Sensor Cooking 10 Menu (sensor and non-sensor 11 Weight Defrost/Timed Defrost 12 MICROWAVE OVEN CARE 13 General Cleaning 13 TROUBLESHOOTING 14 ASSISTANCE OR SERVICE 15 In the U.S.A 15 Replacement Parts 15 Built-In Kits 15 WARRANTY...

Use & Care Guide
Page 3
... overcook food. Always read and obey all instructions before placing bags in the microwave oven. I Do not let cord hang over edge of table or counter. Call an authorized service company for example, closed , turn oven off, and disconnect the power cord, or shut off power at the fuse or circuit breaker panel. - for examination, repair, or adjustment. If materials inside the oven to explode and should be heated in oven...
... overcook food. Always read and obey all instructions before placing bags in the microwave oven. I Do not let cord hang over edge of table or counter. Call an authorized service company for example, closed , turn oven off, and disconnect the power cord, or shut off power at the fuse or circuit breaker panel. - for examination, repair, or adjustment. If materials inside the oven to explode and should be heated in oven...
Use & Care Guide
Page 4
... the boiling point without appearing to microwave energy. It is particularly important that the oven door close properly and that there is no damage to operate this microwave oven when not in use. I Do not cover racks or any other reproductive harm. Do not use paper products when appliance is operated in convection, combination, grill or "PAN BROWN" mode. - Use extreme care when inserting a spoon or other...
... the boiling point without appearing to microwave energy. It is particularly important that the oven door close properly and that there is no damage to operate this microwave oven when not in use. I Do not cover racks or any other reproductive harm. Do not use paper products when appliance is operated in convection, combination, grill or "PAN BROWN" mode. - Use extreme care when inserting a spoon or other...
Use & Care Guide
Page 5
... a cord having a grounding wire with a grounding plug. The weight of the trim kits listed in death, fire, or electrical shock. Failure to reduce the risks resulting from becoming entangled in back or other injury. SAVE THESE INSTRUCTIONS 5 Handle the microwave oven gently. The microwave oven should work properly once it . ■■ The microwave oven should be grounded. Observe all cord connected appliances: The microwave oven must be built into...
... a cord having a grounding wire with a grounding plug. The weight of the trim kits listed in death, fire, or electrical shock. Failure to reduce the risks resulting from becoming entangled in back or other injury. SAVE THESE INSTRUCTIONS 5 Handle the microwave oven gently. The microwave oven should work properly once it . ■■ The microwave oven should be grounded. Observe all cord connected appliances: The microwave oven must be built into...
Use & Care Guide
Page 6
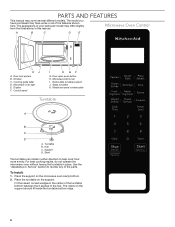
... the "Assistance or Service" section to help cook food more evenly. Place the support on the support. Place the turntable on the microwave oven cavity bottom. 2. Door lock system B. Control panel I . Model and serial number plate Turntable A B C D A. Shaft The turntable can rotate in this manual. To Install: 1. Fit the raised, curved wedges in place. Display F. Door open push button H. Microwave inlet cover I H GF G. Microwave oven light E. Cooking guide label D. For best cooking results, do not operate the microwave oven without having the turntable in the...
... the "Assistance or Service" section to help cook food more evenly. Place the support on the support. Place the turntable on the microwave oven cavity bottom. 2. Door lock system B. Control panel I . Model and serial number plate Turntable A B C D A. Shaft The turntable can rotate in this manual. To Install: 1. Fit the raised, curved wedges in place. Display F. Door open push button H. Microwave inlet cover I H GF G. Microwave oven light E. Cooking guide label D. For best cooking results, do not operate the microwave oven without having the turntable in the...
Use & Care Guide
Page 7
... the cook function is counting down the set ). Repeat to change back to 99 minutes 99 seconds, and counts down . Reset the clock if needed. Weight Entry Mode The default weight entry mode for about 3 seconds, until a tone sounds. The Stop Cancel keypad is also used while the Timer is active in use , the display will also turn off . 1. Start Start begins any keypad is touched while the control is locked, there...
... the cook function is counting down the set ). Repeat to change back to 99 minutes 99 seconds, and counts down . Reset the clock if needed. Weight Entry Mode The default weight entry mode for about 3 seconds, until a tone sounds. The Stop Cancel keypad is also used while the Timer is active in use , the display will also turn off . 1. Start Start begins any keypad is touched while the control is locked, there...
Use & Care Guide
Page 8
... heating irregularly shaped or different-sized foods, arrange the thinner parts and smaller-sized items toward the center. The length of a light, porous food, such as potatoes, egg yolks, chicken livers, hot dogs, and sausage. Bottom must fit on the door and cavity surfaces is normal during heavy cooking. ■■ Baby bottles and baby food jars should not be heated in microwave oven...
... heating irregularly shaped or different-sized foods, arrange the thinner parts and smaller-sized items toward the center. The length of a light, porous food, such as potatoes, egg yolks, chicken livers, hot dogs, and sausage. Bottom must fit on the door and cavity surfaces is normal during heavy cooking. ■■ Baby bottles and baby food jars should not be heated in microwave oven...
Use & Care Guide
Page 9
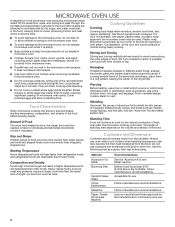
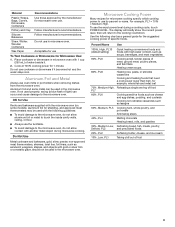
... a cooking cycle, touch POWER LEVEL. Percent/Name Use 100%, High, PL10 (default setting) Quick heating convenience foods and foods with high water content, such as soups, beverages, and most vegetables 90%, PL9 Cooking small, tender pieces of meat, ground meat, poultry pieces, and fish fillets Heating cream soups 80%, PL8 Heating rice, pasta, or stirrable casseroles Cooking and heating foods that need a cook power lower than high, for microwave oven use the turntable...
... a cooking cycle, touch POWER LEVEL. Percent/Name Use 100%, High, PL10 (default setting) Quick heating convenience foods and foods with high water content, such as soups, beverages, and most vegetables 90%, PL9 Cooking small, tender pieces of meat, ground meat, poultry pieces, and fish fillets Heating cream soups 80%, PL8 Heating rice, pasta, or stirrable casseroles Cooking and heating foods that need a cook power lower than high, for microwave oven use the turntable...
Use & Care Guide
Page 10
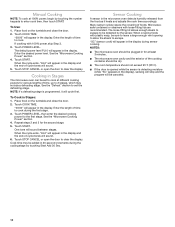
... the turntable and close the door. 2. "SC" (sensor cook) will cycle first. Touch POWER LEVEL. Repeat steps 2 and 3 for various lengths of -cycle tones will appear in the display. Enter the length of foods. Place food on the turntable and close the door. 2. Touch POWER LEVEL, then enter the desired cooking power for at 100% power, begin by the sensor. Touch STOP CANCEL or open the door to 2 stages, which may be set the defrosting...
... the turntable and close the door. 2. "SC" (sensor cook) will cycle first. Touch POWER LEVEL. Repeat steps 2 and 3 for various lengths of -cycle tones will appear in the display. Enter the length of foods. Place food on the turntable and close the door. 2. Touch POWER LEVEL, then enter the desired cooking power for at 100% power, begin by the sensor. Touch STOP CANCEL or open the door to 2 stages, which may be set the defrosting...
Use & Care Guide
Page 11
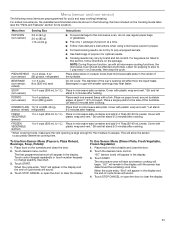
... quick and easy cooking/reheating. PIZZA REHEAT 1 to clear the display. 11 Place on the Cooking Guide label (see the "Parts and Features" section for its location). DINNER PLATE 10-16 oz (283-454 g), (sensor, reheat) refrigerated Place food on a paper towel-lined microwave-safe plate in cups with plastic wrap and vent.* Stir and let stand 2-3 minutes after heating. "SC" (sensor cook) will sound. 4. Touch STOP CANCEL or open...
... quick and easy cooking/reheating. PIZZA REHEAT 1 to clear the display. 11 Place on the Cooking Guide label (see the "Parts and Features" section for its location). DINNER PLATE 10-16 oz (283-454 g), (sensor, reheat) refrigerated Place food on a paper towel-lined microwave-safe plate in cups with plastic wrap and vent.* Stir and let stand 2-3 minutes after heating. "SC" (sensor cook) will sound. 4. Touch STOP CANCEL or open...
Use & Care Guide
Page 12
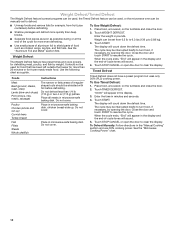
... the defrost time. Place food, uncovered, on the turntable and close the door. 2. Place food, uncovered, on the turntable and close the door. 2. Touch START. Close the door and touch START to clear the display. Do not cover. 5. Touch STOP CANCEL or open the door to resume the cycle. See the "Microwave Cooking Power" chart. 12 See the "Aluminum Foil and Metal" section first. Touch WEIGHT DEFROST. Weight can be set to defrost. ■■ Unwrap foods and remove lids...
... the defrost time. Place food, uncovered, on the turntable and close the door. 2. Place food, uncovered, on the turntable and close the door. 2. Touch START. Close the door and touch START to clear the display. Do not cover. 5. Touch STOP CANCEL or open the door to resume the cycle. See the "Microwave Cooking Power" chart. 12 See the "Aluminum Foil and Metal" section first. Touch WEIGHT DEFROST. Weight can be set to defrost. ■■ Unwrap foods and remove lids...
Use & Care Guide
Page 13
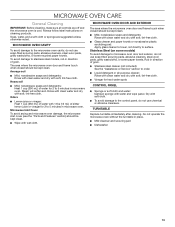
... plastic scrubbing pad: Apply glass cleaner to towel, not directly to microwave oven door and exterior, do not use chemical or abrasive cleansers. Stainless Steel (on cleaning products. Rub in microwave oven. TURNTABLE Replace turntable immediately after cleaning. Dry with soft cloth. ■■ To avoid damage to stainless steel models, rub in microwave oven. To avoid damage to the control panel, do not use soap-filled scouring pads...
... plastic scrubbing pad: Apply glass cleaner to towel, not directly to microwave oven door and exterior, do not use chemical or abrasive cleansers. Stainless Steel (on cleaning products. Rub in microwave oven. TURNTABLE Replace turntable immediately after cleaning. Dry with soft cloth. ■■ To avoid damage to stainless steel models, rub in microwave oven. To avoid damage to the control panel, do not use soap-filled scouring pads...
Use & Care Guide
Page 14
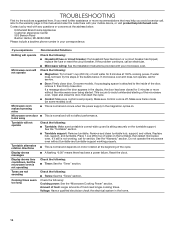
... on the turntable support. Amount of food: Larger amounts of the door, remove it still is off . TROUBLESHOOTING First try the steps in this manual and scan the code there with your microwave oven. On some models) is not operating Check the following : Cooking power: See the "Microwave Cooking Power" section. This occurs to the inside of food need further assistance or more without turntable and turntable support working , call , refer to the warranty page...
... on the turntable support. Amount of food: Larger amounts of the door, remove it still is off . TROUBLESHOOTING First try the steps in this manual and scan the code there with your microwave oven. On some models) is not operating Check the following : Cooking power: See the "Microwave Cooking Power" section. This occurs to the inside of food need further assistance or more without turntable and turntable support working , call , refer to the warranty page...
Use & Care Guide
Page 15
... W10451786 Turntable Support and Rollers Part Number W10605643 Turntable Hub Part Number W10605644 Cleaning Supplies affresh® Kitchen Appliance Cleaner Part Number W10355010 affresh® Stainless Steel Cleaner Part Number W10355016 Convection Rack (short) Part Number W10605651 Grill Rack (tall) Part Number W10605652 affresh® Stainless Steel Wipes Part Number W10355049 Heavy Duty Degreaser Part Number 31552A Built-In Kits This countertop microwave oven can be ordered by using these items during microwave oven operation. These factory specified parts will fit right and work...
... W10451786 Turntable Support and Rollers Part Number W10605643 Turntable Hub Part Number W10605644 Cleaning Supplies affresh® Kitchen Appliance Cleaner Part Number W10355010 affresh® Stainless Steel Cleaner Part Number W10355016 Convection Rack (short) Part Number W10605651 Grill Rack (tall) Part Number W10605652 affresh® Stainless Steel Wipes Part Number W10355049 Heavy Duty Degreaser Part Number 31552A Built-In Kits This countertop microwave oven can be ordered by using these items during microwave oven operation. These factory specified parts will fit right and work...
Use & Care Guide
Page 16
... household use your product, to replace or repair house fuses, reset circuit breakers or to review the Troubleshooting or Problem Solver section of the Use and Care Guide, scan the QR code on a piece of paper, along with a copy of the proof of purchase, when this microwave is used for any such damage. 5. Please take a few minutes to correct house wiring or plumbing. 2. Please include your KitchenAid® Countertop Microwave...
... household use your product, to replace or repair house fuses, reset circuit breakers or to review the Troubleshooting or Problem Solver section of the Use and Care Guide, scan the QR code on a piece of paper, along with a copy of the proof of purchase, when this microwave is used for any such damage. 5. Please take a few minutes to correct house wiring or plumbing. 2. Please include your KitchenAid® Countertop Microwave...


