
Use & Care Guide
Page 3
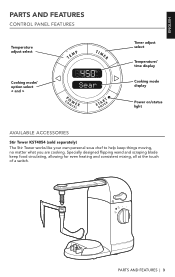
ENGLISH PARTS AND FEATURES CONTROL PANEL FEATURES Temperature adjust select Cooking mode/ option select < and > FC h Sear Timer adjust select Temperature/ time display Cooking mode display Power on/status light AVAILABLE ACCESSORIES Stir Tower KST4054 (sold separately) The Stir Tower works like your own personal sous chef to help keep food circulating, allowing for even heating and consistent mixing, all at the touch of a switch. Specially designed flipping wand and scraping blade keep things moving, no matter what you are cooking. PARTS AND FEATURES | 3
ENGLISH PARTS AND FEATURES CONTROL PANEL FEATURES Temperature adjust select Cooking mode/ option select < and > FC h Sear Timer adjust select Temperature/ time display Cooking mode display Power on/status light AVAILABLE ACCESSORIES Stir Tower KST4054 (sold separately) The Stir Tower works like your own personal sous chef to help keep food circulating, allowing for even heating and consistent mixing, all at the touch of a switch. Specially designed flipping wand and scraping blade keep things moving, no matter what you are cooking. PARTS AND FEATURES | 3
Use & Care Guide
Page 4
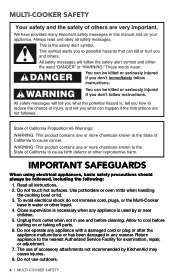
... other liquid. 4. Do not operate any appliance with a damaged cord or plug or after the appliance malfunctions or has been damaged in any appliance is necessary when any manner. Use potholders or oven mitts when handling the cooking bowl or lid. 3. Allow to the nearest Authorized Service Facility for examination, repair, or adjustment. 7. Close supervision is used by KitchenAid may cause injuries. 8. Return...
... other liquid. 4. Do not operate any appliance with a damaged cord or plug or after the appliance malfunctions or has been damaged in any appliance is necessary when any manner. Use potholders or oven mitts when handling the cooking bowl or lid. 3. Allow to the nearest Authorized Service Facility for examination, repair, or adjustment. 7. Close supervision is used by KitchenAid may cause injuries. 8. Return...

Use & Care Guide
Page 5
... outlet only one way. Do not fill cooking pot above the Max Fill line. 16. ELECTRICAL REQUIREMENTS Voltage: 120 VAC Frequency: 60 Hz Wattage: 700 Watts NOTE: This Multi-Cooker has a 3 prong grounded plug. Do not use only. Cook only in a heated oven. 11. If control panel is designed for household use an extension cord. Never drape cord over edge of table or counter, or...
... outlet only one way. Do not fill cooking pot above the Max Fill line. 16. ELECTRICAL REQUIREMENTS Voltage: 120 VAC Frequency: 60 Hz Wattage: 700 Watts NOTE: This Multi-Cooker has a 3 prong grounded plug. Do not use only. Cook only in a heated oven. 11. If control panel is designed for household use an extension cord. Never drape cord over edge of table or counter, or...
Use & Care Guide
Page 6
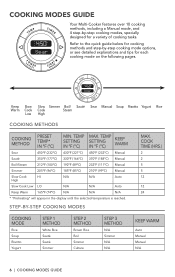
... N/A N/A KEEP WARM Auto Manual Manual N/A 6 | COOKING MODES GUIDE FC h Sear Keep Slow Slow Simmer Boil/ Sauté Sear Manual Soup Risotto Yogurt Rice Warm Cook Cook Steam Low High COOKING METHODS COOKING METHOD PRESET TEMP* IN °F (°C) MIN. Refer to the quick guide below for cooking methods and step-by -step cooking modes, specially designed for each cooking mode on the following pages. COOKING MODES GUIDE FC h Sear Your Multi-Cooker features over 10 cooking...
... N/A N/A KEEP WARM Auto Manual Manual N/A 6 | COOKING MODES GUIDE FC h Sear Keep Slow Slow Simmer Boil/ Sauté Sear Manual Soup Risotto Yogurt Rice Warm Cook Cook Steam Low High COOKING METHODS COOKING METHOD PRESET TEMP* IN °F (°C) MIN. Refer to the quick guide below for cooking methods and step-by -step cooking modes, specially designed for each cooking mode on the following pages. COOKING MODES GUIDE FC h Sear Your Multi-Cooker features over 10 cooking...
Use & Care Guide
Page 7
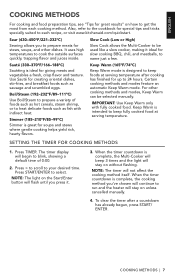
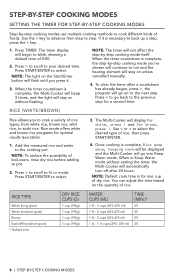
... to heat delicate foods such as sausage and scrambled eggs. It uses high temperatures to select. Keep Warm is complete, the Multi-Cooker will beep 3 times and the light will stay on without flashing. SETTING THE TIMER FOR COOKING METHODS 1. The timer display will not affect the cooking method itself. Press START/ENTER to cook the outside surfaces quickly, trapping flavor and juices inside. Slow Cook (Low or High) Slow Cook allows...
... to heat delicate foods such as sausage and scrambled eggs. It uses high temperatures to select. Keep Warm is complete, the Multi-Cooker will beep 3 times and the light will stay on without flashing. SETTING THE TIMER FOR COOKING METHODS 1. The timer display will not affect the cooking method itself. Press START/ENTER to cook the outside surfaces quickly, trapping flavor and juices inside. Slow Cook (Low or High) Slow Cook allows...
Use & Care Guide
Page 8
...cook different kinds of foods. Press TIMER. When the timer countdown is complete, the Multi-Cooker will beep 3 times, and the light will stay on without setting the timer, the Multi-Cooker will automatically turn off after a countdown has already begun, press >, the program will not affect the step-by -step cooking modes use multiple cooking...and brown rice programs for a second time. NOTE: Default cook time is complete, Rice mode done, keeping warm will be displayed and the Multi-Cooker will stay on to pot. 2. You can adjust the time based on the Start/Enter button will flash until...
...cook different kinds of foods. Press TIMER. When the timer countdown is complete, the Multi-Cooker will beep 3 times, and the light will stay on without setting the timer, the Multi-Cooker will automatically turn off after a countdown has already begun, press >, the program will not affect the step-by -step cooking modes use multiple cooking...and brown rice programs for a second time. NOTE: Default cook time is complete, Rice mode done, keeping warm will be displayed and the Multi-Cooker will stay on to pot. 2. You can adjust the time based on the Start/Enter button will flash until...
Use & Care Guide
Page 9
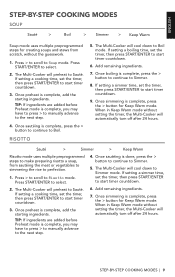
... Multi-Cooker will cool down to the next step. 4. If setting a cooking time, set the timer, then press START/ENTER to Simmer. 8. Once boiling is complete, press the > button to continue to start timer countdown. 3. RISOTTO Sauté > Simmer > Keep Warm Risotto mode uses multiple preprogrammed steps to Sauté. If setting a cooking time, set the timer, then press START/ENTER to select. 2. If setting a simmer time, set the timer...
... Multi-Cooker will cool down to the next step. 4. If setting a cooking time, set the timer, then press START/ENTER to Simmer. 8. Once boiling is complete, press the > button to continue to start timer countdown. 3. RISOTTO Sauté > Simmer > Keep Warm Risotto mode uses multiple preprogrammed steps to Sauté. If setting a cooking time, set the timer, then press START/ENTER to select. 2. If setting a simmer time, set the timer...

Use & Care Guide
Page 10
..., press the > button to continue to select. 3. Press > to scroll to 12 minutes of milk. STEP-BY-STEP COOKING MODES YOGURT Simmer > Culture WARNING Food Poisoning Hazard Do not cook any foods, other than other cooking modes and is designed for 4 cups (0.95L) of heating time before moving on to start timer countdown. The Multi-Cooker will preheat...
..., press the > button to continue to select. 3. Press > to scroll to 12 minutes of milk. STEP-BY-STEP COOKING MODES YOGURT Simmer > Culture WARNING Food Poisoning Hazard Do not cook any foods, other than other cooking modes and is designed for 4 cups (0.95L) of heating time before moving on to start timer countdown. The Multi-Cooker will preheat...

Use & Care Guide
Page 11
.... Medium will appear in 5°F (3°C) increments, or press and hold < or > to jump between Manual cooking modes. To select and adjust a Manual mode: 1. MANUAL COOKING | 11 Press START/ENTER to Manual mode. Tap < or > to adjust the temperature in the display until the selected temperature is adjustable based on a regular stove top: Warm, Low, Med-Lo, Medium, Med-Hi, and High.
.... Medium will appear in 5°F (3°C) increments, or press and hold < or > to jump between Manual cooking modes. To select and adjust a Manual mode: 1. MANUAL COOKING | 11 Press START/ENTER to Manual mode. Tap < or > to adjust the temperature in the display until the selected temperature is adjustable based on a regular stove top: Warm, Low, Med-Lo, Medium, Med-Hi, and High.

Use & Care Guide
Page 12
... Selection. 2. Press < or > to switch between degrees Fahrenheit and degrees Celsius, press and hold the TEMP button for 3 seconds. Scroll to select and save setting. 12 | ADDITIONAL FEATURES ADDITIONAL FEATURES LAST SELECTIONS USED FC h Set Tim If the Multi-Cooker remains plugged in, it will remember the last cooking method or mode and temperature settings used the next time it is turned on...
... Selection. 2. Press < or > to switch between degrees Fahrenheit and degrees Celsius, press and hold the TEMP button for 3 seconds. Scroll to select and save setting. 12 | ADDITIONAL FEATURES ADDITIONAL FEATURES LAST SELECTIONS USED FC h Set Tim If the Multi-Cooker remains plugged in, it will remember the last cooking method or mode and temperature settings used the next time it is turned on...
Use & Care Guide
Page 13
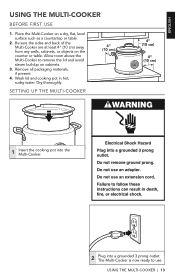
... sides and back of the Multi-Cooker are at least 4" (10 cm) away from any walls, cabinets, or objects on a dry, flat, level surface such as a countertop or table. 2. ENGLISH USING THE MULTI-COOKER BEFORE FIRST USE 1. SETTING UP THE MULTI-COOKER 4" (104c"m) 4(1"04"cm) 4" (140 "cm) F Sear 1 Insert the cooking pot into the Multi-Cooker. 2 Plug into a grounded 3 prong outlet...
... sides and back of the Multi-Cooker are at least 4" (10 cm) away from any walls, cabinets, or objects on a dry, flat, level surface such as a countertop or table. 2. ENGLISH USING THE MULTI-COOKER BEFORE FIRST USE 1. SETTING UP THE MULTI-COOKER 4" (104c"m) 4(1"04"cm) 4" (140 "cm) F Sear 1 Insert the cooking pot into the Multi-Cooker. 2 Plug into a grounded 3 prong outlet...

Use & Care Guide
Page 14
... the timer countdown. 6 Place ingredients in the cooking pot. 14 | USING THE MULTI-COOKER FC h Sauté Use the < or > to scroll to decrease or increase the temperature. FC h Sauté To adjust the temperature, if desired, press the TEMP button, then press 4 < or > to the 2 desired cooking method or mode. USING THE MULTI-COOKER OPERATING THE MULTI-COOKER FC h Set Tim FC h Sear 1 Press POWER/CANCEL...
... the timer countdown. 6 Place ingredients in the cooking pot. 14 | USING THE MULTI-COOKER FC h Sauté Use the < or > to scroll to decrease or increase the temperature. FC h Sauté To adjust the temperature, if desired, press the TEMP button, then press 4 < or > to the 2 desired cooking method or mode. USING THE MULTI-COOKER OPERATING THE MULTI-COOKER FC h Set Tim FC h Sear 1 Press POWER/CANCEL...
Use & Care Guide
Page 15
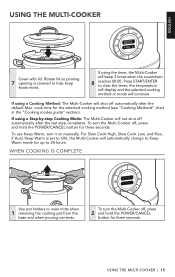
... to Keep Warm mode for three seconds. cook time for three seconds. To use Keep Warm, turn the Multi-Cooker off automatically after the default Max. For Slow Cook High, Slow Cook Low, and Rice, if Auto Keep Warm is covered to ON, the Multi-Cooker will not shut off , press 2 and hold the POWER/CANCEL button for up to 24 hours. Rotate lid so pouring 7 opening is set to help keep foods...
... to Keep Warm mode for three seconds. cook time for three seconds. To use Keep Warm, turn the Multi-Cooker off automatically after the default Max. For Slow Cook High, Slow Cook Low, and Rice, if Auto Keep Warm is covered to ON, the Multi-Cooker will not shut off , press 2 and hold the POWER/CANCEL button for up to 24 hours. Rotate lid so pouring 7 opening is set to help keep foods...
Use & Care Guide
Page 16
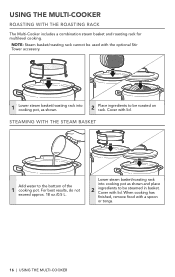
... be steamed in basket. Cover with lid. Cover with lid. USING THE MULTI-COOKER ROASTING WITH THE ROASTING RACK The Multi-Cooker includes a combination steam basket and roasting rack for multilevel cooking. For best results, do not exceed approx. 18 oz./0.5 L. When cooking has finished, remove food with the optional Stir Tower accessory. 1 Lower steam basket/roasting rack into cooking pot as shown. STEAMING WITH...
... be steamed in basket. Cover with lid. Cover with lid. USING THE MULTI-COOKER ROASTING WITH THE ROASTING RACK The Multi-Cooker includes a combination steam basket and roasting rack for multilevel cooking. For best results, do not exceed approx. 18 oz./0.5 L. When cooking has finished, remove food with the optional Stir Tower accessory. 1 Lower steam basket/roasting rack into cooking pot as shown. STEAMING WITH...
Use & Care Guide
Page 17
... the lid slowly during cooking. • Make sure the lid covers the cooking pot spout to trap steam for optimal rice cooking performance. • Most types of rice will allow the unit to preheat when steaming foods; Liquids other seasonings can be slightly undercooked at a time for the best results and to avoid steaming the meat. • If using this part...
... the lid slowly during cooking. • Make sure the lid covers the cooking pot spout to trap steam for optimal rice cooking performance. • Most types of rice will allow the unit to preheat when steaming foods; Liquids other seasonings can be slightly undercooked at a time for the best results and to avoid steaming the meat. • If using this part...
Use & Care Guide
Page 18
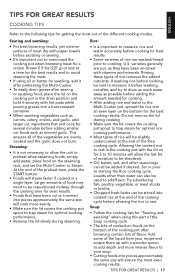
... cooked during the last few minutes of cooking. • To prevent overcooking and keep the texture of the risotto creamy, remove the cooking pot from whole, reduced fat, or fat-free milk. Manual: • When heating a large amount of water for using your risotto recipe...temperature setting (450°F/232°C). TIPS FOR GREAT RESULTS • It is not necessary to thaw frozen vegetables prior to adding to a soup for extended cooking. Pasta, seafood, milk, cream, or sour cream should be added 2 hours before starting with the Soup cycle to be made from the multi-cooker base...
... cooked during the last few minutes of cooking. • To prevent overcooking and keep the texture of the risotto creamy, remove the cooking pot from whole, reduced fat, or fat-free milk. Manual: • When heating a large amount of water for using your risotto recipe...temperature setting (450°F/232°C). TIPS FOR GREAT RESULTS • It is not necessary to thaw frozen vegetables prior to adding to a soup for extended cooking. Pasta, seafood, milk, cream, or sour cream should be added 2 hours before starting with the Soup cycle to be made from the multi-cooker base...
Use & Care Guide
Page 19
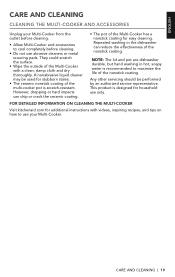
... coating. A nonabrasive liquid cleaner may be performed by an authorized service representative. This product is designed for stubborn stains. • The ceramic nonstick coating of the multi-cooker pot is recommended to maximize the life of the Multi-Cooker with videos, inspiring recipes, and tips on how to use your Multi-Cooker from the outlet before cleaning. • Allow Multi...
... coating. A nonabrasive liquid cleaner may be performed by an authorized service representative. This product is designed for stubborn stains. • The ceramic nonstick coating of the multi-cooker pot is recommended to maximize the life of the Multi-Cooker with videos, inspiring recipes, and tips on how to use your Multi-Cooker from the outlet before cleaning. • Allow Multi...
Use & Care Guide
Page 20
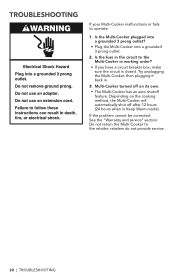
If the problem cannot be corrected: See the "Warranty and service" section. Do not return the Multi-Cooker to the Multi-Cooker in the circuit to the retailer; retailers do not provide service. 20 | TROUBLESHOOTING Depending on its own. • The Multi-Cooker has an auto shutoff feature. Try unplugging the Multi-Cooker, then plugging it back in Keep Warm mode). Is the...
If the problem cannot be corrected: See the "Warranty and service" section. Do not return the Multi-Cooker to the Multi-Cooker in the circuit to the retailer; retailers do not provide service. 20 | TROUBLESHOOTING Depending on its own. • The Multi-Cooker has an auto shutoff feature. Try unplugging the Multi-Cooker, then plugging it back in Keep Warm mode). Is the...
Use & Care Guide
Page 21
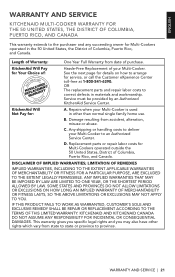
... PERIOD ALLOWED BY LAW. IF THIS PRODUCT FAILS TO WORK AS WARRANTED, CUSTOMER'S SOLE AND EXCLUSIVE REMEDY SHALL BE REPAIR OR REPLACEMENT ACCORDING TO THE TERMS OF THIS LIMITED WARRANTY. WARRANTY AND SERVICE | 21 Damage resulting from date of your Multi-Cooker to the purchaser and any succeeding owner for Multi-Cookers operated in other rights which vary from state...
... PERIOD ALLOWED BY LAW. IF THIS PRODUCT FAILS TO WORK AS WARRANTED, CUSTOMER'S SOLE AND EXCLUSIVE REMEDY SHALL BE REPAIR OR REPLACEMENT ACCORDING TO THE TERMS OF THIS LIMITED WARRANTY. WARRANTY AND SERVICE | 21 Damage resulting from date of your Multi-Cooker to the purchaser and any succeeding owner for Multi-Cookers operated in other rights which vary from state...
Use & Care Guide
Page 22
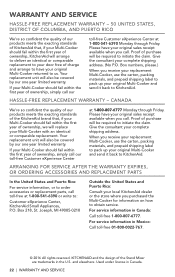
... be covered by our one year limited warranty. WARRANTY AND SERVICE HASSLE-FREE REPLACEMENT WARRANTY - 50 UNITED STATES, DISTRICT OF COLUMBIA, AND PUERTO RICO We're so confident the quality of our products meets the exacting standards of KitchenAid that , if your Multi-Cooker should fail within the first year of ownership, KitchenAid will arrange to deliver an identical or comparable replacement to...
... be covered by our one year limited warranty. WARRANTY AND SERVICE HASSLE-FREE REPLACEMENT WARRANTY - 50 UNITED STATES, DISTRICT OF COLUMBIA, AND PUERTO RICO We're so confident the quality of our products meets the exacting standards of KitchenAid that , if your Multi-Cooker should fail within the first year of ownership, KitchenAid will arrange to deliver an identical or comparable replacement to...


