
Installation Instructions
Page 2
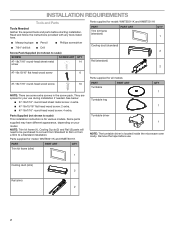
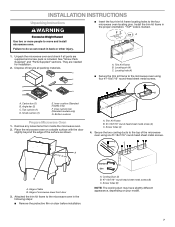
...-head sheet metal screw: 4 extra. ■ #7-16x15/16" flat head wood screw: 2 extra. ■ #7-16x7/16" round-head wood screw: 4 extra. Parts Supplied (not shown to scale) This installation instruction is for all models PART Turntable PART ART Turntable ring Turntable driver QTY 1 1 1 NOTE: The turntable driver is located inside the microwave oven cavity. Parts supplied for model: WMT50011K and KMBT5011K PART PART ART QTY Trim kit frame (slim) Parts supplied for various models. INSTALLATION REQUIREMENTS Tools and Parts Tools Needed...
...-head sheet metal screw: 4 extra. ■ #7-16x15/16" flat head wood screw: 2 extra. ■ #7-16x7/16" round-head wood screw: 4 extra. Parts Supplied (not shown to scale) This installation instruction is for all models PART Turntable PART ART Turntable ring Turntable driver QTY 1 1 1 NOTE: The turntable driver is located inside the microwave oven cavity. Parts supplied for model: WMT50011K and KMBT5011K PART PART ART QTY Trim kit frame (slim) Parts supplied for various models. INSTALLATION REQUIREMENTS Tools and Parts Tools Needed...
Installation Instructions
Page 3
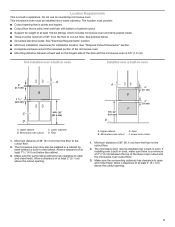
... solid, level and flush with bottom of cabinet cutout. ■ Support for installation location. Lower cabinets B. Microwave oven cutout D. See pictorial below the cabinet. 3. The microwave oven may be installed into a wood cabinetry. Microwave oven cutout F. Minimum distance of 36" (91.4 cm) from the floor to the cutout floor. 2. Do not use as countertop microwave oven. A B F min. 36" (91.4 cm) D 2" (5.1 cm) 3" (7.6 cm) A. Make sure the surrounding cabinetry has clearance to open and close...
... solid, level and flush with bottom of cabinet cutout. ■ Support for installation location. Lower cabinets B. Microwave oven cutout D. See pictorial below the cabinet. 3. The microwave oven may be installed into a wood cabinetry. Microwave oven cutout F. Minimum distance of 36" (91.4 cm) from the floor to the cutout floor. 2. Do not use as countertop microwave oven. A B F min. 36" (91.4 cm) D 2" (5.1 cm) 3" (7.6 cm) A. Make sure the surrounding cabinetry has clearance to open and close...
Installation Instructions
Page 5
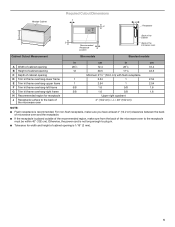
... of cabinet opening D Trim kit frame overhang-lower frame E Trim kit frame overhang-upper frame F Trim kit frame overhang-left frame G Trim kit frame overhang-right frame H Recommended region for receptacle J Receptacle surface to the receptacle must be within 40" (102 cm). Required Cutout Dimensions Wooden Cabinet B C A F E H D Recommended Receptacle G Location J Receptacle e Back of the Cabinet Back of the microwave oven Cabinet Cutout Measurement Slim models Standard models A Width of cabinet opening B Height of cabinet opening...
... of cabinet opening D Trim kit frame overhang-lower frame E Trim kit frame overhang-upper frame F Trim kit frame overhang-left frame G Trim kit frame overhang-right frame H Recommended region for receptacle J Receptacle surface to the receptacle must be within 40" (102 cm). Required Cutout Dimensions Wooden Cabinet B C A F E H D Recommended Receptacle G Location J Receptacle e Back of the Cabinet Back of the microwave oven Cabinet Cutout Measurement Slim models Standard models A Width of cabinet opening B Height of cabinet opening...
Installation Instructions
Page 6
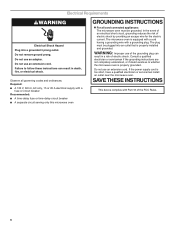
... an electrical short circuit, grounding reduces the risk of electric shock. SAVE THESE INSTRUCTIONS This device complies with a fuse or circuit breaker Recommended: ■ A time-delay fuse or time-delay circuit breaker ■ A separate circuit serving only this microwave oven GROUNDING INSTRUCTIONS For all governing codes and ordinances. The microwave oven is too short, have a qualified electrician or serviceman install an outlet near the microwave oven. WARNING: Improper use an extension cord...
... an electrical short circuit, grounding reduces the risk of electric shock. SAVE THESE INSTRUCTIONS This device complies with a fuse or circuit breaker Recommended: ■ A time-delay fuse or time-delay circuit breaker ■ A separate circuit serving only this microwave oven GROUNDING INSTRUCTIONS For all governing codes and ordinances. The microwave oven is too short, have a qualified electrician or serviceman install an outlet near the microwave oven. WARNING: Improper use an extension cord...
Installation Instructions
Page 7
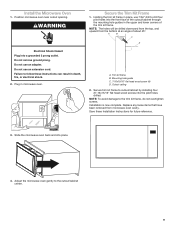
... models only) G. BC A 1. Top cushion (1) D. Trim Kit Frame B. #7-18x7/16" round head sheet metal screw (4) C. Edge of microwave-lower front door 3. Carton box (1) B. Screw holes (4) 4. Dispose of the microwave oven using four #7-18x7/16" round-head sheet metal screws. Secure the two cooling ducts to the four microwave oven locating pins. INSTALLATION INSTRUCTIONS Unpacking Instructions WARNING Excessive Weight Hazard Use two or more people to the microwave oven using six #7-18x7/16" round-head sheet metal screws. Locating...
... models only) G. BC A 1. Top cushion (1) D. Trim Kit Frame B. #7-18x7/16" round head sheet metal screw (4) C. Edge of microwave-lower front door 3. Carton box (1) B. Screw holes (4) 4. Dispose of the microwave oven using four #7-18x7/16" round-head sheet metal screws. Secure the two cooling ducts to the four microwave oven locating pins. INSTALLATION INSTRUCTIONS Unpacking Instructions WARNING Excessive Weight Hazard Use two or more people to the microwave oven using six #7-18x7/16" round-head sheet metal screws. Locating...
Installation Instructions
Page 9
... the mounting hole guides in microwave oven. WARNING Secure the Trim Kit Frame 1. Do not use an extension cord. Cutout ceiling 2. Electrical Shock Hazard Plug into place. 4. Slide the microwave oven back and into a grounded 3 prong outlet. Adjust the microwave oven gently to the cutout/cabinet center. 9 Position microwave oven near cutout opening. Plug in the upper and lower corners of about 45°. Replace any loose items that have been removed...
... the mounting hole guides in microwave oven. WARNING Secure the Trim Kit Frame 1. Do not use an extension cord. Cutout ceiling 2. Electrical Shock Hazard Plug into place. 4. Slide the microwave oven back and into a grounded 3 prong outlet. Adjust the microwave oven gently to the cutout/cabinet center. 9 Position microwave oven near cutout opening. Plug in the upper and lower corners of about 45°. Replace any loose items that have been removed...
Owners Manual
Page 1
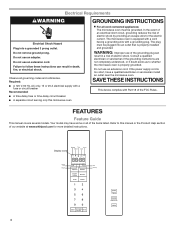
... Requirements 4 FEATURES 4 Standby Mode 7 Demo Mode 7 Control Lock 7 MICROWAVE OVEN USE 7 Food Characteristics 7 Cooking Guidelines 7 Cookware and Dinnerware 8 Aluminum Foil and Metal 8 Microwave Cooking Power 8 Popcorn 9 Reheat 9 Frozen Entrée 9 Defrost 9 Cook 10 MICROWAVE OVEN CARE 11 General Cleaning 11 Replacing The Cavity Light 12 TROUBLESHOOTING 14 ACCESSORIES 14 W11412755B Register your product model and serial numbers. Model Number Serial Number Table of the microwave oven door. BUILT-IN MICROWAVE WITH TRIM KIT OWNER'S MANUAL THANK YOU for...
... Requirements 4 FEATURES 4 Standby Mode 7 Demo Mode 7 Control Lock 7 MICROWAVE OVEN USE 7 Food Characteristics 7 Cooking Guidelines 7 Cookware and Dinnerware 8 Aluminum Foil and Metal 8 Microwave Cooking Power 8 Popcorn 9 Reheat 9 Frozen Entrée 9 Defrost 9 Cook 10 MICROWAVE OVEN CARE 11 General Cleaning 11 Replacing The Cavity Light 12 TROUBLESHOOTING 14 ACCESSORIES 14 W11412755B Register your product model and serial numbers. Model Number Serial Number Table of the microwave oven door. BUILT-IN MICROWAVE WITH TRIM KIT OWNER'S MANUAL THANK YOU for...

Owners Manual
Page 2
... be heated in the microwave oven. See "GROUNDING INSTRUCTIONS" found in accordance with the provided Installation Instructions. SAVE THESE INSTRUCTIONS 2 MICROWAVE OVEN SAFETY IMPORTANT SAFETY INSTRUCTIONS When using the microwave oven. for example, closed glass jars are able to excessive microwave energy: I Install or locate the microwave oven only in this section and in the shell and sealed containers - Connect only to properly grounded outlet. I Read and follow the specific...
... be heated in the microwave oven. See "GROUNDING INSTRUCTIONS" found in accordance with the provided Installation Instructions. SAVE THESE INSTRUCTIONS 2 MICROWAVE OVEN SAFETY IMPORTANT SAFETY INSTRUCTIONS When using the microwave oven. for example, closed glass jars are able to excessive microwave energy: I Install or locate the microwave oven only in this section and in the shell and sealed containers - Connect only to properly grounded outlet. I Read and follow the specific...
Owners Manual
Page 3
... oven ignite, keep oven door closed, turn oven off, and disconnect the power cord, or shut off power at the fuse or circuit breaker panel. - I The microwave oven should not be serviced only by anyone except properly qualified service personnel. 3 I Do not mount over edge of injury to heat, cook, or dry food. I Do not store this oven with any openings on sealing surfaces. (c) Do not operate the oven if it is not working...
... oven ignite, keep oven door closed, turn oven off, and disconnect the power cord, or shut off power at the fuse or circuit breaker panel. - I The microwave oven should not be serviced only by anyone except properly qualified service personnel. 3 I Do not mount over edge of injury to heat, cook, or dry food. I Do not store this oven with any openings on sealing surfaces. (c) Do not operate the oven if it is not working...
Owners Manual
Page 4
... Feature Guide This manual covers several models. Your model may have a qualified electrician or serviceman install an outlet near the microwave oven. Refer to follow these instructions can result in death, fire, or electrical shock. Display icons Cook Timer Power Defrost Clock PW Control Lock Weight Start Quantity 4 If the power supply cord is properly grounded. Failure to this microwave oven GROUNDING INSTRUCTIONS I For all of the items listed. In the event of an electrical short circuit, grounding...
... Feature Guide This manual covers several models. Your model may have a qualified electrician or serviceman install an outlet near the microwave oven. Refer to follow these instructions can result in death, fire, or electrical shock. Display icons Cook Timer Power Defrost Clock PW Control Lock Weight Start Quantity 4 If the power supply cord is properly grounded. Failure to this microwave oven GROUNDING INSTRUCTIONS I For all of the items listed. In the event of an electrical short circuit, grounding...
Owners Manual
Page 5
... the number button to enter time up to set the clock, follow the instructions below : 1. To run an auto cooking mode: Press POPCORN/REHEAT/FROZEN ENTREE/DEFROST button. To run manual cooking mode: Press POWER button to set the power level, and press POWER button again to another 10 minutes. If cooking is interrupted by cooking for 30 seconds using the most recent power setting. 2. The microwave oven will also turn off . Close the door and touch the START button to reset the timer. Activate Control Lock to a stop...
... the number button to enter time up to set the clock, follow the instructions below : 1. To run an auto cooking mode: Press POPCORN/REHEAT/FROZEN ENTREE/DEFROST button. To run manual cooking mode: Press POWER button to set the power level, and press POWER button again to another 10 minutes. If cooking is interrupted by cooking for 30 seconds using the most recent power setting. 2. The microwave oven will also turn off . Close the door and touch the START button to reset the timer. Activate Control Lock to a stop...
Owners Manual
Page 6
... the weight. For example, to set the time to 2:30 in this guide for the food category or reference the sticker on the door of the microwave. 3. When the stop time is reached, the microwave oven will shut off automatically, and the end tone will flash on the display. 2. will sound. Press START button. "Start?" This may make the defrosting time seem longer than expected. Auto Cook To use the popcorn preset...
... the weight. For example, to set the time to 2:30 in this guide for the food category or reference the sticker on the door of the microwave. 3. When the stop time is reached, the microwave oven will shut off automatically, and the end tone will flash on the display. 2. will sound. Press START button. "Start?" This may make the defrosting time seem longer than expected. Auto Cook To use the popcorn preset...

Owners Manual
Page 7
..., walls, and ceiling and pass through the turntable and appropriate cookware to the food. If possible, turn food over from bottom to unlock. Food Characteristics When the microwave oven is normal during heavy cooking. Touch any key or open/close the door, and the display will switch to Standby Power mode and slightly dim the display brightness after the microwave cooking cycle ends. A tone will sound and the LOCK icon will heat...
..., walls, and ceiling and pass through the turntable and appropriate cookware to the food. If possible, turn food over from bottom to unlock. Food Characteristics When the microwave oven is normal during heavy cooking. Touch any key or open/close the door, and the display will switch to Standby Power mode and slightly dim the display brightness after the microwave cooking cycle ends. A tone will sound and the LOCK icon will heat...
Owners Manual
Page 8
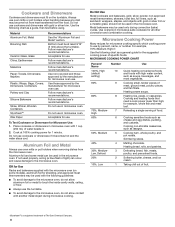
..., such as a guide, then test before using. Cooking non-stirrable casseroles, such as a general guide for the suggested cooking power of specific foods. Follow manufacturer's recommendations. Follow manufacturer's recommendations. Use non-recycled and those approved by the manufacturer for all other convection and combination cooking. Follow manufacturer's recommendations. Cook at least 3/16" (5 mm) above the turntable. Metal bakeware may be used in the microwave oven. Use the following guidelines...
..., such as a guide, then test before using. Cooking non-stirrable casseroles, such as a general guide for the suggested cooking power of specific foods. Follow manufacturer's recommendations. Follow manufacturer's recommendations. Use non-recycled and those approved by the manufacturer for all other convection and combination cooking. Follow manufacturer's recommendations. Cook at least 3/16" (5 mm) above the turntable. Metal bakeware may be used in the microwave oven. Use the following guidelines...

Owners Manual
Page 9
... for defrosting a number of food types. Remove giblets from package. Do not defrost less than 20 minutes or frozen ready-made food should be defrosted using a microwave popcorn popper. ■ Listen for popping to slow to 2 kg) 4 Quick Defrost 1.0 lb only * See the Defrost Preparation Chart at the end of the cycle for more even defrosting. ■ Foods left outside the freezer for cuts, sizes, and instructions. Loosen cover on plate...
... for defrosting a number of food types. Remove giblets from package. Do not defrost less than 20 minutes or frozen ready-made food should be defrosted using a microwave popcorn popper. ■ Listen for popping to slow to 2 kg) 4 Quick Defrost 1.0 lb only * See the Defrost Preparation Chart at the end of the cycle for more even defrosting. ■ Foods left outside the freezer for cuts, sizes, and instructions. Loosen cover on plate...
Owners Manual
Page 11
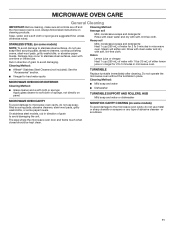
..., cooktop polishing creme, steel-wool pads, gritty washcloths, or abrasive paper towels. TURNTABLE Replace turntable immediately after cleaning. The area where the microwave oven door and frame touch when closed should be kept clean. 11 Heavy soil STAINLESS STEEL (on panel. On stainless steel models, rub in microwave oven. Always follow label instructions on some paper towels. Steam will soften soil. Do not operate the microwave oven without...
..., cooktop polishing creme, steel-wool pads, gritty washcloths, or abrasive paper towels. TURNTABLE Replace turntable immediately after cleaning. The area where the microwave oven door and frame touch when closed should be kept clean. 11 Heavy soil STAINLESS STEEL (on panel. On stainless steel models, rub in microwave oven. Always follow label instructions on some paper towels. Steam will soften soil. Do not operate the microwave oven without...
Owners Manual
Page 12
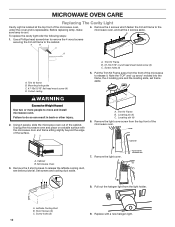
... halogen light. Set screws and cooling duct aside. 7. Trim kit frame B. Screw holes (4) 5. Leftside Cooling Duct B. Short Screws (3) C. Before replacing lamp, make sure lamp is replaceable. Note the 'TOP' and 'up arrow' molded into the frame, the 4 locating pins and the locating slots, set the 4 screws aside. Screw Light cover A. Cutout ceiling WARNING Excessive Weight Hazard Use two or more people to do so can result in back or other injury. 2. Cabinet B. Remove the light cover. A B 1. B A C A. Microwave Oven 3. A. Using 2 people...
... halogen light. Set screws and cooling duct aside. 7. Trim kit frame B. Screw holes (4) 5. Leftside Cooling Duct B. Short Screws (3) C. Before replacing lamp, make sure lamp is replaceable. Note the 'TOP' and 'up arrow' molded into the frame, the 4 locating pins and the locating slots, set the 4 screws aside. Screw Light cover A. Cutout ceiling WARNING Excessive Weight Hazard Use two or more people to do so can result in back or other injury. 2. Cabinet B. Remove the light cover. A B 1. B A C A. Microwave Oven 3. A. Using 2 people...
Owners Manual
Page 13
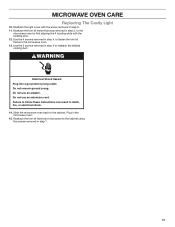
.... MICROWAVE OVEN CARE Replacing The Cavity Light 10. Reattach the trim kit frame and microwave to reattach the leftside cooling duct. Use the 3 screws removed in step 3 to the cabinet using the screws removed in death, fire, or electrical shock. 14. Do not use an adapter. Failure to the microwave oven by first aligning the 4 locating slots with the screw removed in the microwave oven. 15. Do not use an extension cord. Reattach the light cover with the locating pins...
.... MICROWAVE OVEN CARE Replacing The Cavity Light 10. Reattach the trim kit frame and microwave to reattach the leftside cooling duct. Use the 3 screws removed in step 3 to the cabinet using the screws removed in death, fire, or electrical shock. 14. Do not use an adapter. Failure to the microwave oven by first aligning the 4 locating slots with the screw removed in the microwave oven. 15. Do not use an extension cord. Reattach the light cover with the locating pins...
Owners Manual
Page 14
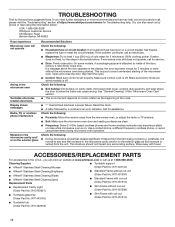
... firmly close door. If you need further assistance or more without cut -out (Order Part No: W11451314) ■ Turntable hub (Order Part No: W11452278) 14 If microwave oven still does not operate, call , please visit the "Troubleshooting" section at 1-866-698-2538. On some models) is off . Make sure Control Lock is off . Make sure Demo mode (on cavity walls, microwave inlet cover, cooking rack supports, and area where the door touches the...
... firmly close door. If you need further assistance or more without cut -out (Order Part No: W11451314) ■ Turntable hub (Order Part No: W11452278) 14 If microwave oven still does not operate, call , please visit the "Troubleshooting" section at 1-866-698-2538. On some models) is off . Make sure Control Lock is off . Make sure Demo mode (on cavity walls, microwave inlet cover, cooking rack supports, and area where the door touches the...

Dimension Guide
Page 5
....2 STANDARD TRIM KIT MODELS WMT55511K / KMBT5511K in appliance. W11436613A DIMENSIONS OPENING/CLEARANCE DIMENSIONS 5 of 10 MODEL # Unit of Measurement Width of cabinet opening that is solid, level and flush with bottom of 36" from the floor to cut-out floor. Do not use an extension cord. n This microwave oven must provide: 1. Support for planning purposes only. All Whirlpool® appliances are provided for weight of the microwave oven. Cutout floor...
....2 STANDARD TRIM KIT MODELS WMT55511K / KMBT5511K in appliance. W11436613A DIMENSIONS OPENING/CLEARANCE DIMENSIONS 5 of 10 MODEL # Unit of Measurement Width of cabinet opening that is solid, level and flush with bottom of 36" from the floor to cut-out floor. Do not use an extension cord. n This microwave oven must provide: 1. Support for planning purposes only. All Whirlpool® appliances are provided for weight of the microwave oven. Cutout floor...


