Use & Care Guide
Page 1
... on the label located on the oven frame behind the top right side of your product model and serial numbers. Register your range at www.kitchenaid.com. Model Number Serial Number Para una versión de estas instrucciones en español, visite www... USE 12 Food Characteristics 12 Cooking Guidelines 12 Cookware and Dinnerware 13 Aluminum Foil and Metal 13 Positioning Baking Tray 13 Microwave Cooking Power 14 Doneness 14 Sensor Cook 14 Manual Cooking 14 Crisper Pan Frying 15 Reheat 15 Defrost 16 Steam Cooking 16 Popcorn 16 Keeping Food Warm 16 Crisp 17...
... on the label located on the oven frame behind the top right side of your product model and serial numbers. Register your range at www.kitchenaid.com. Model Number Serial Number Para una versión de estas instrucciones en español, visite www... USE 12 Food Characteristics 12 Cooking Guidelines 12 Cookware and Dinnerware 13 Aluminum Foil and Metal 13 Positioning Baking Tray 13 Microwave Cooking Power 14 Doneness 14 Sensor Cook 14 Manual Cooking 14 Crisper Pan Frying 15 Reheat 15 Defrost 16 Steam Cooking 16 Popcorn 16 Keeping Food Warm 16 Crisp 17...
Use & Care Guide
Page 2
...this oven when not in use as described in this section. ■ Install or locate the microwave oven only in this manual. This is not designed for its intended use . ■ Do not operate the microwave oven if it has a damaged cord or plug, if it is , tell you don't ...damaged or dropped. ■ Do not deep fry in this manual and on the microwave oven. See "GROUNDING INSTRUCTIONS" found in oven. WARNING You can be inserted in the microwave oven as whole eggs in the microwave oven. ■ Use the microwave oven only for industrial or laboratory use. ■ Oversized foods...
...this oven when not in use as described in this section. ■ Install or locate the microwave oven only in this manual. This is not designed for its intended use . ■ Do not operate the microwave oven if it has a damaged cord or plug, if it is , tell you don't ...damaged or dropped. ■ Do not deep fry in this manual and on the microwave oven. See "GROUNDING INSTRUCTIONS" found in oven. WARNING You can be inserted in the microwave oven as whole eggs in the microwave oven. ■ Use the microwave oven only for industrial or laboratory use. ■ Oversized foods...
Use & Care Guide
Page 4
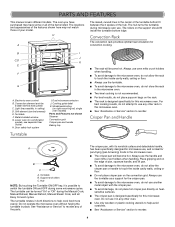
... rollers C. The turntable can be turned "On" or "Off" during the Manual Cook, Manual Reheat, Manual Defrost, Manual Steam Cook, and all of pan, squeeze handle, and lift pan. ■ To avoid damage to the microwave oven, do not store the rack in this microwave oven. The turntable rotates in both directions to help avoid scratches...
... rollers C. The turntable can be turned "On" or "Off" during the Manual Cook, Manual Reheat, Manual Defrost, Manual Steam Cook, and all of pan, squeeze handle, and lift pan. ■ To avoid damage to the microwave oven, do not store the rack in this microwave oven. The turntable rotates in both directions to help avoid scratches...
Use & Care Guide
Page 6
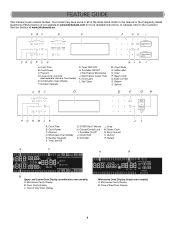
... Care Guide) E. Easy Convect R. Number Keypads F. Clock/Tools K. Oven Cavity Display C. Time of our website at www.kitchenaid.ca. In Canada, refer to this manual or the Frequently Asked Questions (FAQs) section of Day/Timer Display Microwave Oven Display (single oven models) A. Cook Time B. Defrost A BC D E F GH PONM LK A. Turntable On/Off J. Steam...
... Care Guide) E. Easy Convect R. Number Keypads F. Clock/Tools K. Oven Cavity Display C. Time of our website at www.kitchenaid.ca. In Canada, refer to this manual or the Frequently Asked Questions (FAQs) section of Day/Timer Display Microwave Oven Display (single oven models) A. Cook Time B. Defrost A BC D E F GH PONM LK A. Turntable On/Off J. Steam...
Use & Care Guide
Page 11
...and then "4" to toggle volume between Fahrenheit and Celsius settings. To Use: 1. You can also touch the Clock/Tools keypad repeatedly to manually scroll through the various options. To Change: Touch CLOCK/TOOLS and then "2" to toggle temperature between high and low settings. The oven...Celsius, "°C" follows the oven temperature. Clock This is a 12-hour clock. Touch CLOCK/TOOLS or START. Microwave Oven Cancel The Cancel keypad stops any microwave oven function except for the specific option to toggle the function setup. The oven display will remain on the oven ...
...and then "4" to toggle volume between Fahrenheit and Celsius settings. To Use: 1. You can also touch the Clock/Tools keypad repeatedly to manually scroll through the various options. To Change: Touch CLOCK/TOOLS and then "2" to toggle temperature between high and low settings. The oven...Celsius, "°C" follows the oven temperature. Clock This is a 12-hour clock. Touch CLOCK/TOOLS or START. Microwave Oven Cancel The Cancel keypad stops any microwave oven function except for the specific option to toggle the function setup. The oven display will remain on the oven ...

Use & Care Guide
Page 14
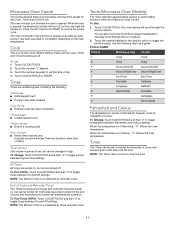
... 60% 6 Cooking sensitive foods such as a general guide for manual cooking. 3. Using the Microwave Cooking Power chart above 95°F (35°C), and the outside of the cooking container and the microwave oven cavity are Normal (default), More or Less and will appear... skip to cook. 2. Touch COOK TIME and then number keypads to set a length of Manual Cooking, Popcorn, EasyConvect™, Custom Reheat (beverage-manual), Defrost (manual) and Steam (manual). MICROWAVE COOKING POWER CHART PERCENT/NAME NUMBER USE 100%, High 10 (default setting) Quick heating convenience foods...
... 60% 6 Cooking sensitive foods such as a general guide for manual cooking. 3. Using the Microwave Cooking Power chart above 95°F (35°C), and the outside of the cooking container and the microwave oven cavity are Normal (default), More or Less and will appear... skip to cook. 2. Touch COOK TIME and then number keypads to set a length of Manual Cooking, Popcorn, EasyConvect™, Custom Reheat (beverage-manual), Defrost (manual) and Steam (manual). MICROWAVE COOKING POWER CHART PERCENT/NAME NUMBER USE 100%, High 10 (default setting) Quick heating convenience foods...

Use & Care Guide
Page 15
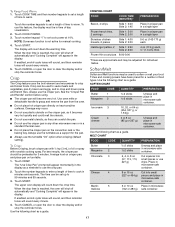
...CODE QUANTITY Meal 1 Place food on turntable. Stir and let stand 2-3 minutes after reheating. 8-16 oz (227-454 g) Casserole 2 Place in microwave-safe container. Before using the crisper pan (default setting). Place pan on plate. Let stand 2-3 minutes after reheating. 1-4 cups (250 mL-1...1-2 cups (250 mL-500 mL) Pizza 4 Place on crisper pan. Stir and let stand 2-3 minutes after reheating. 1-4 cups (250 mL-1 L) Manual 7 Default power level 70% 15 Crisper Pan Frying When the crisper pan is like a frying pan or griddle, ideal for individual tastes. Before Use...
...CODE QUANTITY Meal 1 Place food on turntable. Stir and let stand 2-3 minutes after reheating. 8-16 oz (227-454 g) Casserole 2 Place in microwave-safe container. Before using the crisper pan (default setting). Place pan on plate. Let stand 2-3 minutes after reheating. 1-4 cups (250 mL-1...1-2 cups (250 mL-500 mL) Pizza 4 Place on crisper pan. Stir and let stand 2-3 minutes after reheating. 1-4 cups (250 mL-1 L) Manual 7 Default power level 70% 15 Crisper Pan Frying When the crisper pan is like a frying pan or griddle, ideal for individual tastes. Before Use...

Use & Care Guide
Page 16
... cuts should be shielded with foil before using. Do not defrost less than ¼ lb (113 g) or two 4 oz (113 g) patties. See the "KitchenAid™ Steamer Vessel" section before defrosting. NOTE: Follow the instructions provided by brand and fat content. ■ Recommended bag sizes are 3.5 oz, 3.0 oz, ...Cook is recommended to add ½ cup (125 mL) of food. ■ Cover foods that uses microwaves to steam food. Defrost The Defrost feature can be used, or the microwave oven can be manually set to defrost by using 30% cook power. ■ For optimal results, food should be 0°F ...
... cuts should be shielded with foil before using. Do not defrost less than ¼ lb (113 g) or two 4 oz (113 g) patties. See the "KitchenAid™ Steamer Vessel" section before defrosting. NOTE: Follow the instructions provided by brand and fat content. ■ Recommended bag sizes are 3.5 oz, 3.0 oz, ...Cook is recommended to add ½ cup (125 mL) of food. ■ Cover foods that uses microwaves to steam food. Defrost The Defrost feature can be used, or the microwave oven can be manually set to defrost by using 30% cook power. ■ For optimal results, food should be 0°F ...
Use & Care Guide
Page 17
...spray. Use the following chart as a support for individual tastes. Cut squares into small pieces and place in minutes and seconds. Place in microwave-safe container. Crisp can be adjusted for the pan. ■ Always use chips. The upper oven display will appear in microwavesafe container...."Crisper Pan and Handle" section before using. ■ The crisper pan will sound every minute. 5. Times and cooking powers have been preset for manual cooking. 4. Touch COOK TIME and then number keypads to set up to warm. Always use the crisper pan. To Keep Food Warm: 1. If...
...spray. Use the following chart as a support for individual tastes. Cut squares into small pieces and place in minutes and seconds. Place in microwave-safe container. Crisp can be adjusted for the pan. ■ Always use chips. The upper oven display will appear in microwavesafe container...."Crisper Pan and Handle" section before using. ■ The crisper pan will sound every minute. 5. Times and cooking powers have been preset for manual cooking. 4. Touch COOK TIME and then number keypads to set up to warm. Always use the crisper pan. To Keep Food Warm: 1. If...

Installation Guide
Page 1
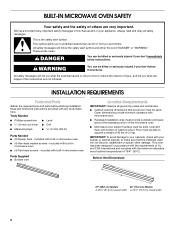
...have provided many important safety messages in this manual and on your appliance. Always read and obey...word "DANGER" or "WARNING." INSTALLATION INSTRUCTIONS 27" (68.6 CM) AND 30" (76.2 CM) ELECTRIC BUILT-IN CONVECTION MICROWAVE OVEN INSTRUCTIONS D'INSTALLATION FOUR À MICRO-ONDES ENCASTRÉ ÉLECTRIQUE À CONVECTION DE 27" (68,6 CM)... ET 30" (76,2 CM) Table of Contents/Table des matières BUILT-IN MICROWAVE OVEN SAFETY 1 SÉCURITÉ DU FOUR À MICRO-ONDES ENCASTR 7 INSTALLATION REQUIREMENTS 2 Tools and Parts 2 Location ...
...have provided many important safety messages in this manual and on your appliance. Always read and obey...word "DANGER" or "WARNING." INSTALLATION INSTRUCTIONS 27" (68.6 CM) AND 30" (76.2 CM) ELECTRIC BUILT-IN CONVECTION MICROWAVE OVEN INSTRUCTIONS D'INSTALLATION FOUR À MICRO-ONDES ENCASTRÉ ÉLECTRIQUE À CONVECTION DE 27" (68,6 CM)... ET 30" (76,2 CM) Table of Contents/Table des matières BUILT-IN MICROWAVE OVEN SAFETY 1 SÉCURITÉ DU FOUR À MICRO-ONDES ENCASTR 7 INSTALLATION REQUIREMENTS 2 Tools and Parts 2 Location ...
Instruction Sheet
Page 2
...washer screws - This oven has been designed in accordance with the requirements of UL and CSA International and complies with built-in this manual and on your builder or cabinet supplier to support a weight of 90 lbs (41.0 kg). This symbol alerts you to reduce ...cabinet cutout. Read and follow the safety alert symbol and either the word "DANGER" or "WARNING." We have provided many important safety messages in microwave oven Parts Supplied ■ Bottom vent Location Requirements IMPORTANT: Observe all safety messages. Tools Needed ■ Phillips screwdriver ■ Level ■ ...
...washer screws - This oven has been designed in accordance with the requirements of UL and CSA International and complies with built-in this manual and on your builder or cabinet supplier to support a weight of 90 lbs (41.0 kg). This symbol alerts you to reduce ...cabinet cutout. Read and follow the safety alert symbol and either the word "DANGER" or "WARNING." We have provided many important safety messages in microwave oven Parts Supplied ■ Bottom vent Location Requirements IMPORTANT: Observe all safety messages. Tools Needed ■ Phillips screwdriver ■ Level ■ ...


