
Use & Care Guide
Page 3
... Arranging for Service after the Warranty Expires 6 Arranging for Mixing and Kneading Yeast Dough 55 Bread Making Tips 56 KitchenAid® Attachments and Accessories 80 3 General Instructions 16 Appetizers, Entrees, and Vegetables 17 Cakes and Frostings 27 Cookies, Bars, and Candies ...Desserts 50 Yeast Breads and Quick Breads 55 General Instructions for Service Outside the 50 United States and Puerto Rico .....6 Ordering Accessories and Replacement Parts 6 Electrical Requirements 7 Troubleshooting Problems 7 About Your Mixer Bowl Lift Stand Mixer Features 8 Assembling Your ...
... Arranging for Service after the Warranty Expires 6 Arranging for Mixing and Kneading Yeast Dough 55 Bread Making Tips 56 KitchenAid® Attachments and Accessories 80 3 General Instructions 16 Appetizers, Entrees, and Vegetables 17 Cakes and Frostings 27 Cookies, Bars, and Candies ...Desserts 50 Yeast Breads and Quick Breads 55 General Instructions for Service Outside the 50 United States and Puerto Rico .....6 Ordering Accessories and Replacement Parts 6 Electrical Requirements 7 Troubleshooting Problems 7 About Your Mixer Bowl Lift Stand Mixer Features 8 Assembling Your ...
Use & Care Guide
Page 6
... Warranty for Puerto Rico A limited one year warranty extends to learn the location of a Service Center near you. Ordering Accessories and Replacement Parts To order accessories or replacement parts for your local KitchenAid dealer the stand mixer for information on or the store where you purchased how to the nearest Authorized Service Center...
... Warranty for Puerto Rico A limited one year warranty extends to learn the location of a Service Center near you. Ordering Accessories and Replacement Parts To order accessories or replacement parts for your local KitchenAid dealer the stand mixer for information on or the store where you purchased how to the nearest Authorized Service Center...
Use & Care Guide
Page 8
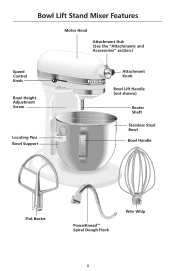
Bowl Lift Stand Mixer Features Motor Head Attachment Hub (See the "Attachments and Accessories" section.) Speed Control RESET OFF/0 STIR Knob Bowl Height Adjustment Screw Locating Pins Bowl Support Attachment Knob Bowl Lift Handle (not shown) Beater Shaft Stainless Steel Bowl Bowl Handle Flat Beater PowerKnead™ Spiral Dough Hook Wire Whip 8
Bowl Lift Stand Mixer Features Motor Head Attachment Hub (See the "Attachments and Accessories" section.) Speed Control RESET OFF/0 STIR Knob Bowl Height Adjustment Screw Locating Pins Bowl Support Attachment Knob Bowl Lift Handle (not shown) Beater Shaft Stainless Steel Bowl Bowl Handle Flat Beater PowerKnead™ Spiral Dough Hook Wire Whip 8
Use & Care Guide
Page 10
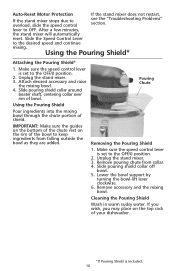
...Removing the Pouring Shield 1. Slide pouring shield collar off bowl. 5. Lower the bowl support by turning the bowl-lift lever clockwise. 6. Remove accessory and the mixing bowl. Slide pouring shield collar around beater shaft, centering collar over rim of shield. Unplug the stand mixer. 3. If ...position. 2. Cleaning the Pouring Shield Wash in warm sudsy water. After a few minutes, the stand mixer will automatically reset. Attach desired accessory and raise the mixing bowl. 4. Auto-Reset Motor Protection If the stand mixer does not restart, If the stand mixer stops due to...
...Removing the Pouring Shield 1. Slide pouring shield collar off bowl. 5. Lower the bowl support by turning the bowl-lift lever clockwise. 6. Remove accessory and the mixing bowl. Slide pouring shield collar around beater shaft, centering collar over rim of shield. Unplug the stand mixer. 3. If ...position. 2. Cleaning the Pouring Shield Wash in warm sudsy water. After a few minutes, the stand mixer will automatically reset. Attach desired accessory and raise the mixing bowl. 4. Auto-Reset Motor Protection If the stand mixer does not restart, If the stand mixer stops due to...
Use & Care Guide
Page 16
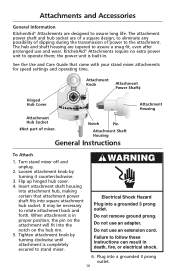
Attachments and Accessories General Information KitchenAid® Attachments are designed to rotate attachment back and forth. Notch Pin Attachment Shaft Housing General Instructions Attachment Housing To Attach 1. Turn stand...-in death, fire, or electrical shock. 6. Tighten attachment knob by turning it counterclockwise. 3. Electrical Shock Hazard Plug into a grounded 3 prong outlet. 16 KitchenAid® Attachments require no extra power unit to follow these instructions can result in . Insert attachment shaft housing into attachment hub, making certain that came...
Attachments and Accessories General Information KitchenAid® Attachments are designed to rotate attachment back and forth. Notch Pin Attachment Shaft Housing General Instructions Attachment Housing To Attach 1. Turn stand...-in death, fire, or electrical shock. 6. Tighten attachment knob by turning it counterclockwise. 3. Electrical Shock Hazard Plug into a grounded 3 prong outlet. 16 KitchenAid® Attachments require no extra power unit to follow these instructions can result in . Insert attachment shaft housing into attachment hub, making certain that came...


