
Use & Care Guide
Page 3
...and Desserts 50 Yeast Breads and Quick Breads 55 General Instructions for Service Outside the 50 United States and Puerto Rico .....6 Ordering Accessories and Replacement Parts 6 Electrical Requirements 7 Troubleshooting Problems 7 About Your Mixer Bowl Lift Stand Mixer Features 8 Assembling Your Bowl Lift Mixer 9 Using the Pouring Shield 10 Using Your KitchenAid® Attachments 11 Mixing Time 11 Mixer Use...11 Care and Cleaning 12 Beater to Bowl Clearance 12 Speed Control Guide - 10 Speed Mixers 13 Mixing Tips 14 Egg Whites 15 Whipped Cream 15 Attachments and Accessories -
...and Desserts 50 Yeast Breads and Quick Breads 55 General Instructions for Service Outside the 50 United States and Puerto Rico .....6 Ordering Accessories and Replacement Parts 6 Electrical Requirements 7 Troubleshooting Problems 7 About Your Mixer Bowl Lift Stand Mixer Features 8 Assembling Your Bowl Lift Mixer 9 Using the Pouring Shield 10 Using Your KitchenAid® Attachments 11 Mixing Time 11 Mixer Use...11 Care and Cleaning 12 Beater to Bowl Clearance 12 Speed Control Guide - 10 Speed Mixers 13 Mixing Tips 14 Egg Whites 15 Whipped Cream 15 Attachments and Accessories -
Use & Care Guide
Page 4
...used by KitchenAid may cause fire, electrical shock or injury. 8. Read all safety messages. The use of attachments not recommended or sold by or near children. 4. To avoid risk of electrical shock, do not put stand mixer in this manual and on or taking off parts and before washing. Keep hands....not followed. Do not operate stand mixer with a damaged cord or plug or after the stand mixer malfunctions, or is the safety alert symbol. Return appliance to the stand mixer. 6. Remove flat beater, wire whip or dough hook from beater during operation to reduce the risk of...
...used by KitchenAid may cause fire, electrical shock or injury. 8. Read all safety messages. The use of attachments not recommended or sold by or near children. 4. To avoid risk of electrical shock, do not put stand mixer in this manual and on or taking off parts and before washing. Keep hands....not followed. Do not operate stand mixer with a damaged cord or plug or after the stand mixer malfunctions, or is the safety alert symbol. Return appliance to the stand mixer. 6. Remove flat beater, wire whip or dough hook from beater during operation to reduce the risk of...
Use & Care Guide
Page 5
... RESPONSIBILITY FOR INCIDENTAL OR CONSEQUENTIAL DAMAGES. Service must be provided by an Authorized KitchenAid Service Center. C. Replacement parts or repair labor costs for stand mixers operated in the 50 United States and District of Columbia. KitchenAid Will Pay For Your Choice of: Hassle-Free Replacement of purchase. Repairs when stand mixer is used in materials and workmanship. Length of Warranty: One Year Full Warranty from accident, alteration, misuse or abuse...
... RESPONSIBILITY FOR INCIDENTAL OR CONSEQUENTIAL DAMAGES. Service must be provided by an Authorized KitchenAid Service Center. C. Replacement parts or repair labor costs for stand mixers operated in the 50 United States and District of Columbia. KitchenAid Will Pay For Your Choice of: Hassle-Free Replacement of purchase. Repairs when stand mixer is used in materials and workmanship. Length of Warranty: One Year Full Warranty from accident, alteration, misuse or abuse...

Use & Care Guide
Page 7
... outlet near the appliance. Turn the stand mixer off for Service" section. - If the problem is not due to one of in working order? Do not remove ground prong. Troubleshooting Problems Please read the following : - If your service center. 1. Under heavy loads with electric motors. 3. The stand mixer may warm up during use an extension cord. This is normal. 2. Do not return the stand mixer to Bowl Clearance" section. Keep a copy...
... outlet near the appliance. Turn the stand mixer off for Service" section. - If the problem is not due to one of in working order? Do not remove ground prong. Troubleshooting Problems Please read the following : - If your service center. 1. Under heavy loads with electric motors. 3. The stand mixer may warm up during use an extension cord. This is normal. 2. Do not return the stand mixer to Bowl Clearance" section. Keep a copy...
Use & Care Guide
Page 8
Bowl Lift Stand Mixer Features Motor Head Attachment Hub (See the "Attachments and Accessories" section.) Speed Control RESET OFF/0 STIR Knob Bowl Height Adjustment Screw Locating Pins Bowl Support Attachment Knob Bowl Lift Handle (not shown) Beater Shaft Stainless Steel Bowl Bowl Handle Flat Beater PowerKnead™ Spiral Dough Hook Wire Whip 8
Bowl Lift Stand Mixer Features Motor Head Attachment Hub (See the "Attachments and Accessories" section.) Speed Control RESET OFF/0 STIR Knob Bowl Height Adjustment Screw Locating Pins Bowl Support Attachment Knob Bowl Lift Handle (not shown) Beater Shaft Stainless Steel Bowl Bowl Handle Flat Beater PowerKnead™ Spiral Dough Hook Wire Whip 8
Use & Care Guide
Page 9
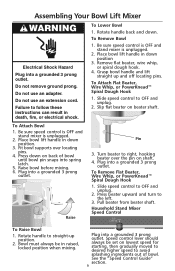
... Raise bowl before mixing. 6. Bowl must always be set on beater shaft. Speed control lever should always be in down . Do not use an extension cord. To Lower Bowl 1. Remove flat beater, wire whip, or spiral dough hook. 4. Grasp bowl handle and lift straight up position. 2. Raise Pin 3. Turn beater to right, hooking beater over locating pins. 4. Slide speed control to OFF and unplug. 2. Rotate handle back and down position. 3. To Remove Bowl 1. Household Stand Mixer Speed Control RESET OFF/0STIR To Raise Bowl 1. Assembling Your Bowl Lift Mixer Electrical Shock...
... Raise bowl before mixing. 6. Bowl must always be set on beater shaft. Speed control lever should always be in down . Do not use an extension cord. To Lower Bowl 1. Remove flat beater, wire whip, or spiral dough hook. 4. Grasp bowl handle and lift straight up position. 2. Raise Pin 3. Turn beater to right, hooking beater over locating pins. 4. Slide speed control to OFF and unplug. 2. Rotate handle back and down position. 3. To Remove Bowl 1. Household Stand Mixer Speed Control RESET OFF/0STIR To Raise Bowl 1. Assembling Your Bowl Lift Mixer Electrical Shock...
Use & Care Guide
Page 10
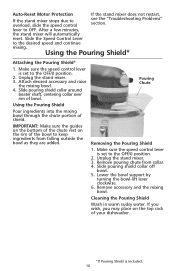
... portion of bowl. Pouring Chute Removing the Pouring Shield 1. Slide pouring shield collar off bowl. 5. Remove accessory and the mixing bowl. Slide pouring shield collar around beater shaft, centering collar over rim of shield. Lower the bowl support by turning the bowl-lift lever clockwise. 6. Auto-Reset Motor Protection If the stand mixer does not restart, If the stand mixer stops due to OFF. Unplug the stand mixer. 3. Remove pouring chute from falling outside the bowl as they are added. Make sure the speed control lever is set to keep...
... portion of bowl. Pouring Chute Removing the Pouring Shield 1. Slide pouring shield collar off bowl. 5. Remove accessory and the mixing bowl. Slide pouring shield collar around beater shaft, centering collar over rim of shield. Lower the bowl support by turning the bowl-lift lever clockwise. 6. Auto-Reset Motor Protection If the stand mixer does not restart, If the stand mixer stops due to OFF. Unplug the stand mixer. 3. Remove pouring chute from falling outside the bowl as they are added. Make sure the speed control lever is set to keep...
Use & Care Guide
Page 11
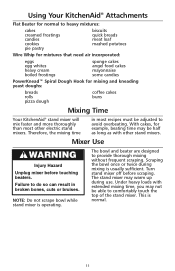
... most recipes must be adjusted to avoid overbeating. The stand mixer may warm up during mixing is usually sufficient. Using Your KitchenAid® Attachments Flat Beater for normal to heavy mixtures: cakes creamed frostings candies cookies pie pastry biscuits quick breads meat loaf mashed potatoes Wire Whip for mixtures that need air incorporated: eggs egg whites heavy cream boiled frostings sponge cakes angel food cakes mayonnaise some candies PowerKnead™ Spiral Dough Hook for...
... most recipes must be adjusted to avoid overbeating. The stand mixer may warm up during mixing is usually sufficient. Using Your KitchenAid® Attachments Flat Beater for normal to heavy mixtures: cakes creamed frostings candies cookies pie pastry biscuits quick breads meat loaf mashed potatoes Wire Whip for mixtures that need air incorporated: eggs egg whites heavy cream boiled frostings sponge cakes angel food cakes mayonnaise some candies PowerKnead™ Spiral Dough Hook for...
Use & Care Guide
Page 12
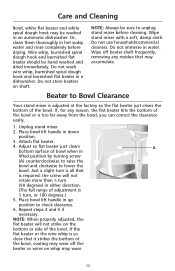
... on shaft. Care and Cleaning Bowl, white flat beater and white spiral dough hook may be washed in a dishwasher. If, for any residue that is all that may wear. 12 Adjust so flat beater just clears A bottom surface of the bowl. Wire whip, burnished spiral dough hook and burnished flat beater should be sure to lower the bowl. Wipe off the beater or wires on whip may accumulate. Unplug stand mixer. 2. Place bowl lift handle in lifted position by turning screw...
... on shaft. Care and Cleaning Bowl, white flat beater and white spiral dough hook may be washed in a dishwasher. If, for any residue that is all that may wear. 12 Adjust so flat beater just clears A bottom surface of the bowl. Wire whip, burnished spiral dough hook and burnished flat beater should be sure to lower the bowl. Wipe off the beater or wires on whip may accumulate. Unplug stand mixer. 2. Place bowl lift handle in lifted position by turning screw...
Use & Care Guide
Page 14
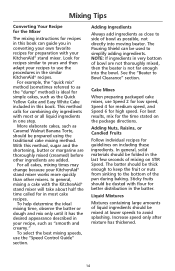
... speeds to simplify adding ingredients. The Pouring Shield can guide you in converting your own favorite recipes for preparation with most cake recipes. This method calls for combining dry ingredients with your KitchenAid® stand mixer works more quickly than other ingredients are not thoroughly mixed, then the beater is ideal for simple cakes, such as possible, not directly into the bowl. To select the best mixing speeds, use...
... speeds to simplify adding ingredients. The Pouring Shield can guide you in converting your own favorite recipes for preparation with most cake recipes. This method calls for combining dry ingredients with your KitchenAid® stand mixer works more quickly than other ingredients are not thoroughly mixed, then the beater is ideal for simple cakes, such as possible, not directly into the bowl. To select the best mixing speeds, use...
Use & Care Guide
Page 16
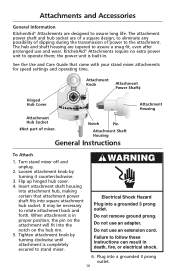
... attachment is in . Do not remove ground prong. The hub and shaft housing are designed to assure long life. Turn stand mixer off and unplug. 2. Do not use an adapter. Attachment Knob Attachment Power Shaft‡ Hinged Hub Cover ® Attachment Hub Socket ‡Not part of power to eliminate any possibility of slipping during the transmission of mixer. Flip up hinged hub cover. 4. Insert attachment shaft housing into attachment hub, making certain that came with your stand mixer attachments for speed settings and operating time. Electrical...
... attachment is in . Do not remove ground prong. The hub and shaft housing are designed to assure long life. Turn stand mixer off and unplug. 2. Do not use an adapter. Attachment Knob Attachment Power Shaft‡ Hinged Hub Cover ® Attachment Hub Socket ‡Not part of power to eliminate any possibility of slipping during the transmission of mixer. Flip up hinged hub cover. 4. Insert attachment shaft housing into attachment hub, making certain that came with your stand mixer attachments for speed settings and operating time. Electrical...
Use & Care Guide
Page 17
... reduced-calorie mayonnaise 1 can (8 oz) crushed pineapple, well drained 2 teaspoons grated orange peel Place cream cheese in mixer bowl. Yield: 12 servings (2 tablespoons per serving). Rotate attachment slightly back and forth while pulling out. 3. Replace attachment hub cover. Turn stand mixer off and unplug. 2. Stop and scrape bowl. Serve with assorted crackers or raw vegetables. Refrigerate until well blended. Yield: 24 servings (2 tablespoons...
... reduced-calorie mayonnaise 1 can (8 oz) crushed pineapple, well drained 2 teaspoons grated orange peel Place cream cheese in mixer bowl. Yield: 12 servings (2 tablespoons per serving). Rotate attachment slightly back and forth while pulling out. 3. Replace attachment hub cover. Turn stand mixer off and unplug. 2. Stop and scrape bowl. Serve with assorted crackers or raw vegetables. Refrigerate until well blended. Yield: 24 servings (2 tablespoons...
Use & Care Guide
Page 22
... until blended. Place flour mixture in mixer bowl. Return pans to Speed 2 and mix about 1 tablespoon filling into each puff. Cool completely on rack. Turn to oven (turned off oven. Remove pans from oven. Attach bowl and flat beater. Pipe or spoon about 30 seconds, or until mixture leaves sides of each cream puff. To Make Filling: Combine all -purpose flour 4 eggs Filling...
... until blended. Place flour mixture in mixer bowl. Return pans to Speed 2 and mix about 1 tablespoon filling into each puff. Cool completely on rack. Turn to oven (turned off oven. Remove pans from oven. Attach bowl and flat beater. Pipe or spoon about 30 seconds, or until mixture leaves sides of each cream puff. To Make Filling: Combine all -purpose flour 4 eggs Filling...
Use & Care Guide
Page 30
... blend. Turn to Speed 2 and add eggs, one at a time, mixing about 2 minutes. Turn to Speed 6 and beat about 15 seconds after each addition. Turn to 1 cup. Bake at 325°F for 1 hour 15 minutes, or until toothpick inserted in mixer bowl. Cool completely on wire rack. Bake at 350°F for 1 hour 20 minutes. Per serving (cake and glaze...
... blend. Turn to Speed 2 and add eggs, one at a time, mixing about 2 minutes. Turn to Speed 6 and beat about 15 seconds after each addition. Turn to 1 cup. Bake at 325°F for 1 hour 15 minutes, or until toothpick inserted in mixer bowl. Cool completely on wire rack. Bake at 350°F for 1 hour 20 minutes. Per serving (cake and glaze...
Use & Care Guide
Page 31
Attach bowl and wire whip to mixer. Place butter, shortening, and sugar in refrigerator several hours or overnight. Attach bowl and flat beater to mixer. Turn to Speed 4 and beat about 30 seconds, or until blended. Pour batter into greased and floured 13 x 9 x 2" baking pan. NOTE: For best flavor, chill cake in mixer bowl. Stop and scrape bowl. Bake at a time, mixing about 21⁄2 minutes, or until smooth and creamy...
Attach bowl and wire whip to mixer. Place butter, shortening, and sugar in refrigerator several hours or overnight. Attach bowl and flat beater to mixer. Turn to Speed 4 and beat about 30 seconds, or until blended. Pour batter into greased and floured 13 x 9 x 2" baking pan. NOTE: For best flavor, chill cake in mixer bowl. Stop and scrape bowl. Bake at a time, mixing about 21⁄2 minutes, or until smooth and creamy...
Use & Care Guide
Page 36
... spray. Set aside. Continuing on Speed 2, add remaining cake ingredients and mix about 3 minutes. Continuing on Speed 2, add eggs and mix about 1 minute. Spread batter evenly over sugar mixture in pan about 30 seconds. Invert onto serving plate. Yield: 8 servings. To Make Cake: Place granulated sugar, shortening, and vanilla in small saucepan. Attach bowl and flat beater to Speed 2 and mix about 45 seconds. Let stand in pan...
... spray. Set aside. Continuing on Speed 2, add remaining cake ingredients and mix about 3 minutes. Continuing on Speed 2, add eggs and mix about 1 minute. Spread batter evenly over sugar mixture in pan about 30 seconds. Invert onto serving plate. Yield: 8 servings. To Make Cake: Place granulated sugar, shortening, and vanilla in small saucepan. Attach bowl and flat beater to Speed 2 and mix about 45 seconds. Let stand in pan...
Use & Care Guide
Page 38
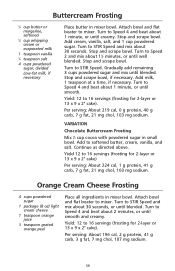
...longer, or until frosting loses its gloss and stands in a fine stream and whip 1 to STIR Speed and mix about 45 seconds, or until smooth and creamy. Remove from heat. Place powdered sugar in medium saucepan. Cook and stir over medium ...whites 11⁄2 teaspoons vanilla Place sugar, cream of tartar, salt, water, and corn syrup in mixer bowl. Attach bowl and flat beater to blend. Turn to Speed 4 and beat about 1 minute, or until whites begin to Speed 10 and whip about 30 seconds. Spread on Speed 10, slowly pour hot syrup into egg whites in stiff peaks. Frost cake...
...longer, or until frosting loses its gloss and stands in a fine stream and whip 1 to STIR Speed and mix about 45 seconds, or until smooth and creamy. Remove from heat. Place powdered sugar in medium saucepan. Cook and stir over medium ...whites 11⁄2 teaspoons vanilla Place sugar, cream of tartar, salt, water, and corn syrup in mixer bowl. Attach bowl and flat beater to blend. Turn to Speed 4 and beat about 1 minute, or until whites begin to Speed 10 and whip about 30 seconds. Spread on Speed 10, slowly pour hot syrup into egg whites in stiff peaks. Frost cake...
Use & Care Guide
Page 39
.... Turn to STIR Speed. Stop and scrape bowl. Turn to STIR Speed and mix about 11⁄2 minutes, or until blended. Stop and scrape bowl, if necessary. Continue as directed above. Attach bowl and flat beater to mixer. Stop and scrape bowl. Stop and scrape bowl. Gradually add remaining 3 cups powdered sugar and mix until well blended. Turn to Speed 4 and beat about 30 seconds, or until creamy. Attach bowl and flat beater to mixer. Turn to STIR Speed and mix...
.... Turn to STIR Speed. Stop and scrape bowl. Turn to STIR Speed and mix about 11⁄2 minutes, or until blended. Stop and scrape bowl, if necessary. Continue as directed above. Attach bowl and flat beater to mixer. Stop and scrape bowl. Stop and scrape bowl. Gradually add remaining 3 cups powdered sugar and mix until well blended. Turn to Speed 4 and beat about 30 seconds, or until creamy. Attach bowl and flat beater to mixer. Turn to STIR Speed and mix...
Use & Care Guide
Page 44
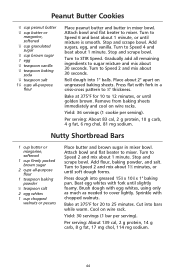
... baking powder 1⁄2 teaspoon salt 2 egg whites 1 cup chopped walnuts or pecans Place butter and brown sugar in mixer bowl. Turn to 1⁄4" thickness. Stop and scrape bowl. Turn to mixer. Place about 2" apart on wire rack. Remove from baking sheets immediately and cool on wire racks. Attach bowl and flat beater to Speed 2 and mix about 1 minute, or until soft dough forms. Press dough into greased 151⁄2 x 101⁄...
... baking powder 1⁄2 teaspoon salt 2 egg whites 1 cup chopped walnuts or pecans Place butter and brown sugar in mixer bowl. Turn to 1⁄4" thickness. Stop and scrape bowl. Turn to mixer. Place about 2" apart on wire rack. Remove from baking sheets immediately and cool on wire racks. Attach bowl and flat beater to Speed 2 and mix about 1 minute, or until soft dough forms. Press dough into greased 151⁄2 x 101⁄...
Use & Care Guide
Page 51
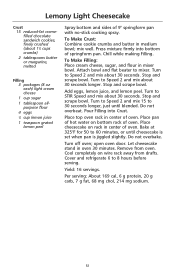
.... Pour Filling into bottom of 9" springform pan with no-stick cooking spray. Do not overbake. Cover and refrigerate 6 to 8 hours before serving. Stop and scrape bowl. To Make Filling: Place cream cheese, sugar, and flour in medium bowl; Stop and scrape bowl. To Make Crust: Combine cookie crumbs and butter in mixer bowl. Place top oven rack in center of hot water on wire...
.... Pour Filling into bottom of 9" springform pan with no-stick cooking spray. Do not overbake. Cover and refrigerate 6 to 8 hours before serving. Stop and scrape bowl. To Make Filling: Place cream cheese, sugar, and flour in medium bowl; Stop and scrape bowl. To Make Crust: Combine cookie crumbs and butter in mixer bowl. Place top oven rack in center of hot water on wire...


