
Installation Guide
Page 2
...countertop with your dealer to comply with the installation clearances specified in oven, do not find this label, contact your cooktop model number. When installing cooktop, use and proper cutout dimensions. ■ When installing cooktop over a built-in oven. ■...(6.4 cm) clamping screws (4) ■ #8 x ³⁄₈" (9.5 mm) sheet metal screws (4) Parts needed for an approved installation label. Model/serial rating plate location 2 If you don't find this label, your oven is recommended that all governing codes and ordinances. It is approved. Read ...
...countertop with your dealer to comply with the installation clearances specified in oven, do not find this label, contact your cooktop model number. When installing cooktop, use and proper cutout dimensions. ■ When installing cooktop over a built-in oven. ■...(6.4 cm) clamping screws (4) ■ #8 x ³⁄₈" (9.5 mm) sheet metal screws (4) Parts needed for an approved installation label. Model/serial rating plate location 2 If you don't find this label, your oven is recommended that all governing codes and ordinances. It is approved. Read ...
Installation Guide
Page 3
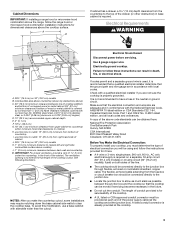
... flexible, armored cable extending from the countertop to the top of cabinet J. 29½" (75.0 cm) on 30" (76.2 cm) models K. 1" (2.5 cm) minimum distance to follow these instructions can be obtained from upper cabinet to countertop within minimum horizontal clearances to have a fuse...cable. A listed conduit connector is required on a separate, 50-amp circuit (36" [91.4 cm] models) or 40-amp circuit (30" [76.2 cm] models), fused on 30" (76.2 cm) models B. Cabinet Dimensions IMPORTANT: If installing a range hood or microwave hood combination above the range, follow the instructions...
... flexible, armored cable extending from the countertop to the top of cabinet J. 29½" (75.0 cm) on 30" (76.2 cm) models K. 1" (2.5 cm) minimum distance to follow these instructions can be obtained from upper cabinet to countertop within minimum horizontal clearances to have a fuse...cable. A listed conduit connector is required on a separate, 50-amp circuit (36" [91.4 cm] models) or 40-amp circuit (30" [76.2 cm] models), fused on 30" (76.2 cm) models B. Cabinet Dimensions IMPORTANT: If installing a range hood or microwave hood combination above the range, follow the instructions...
Use & Care Guide
Page 4
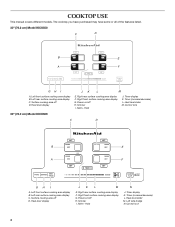
The cooktop you have purchased may have some or all of the features listed. 30" (76.2 cm) Model KICU500 C D B E A F GH I . Heat level display JK L M E. Simmer I A. Left side bridge N. Surface cooking area off H. Right rear surface ... surface cooking area display C. Right front surface cooking area display G. Melt + Hold N J. Heat level slider M. COOKTOP USE This manual covers different models. Left front surface cooking area display B. Heat level display JK L M E. Left rear surface cooking area display C. Heat level slider M. Timer (...
The cooktop you have purchased may have some or all of the features listed. 30" (76.2 cm) Model KICU500 C D B E A F GH I . Heat level display JK L M E. Simmer I A. Left side bridge N. Surface cooking area off H. Right rear surface ... surface cooking area display C. Right front surface cooking area display G. Melt + Hold N J. Heat level slider M. COOKTOP USE This manual covers different models. Left front surface cooking area display B. Heat level display JK L M E. Left rear surface cooking area display C. Heat level slider M. Timer (...
Use & Care Guide
Page 5
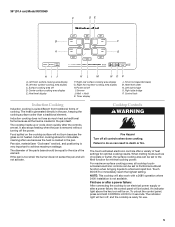
... turn off D. If the pan is generated directly in the pan. Surface cooking area off , and the cooktop is ready for 3 seconds. 36" (91.4 cm) Model KICU569 C DE B F A G HI J A.
... turn off D. If the pan is generated directly in the pan. Surface cooking area off , and the cooktop is ready for 3 seconds. 36" (91.4 cm) Model KICU569 C DE B F A G HI J A.

Use & Care Guide
Page 6
... that each surface cooking area will light to indicate that was touched will flash for 1 minute, the surface cooking area will automatically turn on some models) The dual size surface cooking area offers flexibility to the cooktop. If the size of the pan is ready to show that it may activate...
... that each surface cooking area will light to indicate that was touched will flash for 1 minute, the surface cooking area will automatically turn on some models) The dual size surface cooking area offers flexibility to the cooktop. If the size of the pan is ready to show that it may activate...
Use & Care Guide
Page 7
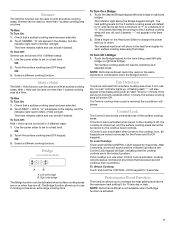
.... To Turn Off: Simmer can be used (left side bridge or right side bridge). Touch the Bridge keypad for the zone being used on some models) A B A. Left side bridge B.
.... To Turn Off: Simmer can be used (left side bridge or right side bridge). Touch the Bridge keypad for the zone being used on some models) A B A. Left side bridge B.
Use & Care Guide
Page 8
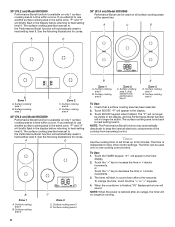
...9. The timer can be used on all surface cooking areas at the same time. Surface cooking area 4 30" (76.2 cm) Model KICU509 Performance Boost function is available on only 1 surface cooking area at a time within a zone. Surface cooking area 1 B. Touch...no longer be active. To Use: 1. See the following illustrations for zones. See the following illustrations for zones. Surface cooking area 3 D. 30" (76.2 cm) Model KICU500 Performance Boost function is available on only 1 surface cooking area at a time within a zone. Surface cooking area 3 D. A D B Zone 1 A. Surface...
...9. The timer can be used on all surface cooking areas at the same time. Surface cooking area 4 30" (76.2 cm) Model KICU509 Performance Boost function is available on only 1 surface cooking area at a time within a zone. Surface cooking area 1 B. Touch...no longer be active. To Use: 1. See the following illustrations for zones. See the following illustrations for zones. Surface cooking area 3 D. 30" (76.2 cm) Model KICU500 Performance Boost function is available on only 1 surface cooking area at a time within a zone. Surface cooking area 3 D. A D B Zone 1 A. Surface...
Use & Care Guide
Page 11
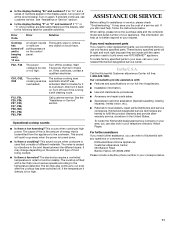
... your telephone directory Yellow Pages. If you use only factory specified parts. Wait 5 minutes for it to build every new KITCHENAID® appliance. ASSISTANCE OR SERVICE Before calling for possible solutions. These factory specified parts will fit right and work right because...distributors and service companies. Turn off and is too low or too high. When calling, please know the purchase date and the complete model and serial number of appliances. ■ Installation information. ■ Use and maintenance procedures. ■ Accessory and repair parts sales. &#...
... your telephone directory Yellow Pages. If you use only factory specified parts. Wait 5 minutes for it to build every new KITCHENAID® appliance. ASSISTANCE OR SERVICE Before calling for possible solutions. These factory specified parts will fit right and work right because...distributors and service companies. Turn off and is too low or too high. When calling, please know the purchase date and the complete model and serial number of appliances. ■ Installation information. ■ Use and maintenance procedures. ■ Accessory and repair parts sales. &#...
Use & Care Guide
Page 12
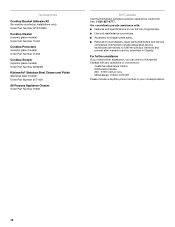
... countertop installations only) Order Part Number W10310006 Cooktop Cleaner (ceramic glass models) Order Part Number 31464 Cooktop Protectant (ceramic glass models) Order Part Number 31463 Cooktop Scraper (ceramic glass models) Order Part Number WA906B KitchenAid® Stainless Steel Cleaner and Polish (stainless steel models) Order Part Number 8171420 All-Purpose Appliance Cleaner Order Part Number...
... countertop installations only) Order Part Number W10310006 Cooktop Cleaner (ceramic glass models) Order Part Number 31464 Cooktop Protectant (ceramic glass models) Order Part Number 31463 Cooktop Scraper (ceramic glass models) Order Part Number WA906B KitchenAid® Stainless Steel Cleaner and Polish (stainless steel models) Order Part Number 8171420 All-Purpose Appliance Cleaner Order Part Number...
Use & Care Guide
Page 13
...United States or Canada and applies only when the major appliance is covered by a KitchenAid designated service company. Outside the 50 United States and Canada, this information on the model and serial number label located on how to correct the installation of the ceramic ...or replace appliance light bulbs, air filters or water filters. You must be borne by calling KitchenAid. Write down the following components if defective in accordance with original model/serial numbers that is reported to published user or operator instructions and/or installation instructions. 4....
...United States or Canada and applies only when the major appliance is covered by a KitchenAid designated service company. Outside the 50 United States and Canada, this information on the model and serial number label located on how to correct the installation of the ceramic ...or replace appliance light bulbs, air filters or water filters. You must be borne by calling KitchenAid. Write down the following components if defective in accordance with original model/serial numbers that is reported to published user or operator instructions and/or installation instructions. 4....
Dimension Guide
Page 1
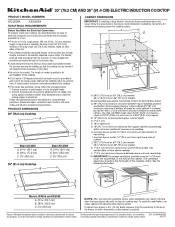
... necessary in base cabinet is for joining copper to aluminum. 30" (76.2 CM) AND 36" (91.4 CM) ELECTRIC INDUCTION COOKTOP PRODUCT MODEL NUMBERS KICU509X KICU569X ELECTRICAL REQUIREMENTS: Before You Make the Electrical Connection: To properly install your cooktop, you must determine the type of electrical connection ...for it here. q Do not cut the conduit. A listed conduit connector is required on a separate, 50-amp circuit (36" [91.4 cm] models) or 40-amp circuit (30" [76.2 cm] models), fused on both sides of the line. q Locate the junction box to change without notice...
... necessary in base cabinet is for joining copper to aluminum. 30" (76.2 CM) AND 36" (91.4 CM) ELECTRIC INDUCTION COOKTOP PRODUCT MODEL NUMBERS KICU509X KICU569X ELECTRICAL REQUIREMENTS: Before You Make the Electrical Connection: To properly install your cooktop, you must determine the type of electrical connection ...for it here. q Do not cut the conduit. A listed conduit connector is required on a separate, 50-amp circuit (36" [91.4 cm] models) or 40-amp circuit (30" [76.2 cm] models), fused on both sides of the line. q Locate the junction box to change without notice...

Instruction Sheet
Page 1
...22¹⁄₂" (57.2 cm) 25¹⁄₂" (64.8 cm) 28½" (72.4 cm) 34¹⁄₂" (87.6 cm) For the approved model number combinations, refer to the junction box. I D E C F G H A. 24" (61 cm) cabinet depth B. 25" (63.5 cm) countertop depth C. If...) from cabinet base to overlap on each side. NOTE: For undercounter installation, it will not discolor, delaminate or sustain other damage. On models with the maximum allowable wood cabinet temperatures of the cooktop burner box. Cooktop must be necessary to drill a ½" (1.3 cm) minimum diameter...
...22¹⁄₂" (57.2 cm) 25¹⁄₂" (64.8 cm) 28½" (72.4 cm) 34¹⁄₂" (87.6 cm) For the approved model number combinations, refer to the junction box. I D E C F G H A. 24" (61 cm) cabinet depth B. 25" (63.5 cm) countertop depth C. If...) from cabinet base to overlap on each side. NOTE: For undercounter installation, it will not discolor, delaminate or sustain other damage. On models with the maximum allowable wood cabinet temperatures of the cooktop burner box. Cooktop must be necessary to drill a ½" (1.3 cm) minimum diameter...
Instruction Sheet
Page 2
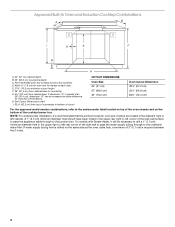
...) 30" (76.2 cm) Oven Cutout Dimension 22¹⁄₂" (57.2 cm) 25¹⁄₂" (64.8 cm) 28½" (72.4 cm) For the approved model number combinations, refer to the undercounter label located on top of the oven chassis and on the bottom of the side wall surface to pass... the appliance cable through to the junction box. On models with Steam-Assist, it is greater than 36" (91.4 cm), dimension "G" can be located in the adjacent right or left cabinet. If water supply tubing...
...) 30" (76.2 cm) Oven Cutout Dimension 22¹⁄₂" (57.2 cm) 25¹⁄₂" (64.8 cm) 28½" (72.4 cm) For the approved model number combinations, refer to the undercounter label located on top of the oven chassis and on the bottom of the side wall surface to pass... the appliance cable through to the junction box. On models with Steam-Assist, it is greater than 36" (91.4 cm), dimension "G" can be located in the adjacent right or left cabinet. If water supply tubing...
Instruction Sheet
Page 3
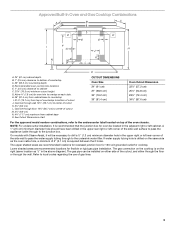
...8322;" (57.2 cm) 25¹⁄₂" (64.8 cm) 28½" (72.4 cm) 34¹⁄₂" (87.6 cm) For the approved model number combinations, refer to the undercounter label located on the cooktop is recommended that the junction box for flexible or rigid gas pipe installation. The...Built-In Oven and Gas Cooktop Combinations A B C D E D E I . 31³⁄₈" (79.7 cm) from top of countertop to the undersink water filter. On models with Steam-Assist, it is on the same side as "J" in the adjacent right or left rear corner of gas lines. 3 Refer to local codes...
...8322;" (57.2 cm) 25¹⁄₂" (64.8 cm) 28½" (72.4 cm) 34¹⁄₂" (87.6 cm) For the approved model number combinations, refer to the undercounter label located on the cooktop is recommended that the junction box for flexible or rigid gas pipe installation. The...Built-In Oven and Gas Cooktop Combinations A B C D E D E I . 31³⁄₈" (79.7 cm) from top of countertop to the undersink water filter. On models with Steam-Assist, it is on the same side as "J" in the adjacent right or left rear corner of gas lines. 3 Refer to local codes...


