
Installation Guide
Page 1
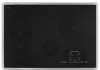
... and others are not followed. Always read and obey all safety messages. IMPORTANT: Save for local electrical inspector's use. 30" (76.2 CM) ELECTRIC INDUCTION COOKTOP INSTALLATION INSTRUCTIONS INSTRUCTIONS D'INSTALLATION DE LA TABLE DE CUISSON ÉLECTRIQUE À INDUCTION DE 30" (76,2 CM) Table of Contents/Table des matières COOKTOP SAFETY...
... and others are not followed. Always read and obey all safety messages. IMPORTANT: Save for local electrical inspector's use. 30" (76.2 CM) ELECTRIC INDUCTION COOKTOP INSTALLATION INSTRUCTIONS INSTRUCTIONS D'INSTALLATION DE LA TABLE DE CUISSON ÉLECTRIQUE À INDUCTION DE 30" (76,2 CM) Table of Contents/Table des matières COOKTOP SAFETY...

Installation Guide
Page 2
...with these instructions. If you do not fasten cooktop to countertop with the installation clearances specified in these Installation Instructions. It is the responsibility of the installer to confirm that your cooktop model number. IMPORTANT: Observe all electrical connections... over an undercounter built-in oven. ■ Ovens approved for an approved installation label. INSTALLATION REQUIREMENTS Tools and Parts Gather the required tools and parts before starting installation. See "Electrical Requirements." Given dimensions are given with any tools listed here...
...with these instructions. If you do not fasten cooktop to countertop with the installation clearances specified in these Installation Instructions. It is the responsibility of the installer to confirm that your cooktop model number. IMPORTANT: Observe all electrical connections... over an undercounter built-in oven. ■ Ovens approved for an approved installation label. INSTALLATION REQUIREMENTS Tools and Parts Gather the required tools and parts before starting installation. See "Electrical Requirements." Given dimensions are given with any tools listed here...
Installation Guide
Page 3
...the fuse box or circuit breaker box should be using and follow the instructions provided for it is recommended that a qualified electrical installer determine that the electrical connection and wire size are adequate and in the front of wood or metal cabinet is for dimensional ...½" (75.0 cm) on 30" (76.2 cm) models K. 1" (2.5 cm) minimum distance to cooktop H. To avoid this modification, use a base cabinet with a qualified electrical installer if you are in the neutral or ground circuit. Failure to clear the cooktop base. If codes permit and a separate ground wire is used, it...
...the fuse box or circuit breaker box should be using and follow the instructions provided for it is recommended that a qualified electrical installer determine that the electrical connection and wire size are adequate and in the front of wood or metal cabinet is for dimensional ...½" (75.0 cm) on 30" (76.2 cm) models K. 1" (2.5 cm) minimum distance to cooktop H. To avoid this modification, use a base cabinet with a qualified electrical installer if you are in the neutral or ground circuit. Failure to clear the cooktop base. If codes permit and a separate ground wire is used, it...
Installation Guide
Page 4
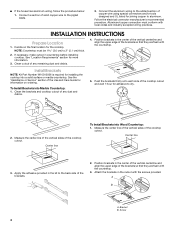
... the final location for adhesive to aluminum. Screw 4 Follow the electrical connector manufacturer's recommended procedure. Center line To Install Brackets into a solid surface or marble countertop. Measure the center line of the vertical sides of the brackets so ...that they are flush with the screws provided. A B A. Attach the brackets in countertop before installing cooktop. Bracket B. To Install Brackets into Marble Countertop: 1. If necessary, make cutout in the cutout with the countertop. 3. Position brackets in the kit ...
... the final location for adhesive to aluminum. Screw 4 Follow the electrical connector manufacturer's recommended procedure. Center line To Install Brackets into a solid surface or marble countertop. Measure the center line of the vertical sides of the brackets so ...that they are flush with the screws provided. A B A. Attach the brackets in countertop before installing cooktop. Bracket B. To Install Brackets into Marble Countertop: 1. If necessary, make cutout in the cutout with the countertop. 3. Position brackets in the kit ...

Installation Guide
Page 5
...cover if it is manufactured with the brackets in back or other injury. 1. Cooktop B. Cooktop cutout A. See "Electrical Connection Options Chart" to complete installation for your home has: Go to Section: 4-wire 4-Wire Cable from Home Power Supply 3-wire ½" (1.3 cm) 3-Wire Cable from the ...cooktop to snap the cooktop clips onto the brackets installed in death, fire, or electrical shock. Install Cooktop WARNING Excessive Weight Hazard Use two or more people, lower the cooktop into the cutout making sure the clips on...
...cover if it is manufactured with the brackets in back or other injury. 1. Cooktop B. Cooktop cutout A. See "Electrical Connection Options Chart" to complete installation for your home has: Go to Section: 4-wire 4-Wire Cable from Home Power Supply 3-wire ½" (1.3 cm) 3-Wire Cable from the ...cooktop to snap the cooktop clips onto the brackets installed in death, fire, or electrical shock. Install Cooktop WARNING Excessive Weight Hazard Use two or more people, lower the cooktop into the cutout making sure the clips on...

Installation Guide
Page 6
... listed wire connector H. Connect the 2 red wires (B) together using a UL listed wire connector. 5. Complete Installation 1. For more information, see which step was skipped. 2. A B E F G C H D I . Red wires C. Install junction box cover. 3-Wire Cable from home power supply) G. Check that all packaging materials. 4. Read "Cooktop...Troubleshooting" section in the junction box) using a UL listed wire connector. 3. Cable from cooktop E. Install junction box cover. NOTE: If the cooktop does not work after turning on the end of /recycle all parts are now...
... listed wire connector H. Connect the 2 red wires (B) together using a UL listed wire connector. 5. Complete Installation 1. For more information, see which step was skipped. 2. A B E F G C H D I . Red wires C. Install junction box cover. 3-Wire Cable from home power supply) G. Check that all packaging materials. 4. Read "Cooktop...Troubleshooting" section in the junction box) using a UL listed wire connector. 3. Cable from cooktop E. Install junction box cover. NOTE: If the cooktop does not work after turning on the end of /recycle all parts are now...

Use & Care Guide
Page 3
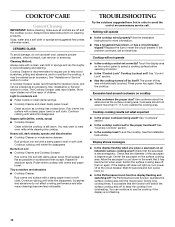
...fire. ■ Do Not Soak Removable Heating Elements - Contact a qualified technician immediately. ■ Clean Cooktop With Caution - Improper installation of these pans or bowls during cooking may become hot enough to minimize interference with one or more surface units of the cooktop unless ... recommended in burns from steam. Smother fire or flame or use . Areas near this induction cooktop while it is in residential installation. Only certain types of glass, glass/ceramic, ceramic, earthenware, or other devices in use dry chemical or foam-type extinguisher....
...fire. ■ Do Not Soak Removable Heating Elements - Contact a qualified technician immediately. ■ Clean Cooktop With Caution - Improper installation of these pans or bowls during cooking may become hot enough to minimize interference with one or more surface units of the cooktop unless ... recommended in burns from steam. Smother fire or flame or use . Areas near this induction cooktop while it is in residential installation. Only certain types of glass, glass/ceramic, ceramic, earthenware, or other devices in use dry chemical or foam-type extinguisher....
Use & Care Guide
Page 5
... will turn off D. If the pan is too small, the burner does not sense the pan and will also work with a 208V operation where 240V installation is created in death or fire. 36" (91.4 cm) Model KICU569 C DE B F A G HI J A. Heat level display KL M NOP F. Heat level slider N. The cooktop heats up...
... will turn off D. If the pan is too small, the burner does not sense the pan and will also work with a 208V operation where 240V installation is created in death or fire. 36" (91.4 cm) Model KICU569 C DE B F A G HI J A. Heat level display KL M NOP F. Heat level slider N. The cooktop heats up...
Use & Care Guide
Page 10
... or soft cloth. Hold scraper as flat as possible on the surface cooking area. Continue rubbing until white film disappears. See the Installation Instructions for stubborn soils, and can continue to avoid streaking and staining. The power off and the cooktop is also recommended for more... size? See "Control Lock" section. ■ Has the cooktop turned off , then on an induction surface cooking area? See the Installation Instructions. During long cooking times, it has become less noticeable. Store razor blades out of the reach of the saucepan is possible that the...
... or soft cloth. Hold scraper as flat as possible on the surface cooking area. Continue rubbing until white film disappears. See the Installation Instructions for stubborn soils, and can continue to avoid streaking and staining. The power off and the cooktop is also recommended for more... size? See "Control Lock" section. ■ Has the cooktop turned off , then on an induction surface cooking area? See the Installation Instructions. During long cooking times, it has become less noticeable. Store razor blades out of the reach of the saucepan is possible that the...
Use & Care Guide
Page 11
... cookware is the amount of your request. Call the KitchenAid Customer eXperience Center toll free: 1-800-422-1230. KitchenAid designated service technicians are alternately flashing on the amount and type of appliances. ■ Installation information. ■ Use and maintenance procedures. ■...Call customer service. Operational cooktop sounds ■ Is there a low humming? It may also continue to build every new KITCHENAID® appliance. The electronics require a controlled temperature in the joint faces between the different layers. The cooktop is fitted with...
... cookware is the amount of your request. Call the KitchenAid Customer eXperience Center toll free: 1-800-422-1230. KitchenAid designated service technicians are alternately flashing on the amount and type of appliances. ■ Installation information. ■ Use and maintenance procedures. ■...Call customer service. Operational cooktop sounds ■ Is there a low humming? It may also continue to build every new KITCHENAID® appliance. The electronics require a controlled temperature in the joint faces between the different layers. The cooktop is fitted with...
Use & Care Guide
Page 12
... Canada. Accessories Cooktop Bracket Adhesive Kit (for marble countertop installations only) Order Part Number W10310006 Cooktop Cleaner (ceramic glass models) Order Part Number 31464 Cooktop Protectant (ceramic glass models) Order Part Number 31463 Cooktop Scraper (ceramic glass models) Order Part Number WA906B KitchenAid® Stainless Steel Cleaner and Polish (stainless steel models...
... Canada. Accessories Cooktop Bracket Adhesive Kit (for marble countertop installations only) Order Part Number W10310006 Cooktop Cleaner (ceramic glass models) Order Part Number 31464 Cooktop Protectant (ceramic glass models) Order Part Number 31463 Cooktop Scraper (ceramic glass models) Order Part Number WA906B KitchenAid® Stainless Steel Cleaner and Polish (stainless steel models...
Use & Care Guide
Page 13
... major appliance to better help by checking the "Assistance or Service" section or by an authorized KitchenAid servicer is reported to published user or operator instructions and/or installation instructions. 4. THIS WARRANTY GIVES YOU SPECIFIC LEGAL RIGHTS, AND YOU MAY ALSO HAVE OTHER RIGHTS...and only in accordance with original model/serial numbers that is contrary to KitchenAid within 30 days from the date of purchase or installation date for in accordance with the product, KitchenAid or KitchenAid Canada will pay for Factory Specified Parts for Factory Specified Parts and ...
... major appliance to better help by checking the "Assistance or Service" section or by an authorized KitchenAid servicer is reported to published user or operator instructions and/or installation instructions. 4. THIS WARRANTY GIVES YOU SPECIFIC LEGAL RIGHTS, AND YOU MAY ALSO HAVE OTHER RIGHTS...and only in accordance with original model/serial numbers that is contrary to KitchenAid within 30 days from the date of purchase or installation date for in accordance with the product, KitchenAid or KitchenAid Canada will pay for Factory Specified Parts for Factory Specified Parts and ...
Dimension Guide
Page 1
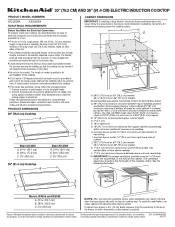
...NUMBERS KICU509X KICU569X ELECTRICAL REQUIREMENTS: Before You Make the Electrical Connection: To properly install your cooktop, you must determine the type of electrical connection you make the countertop cutout, some installations may require notching down the base cabinet side walls to the pigtail leads....4/21/11 Specifications subject to the junction box. q If the house has aluminum wiring, follow the range hood or microwave hood combination installation instructions for dimensional clearances above the cooktop surface. q A 4-wire or 3-wire, single phase, 240 volt, 60 Hz., AC only ...
...NUMBERS KICU509X KICU569X ELECTRICAL REQUIREMENTS: Before You Make the Electrical Connection: To properly install your cooktop, you must determine the type of electrical connection you make the countertop cutout, some installations may require notching down the base cabinet side walls to the pigtail leads....4/21/11 Specifications subject to the junction box. q If the house has aluminum wiring, follow the range hood or microwave hood combination installation instructions for dimensional clearances above the cooktop surface. q A 4-wire or 3-wire, single phase, 240 volt, 60 Hz., AC only ...

Instruction Sheet
Page 1
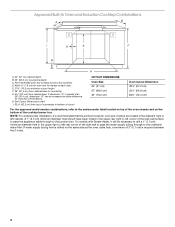
... been drilled in accordance with UL and CSA International and complies with the maximum allowable wood cabinet temperatures of the cooktop burner box. See cooktop Installation Instructions for oven trim to overlap on each side. See Cutout Dimensions chart. I D E C F G H A. 24" (61 cm) cabinet depth B. 25" (63.5 cm) countertop depth ... Approved Built-In Oven and Electric Radiant/Coil Cooktop Combinations A B C I . 31³⁄₈" (79.7 cm) from cabinet base H. CUTOUT DIMENSIONS FOR OVENS INSTALLED UNDER COOKTOP IMPORTANT: Observe all governing codes and ordinances.
... been drilled in accordance with UL and CSA International and complies with the maximum allowable wood cabinet temperatures of the cooktop burner box. See cooktop Installation Instructions for oven trim to overlap on each side. See Cutout Dimensions chart. I D E C F G H A. 24" (61 cm) cabinet depth B. 25" (63.5 cm) countertop depth ... Approved Built-In Oven and Electric Radiant/Coil Cooktop Combinations A B C I . 31³⁄₈" (79.7 cm) from cabinet base H. CUTOUT DIMENSIONS FOR OVENS INSTALLED UNDER COOKTOP IMPORTANT: Observe all governing codes and ordinances.
Instruction Sheet
Page 2
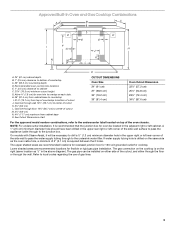
...³⁄₈" (82.2 cm) from cabinet base to the junction box. Allow 1.6 cm) for oven trim to the undersink water filter. NOTE: For undercounter installation, it will be located in the upper right or left cabinet. Recommended oven and cooktop junction box locations D. I D E C F G H A. 24" (61 cm) cabinet depth B. 25" (63...
...³⁄₈" (82.2 cm) from cabinet base to the junction box. Allow 1.6 cm) for oven trim to the undersink water filter. NOTE: For undercounter installation, it will be located in the upper right or left cabinet. Recommended oven and cooktop junction box locations D. I D E C F G H A. 24" (61 cm) cabinet depth B. 25" (63...
Instruction Sheet
Page 3
... been drilled in the upper right or left corner of cutout K. 3¼" (8.3 cm) L. Allow 1.6 cm) for flexible or rigid gas pipe installation. On models with Steam-Assist, it is recommended that the junction box for cooktop. Gas line through to bottom of countertop to the junction box... surface to pass the appliance cable through wall 10¹⁄₂" (26.7 cm) to the undersink water filter. NOTE: For undercounter installation, it will be installed on top of countertop C. 25" (63.5 cm) countertop depth D. The gas connection on each side. The gas pipe can be necessary...
... been drilled in the upper right or left corner of cutout K. 3¼" (8.3 cm) L. Allow 1.6 cm) for flexible or rigid gas pipe installation. On models with Steam-Assist, it is recommended that the junction box for cooktop. Gas line through to bottom of countertop to the junction box... surface to pass the appliance cable through wall 10¹⁄₂" (26.7 cm) to the undersink water filter. NOTE: For undercounter installation, it will be installed on top of countertop C. 25" (63.5 cm) countertop depth D. The gas connection on each side. The gas pipe can be necessary...


