Use & Care Guide
Page 1
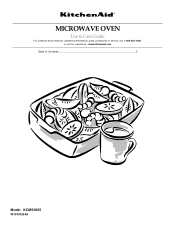
www.kitchenaid.com Table of Contents...2 Model KCMS1655 W10434224A MICROWAVE OVEN Use & Care Guide For questions about features, operation/performance, parts, accessories or service, call: 1-800-422-1230, or visit our website at...
www.kitchenaid.com Table of Contents...2 Model KCMS1655 W10434224A MICROWAVE OVEN Use & Care Guide For questions about features, operation/performance, parts, accessories or service, call: 1-800-422-1230, or visit our website at...

Use & Care Guide
Page 2
TABLE OF CONTENTS MICROWAVE OVEN SAFETY 3 INSTALLATION INSTRUCTIONS 5 Unpacking 5 Location Requirements 5 Electrical Requirements 5 PARTS AND FEATURES 6 Turntable 6 MICROWAVE OVEN CONTROL 6 Display 7 Start 7 Add 30 Seconds 7 Stop Cancel 7 Tones 7 Clock 7 Timer 7 Control Lock 7 MICROWAVE OVEN USE 8 Food Characteristics 8 Cooking Guidelines 8 ... Menu (sensor and non-sensor 11 Weight Defrost / Timed Defrost 12 MICROWAVE OVEN CARE 13 General Cleaning 13 TROUBLESHOOTING 14 ASSISTANCE OR SERVICE 15 Replacement Parts 15 Built-In Kits 15 WARRANTY 15 2
TABLE OF CONTENTS MICROWAVE OVEN SAFETY 3 INSTALLATION INSTRUCTIONS 5 Unpacking 5 Location Requirements 5 Electrical Requirements 5 PARTS AND FEATURES 6 Turntable 6 MICROWAVE OVEN CONTROL 6 Display 7 Start 7 Add 30 Seconds 7 Stop Cancel 7 Tones 7 Clock 7 Timer 7 Control Lock 7 MICROWAVE OVEN USE 8 Food Characteristics 8 Cooking Guidelines 8 ... Menu (sensor and non-sensor 11 Weight Defrost / Timed Defrost 12 MICROWAVE OVEN CARE 13 General Cleaning 13 TROUBLESHOOTING 14 ASSISTANCE OR SERVICE 15 Replacement Parts 15 Built-In Kits 15 WARRANTY 15 2

Use & Care Guide
Page 3
... messages. Call an authorized service company for example, closed , turn oven off, and disconnect the power cord, or shut off the pad and touch electrical parts involving a risk of electric shock. SAVE THESE INSTRUCTIONS 3 are able to be overheated beyond the boiling point without appearing to heat, cook, or dry food...
... messages. Call an authorized service company for example, closed , turn oven off, and disconnect the power cord, or shut off the pad and touch electrical parts involving a risk of electric shock. SAVE THESE INSTRUCTIONS 3 are able to be overheated beyond the boiling point without appearing to heat, cook, or dry food...
Use & Care Guide
Page 4
... products when appliance is operated in convection, combination, grill or "PAN BROWN" mode (on models with such features). ■ Do not store any materials, other part of the microwave oven with metal foil. It is particularly important that the oven door close properly and that there is in operation. ■ Do...a kitchen sink, in a wet basement, or near water - This will cause overheating of the FCC Rules. 4 It is important not to defeat or tamper with Part 18 of the microwave oven. ■ Do not cover or block any object between the oven front face and the door or allow soil or...
... products when appliance is operated in convection, combination, grill or "PAN BROWN" mode (on models with such features). ■ Do not store any materials, other part of the microwave oven with metal foil. It is particularly important that the oven door close properly and that there is in operation. ■ Do...a kitchen sink, in a wet basement, or near water - This will cause overheating of the FCC Rules. 4 It is important not to defeat or tamper with Part 18 of the microwave oven. ■ Do not cover or block any object between the oven front face and the door or allow soil or...

Use & Care Guide
Page 5
... to do not remove microwave inlet cover. The plug must be at the back and side of electric shock. Do not use an adapter. See "Parts and Features." Failure to ensure proper airflow. Do not use of the grounding plug can result in death, fire, or electrical shock. Recommended: ■ A time...
... to do not remove microwave inlet cover. The plug must be at the back and side of electric shock. Do not use an adapter. See "Parts and Features." Failure to ensure proper airflow. Do not use of the grounding plug can result in death, fire, or electrical shock. Recommended: ■ A time...

Use & Care Guide
Page 6
... serial number plate Turntable A B C D A. Support D. Shaft The turntable can rotate in either direction to reorder any of the parts. The rollers on the microwave oven cavity bottom. 2. Window C. Door open push button H. Removable turntable support J. See "Assistance or...support on the support should fit inside the turntable bottom ridge. Microwave oven light E. Turntable B. Hub C. Place the turntable on the support. PARTS AND FEATURES This manual may have some or all of the features shown here. Display F. The model you have purchased may cover several different ...
... serial number plate Turntable A B C D A. Support D. Shaft The turntable can rotate in either direction to reorder any of the parts. The rollers on the microwave oven cavity bottom. 2. Window C. Door open push button H. Removable turntable support J. See "Assistance or...support on the support should fit inside the turntable bottom ridge. Microwave oven light E. Turntable B. Hub C. Place the turntable on the support. PARTS AND FEATURES This manual may have some or all of the features shown here. Display F. The model you have purchased may cover several different ...
Use & Care Guide
Page 8
... turntable and appropriate cookware to the food. Plastic wrap should be slightly firm. Arranging If heating irregularly shaped or different sized foods, arrange the thinner parts and smaller sized items toward the center. Shielding Use small, flat pieces of aluminum foil to shield the thin pieces of food will continue to...
... turntable and appropriate cookware to the food. Plastic wrap should be slightly firm. Arranging If heating irregularly shaped or different sized foods, arrange the thinner parts and smaller sized items toward the center. Shielding Use small, flat pieces of aluminum foil to shield the thin pieces of food will continue to...
Use & Care Guide
Page 11
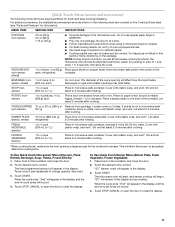
... g) ■ To avoid damage to accurately determine cooking time. This will appear in the following menu items are included on the Cooking Guide label (see "Parts and Features" for optimal results. ■ Cooking results may heat faster. "SC" (sensor cook) will allow the sensor to the microwave oven, do not use...
... g) ■ To avoid damage to accurately determine cooking time. This will appear in the following menu items are included on the Cooking Guide label (see "Parts and Features" for optimal results. ■ Cooking results may heat faster. "SC" (sensor cook) will allow the sensor to the microwave oven, do not use...
Use & Care Guide
Page 12
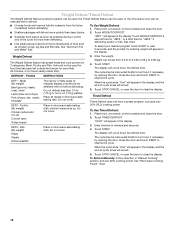
... outside the freezer for more than 1/4 lb (113 g) or two 4 oz (113 g) patties. Do not cover. 3. Touch STOP CANCEL or open the door to shield parts of food such as possible during or at the end of aluminum foil to clear the display.
... outside the freezer for more than 1/4 lb (113 g) or two 4 oz (113 g) patties. Do not cover. 3. Touch STOP CANCEL or open the door to shield parts of food such as possible during or at the end of aluminum foil to clear the display.
Use & Care Guide
Page 13
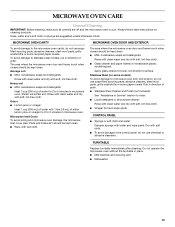
..., nonabrasive soaps and detergents: Heat 1 cup (250 mL) of grain. Microwave Inlet Cover To avoid arcing and microwave oven damage, the microwave inlet cover (see "Parts and Features") should be kept clean. ■ Wipe with wet cloth. TURNTABLE Replace turntable immediately after cleaning. Average soil ■ Mild, nonabrasive soaps and detergents...
..., nonabrasive soaps and detergents: Heat 1 cup (250 mL) of grain. Microwave Inlet Cover To avoid arcing and microwave oven damage, the microwave inlet cover (see "Parts and Features") should be kept clean. ■ Wipe with wet cloth. TURNTABLE Replace turntable immediately after cleaning. Average soil ■ Mild, nonabrasive soaps and detergents...

Use & Care Guide
Page 15
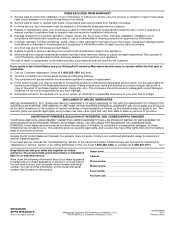
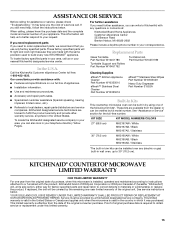
...microwave is installed, operated and maintained according to instructions attached to KitchenAid with the product, KitchenAid brand of the original consumer purchase. To locate factory specified parts in which it was purchased. KitchenAid designated service technicians are made with : ■ Features and ...this limited warranty. 15 In the U.S.A. KITCHENAID® COUNTERTOP MICROWAVE LIMITED WARRANTY ONE YEAR LIMITED WARRANTY For one -year limited warranty of the following trim kits*. It may save you use only factory specified parts. When calling, please know the purchase ...
...microwave is installed, operated and maintained according to instructions attached to KitchenAid with the product, KitchenAid brand of the original consumer purchase. To locate factory specified parts in which it was purchased. KitchenAid designated service technicians are made with : ■ Features and ...this limited warranty. 15 In the U.S.A. KITCHENAID® COUNTERTOP MICROWAVE LIMITED WARRANTY ONE YEAR LIMITED WARRANTY For one -year limited warranty of the following trim kits*. It may save you use only factory specified parts. When calling, please know the purchase ...
Use & Care Guide
Page 16
...AS PROVIDED HEREIN. In Canada call 1-800-422-1230. Damage resulting from your KitchenAid Countertop Microwave should be shipped to published user or operator instructions and/or installation instructions. 5. Repairs to parts or systems resulting from state to state or province to the appliance. 9. ...If you may have other damage to the finish of your authorized KitchenAid dealer to operate within 30 days from state to state...
...AS PROVIDED HEREIN. In Canada call 1-800-422-1230. Damage resulting from your KitchenAid Countertop Microwave should be shipped to published user or operator instructions and/or installation instructions. 5. Repairs to parts or systems resulting from state to state or province to the appliance. 9. ...If you may have other damage to the finish of your authorized KitchenAid dealer to operate within 30 days from state to state...
Warranty Information
Page 1
...assistance (Spanish speaking, hearing impaired, limited vision, etc.). ■ Referrals to local dealers, repair parts distributors and service companies. These kits are made with the product, KitchenAid brand of original purchase date is effective from the original date of purchase, when this limited warranty...by using one of your appliance. If you still need to order replacement parts, we recommend that you can be ordered by a KitchenAid designated service company. These factory specified parts will be provided by kit model number. This limited warranty is used ...
...assistance (Spanish speaking, hearing impaired, limited vision, etc.). ■ Referrals to local dealers, repair parts distributors and service companies. These kits are made with the product, KitchenAid brand of original purchase date is effective from the original date of purchase, when this limited warranty...by using one of your appliance. If you still need to order replacement parts, we recommend that you can be ordered by a KitchenAid designated service company. These factory specified parts will be provided by kit model number. This limited warranty is used ...

Warranty Information
Page 2
... calls to the designated service center. Consumable parts are responsible for repair or replacement. 4. If you also may have other rights that vary from unauthorized modifications made to microwave product failure. 8. KitchenAid will not be directed to forward the product... This warranty gives you specific legal rights, and you ever need service, first see the "Troubleshooting" section of KitchenAid, U.S.A. KITCHENAID SHALL NOT BE LIABLE FOR INCIDENTAL OR CONSEQUENTIAL DAMAGES. Write down the following information about your complete model number and ...
... calls to the designated service center. Consumable parts are responsible for repair or replacement. 4. If you also may have other rights that vary from unauthorized modifications made to microwave product failure. 8. KitchenAid will not be directed to forward the product... This warranty gives you specific legal rights, and you ever need service, first see the "Troubleshooting" section of KitchenAid, U.S.A. KITCHENAID SHALL NOT BE LIABLE FOR INCIDENTAL OR CONSEQUENTIAL DAMAGES. Write down the following information about your complete model number and ...

Installation Guide
Page 1
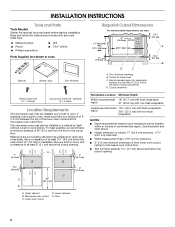
...;lectriques ou gaz, jusqu'à 30" (76,2 cm) de largeur Table of Contents / Table des matières MICROWAVE OVEN SAFETY 1 INSTALLATION INSTRUCTIONS 2 Tools and Parts 2 Location Requirements 2 Required Cutout Dimensions 2 Trim Kit Frame Dimensions 3 Electrical Requirements 3 Prepare Microwave Oven 3 Prepare Cutout/Cabinet Opening 4 Install the Microwave Oven 5 Install Trim Kit...
...;lectriques ou gaz, jusqu'à 30" (76,2 cm) de largeur Table of Contents / Table des matières MICROWAVE OVEN SAFETY 1 INSTALLATION INSTRUCTIONS 2 Tools and Parts 2 Location Requirements 2 Required Cutout Dimensions 2 Trim Kit Frame Dimensions 3 Electrical Requirements 3 Prepare Microwave Oven 3 Prepare Cutout/Cabinet Opening 4 Install the Microwave Oven 5 Install Trim Kit...
Installation Guide
Page 2
...cm) max. 3" (7.6 cm) D C 1 2.7 cm) B A. Microwave oven cutout C. INSTALLATION INSTRUCTIONS Tools and Parts Tools Needed Gather the required tools and parts before starting installation. Read and follow the instructions provided with non-flush receptacle NOTES: ■ Depth requirements depend upon receptacle...with any tools listed here. ■ Measuring tape ■ Pencil ■ Phillips screwdriver ■ Drill ■ 7/64" drill bit Parts Supplied (not shown to open and close freely. Cutout centerline Short screws (14) (11 + 3 extra) Long wood screws (6 -...
...cm) max. 3" (7.6 cm) D C 1 2.7 cm) B A. Microwave oven cutout C. INSTALLATION INSTRUCTIONS Tools and Parts Tools Needed Gather the required tools and parts before starting installation. Read and follow the instructions provided with non-flush receptacle NOTES: ■ Depth requirements depend upon receptacle...with any tools listed here. ■ Measuring tape ■ Pencil ■ Phillips screwdriver ■ Drill ■ 7/64" drill bit Parts Supplied (not shown to open and close freely. Cutout centerline Short screws (14) (11 + 3 extra) Long wood screws (6 -...

