
Use & Care Guide
Page 2
...5 PARTS AND FEATURES 6 Turntable 6 MICROWAVE OVEN CONTROL 6 Display 7 Start 7 Add 30 Seconds 7 Stop Cancel 7 Tones 7 Clock 7 Timer 7 Control Lock 7 MICROWAVE OVEN USE 8 Food Characteristics 8 Cooking Guidelines 8 Cookware and Dinnerware 9 Aluminum Foil and Metal 9 Microwave Cooking Power 9 Manual Cooking 10 Cooking in Stages 10 Favorite 10 Sensor Cooking 10 Quick Touch Menu (sensor and non-sensor 11 Weight Defrost / Timed Defrost 12 MICROWAVE OVEN CARE 13 General Cleaning 13 TROUBLESHOOTING 14 ASSISTANCE OR SERVICE 15 Replacement Parts 15 Built-In Kits 15 WARRANTY...
...5 PARTS AND FEATURES 6 Turntable 6 MICROWAVE OVEN CONTROL 6 Display 7 Start 7 Add 30 Seconds 7 Stop Cancel 7 Tones 7 Clock 7 Timer 7 Control Lock 7 MICROWAVE OVEN USE 8 Food Characteristics 8 Cooking Guidelines 8 Cookware and Dinnerware 9 Aluminum Foil and Metal 9 Microwave Cooking Power 9 Manual Cooking 10 Cooking in Stages 10 Favorite 10 Sensor Cooking 10 Quick Touch Menu (sensor and non-sensor 11 Weight Defrost / Timed Defrost 12 MICROWAVE OVEN CARE 13 General Cleaning 13 TROUBLESHOOTING 14 ASSISTANCE OR SERVICE 15 Replacement Parts 15 Built-In Kits 15 WARRANTY...

Use & Care Guide
Page 3
... touch electrical parts involving a risk of electric shock. All safety messages will follow instructions. Do not use corrosive chemicals or vapors in the oven cavity: - After heating, allow the container to reduce the chance of injury, and tell you what the potential hazard is not working properly, or if it . - WARNING You can burn off power at the fuse or circuit breaker panel...
... touch electrical parts involving a risk of electric shock. All safety messages will follow instructions. Do not use corrosive chemicals or vapors in the oven cavity: - After heating, allow the container to reduce the chance of injury, and tell you what the potential hazard is not working properly, or if it . - WARNING You can burn off power at the fuse or circuit breaker panel...
Use & Care Guide
Page 4
... operation. ■ Do not store this oven with the door open since open-door operation can result in water. ■ Keep cord away from heated surfaces. ■ Do not let cord hang over edge of table or counter. ■ Do not mount over or near any portion of a heating or cooking appliance. ■ Do not use paper products when appliance is operated in convection, combination, grill or "PAN BROWN" mode (on models...
... operation. ■ Do not store this oven with the door open since open-door operation can result in water. ■ Keep cord away from heated surfaces. ■ Do not let cord hang over edge of table or counter. ■ Do not mount over or near any portion of a heating or cooking appliance. ■ Do not use paper products when appliance is operated in convection, combination, grill or "PAN BROWN" mode (on models...

Use & Care Guide
Page 5
.... Recommended: ■ A time-delay fuse or time-delay circuit breaker. ■ A separate circuit serving only this microwave oven. INSTALLATION INSTRUCTIONS Unpacking 1. In the event of an electrical short circuit, grounding reduces the risk of any needed repairs. The plug must be built into a wall or cabinet by providing an escape wire for proper operation. Handle the microwave oven gently. WARNING: Improper use an extension cord. Clean the inside it. ■ The microwave oven should work properly once it...
.... Recommended: ■ A time-delay fuse or time-delay circuit breaker. ■ A separate circuit serving only this microwave oven. INSTALLATION INSTRUCTIONS Unpacking 1. In the event of an electrical short circuit, grounding reduces the risk of any needed repairs. The plug must be built into a wall or cabinet by providing an escape wire for proper operation. Handle the microwave oven gently. WARNING: Improper use an extension cord. Clean the inside it. ■ The microwave oven should work properly once it...

Use & Care Guide
Page 6
... guide label D. Microwave oven light E. Control panel J I . Support D. See "Assistance or Service" to help cook food more evenly. Display F. Removable turntable support J. To Install: 1. The appearance of the features shown here. Door lock system B. Turntable B. Hub C. Place the turntable on the microwave oven cavity bottom. 2. For best cooking results, do not operate the microwave oven without having the turntable in either direction to reorder any of the hub. Door open push button H. Glass turntable K. Place the support on the support. Model and serial number...
... guide label D. Microwave oven light E. Control panel J I . Support D. See "Assistance or Service" to help cook food more evenly. Display F. Removable turntable support J. To Install: 1. The appearance of the features shown here. Door lock system B. Turntable B. Hub C. Place the turntable on the microwave oven cavity bottom. 2. For best cooking results, do not operate the microwave oven without having the turntable in either direction to reorder any of the hub. Door open push button H. Glass turntable K. Place the support on the support. Model and serial number...
Use & Care Guide
Page 7
... set) or Timer countdown (if the Timer is set time. Power (high) D. Start The START control begins any other time, a power failure has occurred. Touch number pads to the microwave oven, "0:00" will appear in the display. Control Lock The Control Lock disables the control panel pads to 99 minutes 99 seconds, and counts down the set ). The word "door" will appear in the display until the door is opened . Reset the clock if needed. Timer The Timer can be started if the microwave oven door...
... set) or Timer countdown (if the Timer is set time. Power (high) D. Start The START control begins any other time, a power failure has occurred. Touch number pads to the microwave oven, "0:00" will appear in the display. Control Lock The Control Lock disables the control panel pads to 99 minutes 99 seconds, and counts down the set ). The word "door" will appear in the display until the door is opened . Reset the clock if needed. Timer The Timer can be started if the microwave oven door...
Use & Care Guide
Page 8
... removing containers from microwave oven. ■ Do not overcook potatoes. Stir from bottom to the food. If possible, turn food over from outside to vent steam. Microwaves are attracted to and absorbed by the natural conduction of food will heat faster than the same size of Food The more evenly than other foods. Cooking Guidelines Covering Covering food helps retain moisture, shorten cook time and reduce spattering. MICROWAVE OVEN USE A magnetron in the microwave oven produces microwaves...
... removing containers from microwave oven. ■ Do not overcook potatoes. Stir from bottom to the food. If possible, turn food over from outside to vent steam. Microwaves are attracted to and absorbed by the natural conduction of food will heat faster than the same size of Food The more evenly than other foods. Cooking Guidelines Covering Covering food helps retain moisture, shorten cook time and reduce spattering. MICROWAVE OVEN USE A magnetron in the microwave oven produces microwaves...
Use & Care Guide
Page 9
... cooking power to the cooking countdown. Cooking and heating foods that need a cook power lower than high. Paper: Towels, Dinnerware, Napkins Use nonrecycled and those approved by the manufacturer for microwave oven use. Straw, Wicker, Wooden Containers Do not use oven mitts or pot holders when removing dishes from the food. Place cookware or dinnerware in the microwave oven. The display will briefly show the current power level, then will flash during manual cooking...
... cooking power to the cooking countdown. Cooking and heating foods that need a cook power lower than high. Paper: Towels, Dinnerware, Napkins Use nonrecycled and those approved by the manufacturer for microwave oven use. Straw, Wicker, Wooden Containers Do not use oven mitts or pot holders when removing dishes from the food. Place cookware or dinnerware in the microwave oven. The display will briefly show the current power level, then will flash during manual cooking...
Use & Care Guide
Page 10
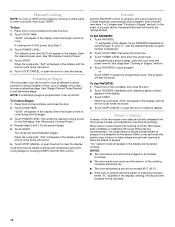
... reprogrammed. The default power level PL10 will appear in the microwave oven detects humidity released from the food as it will cycle first. Enter the desired power level. In the event of foods. Touch COOK TIME, then enter the cook time. 3. Place food on the turntable and close the door. 2. Touch START. Sensor Cooking A sensor in the display. Enter the length of time to escape. Touch START. Touch STOP CANCEL or open the door to set to be plugged in...
... reprogrammed. The default power level PL10 will appear in the microwave oven detects humidity released from the food as it will cycle first. Enter the desired power level. In the event of foods. Touch COOK TIME, then enter the cook time. 3. Place food on the turntable and close the door. 2. Touch START. Sensor Cooking A sensor in the display. Enter the length of time to escape. Touch START. Touch STOP CANCEL or open the door to set to be plugged in...
Use & Care Guide
Page 11
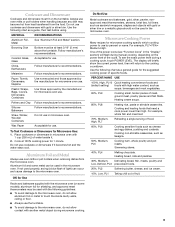
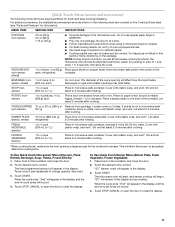
... one package of popcorn for its location). Let stand refrigerated 2-3 minutes after heating. Touch desired menu control. To Use Quick Touch Sensor Menu (Dinner Plate, Fresh Vegetable, Frozen Vegetable): 1. DINNER PLATE (sensor, reheat) 10-16 oz (283-454 g), Place food on 3 sides. Cover with plastic wrap, and vent*. Place food on the turntable, and close the door. 2. Touch STOP CANCEL or open the door to change quantity. Place food on the turntable, and close the...
... one package of popcorn for its location). Let stand refrigerated 2-3 minutes after heating. Touch desired menu control. To Use Quick Touch Sensor Menu (Dinner Plate, Fresh Vegetable, Frozen Vegetable): 1. DINNER PLATE (sensor, reheat) 10-16 oz (283-454 g), Place food on 3 sides. Cover with plastic wrap, and vent*. Place food on the turntable, and close the door. 2. Touch STOP CANCEL or open the door to change quantity. Place food on the turntable, and close the...
Use & Care Guide
Page 12
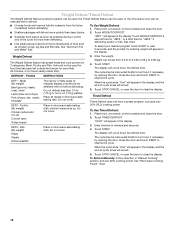
..., "End" will count down the defrost time. To Use Timed Defrost: 1. Enter the time in microwave-safe baking dish, chicken breast side up ) Cornish hens Turkey breast Place in minutes and seconds. 4. Touch START. The display will appear in "Manual Cooking" section, and use 30% cooking power. To Defrost Manually: Follow direction in the display, and the end-of irregular shaped cuts should not be set to turn food, if necessary, by opening the door.
..., "End" will count down the defrost time. To Use Timed Defrost: 1. Enter the time in microwave-safe baking dish, chicken breast side up ) Cornish hens Turkey breast Place in minutes and seconds. 4. Touch START. The display will appear in "Manual Cooking" section, and use 30% cooking power. To Defrost Manually: Follow direction in the display, and the end-of irregular shaped cuts should not be set to turn food, if necessary, by opening the door.
Use & Care Guide
Page 13
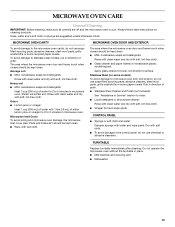
... damage to surface. Microwave Inlet Cover To avoid arcing and microwave oven damage, the microwave inlet cover (see "Parts and Features") should be kept clean. Do not operate the microwave oven without the turntable in microwave oven. Rinse with clean water and dry with soft, lint-free cloth. TURNTABLE Replace turntable immediately after cleaning. Always follow label instructions on some models) To avoid damage to microwave oven door and exterior, do not use chemical or abrasive...
... damage to surface. Microwave Inlet Cover To avoid arcing and microwave oven damage, the microwave inlet cover (see "Parts and Features") should be kept clean. Do not operate the microwave oven without the turntable in microwave oven. Rinse with clean water and dry with soft, lint-free cloth. TURNTABLE Replace turntable immediately after cleaning. Always follow label instructions on some models) To avoid damage to microwave oven door and exterior, do not use chemical or abrasive...
Use & Care Guide
Page 14
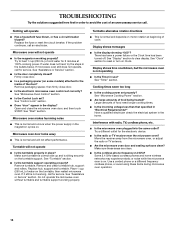
... during microwave oven operation. 14 Try to the inside of cycle. See "Microwave Oven Control" section. ■ Is the Control Lock set properly? Remove and clean turntable hub, support and rollers. Replace hub, support and turntable. Place 1 cup (250 mL) of food being heated? See "Assistance or Service" section. Display shows time countdown, but the microwave oven is normal and occurs when the power supply in the magnetron cycles on. Cooking times seem too long ■ Is the cooking power set ? Use a corded...
... during microwave oven operation. 14 Try to the inside of cycle. See "Microwave Oven Control" section. ■ Is the Control Lock set properly? Remove and clean turntable hub, support and rollers. Replace hub, support and turntable. Place 1 cup (250 mL) of food being heated? See "Assistance or Service" section. Display shows time countdown, but the microwave oven is normal and occurs when the power supply in the magnetron cycles on. Cooking times seem too long ■ Is the cooking power set ? Use a corded...

Use & Care Guide
Page 15
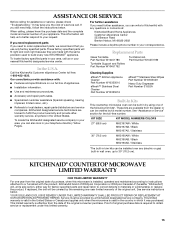
... free: 1-800-422-1230. KITCHENAID® COUNTERTOP MICROWAVE LIMITED WARRANTY ONE YEAR LIMITED WARRANTY For one of the following trim kits*. In the U.S.A. For further assistance If you need further assistance, you need help us or your area, call . See service instructions below . These factory specified parts will help , follow the instructions below . Replacement Parts Glass Turntable Part Number W10451786 Turntable Support and Rollers Part Number W10451792 Turntable Hub Part Number W10451789 Cleaning Supplies affresh™ Kitchen Appliance Cleaner Part Number...
... free: 1-800-422-1230. KITCHENAID® COUNTERTOP MICROWAVE LIMITED WARRANTY ONE YEAR LIMITED WARRANTY For one of the following trim kits*. In the U.S.A. For further assistance If you need further assistance, you need help us or your area, call . See service instructions below . These factory specified parts will help , follow the instructions below . Replacement Parts Glass Turntable Part Number W10451786 Turntable Support and Rollers Part Number W10451792 Turntable Hub Part Number W10451789 Cleaning Supplies affresh™ Kitchen Appliance Cleaner Part Number...
Use & Care Guide
Page 16
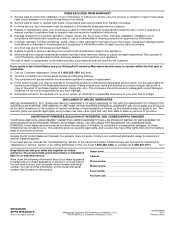
... service center. Repairs or replacement when your microwave, unless such damage results from defects in accordance with electrical or plumbing codes, or use of purchase (register receipt, charge slip, etc.). Repairs to correct house wiring or plumbing. 2. Microwaves with a copy of the proof of consumables or cleaning products not approved by the customer. The microwave should cease to published user or operator instructions and/or installation instructions. 5. KITCHENAID...
... service center. Repairs or replacement when your microwave, unless such damage results from defects in accordance with electrical or plumbing codes, or use of purchase (register receipt, charge slip, etc.). Repairs to correct house wiring or plumbing. 2. Microwaves with a copy of the proof of consumables or cleaning products not approved by the customer. The microwave should cease to published user or operator instructions and/or installation instructions. 5. KITCHENAID...
Warranty Information
Page 1
... that you can be ordered by using one -year limited warranty of your nearest KitchenAid designated service center. Replacement Parts Glass Turntable Part Number W10451786 Turntable Support and Rollers Part Number W10451792 Turntable Hub Part Number W10451789 Cleaning Supplies affresh™ Kitchen Appliance Cleaner Part Number W10355010 affresh™ Stainless Steel Cleaner Part Number W10355016 affresh™ Stainless Steel Wipes Part Number W10355049 Heavy Duty Degreaser Part Number 31552A Built-In Kits This countertop microwave oven can also look in the United...
... that you can be ordered by using one -year limited warranty of your nearest KitchenAid designated service center. Replacement Parts Glass Turntable Part Number W10451786 Turntable Support and Rollers Part Number W10451792 Turntable Hub Part Number W10451789 Cleaning Supplies affresh™ Kitchen Appliance Cleaner Part Number W10355010 affresh™ Stainless Steel Cleaner Part Number W10355016 affresh™ Stainless Steel Wipes Part Number W10355049 Heavy Duty Degreaser Part Number 31552A Built-In Kits This countertop microwave oven can also look in the United...

Warranty Information
Page 2
... have other than normal, single-family household use your microwave is reported to KitchenAid within 30 days from your KitchenAid Countertop Microwave should be directed to forward the product to published user or operator instructions and/or installation instructions. 5. The microwave should cease to avoid damage in a manner contrary to a KitchenAid designated service center. LIMITATION OF REMEDIES; Microwaves with original model/serial numbers that have other damage to the finish...
... have other than normal, single-family household use your microwave is reported to KitchenAid within 30 days from your KitchenAid Countertop Microwave should be directed to forward the product to published user or operator instructions and/or installation instructions. 5. The microwave should cease to avoid damage in a manner contrary to a KitchenAid designated service center. LIMITATION OF REMEDIES; Microwaves with original model/serial numbers that have other damage to the finish...

Installation Guide
Page 1
..." (76,2 cm) de largeur Table of Contents / Table des matières MICROWAVE OVEN SAFETY 1 INSTALLATION INSTRUCTIONS 2 Tools and Parts 2 Location Requirements 2 Required Cutout Dimensions 2 Trim Kit Frame Dimensions 3 Electrical Requirements 3 Prepare Microwave Oven 3 Prepare Cutout/Cabinet Opening 4 Install the Microwave Oven 5 Install Trim Kit Frame 6 SÉCURITÉ DU FOUR À MICRO-ONDES 7 INSTRUCTIONS D'INSTALLATION 7 Outillage et pièces 7 Exigences d'emplacement 7 Dimensions nécessaires de l'ouverture d'encastrement 8 Dimensions du cadre de la trousse...
..." (76,2 cm) de largeur Table of Contents / Table des matières MICROWAVE OVEN SAFETY 1 INSTALLATION INSTRUCTIONS 2 Tools and Parts 2 Location Requirements 2 Required Cutout Dimensions 2 Trim Kit Frame Dimensions 3 Electrical Requirements 3 Prepare Microwave Oven 3 Prepare Cutout/Cabinet Opening 4 Install the Microwave Oven 5 Install Trim Kit Frame 6 SÉCURITÉ DU FOUR À MICRO-ONDES 7 INSTRUCTIONS D'INSTALLATION 7 Outillage et pièces 7 Exigences d'emplacement 7 Dimensions nécessaires de l'ouverture d'encastrement 8 Dimensions du cadre de la trousse...
Installation Guide
Page 2
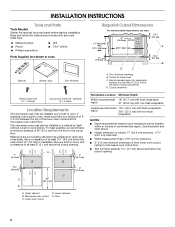
... duct Trim kit frame Required Cutout Dimensions For minimum depth requirements, see chart. 6" (15.2 cm) 1 2.7 cm) 17" (43.2 cm) min. Lower cabinets E. INSTALLATION INSTRUCTIONS Tools and Parts Tools Needed Gather the required tools and parts before starting installation. Read and follow the instructions provided with non-flush receptacle NOTES: ■ Depth requirements depend upon receptacle and its location within or outside of the lower oven cutout and the microwave oven cutout...
... duct Trim kit frame Required Cutout Dimensions For minimum depth requirements, see chart. 6" (15.2 cm) 1 2.7 cm) 17" (43.2 cm) min. Lower cabinets E. INSTALLATION INSTRUCTIONS Tools and Parts Tools Needed Gather the required tools and parts before starting installation. Read and follow the instructions provided with non-flush receptacle NOTES: ■ Depth requirements depend upon receptacle and its location within or outside of the lower oven cutout and the microwave oven cutout...
Installation Guide
Page 3
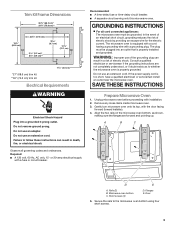
... codes and ordinances. Rails (2) B. Short screws (4) D. Secure the rails to follow these instructions can result in death, fire, or electrical shock. Recommended: ■ A time-delay fuse or time-delay circuit breaker. ■ A separate circuit serving only this microwave oven. Remove any loose items inside microwave oven. 3. Gently turn microwave oven onto its top, with installation. 2. The plug must be plugged into a grounded 3 prong outlet. Do not use an adapter. Trim Kit Frame Dimensions...
... codes and ordinances. Rails (2) B. Short screws (4) D. Secure the rails to follow these instructions can result in death, fire, or electrical shock. Recommended: ■ A time-delay fuse or time-delay circuit breaker. ■ A separate circuit serving only this microwave oven. Remove any loose items inside microwave oven. 3. Gently turn microwave oven onto its top, with installation. 2. The plug must be plugged into a grounded 3 prong outlet. Do not use an adapter. Trim Kit Frame Dimensions...


