Use & Care Guide
Page 1
IMMERSION BLENDER INSTRUCTIONS AND RECIPES KHB100 KHB200 KHB300 1-800-541-6390 Details Inside ® FOR THE WA1Y IT'S MADE.™
IMMERSION BLENDER INSTRUCTIONS AND RECIPES KHB100 KHB200 KHB300 1-800-541-6390 Details Inside ® FOR THE WA1Y IT'S MADE.™

Use & Care Guide
Page 2
... of in-warranty service. Your replacement unit will enable us in the 50 United States and your KitchenAid® Immersion Blender should fail within the first year of purchase (register receipt, credit card charge slip, etc.). to receive this quality service. Give the consultant your personal records: Model Number Serial Number Date Purchased Store Name This card will also be covered by...
... of in-warranty service. Your replacement unit will enable us in the 50 United States and your KitchenAid® Immersion Blender should fail within the first year of purchase (register receipt, credit card charge slip, etc.). to receive this quality service. Give the consultant your personal records: Model Number Serial Number Date Purchased Store Name This card will also be covered by...

Use & Care Guide
Page 3
...-Free Replacement Warranty Inside Front Cover Product Registration Card Inside Front Cover Important Safeguards 2 Warranty ...3 For the 50 United States and District of Columbia 3 For Puerto Rico 4 Arranging for Service after the Warranty Expires 4 Arranging for Service Outside the 50 United States and Puerto Rico ...........4 Ordering Accessories and Replacement Parts 4 Electrical Requirements 5 Troubleshooting Problems 5 Immersion Blender Features 6 Assembling Your Immersion Blender 8 Operating Your Immersion Blender 9 Operating Tips 13 Care and Cleaning 13 Storage...13 Recipes...
...-Free Replacement Warranty Inside Front Cover Product Registration Card Inside Front Cover Important Safeguards 2 Warranty ...3 For the 50 United States and District of Columbia 3 For Puerto Rico 4 Arranging for Service after the Warranty Expires 4 Arranging for Service Outside the 50 United States and Puerto Rico ...........4 Ordering Accessories and Replacement Parts 4 Electrical Requirements 5 Troubleshooting Problems 5 Immersion Blender Features 6 Assembling Your Immersion Blender 8 Operating Your Immersion Blender 9 Operating Tips 13 Care and Cleaning 13 Storage...13 Recipes...

Use & Care Guide
Page 4
... hands and utensils out of the container while blending to prevent the possibility of severe injury to persons or damage to the nearest Authorized Service Facility for household use a tall container or make small quantities at a time to reduce spillage. 13. This product is designed for examination, repair or electrical or mechanical adjustment. 7. Avoid contacting moving parts. 6. Do not operate...
... hands and utensils out of the container while blending to prevent the possibility of severe injury to persons or damage to the nearest Authorized Service Facility for household use a tall container or make small quantities at a time to reduce spillage. 13. This product is designed for examination, repair or electrical or mechanical adjustment. 7. Avoid contacting moving parts. 6. Do not operate...
Use & Care Guide
Page 5
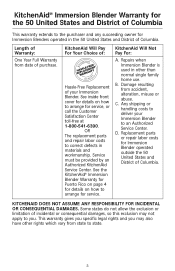
... KitchenAid Service Center. B. Damage resulting from date of purchase. Replacement parts or repair labor costs for Immersion Blenders operated in the 50 United States and District of Columbia. KitchenAid® Immersion Blender Warranty for the 50 United States and District of Columbia This warranty extends to the purchaser and any succeeding owner for Immersion Blender operated outside the 50 United States and District of Columbia. See the KitchenAid® Immersion Blender Warranty...
... KitchenAid Service Center. B. Damage resulting from date of purchase. Replacement parts or repair labor costs for Immersion Blenders operated in the 50 United States and District of Columbia. KitchenAid® Immersion Blender Warranty for the 50 United States and District of Columbia This warranty extends to the purchaser and any succeeding owner for Immersion Blender operated outside the 50 United States and District of Columbia. See the KitchenAid® Immersion Blender Warranty...

Use & Care Guide
Page 6
... Accessories and Replacement Parts To order accessories or replacement parts for your local KitchenAid dealer Immersion Blender for information on or the store where you . Box 218 St. Please bring the Immersion Blender, or ship it prepaid and insured, to the purchaser and any succeeding owner for Immersion Blenders operated in death or electrical shock. During the warranty period, all service must be returned to : Customer Satisfaction Center KitchenAid...
... Accessories and Replacement Parts To order accessories or replacement parts for your local KitchenAid dealer Immersion Blender for information on or the store where you . Box 218 St. Please bring the Immersion Blender, or ship it prepaid and insured, to the purchaser and any succeeding owner for Immersion Blenders operated in death or electrical shock. During the warranty period, all service must be returned to : Customer Satisfaction Center KitchenAid...

Use & Care Guide
Page 7
If a long extension cord is used if special care is exercised in a polarized outlet only one blade is closed. 3. Is the fuse in the circuit to the Immersion Blender in ? 2. Turn Immersion Blender off for your Immersion Blender should be corrected with the above steps, see the KitchenAid Warranty on the serial plate. Electrical Requirements Volts: 120 A.C. Other recommended attachments may be sure the circuit is...
If a long extension cord is used if special care is exercised in a polarized outlet only one blade is closed. 3. Is the fuse in the circuit to the Immersion Blender in ? 2. Turn Immersion Blender off for your Immersion Blender should be corrected with the above steps, see the KitchenAid Warranty on the serial plate. Electrical Requirements Volts: 120 A.C. Other recommended attachments may be sure the circuit is...
Use & Care Guide
Page 8
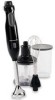
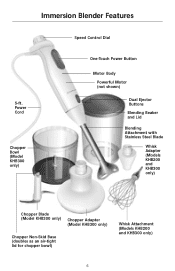
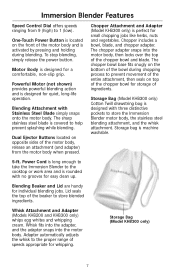
Immersion Blender Features Speed Control Dial 5-ft. Power Cord Chopper Bowl (Model KHB300 only) One-Touch Power Button Motor Body Powerful Motor (not shown) Dual Ejector Buttons Blending Beaker and Lid Blending Attachment with Stainless Steel Blade Whisk Adapter (Models KHB200 and KHB300 only) Chopper Blade (Model KHB300 only) Chopper Adapter (Model KHB300 only) Chopper Non-Skid Base (doubles as an air-tight lid for chopper bowl) Whisk Attachment (Models KHB200 and KHB300 only) 6
Immersion Blender Features Speed Control Dial 5-ft. Power Cord Chopper Bowl (Model KHB300 only) One-Touch Power Button Motor Body Powerful Motor (not shown) Dual Ejector Buttons Blending Beaker and Lid Blending Attachment with Stainless Steel Blade Whisk Adapter (Models KHB200 and KHB300 only) Chopper Blade (Model KHB300 only) Chopper Adapter (Model KHB300 only) Chopper Non-Skid Base (doubles as an air-tight lid for chopper bowl) Whisk Attachment (Models KHB200 and KHB300 only) 6
Use & Care Guide
Page 9
... chopping process to help prevent splashing while blending. The chopper bowl base fits snugly on opposite sides of ingredients. Adapter automatically adjusts the whisk to the proper range of speeds appropriate for storage of the motor body, release an attachment (and adapter) from 9 (high) to store blended ingredients. To stop blending, simply release the power button. Whisk Attachment and Adapter (Models KHB200 and KHB300 only) whips egg whites and whipping cream. Dual...
... chopping process to help prevent splashing while blending. The chopper bowl base fits snugly on opposite sides of ingredients. Adapter automatically adjusts the whisk to the proper range of speeds appropriate for storage of the motor body, release an attachment (and adapter) from 9 (high) to store blended ingredients. To stop blending, simply release the power button. Whisk Attachment and Adapter (Models KHB200 and KHB300 only) whips egg whites and whipping cream. Dual...
Use & Care Guide
Page 10
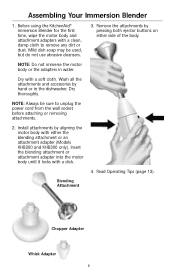
... the power cord from the wall socket before attaching or removing attachments. 2. Wash all the attachments and accessories by pressing both ejector buttons on either the blending attachment or an attachment adapter (Models KHB200 and KHB300 only). Insert the blending attachment or attachment adapter into the motor body until it locks with either side of the body. Remove the attachments by hand or in water. Dry thoroughly. Read Operating Tips (page 13). Assembling Your Immersion Blender 1. Install attachments...
... the power cord from the wall socket before attaching or removing attachments. 2. Wash all the attachments and accessories by pressing both ejector buttons on either the blending attachment or an attachment adapter (Models KHB200 and KHB300 only). Insert the blending attachment or attachment adapter into the motor body until it locks with either side of the body. Remove the attachments by hand or in water. Dry thoroughly. Read Operating Tips (page 13). Assembling Your Immersion Blender 1. Install attachments...
Use & Care Guide
Page 11
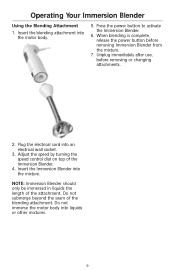
... changing attachments. 2. Plug the electrical cord into liquids or other mixtures. 9 Operating Your Immersion Blender Using the Blending Attachment 1. Do not submerge beyond the seam of the attachment. Do not immerse the motor body into an electrical wall socket. 3. Unplug immediately after use, before removing Immersion Blender from the mixture. 7. Insert the Immersion Blender into the motor body. 5. Insert the blending attachment into the mixture. Press the power button to activate the Immersion Blender. 6. NOTE: Immersion Blender...
... changing attachments. 2. Plug the electrical cord into liquids or other mixtures. 9 Operating Your Immersion Blender Using the Blending Attachment 1. Do not submerge beyond the seam of the attachment. Do not immerse the motor body into an electrical wall socket. 3. Unplug immediately after use, before removing Immersion Blender from the mixture. 7. Insert the Immersion Blender into the motor body. 5. Insert the blending attachment into the mixture. Press the power button to activate the Immersion Blender. 6. NOTE: Immersion Blender...
Use & Care Guide
Page 12
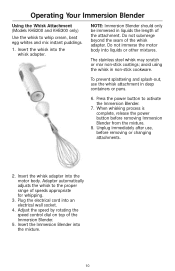
... immediately after use the whisk attachment in deep containers or pans. 6. Insert the whisk into liquids or other mixtures. NOTE: Immersion Blender should only be immersed in non-stick cookware. Do not immerse the motor body into the whisk adapter. When whisking process is complete, release the power button before removing or changing attachments. 2. Insert the Immersion Blender into the mixture. 10 Operating Your Immersion Blender Using the Whisk Attachment (Models KHB200 and...
... immediately after use the whisk attachment in deep containers or pans. 6. Insert the whisk into liquids or other mixtures. NOTE: Immersion Blender should only be immersed in non-stick cookware. Do not immerse the motor body into the whisk adapter. When whisking process is complete, release the power button before removing or changing attachments. 2. Insert the Immersion Blender into the mixture. 10 Operating Your Immersion Blender Using the Whisk Attachment (Models KHB200 and...
Use & Care Guide
Page 13
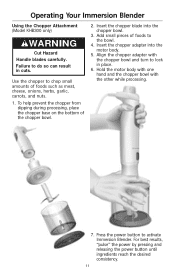
... chopper blade into the motor body. 5. Use the chopper to chop small amounts of foods to lock in cuts. Add small pieces of foods such as meat, cheese, onions, herbs, garlic, carrots, and nuts. 1. Hold the motor body with one hand and the chopper bowl with the chopper bowl and turn to the bowl. 4. To help prevent the chopper from slipping during processing, place the chopper base on the bottom of the chopper bowl. 2. For best results, "pulse...
... chopper blade into the motor body. 5. Use the chopper to chop small amounts of foods to lock in cuts. Add small pieces of foods such as meat, cheese, onions, herbs, garlic, carrots, and nuts. 1. Hold the motor body with one hand and the chopper bowl with the chopper bowl and turn to the bowl. 4. To help prevent the chopper from slipping during processing, place the chopper base on the bottom of the chopper bowl. 2. For best results, "pulse...
Use & Care Guide
Page 14
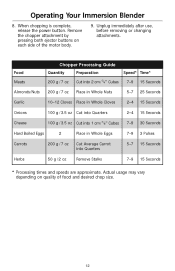
Operating Your Immersion Blender 8. When chopping is complete, release the power button. Unplug immediately after use, before removing or changing attachments. Actual usage may vary depending on each side of food and desired chop size. 12 Remove the chopper attachment by pressing both ejector buttons on quality of the motor body. 9. Food Meats Almonds/Nuts Chopper Processing Guide Quantity Preparation Speed* Time* 200 g / 7 oz Cut into 2 cm/ 3⁄4" Cubes 7-9 15 Seconds 200 g / 7 oz Place...
Operating Your Immersion Blender 8. When chopping is complete, release the power button. Unplug immediately after use, before removing or changing attachments. Actual usage may vary depending on each side of food and desired chop size. 12 Remove the chopper attachment by pressing both ejector buttons on quality of the motor body. 9. Food Meats Almonds/Nuts Chopper Processing Guide Quantity Preparation Speed* Time* 200 g / 7 oz Cut into 2 cm/ 3⁄4" Cubes 7-9 15 Seconds 200 g / 7 oz Place...
Use & Care Guide
Page 15
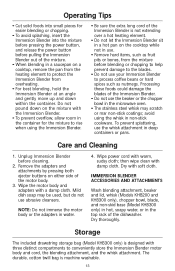
... use abrasive cleansers. Unplug Immersion Blender before pulling the Immersion Blender out of the motor body. 3. Dry with warm, sudsy cloth; IMMERSION BLENDER ACCESSORIES AND ATTACHMENTS Wash blending attachment, beaker and lid, whisk (Models KHB200 and KHB300 only), chopper bowl, blade, and non-skid base (Model KHB300 only) in hot, soapy water, or in the microwave oven. • The stainless steel whisk may be used, but do not use . • Remove hard items...
... use abrasive cleansers. Unplug Immersion Blender before pulling the Immersion Blender out of the motor body. 3. Dry with warm, sudsy cloth; IMMERSION BLENDER ACCESSORIES AND ATTACHMENTS Wash blending attachment, beaker and lid, whisk (Models KHB200 and KHB300 only), chopper bowl, blade, and non-skid base (Model KHB300 only) in hot, soapy water, or in the microwave oven. • The stainless steel whisk may be used, but do not use . • Remove hard items...
Use & Care Guide
Page 23
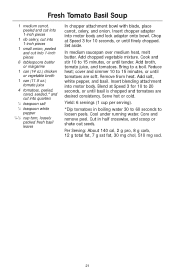
... consistency. Insert chopper adapter into quarters 1⁄4 teaspoon salt 1⁄4 teaspoon white pepper 1⁄4-1⁄3 cup torn, loosely packed fresh basil leaves In chopper attachment bowl with blade, place carrot, celery, and onion. Cook and stir 10 to a boil. Insert blending attachment into motor body. Yield: 6 servings (1 cup per serving). *Dip tomatoes in half crosswise, and scoop or shake out seeds. Core and remove peel.
... consistency. Insert chopper adapter into quarters 1⁄4 teaspoon salt 1⁄4 teaspoon white pepper 1⁄4-1⁄3 cup torn, loosely packed fresh basil leaves In chopper attachment bowl with blade, place carrot, celery, and onion. Cook and stir 10 to a boil. Insert blending attachment into motor body. Yield: 6 servings (1 cup per serving). *Dip tomatoes in half crosswise, and scoop or shake out seeds. Core and remove peel.
Use & Care Guide
Page 26
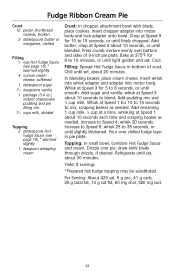
..., whisking at Speed 4 about 10 seconds to mix, scraping beaker as needed . Add butter; Press crumb mixture evenly over chilled fudge layer in bottom of 9-inch pie plate. Chill until light golden and set , about 20 minutes. Add sugar and vanilla; Add pudding mix and 1⁄2 cup milk. whisk 20 seconds. Insert chopper adapter into motor body. Increase...
..., whisking at Speed 4 about 10 seconds to mix, scraping beaker as needed . Add butter; Press crumb mixture evenly over chilled fudge layer in bottom of 9-inch pie plate. Chill until light golden and set , about 20 minutes. Add sugar and vanilla; Add pudding mix and 1⁄2 cup milk. whisk 20 seconds. Insert chopper adapter into motor body. Increase...
Use & Care Guide
Page 27
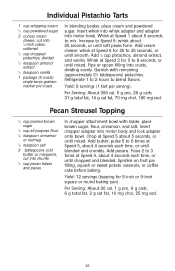
... and pieces In chopper attachment bowl with remaining (approximately 21⁄2 tablespoons) pistachios. Pulse 2 to 25 seconds, or until soft peaks form. Pecan Streusel Topping 1⁄3 cup packed brown sugar 1⁄4 cup all-purpose flour 1⁄8 teaspoon cinnamon or nutmeg 1⁄8 teaspoon salt 3 tablespoons cold butter or margarine, cut into motor body. Add pecans. Increase to blend flavors. whisk at Speed...
... and pieces In chopper attachment bowl with remaining (approximately 21⁄2 tablespoons) pistachios. Pulse 2 to 25 seconds, or until soft peaks form. Pecan Streusel Topping 1⁄3 cup packed brown sugar 1⁄4 cup all-purpose flour 1⁄8 teaspoon cinnamon or nutmeg 1⁄8 teaspoon salt 3 tablespoons cold butter or margarine, cut into motor body. Add pecans. Increase to blend flavors. whisk at Speed...
Use & Care Guide
Page 28
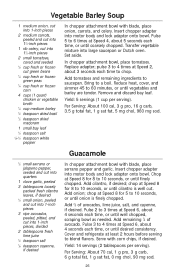
...;8-1⁄4 teaspoon white pepper In chopper attachment bowl with blade, place serrano pepper and garlic. Remove and discard bay leaf. Pulse 2 to 3 times at Speed 2, about 4 seconds each time to chop. Replace adapter; pulse 3 to 60 minutes, or until cilantro is finely chopped. Reduce heat, cover, and simmer 45 to 4 times at Speed 6, about 3 seconds each time, or until well chopped, scraping bowl as needed. Per Serving: About 100...
...;8-1⁄4 teaspoon white pepper In chopper attachment bowl with blade, place serrano pepper and garlic. Remove and discard bay leaf. Pulse 2 to 3 times at Speed 2, about 4 seconds each time to chop. Replace adapter; pulse 3 to 60 minutes, or until cilantro is finely chopped. Reduce heat, cover, and simmer 45 to 4 times at Speed 6, about 3 seconds each time, or until well chopped, scraping bowl as needed. Per Serving: About 100...
Use & Care Guide
Page 29
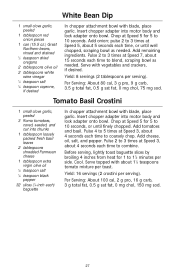
... chopper attachment bowl with about 4 seconds each time to coarsely chop. Pulse 4 to 5 times at Speed 5, about 4 seconds each time, or until finely chopped. Insert chopper adapter into motor body and lock adapter onto bowl. pulse 2 to 11⁄2 minutes per toast. Serve topped with blade, place garlic. Add onion; Insert chopper adapter into motor body and lock adapter onto bowl. Add tomatoes and basil. Add cheese, oil, salt, and pepper. Before serving, lightly...
... chopper attachment bowl with about 4 seconds each time to coarsely chop. Pulse 4 to 5 times at Speed 5, about 4 seconds each time, or until finely chopped. Insert chopper adapter into motor body and lock adapter onto bowl. pulse 2 to 11⁄2 minutes per toast. Serve topped with blade, place garlic. Add onion; Insert chopper adapter into motor body and lock adapter onto bowl. Add tomatoes and basil. Add cheese, oil, salt, and pepper. Before serving, lightly...


