
Use & Care Guide
Page 1
IMMERSION BLENDER INSTRUCTIONS AND RECIPES KHB100 KHB200 KHB300 1-800-541-6390 Details Inside ® FOR THE WA1Y IT'S MADE.™
IMMERSION BLENDER INSTRUCTIONS AND RECIPES KHB100 KHB200 KHB300 1-800-541-6390 Details Inside ® FOR THE WA1Y IT'S MADE.™

Use & Care Guide
Page 2
... KitchenAid® Immersion Blender should fail within the first year of ownership, simply call our toll-free Customer Satisfaction Center at 1-800-541-6390, 8 a.m. This card will enable us to contact you in the unlikely event of a product safety notification and assist us . If you receive your replacement Immersion Blender, use your Immersion Blender, please fill out and mail your personal records: Model Number...
... KitchenAid® Immersion Blender should fail within the first year of ownership, simply call our toll-free Customer Satisfaction Center at 1-800-541-6390, 8 a.m. This card will enable us to contact you in the unlikely event of a product safety notification and assist us . If you receive your replacement Immersion Blender, use your Immersion Blender, please fill out and mail your personal records: Model Number...

Use & Care Guide
Page 3
...-Free Replacement Warranty Inside Front Cover Product Registration Card Inside Front Cover Important Safeguards 2 Warranty ...3 For the 50 United States and District of Columbia 3 For Puerto Rico 4 Arranging for Service after the Warranty Expires 4 Arranging for Service Outside the 50 United States and Puerto Rico ...........4 Ordering Accessories and Replacement Parts 4 Electrical Requirements 5 Troubleshooting Problems 5 Immersion Blender Features 6 Assembling Your Immersion Blender 8 Operating Your Immersion Blender 9 Operating Tips 13 Care and Cleaning 13 Storage...13 Recipes...
...-Free Replacement Warranty Inside Front Cover Product Registration Card Inside Front Cover Important Safeguards 2 Warranty ...3 For the 50 United States and District of Columbia 3 For Puerto Rico 4 Arranging for Service after the Warranty Expires 4 Arranging for Service Outside the 50 United States and Puerto Rico ...........4 Ordering Accessories and Replacement Parts 4 Electrical Requirements 5 Troubleshooting Problems 5 Immersion Blender Features 6 Assembling Your Immersion Blender 8 Operating Your Immersion Blender 9 Operating Tips 13 Care and Cleaning 13 Storage...13 Recipes...

Use & Care Guide
Page 4
... hands and utensils out of the container while blending to the nearest Authorized Service Facility for household use only. This product is designed for examination, repair or electrical or mechanical adjustment. 7. Unplug from outlet when not in any appliance with a damaged cord or plug or after the appliance malfunctions, or is dropped or damaged in use of this Immersion Blender...
... hands and utensils out of the container while blending to the nearest Authorized Service Facility for household use only. This product is designed for examination, repair or electrical or mechanical adjustment. 7. Unplug from outlet when not in any appliance with a damaged cord or plug or after the appliance malfunctions, or is dropped or damaged in use of this Immersion Blender...

Use & Care Guide
Page 5
... Your Choice of: Hassle-Free Replacement of Columbia. Repairs when Immersion Blender is used in materials and workmanship. Damage resulting from date of Columbia. KITCHENAID DOES NOT ASSUME ANY RESPONSIBILITY FOR INCIDENTAL OR CONSEQUENTIAL DAMAGES. This warranty gives you specific legal rights and you . Any shipping or handling costs to deliver your Immersion Blender. OR The replacement parts and repair labor costs to correct defects in...
... Your Choice of: Hassle-Free Replacement of Columbia. Repairs when Immersion Blender is used in materials and workmanship. Damage resulting from date of Columbia. KITCHENAID DOES NOT ASSUME ANY RESPONSIBILITY FOR INCIDENTAL OR CONSEQUENTIAL DAMAGES. This warranty gives you specific legal rights and you . Any shipping or handling costs to deliver your Immersion Blender. OR The replacement parts and repair labor costs to correct defects in...

Use & Care Guide
Page 6
.... KitchenAid® Immersion Blender Warranty for Puerto Rico A limited one year warranty extends to the purchaser and any succeeding owner for Immersion Blenders operated in death or electrical shock. Your repaired Immersion Blender will be handled by an Authorized KitchenAid Service Center. Arranging for your local KitchenAid dealer Immersion Blender for information on or the store where you . to 5 p.m., Saturday, (Eastern Time) or write to : Customer Satisfaction Center KitchenAid...
.... KitchenAid® Immersion Blender Warranty for Puerto Rico A limited one year warranty extends to the purchaser and any succeeding owner for Immersion Blenders operated in death or electrical shock. Your repaired Immersion Blender will be handled by an Authorized KitchenAid Service Center. Arranging for your local KitchenAid dealer Immersion Blender for information on or the store where you . to 5 p.m., Saturday, (Eastern Time) or write to : Customer Satisfaction Center KitchenAid...

Use & Care Guide
Page 7
.... Turn Immersion Blender off for your Immersion Blender should be arranged so it will fit in a polarized outlet only one blade is used if special care is located on the attachment that draws the greatest load. retailers do not provide service. 5 NOTE: This Immersion Blender has a polarized plug (one way. If it can be used : • The marked electrical rating of the extension cord should...
.... Turn Immersion Blender off for your Immersion Blender should be arranged so it will fit in a polarized outlet only one blade is used if special care is located on the attachment that draws the greatest load. retailers do not provide service. 5 NOTE: This Immersion Blender has a polarized plug (one way. If it can be used : • The marked electrical rating of the extension cord should...
Use & Care Guide
Page 8
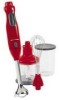
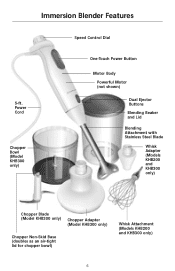
Power Cord Chopper Bowl (Model KHB300 only) One-Touch Power Button Motor Body Powerful Motor (not shown) Dual Ejector Buttons Blending Beaker and Lid Blending Attachment with Stainless Steel Blade Whisk Adapter (Models KHB200 and KHB300 only) Chopper Blade (Model KHB300 only) Chopper Adapter (Model KHB300 only) Chopper Non-Skid Base (doubles as an air-tight lid for chopper bowl) Whisk Attachment (Models KHB200 and KHB300 only) 6 Immersion Blender Features Speed Control Dial 5-ft.
Power Cord Chopper Bowl (Model KHB300 only) One-Touch Power Button Motor Body Powerful Motor (not shown) Dual Ejector Buttons Blending Beaker and Lid Blending Attachment with Stainless Steel Blade Whisk Adapter (Models KHB200 and KHB300 only) Chopper Blade (Model KHB300 only) Chopper Adapter (Model KHB300 only) Chopper Non-Skid Base (doubles as an air-tight lid for chopper bowl) Whisk Attachment (Models KHB200 and KHB300 only) 6 Immersion Blender Features Speed Control Dial 5-ft.
Use & Care Guide
Page 9
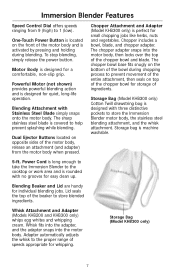
... the Immersion Blender motor body, the stainless steel blending attachment, and the whisk attachment. One-Touch Power Button is located on top of the chopper bowl for whipping. Chopper Attachment and Adapter (Model KHB300 only) is designed with Stainless Steel Blade simply snaps onto the motor body. Lid seals the top of speeds appropriate for storage of the bowl during blending. The chopper bowl base fits snugly on the bottom of ingredients. Dual Ejector Buttons located...
... the Immersion Blender motor body, the stainless steel blending attachment, and the whisk attachment. One-Touch Power Button is located on top of the chopper bowl for whipping. Chopper Attachment and Adapter (Model KHB300 only) is designed with Stainless Steel Blade simply snaps onto the motor body. Lid seals the top of speeds appropriate for storage of the bowl during blending. The chopper bowl base fits snugly on the bottom of ingredients. Dual Ejector Buttons located...
Use & Care Guide
Page 10
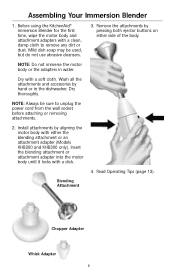
.... Blending Attachment Chopper Adapter Whisk Adapter 8 Remove the attachments by aligning the motor body with a clean, damp cloth to unplug the power cord from the wall socket before attaching or removing attachments. 2. Wash all the attachments and accessories by hand or in water. Dry with a click. 4. Insert the blending attachment or attachment adapter into the motor body until it locks with a soft cloth. NOTE: Always be used, but do not use abrasive cleansers. 3. Assembling Your Immersion Blender 1. Mild...
.... Blending Attachment Chopper Adapter Whisk Adapter 8 Remove the attachments by aligning the motor body with a clean, damp cloth to unplug the power cord from the wall socket before attaching or removing attachments. 2. Wash all the attachments and accessories by hand or in water. Dry with a click. 4. Insert the blending attachment or attachment adapter into the motor body until it locks with a soft cloth. NOTE: Always be used, but do not use abrasive cleansers. 3. Assembling Your Immersion Blender 1. Mild...
Use & Care Guide
Page 11
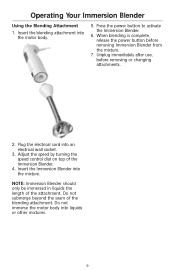
... motor body. 5. When blending is complete, release the power button before removing or changing attachments. 2. Unplug immediately after use, before removing Immersion Blender from the mixture. 7. Operating Your Immersion Blender Using the Blending Attachment 1. Adjust the speed by turning the speed control dial on top of the attachment. Do not submerge beyond the seam of the blending attachment. Insert the blending attachment into liquids or other mixtures. 9 Press the power button to activate the Immersion Blender. 6. Plug the electrical cord...
... motor body. 5. When blending is complete, release the power button before removing or changing attachments. 2. Unplug immediately after use, before removing Immersion Blender from the mixture. 7. Operating Your Immersion Blender Using the Blending Attachment 1. Adjust the speed by turning the speed control dial on top of the attachment. Do not submerge beyond the seam of the blending attachment. Insert the blending attachment into liquids or other mixtures. 9 Press the power button to activate the Immersion Blender. 6. Plug the electrical cord...
Use & Care Guide
Page 12
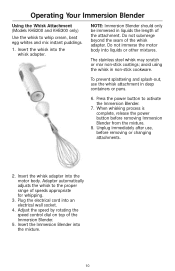
... wall socket. 4. Operating Your Immersion Blender Using the Whisk Attachment (Models KHB200 and KHB300 only) Use the whisk to activate the Immersion Blender. 7. Do not submerge beyond the seam of the Immersion Blender. 5. Adjust the speed by rotating the speed control dial on top of the whisk adapter. avoid using the whisk in deep containers or pans. 6. Press the power button to whip cream, beat egg whites and mix...
... wall socket. 4. Operating Your Immersion Blender Using the Whisk Attachment (Models KHB200 and KHB300 only) Use the whisk to activate the Immersion Blender. 7. Do not submerge beyond the seam of the Immersion Blender. 5. Adjust the speed by rotating the speed control dial on top of the whisk adapter. avoid using the whisk in deep containers or pans. 6. Press the power button to whip cream, beat egg whites and mix...
Use & Care Guide
Page 13
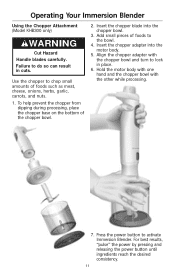
... the chopper blade into the motor body. 5. Align the chopper adapter with the other while processing. 7. Hold the motor body with one hand and the chopper bowl with the chopper bowl and turn to activate Immersion Blender. Insert the chopper adapter into the chopper bowl. 3. Failure to chop small amounts of foods such as meat, cheese, onions, herbs, garlic, carrots, and nuts. 1. Operating Your Immersion Blender Using the Chopper Attachment (Model KHB300 only) WARNING Cut Hazard Handle blades carefully. Use the chopper to...
... the chopper blade into the motor body. 5. Align the chopper adapter with the other while processing. 7. Hold the motor body with one hand and the chopper bowl with the chopper bowl and turn to activate Immersion Blender. Insert the chopper adapter into the chopper bowl. 3. Failure to chop small amounts of foods such as meat, cheese, onions, herbs, garlic, carrots, and nuts. 1. Operating Your Immersion Blender Using the Chopper Attachment (Model KHB300 only) WARNING Cut Hazard Handle blades carefully. Use the chopper to...
Use & Care Guide
Page 14
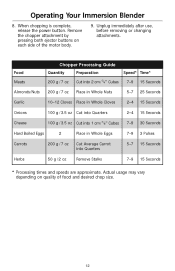
Remove the chopper attachment by pressing both ejector buttons on quality of the motor body. 9. Actual usage may vary depending on each side of food and desired chop size. 12 Operating Your Immersion Blender 8. Unplug immediately after use, before removing or changing attachments. When chopping is complete, release the power button. Food Meats Almonds/Nuts Chopper Processing Guide Quantity Preparation Speed* Time* 200 g / 7 oz Cut into 2 cm/ 3⁄4" Cubes 7-9 15 Seconds 200 g / 7 oz Place...
Remove the chopper attachment by pressing both ejector buttons on quality of the motor body. 9. Actual usage may vary depending on each side of food and desired chop size. 12 Operating Your Immersion Blender 8. Unplug immediately after use, before removing or changing attachments. When chopping is complete, release the power button. Food Meats Almonds/Nuts Chopper Processing Guide Quantity Preparation Speed* Time* 200 g / 7 oz Cut into 2 cm/ 3⁄4" Cubes 7-9 15 Seconds 200 g / 7 oz Place...
Use & Care Guide
Page 15
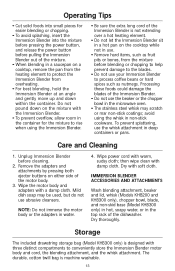
Unplug Immersion Blender before blending or chopping to help prevent damage to the blades. • Do not use the beaker or the chopper bowl in the microwave oven. • The stainless steel whisk may be used, but do not use the whisk attachment in deep containers or pans. Wipe power cord with soft cloth. Dry with warm, sudsy cloth; Operating Tips • Cut solid foods into small pieces for the...
Unplug Immersion Blender before blending or chopping to help prevent damage to the blades. • Do not use the beaker or the chopper bowl in the microwave oven. • The stainless steel whisk may be used, but do not use the whisk attachment in deep containers or pans. Wipe power cord with soft cloth. Dry with warm, sudsy cloth; Operating Tips • Cut solid foods into small pieces for the...
Use & Care Guide
Page 23
Insert chopper adapter into motor body. Bring to 15 minutes, or until tomatoes are desired consistency. Insert blending attachment into motor body and lock adapter onto bowl. Blend at Speed 3 for 10 to 20 seconds, or until finely chopped. Serve hot or cold. Chop at Speed 3 for 10 seconds, or until basil is chopped and tomatoes are soft. Set aside. Reduce heat; Cool under running water. Per Serving: About...
Insert chopper adapter into motor body. Bring to 15 minutes, or until tomatoes are desired consistency. Insert blending attachment into motor body and lock adapter onto bowl. Blend at Speed 3 for 10 to 20 seconds, or until finely chopped. Serve hot or cold. Chop at Speed 3 for 10 seconds, or until basil is chopped and tomatoes are soft. Set aside. Reduce heat; Cool under running water. Per Serving: About...
Use & Care Guide
Page 26
... layer in bottom of 9-inch pie plate. Chill until light golden and set. Add sugar and vanilla; Add remaining 1 cup milk, 1⁄2 cup at a time, whisking at Speed 1 for 5 to mix, scraping beaker as needed . Pour over bottom and sides of crust. Insert chopper adapter into motor body. Add butter; Cool. In blending beaker, place cream cheese. whisk 25 to...
... layer in bottom of 9-inch pie plate. Chill until light golden and set. Add sugar and vanilla; Add remaining 1 cup milk, 1⁄2 cup at a time, whisking at Speed 1 for 5 to mix, scraping beaker as needed . Pour over bottom and sides of crust. Insert chopper adapter into motor body. Add butter; Cool. In blending beaker, place cream cheese. whisk 25 to...

Use & Care Guide
Page 27
.... Insert chopper adapter into crusts, dividing evenly. Individual Pistachio Tarts 1 cup whipping cream 1⁄3 cup powdered sugar 3 ounces cream cheese, cut into chunks 1⁄2 cup pecan halves and pieces In chopper attachment bowl with remaining (approximately 21⁄2 tablespoons) pistachios. Whisk at Speed 3 for 5 to 25 seconds, or until blended and crumbly. Pipe or spoon filling into motor body and lock adapter onto bowl. Per Serving: About...
.... Insert chopper adapter into crusts, dividing evenly. Individual Pistachio Tarts 1 cup whipping cream 1⁄3 cup powdered sugar 3 ounces cream cheese, cut into chunks 1⁄2 cup pecan halves and pieces In chopper attachment bowl with remaining (approximately 21⁄2 tablespoons) pistachios. Whisk at Speed 3 for 5 to 25 seconds, or until blended and crumbly. Pipe or spoon filling into motor body and lock adapter onto bowl. Per Serving: About...
Use & Care Guide
Page 28
...: 5 servings (1 cup per serving). chop at Speed 8 for 8 to 10 seconds, or until cilantro is finely chopped. Add 2⁄3 of avocado. Serve with blade, place onion, carrots, and celery. pulse 3 to 4 times at Speed 4, about 4 seconds each time, or until onion is well cut into 1-inch pieces, divided 2 tablespoons fresh lime juice 1⁄2 teaspoon salt 1⁄8 teaspoon cayenne, if desired In chopper attachment bowl with blade...
...: 5 servings (1 cup per serving). chop at Speed 8 for 8 to 10 seconds, or until cilantro is finely chopped. Add 2⁄3 of avocado. Serve with blade, place onion, carrots, and celery. pulse 3 to 4 times at Speed 4, about 4 seconds each time, or until onion is well cut into 1-inch pieces, divided 2 tablespoons fresh lime juice 1⁄2 teaspoon salt 1⁄8 teaspoon cayenne, if desired In chopper attachment bowl with blade...
Use & Care Guide
Page 29
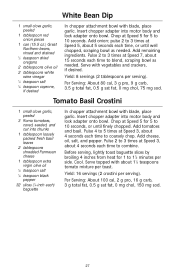
.... Pulse 4 to 5 times at Speed 5 for 1 to blend, scraping bowl as needed . Yield: 16 servings (2 crostini per serving). Add onion; Serve topped with blade, place garlic. Insert chopper adapter into motor body and lock adapter onto bowl. Before serving, lightly toast baguette slices by broiling 4 inches from heat for 5 to coarsely chop. Cool. Add tomatoes and basil. Add remaining ingredients. White Bean Dip 1 small clove garlic, peeled 1 tablespoon red onion pieces...
.... Pulse 4 to 5 times at Speed 5 for 1 to blend, scraping bowl as needed . Yield: 16 servings (2 crostini per serving). Add onion; Serve topped with blade, place garlic. Insert chopper adapter into motor body and lock adapter onto bowl. Before serving, lightly toast baguette slices by broiling 4 inches from heat for 5 to coarsely chop. Cool. Add tomatoes and basil. Add remaining ingredients. White Bean Dip 1 small clove garlic, peeled 1 tablespoon red onion pieces...


