
Use & Care Guide
Page 6
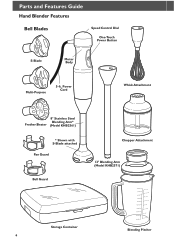
Parts and Features Guide Hand Blender Features Bell Blades Speed Control Dial One-Touch Power Button S-Blade Motor Body Multi-Purpose 5-ft. Power Cord Whisk Attachment 8" Stainless Steel Blending Arm* Frother/Beater (Model KHB2561) * Shown with S-Blade attached Pan Guard Bell Guard Storage Container 6 Chopper Attachment 13" Blending Arm (Model KHB2571) 4 Cup 3 1/2 Cup 3 Cup 2 1/2 Cup 2 Cup 1 1/2 Cup 1 Cup 1/2 Cup Blending Pitcher
Parts and Features Guide Hand Blender Features Bell Blades Speed Control Dial One-Touch Power Button S-Blade Motor Body Multi-Purpose 5-ft. Power Cord Whisk Attachment 8" Stainless Steel Blending Arm* Frother/Beater (Model KHB2561) * Shown with S-Blade attached Pan Guard Bell Guard Storage Container 6 Chopper Attachment 13" Blending Arm (Model KHB2571) 4 Cup 3 1/2 Cup 3 Cup 2 1/2 Cup 2 Cup 1 1/2 Cup 1 Cup 1/2 Cup Blending Pitcher
Use & Care Guide
Page 7
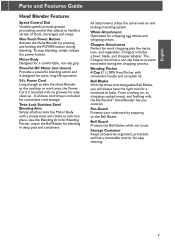
..., and has a removable interior for small chopping jobs like herbs, nuts, and vegetables. English Parts and Features Guide Hand Blender Features Speed Control Dial Variable speeds provide greater processing control that adjusts to handle a variety of tasks. All attachments utilize the same twist on the Bell...multitude of foods, beverages and soups. The Chopper bowl has a non-slip base to chopping cooked meats, and frothing milk, the KitchenAid® Hand Blender has you will always have the right tool for blending in use. Motor Body Designed for quiet, long-life operation. 5-ft....
..., and has a removable interior for small chopping jobs like herbs, nuts, and vegetables. English Parts and Features Guide Hand Blender Features Speed Control Dial Variable speeds provide greater processing control that adjusts to handle a variety of tasks. All attachments utilize the same twist on the Bell...multitude of foods, beverages and soups. The Chopper bowl has a non-slip base to chopping cooked meats, and frothing milk, the KitchenAid® Hand Blender has you will always have the right tool for blending in use. Motor Body Designed for quiet, long-life operation. 5-ft....

Use & Care Guide
Page 9
...before removing Hand Blender from the mixture. 8. Blending English 2. Insert Hand Blender with Blending Arm attached into the mixture. NOTE: Hand Blender should only be immersed in liquids the length of the Hand Blender. 5. Press the Power button to do the work. 6. Rest the Hand Blender on Speed 1. Drawing... and avoid splattering. Insert Blending Arm into the ingredients. Adjust the speed by turning the Speed Control Dial on top of the attachment. Insert the Hand Blender into the Blending Pitcher containing ingredients at the desired consistency. 3. Do...
...before removing Hand Blender from the mixture. 8. Blending English 2. Insert Hand Blender with Blending Arm attached into the mixture. NOTE: Hand Blender should only be immersed in liquids the length of the Hand Blender. 5. Press the Power button to do the work. 6. Rest the Hand Blender on Speed 1. Drawing... and avoid splattering. Insert Blending Arm into the ingredients. Adjust the speed by turning the Speed Control Dial on top of the attachment. Insert the Hand Blender into the Blending Pitcher containing ingredients at the desired consistency. 3. Do...
Use & Care Guide
Page 10
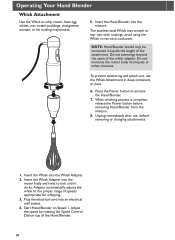
...instant puddings, vinaigrettes, mousse, or for whipping. 3. Insert the Hand Blender into an electrical wall socket. 4. avoid using the Whisk in liquids the length of speeds appropriate for making mayonnaise. 5. NOTE: Hand Blender should only be immersed in non-stick cookware. Press the Power ...Unplug immediately after use the Whisk Attachment in deep containers or pans. 6. Adjust the speed by rotating the Speed Control Dial on Speed 1. Do not submerge beyond the seam of the Hand Blender. 10 When whisking process is complete, release the Power button before removing or changing...
...instant puddings, vinaigrettes, mousse, or for whipping. 3. Insert the Hand Blender into an electrical wall socket. 4. avoid using the Whisk in liquids the length of speeds appropriate for making mayonnaise. 5. NOTE: Hand Blender should only be immersed in non-stick cookware. Press the Power ...Unplug immediately after use the Whisk Attachment in deep containers or pans. 6. Adjust the speed by rotating the Speed Control Dial on Speed 1. Do not submerge beyond the seam of the Hand Blender. 10 When whisking process is complete, release the Power button before removing or changing...

Use & Care Guide
Page 12
...allow 10 minutes to automatically reset. • To avoid splashing, insert the Hand Blender into Quarters 3 15 Seconds Herbs 50 g / 2 oz Remove Stalks 4 15 Seconds * Processing times and speeds are approximate. Do not pound down within the container. Processing these foods ... hot pan on the cooktop while not in use. • Remove hard items, such as nutmegs. Operating Your Hand Blender Using the Chopper Attachment (cont.) Food Chopper Processing Guide Quantity Preparation Speed Time* Meats 200 g / 7 oz Cut into 2 cm / 3/4" Cubes 5 15 Seconds Almonds/Nuts 200 ...
...allow 10 minutes to automatically reset. • To avoid splashing, insert the Hand Blender into Quarters 3 15 Seconds Herbs 50 g / 2 oz Remove Stalks 4 15 Seconds * Processing times and speeds are approximate. Do not pound down within the container. Processing these foods ... hot pan on the cooktop while not in use. • Remove hard items, such as nutmegs. Operating Your Hand Blender Using the Chopper Attachment (cont.) Food Chopper Processing Guide Quantity Preparation Speed Time* Meats 200 g / 7 oz Cut into 2 cm / 3/4" Cubes 5 15 Seconds Almonds/Nuts 200 ...


