
Instruction Manual
Page 1
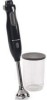
IMMERSION BLENDER INSTRUCTIONS KHB100 KHB200 KHB300 1-800-541-6390 Details Inside ® FOR THE WA1Y IT'S MADE.™
IMMERSION BLENDER INSTRUCTIONS KHB100 KHB200 KHB300 1-800-541-6390 Details Inside ® FOR THE WA1Y IT'S MADE.™

Instruction Manual
Page 2
...Warranty We're so confident the quality of our products meets the exacting standards of KitchenAid that, if your Immersion Blender should fail within the first year of ownership, KitchenAid will also be covered by our one year full warranty. For a detailed explanation ...-warranty service. Box Numbers, please.) When you receive your replacement Immersion Blender, use your Immersion Blender, please fill out and mail your product registration card packed with a copy of the proof of your KitchenAid® Immersion Blender should fail within the first year of warranty terms and conditions,...
...Warranty We're so confident the quality of our products meets the exacting standards of KitchenAid that, if your Immersion Blender should fail within the first year of ownership, KitchenAid will also be covered by our one year full warranty. For a detailed explanation ...-warranty service. Box Numbers, please.) When you receive your replacement Immersion Blender, use your Immersion Blender, please fill out and mail your product registration card packed with a copy of the proof of your KitchenAid® Immersion Blender should fail within the first year of warranty terms and conditions,...
Instruction Manual
Page 3
... Warranty Expires 4 Arranging for Service Outside the 50 United States and Puerto Rico ...........4 Ordering Accessories and Replacement Parts 4 Electrical Requirements 5 Troubleshooting Problems 5 Immersion Blender Features 6 Assembling Your Immersion Blender 8 Operating Your Immersion Blender 9 Operating Tips 13 Care and Cleaning 13 Storage...13 Your safety and the safety of injury, and tell you and others are not...
... Warranty Expires 4 Arranging for Service Outside the 50 United States and Puerto Rico ...........4 Ordering Accessories and Replacement Parts 4 Electrical Requirements 5 Troubleshooting Problems 5 Immersion Blender Features 6 Assembling Your Immersion Blender 8 Operating Your Immersion Blender 9 Operating Tips 13 Care and Cleaning 13 Storage...13 Your safety and the safety of injury, and tell you and others are not...

Instruction Manual
Page 4
... not running. 14. The use a tall container or make small quantities at a time to the unit. Do not let cord hang over edge of this Immersion Blender in place before cleaning. 5. Blades are sharp. Read all instructions. 2. Avoid contacting moving parts. 6. Do not operate any manner. When mixing liquids, especially hot liquids...
... not running. 14. The use a tall container or make small quantities at a time to the unit. Do not let cord hang over edge of this Immersion Blender in place before cleaning. 5. Blades are sharp. Read all instructions. 2. Avoid contacting moving parts. 6. Do not operate any manner. When mixing liquids, especially hot liquids...
Instruction Manual
Page 5
.... See inside front cover for details on how to arrange for service. KitchenAid Will Not Pay For: A. Service must be provided by an Authorized KitchenAid Service Center. KitchenAid® Immersion Blender Warranty for the 50 United States and District of Columbia This warranty extends ...to the purchaser and any succeeding owner for Immersion Blenders operated in the 50 United States and District of your Immersion Blender to arrange for details on how to an Authorized Service Center. See the KitchenAid® Immersion Blender Warranty for Puerto Rico on page 4 for service...
.... See inside front cover for details on how to arrange for service. KitchenAid Will Not Pay For: A. Service must be provided by an Authorized KitchenAid Service Center. KitchenAid® Immersion Blender Warranty for the 50 United States and District of Columbia This warranty extends ...to the purchaser and any succeeding owner for Immersion Blenders operated in the 50 United States and District of your Immersion Blender to arrange for details on how to an Authorized Service Center. See the KitchenAid® Immersion Blender Warranty for Puerto Rico on page 4 for service...

Instruction Manual
Page 6
... Ordering Accessories and Replacement Parts To order accessories or replacement parts for your local KitchenAid dealer Immersion Blender for Service After the Warranty Expires For service information, call toll-free 1-800-541-6390, 8 a.m. Please bring the... Arranging for Immersion Blenders operated in Puerto Rico. Joseph, MI 49085-0218. Your repaired Immersion Blender will be handled by an Authorized KitchenAid Service Center. Box 218, St. to 8 p.m., Monday through Friday, 10 a.m. Box 218, St. Joseph, MI 49085-0218. 4 KitchenAid® Immersion Blender Warranty for ...
... Ordering Accessories and Replacement Parts To order accessories or replacement parts for your local KitchenAid dealer Immersion Blender for Service After the Warranty Expires For service information, call toll-free 1-800-541-6390, 8 a.m. Please bring the... Arranging for Immersion Blenders operated in Puerto Rico. Joseph, MI 49085-0218. Your repaired Immersion Blender will be handled by an Authorized KitchenAid Service Center. Box 218, St. to 8 p.m., Monday through Friday, 10 a.m. Box 218, St. Joseph, MI 49085-0218. 4 KitchenAid® Immersion Blender Warranty for ...
Instruction Manual
Page 7
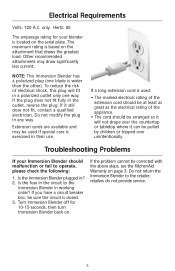
... corrected with the above steps, see the KitchenAid Warranty on the attachment that draws the greatest load. If the plug does not fit fully in any way. Electrical Requirements Volts: 120 A.C. only. Hertz: 60 The amperage rating for 10-15 seconds, then turn Immersion Blender back on the serial plate. Do not modify...
... corrected with the above steps, see the KitchenAid Warranty on the attachment that draws the greatest load. If the plug does not fit fully in any way. Electrical Requirements Volts: 120 A.C. only. Hertz: 60 The amperage rating for 10-15 seconds, then turn Immersion Blender back on the serial plate. Do not modify...
Instruction Manual
Page 8
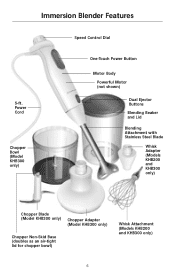
Immersion Blender Features Speed Control Dial 5-ft. Power Cord Chopper Bowl (Model KHB300 only) One-Touch Power Button Motor Body Powerful Motor (not shown) Dual Ejector Buttons Blending Beaker and Lid Blending Attachment with Stainless Steel Blade Whisk Adapter (Models KHB200 and KHB300 only) Chopper Blade (Model KHB300 only) Chopper Adapter (Model KHB300 only) Chopper Non-Skid Base (doubles as an air-tight lid for chopper bowl) Whisk Attachment (Models KHB200 and KHB300 only) 6
Immersion Blender Features Speed Control Dial 5-ft. Power Cord Chopper Bowl (Model KHB300 only) One-Touch Power Button Motor Body Powerful Motor (not shown) Dual Ejector Buttons Blending Beaker and Lid Blending Attachment with Stainless Steel Blade Whisk Adapter (Models KHB200 and KHB300 only) Chopper Blade (Model KHB300 only) Chopper Adapter (Model KHB300 only) Chopper Non-Skid Base (doubles as an air-tight lid for chopper bowl) Whisk Attachment (Models KHB200 and KHB300 only) 6
Instruction Manual
Page 9
Immersion Blender Features Speed Control Dial offers speeds ranging from the motor body when pressed. Chopper includes a bowl, blade, and chopper adapter. Storage bag is designed for ... only) whips egg whites and whipping cream to help prevent splashing while blending. The sharp stainless steel blade is long enough to take the Immersion Blender to store the Immersion Blender motor body, the stainless steel blending attachment, and the whisk attachment. The chopper adapter snaps into the motor body. Power Cord is covered...
Immersion Blender Features Speed Control Dial offers speeds ranging from the motor body when pressed. Chopper includes a bowl, blade, and chopper adapter. Storage bag is designed for ... only) whips egg whites and whipping cream to help prevent splashing while blending. The sharp stainless steel blade is long enough to take the Immersion Blender to store the Immersion Blender motor body, the stainless steel blending attachment, and the whisk attachment. The chopper adapter snaps into the motor body. Power Cord is covered...
Instruction Manual
Page 10
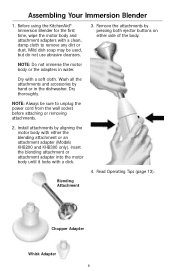
...dirt or dust. Dry with a click. 4. NOTE: Always be used, but do not use abrasive cleansers. 3. NOTE: Do not immerse the motor body or the adapters in the dishwasher. Wash all the attachments and accessories by aligning the motor body with a clean, damp... body until it locks with a soft cloth. Read Operating Tips (page 13). Assembling Your Immersion Blender 1. Blending Attachment Chopper Adapter Whisk Adapter 8 Dry thoroughly. Before using the KitchenAid® Immersion Blender for the first time, wipe the motor body and attachment adapters with either side of the ...
...dirt or dust. Dry with a click. 4. NOTE: Always be used, but do not use abrasive cleansers. 3. NOTE: Do not immerse the motor body or the adapters in the dishwasher. Wash all the attachments and accessories by aligning the motor body with a clean, damp... body until it locks with a soft cloth. Read Operating Tips (page 13). Assembling Your Immersion Blender 1. Blending Attachment Chopper Adapter Whisk Adapter 8 Dry thoroughly. Before using the KitchenAid® Immersion Blender for the first time, wipe the motor body and attachment adapters with either side of the ...
Instruction Manual
Page 11
... attachment. When blending is complete, release the power button before removing or changing attachments. 2. Plug the electrical cord into liquids or other mixtures. 9 Insert the Immersion Blender into the motor body. 5. Insert the blending attachment into the mixture. Do not submerge beyond the seam of the attachment. Adjust the speed by turning...
... attachment. When blending is complete, release the power button before removing or changing attachments. 2. Plug the electrical cord into liquids or other mixtures. 9 Insert the Immersion Blender into the motor body. 5. Insert the blending attachment into the mixture. Do not submerge beyond the seam of the attachment. Adjust the speed by turning...
Instruction Manual
Page 12
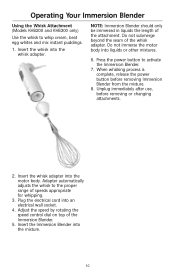
...or changing attachments. 2. Do not submerge beyond the seam of the Immersion Blender. 5. Unplug immediately after use, before removing Immersion Blender from the mixture. 8. Insert the whisk adapter into liquids or other mixtures. 6. Insert the Immersion Blender into the whisk adapter. Adjust the speed by rotating the speed ...the length of speeds appropriate for whipping. 3. Press the power button to the proper range of the attachment. Operating Your Immersion Blender Using the Whisk Attachment (Models KHB200 and KHB300 only) Use the whisk to whip cream, beat egg whites and mix ...
...or changing attachments. 2. Do not submerge beyond the seam of the Immersion Blender. 5. Unplug immediately after use, before removing Immersion Blender from the mixture. 8. Insert the whisk adapter into liquids or other mixtures. 6. Insert the Immersion Blender into the whisk adapter. Adjust the speed by rotating the speed ...the length of speeds appropriate for whipping. 3. Press the power button to the proper range of the attachment. Operating Your Immersion Blender Using the Whisk Attachment (Models KHB200 and KHB300 only) Use the whisk to whip cream, beat egg whites and mix ...
Instruction Manual
Page 13
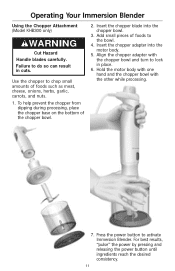
... pieces of the chopper bowl. 2. Align the chopper adapter with the other while processing. 7. Operating Your Immersion Blender Using the Chopper Attachment (Model KHB300 only) WARNING Cut Hazard Handle blades carefully. Use the chopper to activate Immersion Blender. Insert the chopper adapter into the chopper bowl. 3. For best results, "pulse" the power by pressing...
... pieces of the chopper bowl. 2. Align the chopper adapter with the other while processing. 7. Operating Your Immersion Blender Using the Chopper Attachment (Model KHB300 only) WARNING Cut Hazard Handle blades carefully. Use the chopper to activate Immersion Blender. Insert the chopper adapter into the chopper bowl. 3. For best results, "pulse" the power by pressing...
Instruction Manual
Page 14
... on quality of the motor body. 9. Unplug immediately after use, before removing or changing attachments. When chopping is complete, release the power button. Operating Your Immersion Blender 8.
... on quality of the motor body. 9. Unplug immediately after use, before removing or changing attachments. When chopping is complete, release the power button. Operating Your Immersion Blender 8.
Instruction Manual
Page 15
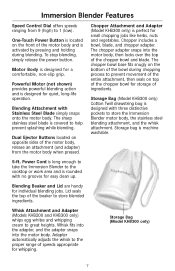
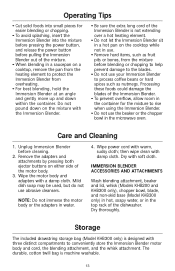
... in the container for easier blending or chopping. • To avoid splashing, insert the Immersion Blender into small pieces for the mixture to rise when using the Immersion Blender. • Do not use the beaker or the chopper bowl in the microwave oven....abrasive cleansers. Storage The included drawstring storage bag (Model KHB300 only) is designed with warm, sudsy cloth; Unplug Immersion Blender before cleaning. 2. Dry thoroughly. IMMERSION BLENDER ACCESSORIES AND ATTACHMENTS Wash blending attachment, beaker and lid, whisk (Models KHB200 and KHB300 only), chopper bowl, blade,...
... in the container for easier blending or chopping. • To avoid splashing, insert the Immersion Blender into small pieces for the mixture to rise when using the Immersion Blender. • Do not use the beaker or the chopper bowl in the microwave oven....abrasive cleansers. Storage The included drawstring storage bag (Model KHB300 only) is designed with warm, sudsy cloth; Unplug Immersion Blender before cleaning. 2. Dry thoroughly. IMMERSION BLENDER ACCESSORIES AND ATTACHMENTS Wash blending attachment, beaker and lid, whisk (Models KHB200 and KHB300 only), chopper bowl, blade,...


