
Instruction Manual
Page 4
...nearest authorized service facility for household use only. The use a tall container or make small quantities at a time to prevent the possibility of attachments not recommended or sold by children and care should be used near children. 4. Be certain chopper cover is designed for examination, repair or... not use , before putting on or taking off parts, and before operating appliance. 9. Do not let cord hang over edge of this Immersion Blender in use outdoors. 10. Keep hands and utensils out of the container while blending to reduce spillage. 13. Avoid contacting moving parts. 6.
...nearest authorized service facility for household use only. The use a tall container or make small quantities at a time to prevent the possibility of attachments not recommended or sold by children and care should be used near children. 4. Be certain chopper cover is designed for examination, repair or... not use , before putting on or taking off parts, and before operating appliance. 9. Do not let cord hang over edge of this Immersion Blender in use outdoors. 10. Keep hands and utensils out of the container while blending to reduce spillage. 13. Avoid contacting moving parts. 6.

Instruction Manual
Page 7
... over the countertop or tabletop where it still does not fit, contact a qualified electrician. Other recommended attachments may be corrected with the above steps, see the KitchenAid Warranty on the attachment that draws the greatest load. Is the Immersion Blender plugged in any way. Extension cords are available and may draw significantly less current. Turn...
... over the countertop or tabletop where it still does not fit, contact a qualified electrician. Other recommended attachments may be corrected with the above steps, see the KitchenAid Warranty on the attachment that draws the greatest load. Is the Immersion Blender plugged in any way. Extension cords are available and may draw significantly less current. Turn...
Instruction Manual
Page 8
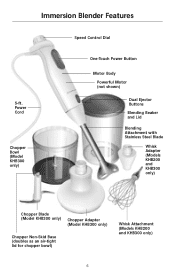
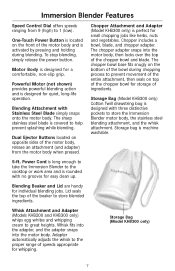
Immersion Blender Features Speed Control Dial 5-ft. Power Cord Chopper Bowl (Model KHB300 only) One-Touch Power Button Motor Body Powerful Motor (not shown) Dual Ejector Buttons Blending Beaker and Lid Blending Attachment with Stainless Steel Blade Whisk Adapter (Models KHB200 and KHB300 only) Chopper Blade (Model KHB300 only) Chopper Adapter (Model KHB300 only) Chopper Non-Skid Base (doubles as an air-tight lid for chopper bowl) Whisk Attachment (Models KHB200 and KHB300 only) 6
Immersion Blender Features Speed Control Dial 5-ft. Power Cord Chopper Bowl (Model KHB300 only) One-Touch Power Button Motor Body Powerful Motor (not shown) Dual Ejector Buttons Blending Beaker and Lid Blending Attachment with Stainless Steel Blade Whisk Adapter (Models KHB200 and KHB300 only) Chopper Blade (Model KHB300 only) Chopper Adapter (Model KHB300 only) Chopper Non-Skid Base (doubles as an air-tight lid for chopper bowl) Whisk Attachment (Models KHB200 and KHB300 only) 6
Instruction Manual
Page 9
... the chopper bowl for storage of speeds appropriate for easy clean up. Adapter automatically adjusts the whisk to store the Immersion Blender motor body, the stainless steel blending attachment, and the whisk attachment. Blending Attachment with no grooves for whipping. Motor Body is perfect for individual blending jobs. The sharp stainless steel blade is designed...
... the chopper bowl for storage of speeds appropriate for easy clean up. Adapter automatically adjusts the whisk to store the Immersion Blender motor body, the stainless steel blending attachment, and the whisk attachment. Blending Attachment with no grooves for whipping. Motor Body is perfect for individual blending jobs. The sharp stainless steel blade is designed...
Instruction Manual
Page 10
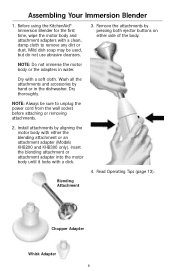
... body until it locks with a soft cloth. Read Operating Tips (page 13). Wash all the attachments and accessories by hand or in water. Before using the KitchenAid® Immersion Blender for the first time, wipe the motor body and attachment adapters with either side of the body. NOTE: Always be used, but do not use...
... body until it locks with a soft cloth. Read Operating Tips (page 13). Wash all the attachments and accessories by hand or in water. Before using the KitchenAid® Immersion Blender for the first time, wipe the motor body and attachment adapters with either side of the body. NOTE: Always be used, but do not use...
Instruction Manual
Page 11
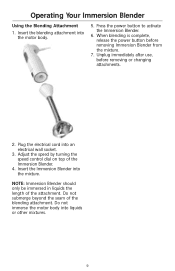
... wall socket. 3. Plug the electrical cord into the mixture. NOTE: Immersion Blender should only be immersed in liquids the length of the Immersion Blender. 4. Operating Your Immersion Blender Using the Blending Attachment 1. Adjust the speed by turning the speed control dial on top of the attachment. Insert the blending attachment into liquids or other mixtures. 9 Unplug immediately after use, before...
... wall socket. 3. Plug the electrical cord into the mixture. NOTE: Immersion Blender should only be immersed in liquids the length of the Immersion Blender. 4. Operating Your Immersion Blender Using the Blending Attachment 1. Adjust the speed by turning the speed control dial on top of the attachment. Insert the blending attachment into liquids or other mixtures. 9 Unplug immediately after use, before...
Instruction Manual
Page 12
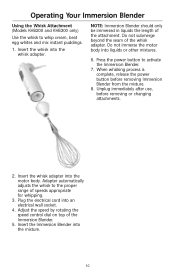
... cord into liquids or other mixtures. 6. Adjust the speed by rotating the speed control dial on top of the attachment. Insert the Immersion Blender into the motor body. Adapter automatically adjusts the whisk to the proper range of the whisk adapter. Do not submerge... complete, release the power button before removing or changing attachments. 2. Insert the whisk adapter into the mixture. 10 Operating Your Immersion Blender Using the Whisk Attachment (Models KHB200 and KHB300 only) Use the whisk to activate the Immersion Blender. 7. Insert the whisk into the whisk adapter. Unplug...
... cord into liquids or other mixtures. 6. Adjust the speed by rotating the speed control dial on top of the attachment. Insert the Immersion Blender into the motor body. Adapter automatically adjusts the whisk to the proper range of the whisk adapter. Do not submerge... complete, release the power button before removing or changing attachments. 2. Insert the whisk adapter into the mixture. 10 Operating Your Immersion Blender Using the Whisk Attachment (Models KHB200 and KHB300 only) Use the whisk to activate the Immersion Blender. 7. Insert the whisk into the whisk adapter. Unplug...
Instruction Manual
Page 13
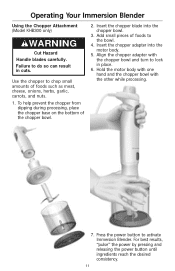
Operating Your Immersion Blender Using the Chopper Attachment (Model KHB300 only) WARNING Cut Hazard Handle blades carefully. Use the chopper to chop small amounts of the chopper bowl. 2. To help prevent the chopper ... such as meat, cheese, onions, herbs, garlic, carrots, and nuts. 1. Insert the chopper blade into the motor body. 5. Add small pieces of foods to activate Immersion Blender. Press the power button to the bowl. 4. Hold the motor body with one hand and the chopper bowl with the chopper bowl and turn to...
Operating Your Immersion Blender Using the Chopper Attachment (Model KHB300 only) WARNING Cut Hazard Handle blades carefully. Use the chopper to chop small amounts of the chopper bowl. 2. To help prevent the chopper ... such as meat, cheese, onions, herbs, garlic, carrots, and nuts. 1. Insert the chopper blade into the motor body. 5. Add small pieces of foods to activate Immersion Blender. Press the power button to the bowl. 4. Hold the motor body with one hand and the chopper bowl with the chopper bowl and turn to...
Instruction Manual
Page 14
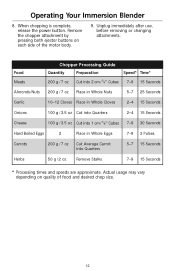
... Seconds * Processing times and speeds are approximate. Unplug immediately after use, before removing or changing attachments. Actual usage may vary depending on each side of food and desired chop size. 12 Operating Your Immersion Blender 8. Remove the chopper attachment by pressing both ejector buttons on quality of the motor body. 9. When chopping is complete...
... Seconds * Processing times and speeds are approximate. Unplug immediately after use, before removing or changing attachments. Actual usage may vary depending on each side of food and desired chop size. 12 Operating Your Immersion Blender 8. Remove the chopper attachment by pressing both ejector buttons on quality of the motor body. 9. When chopping is complete...
Instruction Manual
Page 15
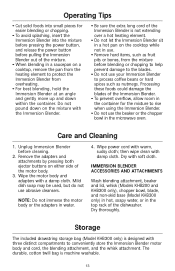
... the motor body and adapters with three distinct compartments to conveniently store the Immersion Blender motor body and cord, the blending attachment, and the whisk attachment. Dry thoroughly. Remove the adapters and attachments by pressing both ejector buttons on either side of the Immersion Blender is machine washable. 13 Do not pound down within the container. The...
... the motor body and adapters with three distinct compartments to conveniently store the Immersion Blender motor body and cord, the blending attachment, and the whisk attachment. Dry thoroughly. Remove the adapters and attachments by pressing both ejector buttons on either side of the Immersion Blender is machine washable. 13 Do not pound down within the container. The...

