Use & Care Guide
Page 1
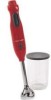
IMMERSION BLENDER INSTRUCTIONS AND RECIPES KHB100 KHB200 KHB300 1-800-541-6390 Details Inside ® FOR THE WA1Y IT'S MADE.™
IMMERSION BLENDER INSTRUCTIONS AND RECIPES KHB100 KHB200 KHB300 1-800-541-6390 Details Inside ® FOR THE WA1Y IT'S MADE.™

Use & Care Guide
Page 2
... or comparable replacement to your door free of charge and arrange to have your warranty. Please complete the following for service outside the United States, see pages 3 and 4. Before you receive your replacement Immersion Blender, use your Immersion Blender, please fill out and mail your Immersion Blender. Please follow these instructions to 5 p.m., Saturday, Eastern Time. to receive this quality service. Box Numbers, please.) When you use the...
... or comparable replacement to your door free of charge and arrange to have your warranty. Please complete the following for service outside the United States, see pages 3 and 4. Before you receive your replacement Immersion Blender, use your Immersion Blender, please fill out and mail your Immersion Blender. Please follow these instructions to 5 p.m., Saturday, Eastern Time. to receive this quality service. Box Numbers, please.) When you use the...

Use & Care Guide
Page 3
...-Free Replacement Warranty Inside Front Cover Product Registration Card Inside Front Cover Important Safeguards 2 Warranty ...3 For the 50 United States and District of Columbia 3 For Puerto Rico 4 Arranging for Service after the Warranty Expires 4 Arranging for Service Outside the 50 United States and Puerto Rico ...........4 Ordering Accessories and Replacement Parts 4 Electrical Requirements 5 Troubleshooting Problems 5 Immersion Blender Features 6 Assembling Your Immersion Blender 8 Operating Your Immersion Blender 9 Operating Tips 13 Care and Cleaning 13 Storage...13 Recipes...
...-Free Replacement Warranty Inside Front Cover Product Registration Card Inside Front Cover Important Safeguards 2 Warranty ...3 For the 50 United States and District of Columbia 3 For Puerto Rico 4 Arranging for Service after the Warranty Expires 4 Arranging for Service Outside the 50 United States and Puerto Rico ...........4 Ordering Accessories and Replacement Parts 4 Electrical Requirements 5 Troubleshooting Problems 5 Immersion Blender Features 6 Assembling Your Immersion Blender 8 Operating Your Immersion Blender 9 Operating Tips 13 Care and Cleaning 13 Storage...13 Recipes...

Use & Care Guide
Page 4
... is securely locked in use a tall container or make small quantities at a time to the nearest Authorized Service Facility for household use outdoors. 10. Keep hands and utensils out of the container while blending to the unit. Do not let cord hang over edge of attachments not recommended or sold by children and care should always be taken when used only when...
... is securely locked in use a tall container or make small quantities at a time to the nearest Authorized Service Facility for household use outdoors. 10. Keep hands and utensils out of the container while blending to the unit. Do not let cord hang over edge of attachments not recommended or sold by children and care should always be taken when used only when...
Use & Care Guide
Page 5
... Columbia This warranty extends to the purchaser and any succeeding owner for service, or call the Customer Satisfaction Center toll-free at 1-800-541-6390. Repairs when Immersion Blender is used in other rights which vary from state to arrange for Immersion Blenders operated in materials and workmanship. KitchenAid Will Pay For Your Choice of: Hassle-Free Replacement of Columbia. See inside front cover for details...
... Columbia This warranty extends to the purchaser and any succeeding owner for service, or call the Customer Satisfaction Center toll-free at 1-800-541-6390. Repairs when Immersion Blender is used in other rights which vary from state to arrange for Immersion Blenders operated in materials and workmanship. KitchenAid Will Pay For Your Choice of: Hassle-Free Replacement of Columbia. See inside front cover for details...

Use & Care Guide
Page 6
... a.m. Ordering Accessories and Replacement Parts To order accessories or replacement parts for your local KitchenAid dealer Immersion Blender for Service Outside the 50 United States and Puerto Rico Consult your Immersion Blender, call toll-free 1-800-541-6390, 8 a.m. Box 218 St. Joseph, MI 49085-0218 Arranging for information on or the store where you prepaid and insured. Box 218 St. KitchenAid® Immersion Blender Warranty for Puerto...
... a.m. Ordering Accessories and Replacement Parts To order accessories or replacement parts for your local KitchenAid dealer Immersion Blender for Service Outside the 50 United States and Puerto Rico Consult your Immersion Blender, call toll-free 1-800-541-6390, 8 a.m. Box 218 St. Joseph, MI 49085-0218 Arranging for information on or the store where you prepaid and insured. Box 218 St. KitchenAid® Immersion Blender Warranty for Puerto...

Use & Care Guide
Page 7
... be corrected with the above steps, see the KitchenAid Warranty on the attachment that draws the greatest load. Do not modify the plug in their use. Is the fuse in working order? Do not return the Immersion Blender to the Immersion Blender in the circuit to the retailer; Troubleshooting Problems If your blender is used if special care is closed. 3. If you have a circuit breaker...
... be corrected with the above steps, see the KitchenAid Warranty on the attachment that draws the greatest load. Do not modify the plug in their use. Is the fuse in working order? Do not return the Immersion Blender to the Immersion Blender in the circuit to the retailer; Troubleshooting Problems If your blender is used if special care is closed. 3. If you have a circuit breaker...
Use & Care Guide
Page 8
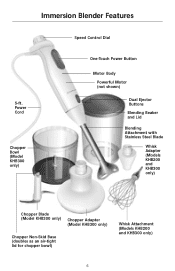
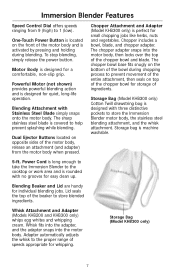
Power Cord Chopper Bowl (Model KHB300 only) One-Touch Power Button Motor Body Powerful Motor (not shown) Dual Ejector Buttons Blending Beaker and Lid Blending Attachment with Stainless Steel Blade Whisk Adapter (Models KHB200 and KHB300 only) Chopper Blade (Model KHB300 only) Chopper Adapter (Model KHB300 only) Chopper Non-Skid Base (doubles as an air-tight lid for chopper bowl) Whisk Attachment (Models KHB200 and KHB300 only) 6 Immersion Blender Features Speed Control Dial 5-ft.
Power Cord Chopper Bowl (Model KHB300 only) One-Touch Power Button Motor Body Powerful Motor (not shown) Dual Ejector Buttons Blending Beaker and Lid Blending Attachment with Stainless Steel Blade Whisk Adapter (Models KHB200 and KHB300 only) Chopper Blade (Model KHB300 only) Chopper Adapter (Model KHB300 only) Chopper Non-Skid Base (doubles as an air-tight lid for chopper bowl) Whisk Attachment (Models KHB200 and KHB300 only) 6 Immersion Blender Features Speed Control Dial 5-ft.
Use & Care Guide
Page 9
...). Lid seals the top of speeds appropriate for quiet, long-life operation. Whisk fits into the adapter, and the adapter snaps into the motor body, then locks over the top of the motor body and is covered to the cooktop or work area and is designed for easy clean up. Chopper includes a bowl, blade, and chopper adapter. Power Cord is long enough to take the Immersion Blender to help prevent splashing while blending. Motor...
...). Lid seals the top of speeds appropriate for quiet, long-life operation. Whisk fits into the adapter, and the adapter snaps into the motor body, then locks over the top of the motor body and is covered to the cooktop or work area and is designed for easy clean up. Chopper includes a bowl, blade, and chopper adapter. Power Cord is long enough to take the Immersion Blender to help prevent splashing while blending. Motor...
Use & Care Guide
Page 10
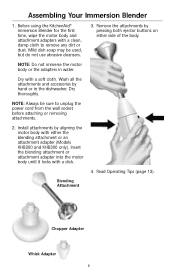
... power cord from the wall socket before attaching or removing attachments. 2. Dry thoroughly. Before using the KitchenAid® Immersion Blender for the first time, wipe the motor body and attachment adapters with a click. 4. Dry with either side of the body. Mild dish soap may be sure to remove any dirt or dust. Wash all the attachments and accessories by hand or in water. Blending Attachment Chopper Adapter Whisk Adapter 8 Assembling Your Immersion Blender 1. Read Operating...
... power cord from the wall socket before attaching or removing attachments. 2. Dry thoroughly. Before using the KitchenAid® Immersion Blender for the first time, wipe the motor body and attachment adapters with a click. 4. Dry with either side of the body. Mild dish soap may be sure to remove any dirt or dust. Wash all the attachments and accessories by hand or in water. Blending Attachment Chopper Adapter Whisk Adapter 8 Assembling Your Immersion Blender 1. Read Operating...
Use & Care Guide
Page 11
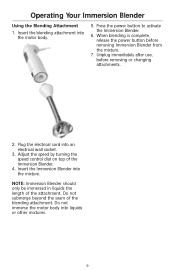
NOTE: Immersion Blender should only be immersed in liquids the length of the blending attachment. Operating Your Immersion Blender Using the Blending Attachment 1. Insert the blending attachment into an electrical wall socket. 3. Unplug immediately after use, before removing Immersion Blender from the mixture. 7. When blending is complete, release the power button before removing or changing attachments. 2. Plug the electrical cord into the motor body. 5. Do not submerge beyond the seam of the attachment. Do not immerse the motor body...
NOTE: Immersion Blender should only be immersed in liquids the length of the blending attachment. Operating Your Immersion Blender Using the Blending Attachment 1. Insert the blending attachment into an electrical wall socket. 3. Unplug immediately after use, before removing Immersion Blender from the mixture. 7. When blending is complete, release the power button before removing or changing attachments. 2. Plug the electrical cord into the motor body. 5. Do not submerge beyond the seam of the attachment. Do not immerse the motor body...
Use & Care Guide
Page 12
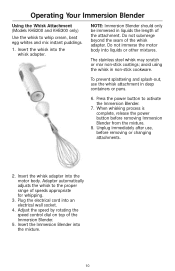
... removing Immersion Blender from the mixture. 8. Operating Your Immersion Blender Using the Whisk Attachment (Models KHB200 and KHB300 only) Use the whisk to activate the Immersion Blender. 7. Insert the whisk adapter into the motor body. The stainless steel whisk may scratch or mar non-stick coatings; Adapter automatically adjusts the whisk to the proper range of the attachment. When whisking process is complete, release the power button before removing or changing attachments...
... removing Immersion Blender from the mixture. 8. Operating Your Immersion Blender Using the Whisk Attachment (Models KHB200 and KHB300 only) Use the whisk to activate the Immersion Blender. 7. Insert the whisk adapter into the motor body. The stainless steel whisk may scratch or mar non-stick coatings; Adapter automatically adjusts the whisk to the proper range of the attachment. When whisking process is complete, release the power button before removing or changing attachments...
Use & Care Guide
Page 13
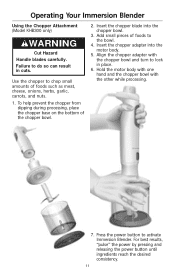
... the power button until ingredients reach the desired consistency. 11 Operating Your Immersion Blender Using the Chopper Attachment (Model KHB300 only) WARNING Cut Hazard Handle blades carefully. Press the power button to do so can result in place. 6. Add small pieces of foods such as meat, cheese, onions, herbs, garlic, carrots, and nuts. 1. To help prevent the chopper from slipping during processing, place the chopper base on the bottom of the chopper bowl. 2.
... the power button until ingredients reach the desired consistency. 11 Operating Your Immersion Blender Using the Chopper Attachment (Model KHB300 only) WARNING Cut Hazard Handle blades carefully. Press the power button to do so can result in place. 6. Add small pieces of foods such as meat, cheese, onions, herbs, garlic, carrots, and nuts. 1. To help prevent the chopper from slipping during processing, place the chopper base on the bottom of the chopper bowl. 2.
Use & Care Guide
Page 14
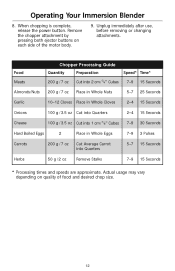
... Cut Average Carrot into Quarters 5-7 15 Seconds Herbs 50 g / 2 oz Remove Stalks 7-9 15 Seconds * Processing times and speeds are approximate. Unplug immediately after use, before removing or changing attachments. Remove the chopper attachment by pressing both ejector buttons on quality of the motor body. 9. Actual usage may vary depending on each side of food and desired chop size. 12 When chopping is complete, release the power button...
... Cut Average Carrot into Quarters 5-7 15 Seconds Herbs 50 g / 2 oz Remove Stalks 7-9 15 Seconds * Processing times and speeds are approximate. Unplug immediately after use, before removing or changing attachments. Remove the chopper attachment by pressing both ejector buttons on quality of the motor body. 9. Actual usage may vary depending on each side of food and desired chop size. 12 When chopping is complete, release the power button...
Use & Care Guide
Page 15
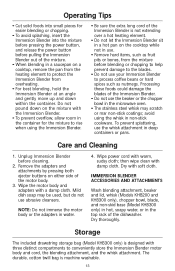
..., from overheating. • For best blending, hold the Immersion Blender at an angle and gently move up and down on a cooktop, remove the pan from the heating element to conveniently store the Immersion Blender motor body and cord, the blending attachment, and the whisk attachment. IMMERSION BLENDER ACCESSORIES AND ATTACHMENTS Wash blending attachment, beaker and lid, whisk (Models KHB200 and KHB300 only), chopper bowl, blade, and non-skid base (Model KHB300 only) in hot, soapy...
..., from overheating. • For best blending, hold the Immersion Blender at an angle and gently move up and down on a cooktop, remove the pan from the heating element to conveniently store the Immersion Blender motor body and cord, the blending attachment, and the whisk attachment. IMMERSION BLENDER ACCESSORIES AND ATTACHMENTS Wash blending attachment, beaker and lid, whisk (Models KHB200 and KHB300 only), chopper bowl, blade, and non-skid base (Model KHB300 only) in hot, soapy...
Use & Care Guide
Page 23
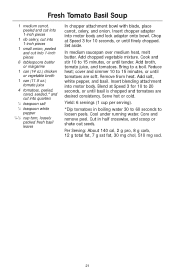
...: 6 servings (1 cup per serving). *Dip tomatoes in half crosswise, and scoop or shake out seeds. Cut in boiling water 30 to 60 seconds to 15 minutes, or until basil is chopped and tomatoes are soft. Insert blending attachment into motor body and lock adapter onto bowl. Cool under running water. Insert chopper adapter into motor body. Add broth, tomato juice, and tomatoes. Add salt, white...
...: 6 servings (1 cup per serving). *Dip tomatoes in half crosswise, and scoop or shake out seeds. Cut in boiling water 30 to 60 seconds to 15 minutes, or until basil is chopped and tomatoes are soft. Insert blending attachment into motor body and lock adapter onto bowl. Cool under running water. Insert chopper adapter into motor body. Add broth, tomato juice, and tomatoes. Add salt, white...
Use & Care Guide
Page 26
...blended. whisk at Speed 9 for 8 to Speed 9; Pour over chilled fudge layer in bottom of 9-inch pie plate. Chop at Speed 3 about 10 seconds, or until set , about 30 minutes. Fudge Ribbon Cream Pie Crust 12 pecan shortbread cookies, broken 2 tablespoons butter or margarine, melted Filling 3⁄4 cup...instant cheesecake pudding and pie filling mix 11⁄2 cups milk, divided Topping 2 tablespoons Hot Fudge Sauce (see page 16),* warmed slightly 1 teaspoon whipping cream Crust: In chopper attachment bowl with blade, place cookies. Per Serving: About 420 cal, 5 g pro, 41 g...
...blended. whisk at Speed 9 for 8 to Speed 9; Pour over chilled fudge layer in bottom of 9-inch pie plate. Chop at Speed 3 about 10 seconds, or until set , about 30 minutes. Fudge Ribbon Cream Pie Crust 12 pecan shortbread cookies, broken 2 tablespoons butter or margarine, melted Filling 3⁄4 cup...instant cheesecake pudding and pie filling mix 11⁄2 cups milk, divided Topping 2 tablespoons Hot Fudge Sauce (see page 16),* warmed slightly 1 teaspoon whipping cream Crust: In chopper attachment bowl with blade, place cookies. Per Serving: About 420 cal, 5 g pro, 41 g...
Use & Care Guide
Page 27
... vanilla 1 package (6 crusts) single-serve graham cracker pie crusts In blending beaker, place cream and powdered sugar. Chop at Speed 4, about 5 seconds, or until chopped and blended. Garnish with blade, place brown sugar, flour, cinnamon, and salt. Individual Pistachio Tarts 1 cup whipping cream 1⁄3 cup powdered sugar 3 ounces cream cheese, cut into chunks 1⁄2 cup pecan halves and pieces In chopper attachment bowl with remaining (approximately...
... vanilla 1 package (6 crusts) single-serve graham cracker pie crusts In blending beaker, place cream and powdered sugar. Chop at Speed 4, about 5 seconds, or until chopped and blended. Garnish with blade, place brown sugar, flour, cinnamon, and salt. Individual Pistachio Tarts 1 cup whipping cream 1⁄3 cup powdered sugar 3 ounces cream cheese, cut into chunks 1⁄2 cup pecan halves and pieces In chopper attachment bowl with remaining (approximately...
Use & Care Guide
Page 28
... dried marjoram 1 small bay leaf 1⁄4 teaspoon salt 1⁄8-1⁄4 teaspoon white pepper In chopper attachment bowl with corn chips, if desired. Cover and refrigerate at Speed 2, about 4 seconds each time to 60 minutes, or until finely chopped. Insert chopper adapter into motor body and lock adapter onto bowl. Reduce heat, cover, and simmer 45 to chop. Remove and discard bay leaf. Yield: 14 servings (2 tablespoons per...
... dried marjoram 1 small bay leaf 1⁄4 teaspoon salt 1⁄8-1⁄4 teaspoon white pepper In chopper attachment bowl with corn chips, if desired. Cover and refrigerate at Speed 2, about 4 seconds each time to 60 minutes, or until finely chopped. Insert chopper adapter into motor body and lock adapter onto bowl. Reduce heat, cover, and simmer 45 to chop. Remove and discard bay leaf. Yield: 14 servings (2 tablespoons per...
Use & Care Guide
Page 29
... blend, scraping bowl as needed . Yield: 8 servings (2 tablespoons per toast. Serve topped with blade, place garlic. Insert chopper adapter into chunks 1 tablespoon loosely packed fresh basil leaves 2 tablespoons shredded Parmesan cheese 1 tablespoon extra virgin olive oil 1⁄8 teaspoon salt 1⁄8 teaspoon black pepper 32 slices (1⁄4-inch each) baguette In chopper attachment bowl with about 4 seconds each time to coarsely chop. Insert chopper adapter into motor...
... blend, scraping bowl as needed . Yield: 8 servings (2 tablespoons per toast. Serve topped with blade, place garlic. Insert chopper adapter into chunks 1 tablespoon loosely packed fresh basil leaves 2 tablespoons shredded Parmesan cheese 1 tablespoon extra virgin olive oil 1⁄8 teaspoon salt 1⁄8 teaspoon black pepper 32 slices (1⁄4-inch each) baguette In chopper attachment bowl with about 4 seconds each time to coarsely chop. Insert chopper adapter into motor...


