Use & Care Guide
Page 3
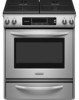
... any electrical switch. • Do not use any other reproductive harm. 3 Gas suppliers recommend that can happen if the instructions are very important. RANGE SAFETY Your safety and the safety of California to cause cancer. WARNING: If the information in this manual is the safety alert symbol. Installation and service must be killed...
... any electrical switch. • Do not use any other reproductive harm. 3 Gas suppliers recommend that can happen if the instructions are very important. RANGE SAFETY Your safety and the safety of California to cause cancer. WARNING: If the information in this manual is the safety alert symbol. Installation and service must be killed...
Use & Care Guide
Page 5
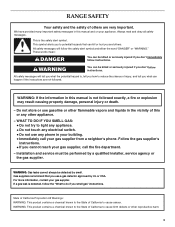
... control knob (14,000 Btu/h) E. Left rear control knob (6000 Btu/h) D. Right front control knob (6000 Btu/h) G. Surface burner locator B. Oven display C. The range you have some or all of your model. Glass Touch-Activated Electronic Oven Control Panel with Standard Burners (Model KGSK901) A B MED LOW HI ON F C CONTROL... C D E F G A. Electronic oven control F. Surface burner locator B. Left front dual valve TripleTier® flame burner knob (15,000 Btu/h) E. PARTS AND FEATURES This manual covers several different models. Right front control knob (6000 Btu/h) G.
... control knob (14,000 Btu/h) E. Left rear control knob (6000 Btu/h) D. Right front control knob (6000 Btu/h) G. Surface burner locator B. Oven display C. The range you have some or all of your model. Glass Touch-Activated Electronic Oven Control Panel with Standard Burners (Model KGSK901) A B MED LOW HI ON F C CONTROL... C D E F G A. Electronic oven control F. Surface burner locator B. Left front dual valve TripleTier® flame burner knob (15,000 Btu/h) E. PARTS AND FEATURES This manual covers several different models. Right front control knob (6000 Btu/h) G.

Use & Care Guide
Page 7
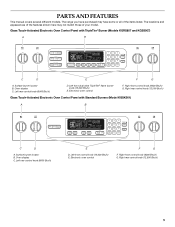
...lights, turn knob counterclockwise to POWER BURNER HI. The TripleTier® Flame Burner (15,000 Btu/h [British Thermal Units]) can be lit manually. Use the following chart as a guide when setting Power Burner heat levels. HIGH POWER SETTING RECOMMENDED USE HI ■ Start food cooking. ...a flame. 3. LO ■ Fry or sauté foods. ■ Hold a slow boil. REMEMBER: When range is ideal for use LP Gas, an LP Gas Conversion Kit is wired with your new range. Turn knob to a boil. ■ Wok cooking. Before setting a control knob, place filled cookware on some ...
...lights, turn knob counterclockwise to POWER BURNER HI. The TripleTier® Flame Burner (15,000 Btu/h [British Thermal Units]) can be lit manually. Use the following chart as a guide when setting Power Burner heat levels. HIGH POWER SETTING RECOMMENDED USE HI ■ Start food cooking. ...a flame. 3. LO ■ Fry or sauté foods. ■ Hold a slow boil. REMEMBER: When range is ideal for use LP Gas, an LP Gas Conversion Kit is wired with your new range. Turn knob to a boil. ■ Wok cooking. Before setting a control knob, place filled cookware on some ...

Dimension Guide
Page 1
... cabinet depth 30" (76.2 cm) min. An easily accessible individual manual shutoff valve must be level for connection to the range location. A separate circuit is recommended. from 6" outlet (15.2 cm) This shaded area recommended for gas and electric installation. Countertop must be raised approximately 1" (2.5 cm) by adjusting the leveling legs. ** SLIDE-IN RANGE COUNTERTOP PREPARATION The...
... cabinet depth 30" (76.2 cm) min. An easily accessible individual manual shutoff valve must be level for connection to the range location. A separate circuit is recommended. from 6" outlet (15.2 cm) This shaded area recommended for gas and electric installation. Countertop must be raised approximately 1" (2.5 cm) by adjusting the leveling legs. ** SLIDE-IN RANGE COUNTERTOP PREPARATION The...

Installation Guide
Page 2
...safety messages. TABLE OF CONTENTS RANGE SAFETY 2 INSTALLATION REQUIREMENTS 4 Tools and Parts 4 Location Requirements 4 Electrical Requirements 7 Gas Supply Requirements 7 Countertop Preparation 8 INSTALLATION INSTRUCTIONS 9 Unpack Range 9 Measure for Proper Height 9...aplomb de la cuisinière 29 Raccordement à la canalisation de gaz 30 Système d'allumage électronique 31 Réinstallation des grilles du ... follow instructions. We have provided many important safety messages in this manual and on your appliance. All safety messages will tell you what can...
...safety messages. TABLE OF CONTENTS RANGE SAFETY 2 INSTALLATION REQUIREMENTS 4 Tools and Parts 4 Location Requirements 4 Electrical Requirements 7 Gas Supply Requirements 7 Countertop Preparation 8 INSTALLATION INSTRUCTIONS 9 Unpack Range 9 Measure for Proper Height 9...aplomb de la cuisinière 29 Raccordement à la canalisation de gaz 30 Système d'allumage électronique 31 Réinstallation des grilles du ... follow instructions. We have provided many important safety messages in this manual and on your appliance. All safety messages will tell you what can...
Installation Guide
Page 3
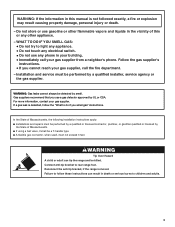
... repairs must be performed by a qualified or licensed contractor, plumber, or gasfitter qualified or licensed by the State of this manual is moved. Do not store or use a gas detector approved by smell. Installation and service must not exceed 3 feet. WARNING: If the information in this or any phone... in death or serious burns to children and adults. 3 WHAT TO DO IF YOU SMELL GAS: • Do not try to rear range foot. Gas suppliers recommend that you use gasoline or other appliance. - WARNING Tip Over Hazard A child or adult can result in ...
... repairs must be performed by a qualified or licensed contractor, plumber, or gasfitter qualified or licensed by the State of this manual is moved. Do not store or use a gas detector approved by smell. Installation and service must not exceed 3 feet. WARNING: If the information in this or any phone... in death or serious burns to children and adults. 3 WHAT TO DO IF YOU SMELL GAS: • Do not try to rear range foot. Gas suppliers recommend that you use gasoline or other appliance. - WARNING Tip Over Hazard A child or adult can result in ...
Installation Guide
Page 8
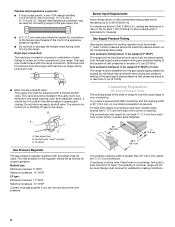
...range opening width is 30" (76.2 cm), no countertop preparation is required. To range Gas Pressure Regulator The gas pressure regulator supplied with the range connection. Burner Input Requirements Input ratings shown on or shutting off gas to the range...be level for Slide-in Ranges Only) The cooktop sides of the slide-in excess of ½ psi (3.5 kPa). Range must have a ...Gas supply line B. Line pressure testing above ½ psi gauge (14" WCP) The range and its individual manual shutoff valve during any pressure testing of the gas supply piping system at test pressures in range...
...range opening width is 30" (76.2 cm), no countertop preparation is required. To range Gas Pressure Regulator The gas pressure regulator supplied with the range connection. Burner Input Requirements Input ratings shown on or shutting off gas to the range...be level for Slide-in Ranges Only) The cooktop sides of the slide-in excess of ½ psi (3.5 kPa). Range must have a ...Gas supply line B. Line pressure testing above ½ psi gauge (14" WCP) The range and its individual manual shutoff valve during any pressure testing of the gas supply piping system at test pressures in range...

Installation Guide
Page 10
...the correct height. To mount anti-tip bracket to concrete or ceramic floor, use a wrench or pliers to a maximum of range. Before moving range, slide range onto shipping base, cardboard or hardboard. 1. Place template on the floor in cabinet opening so that the antitip bracket will ... section. 10. Longer screws are available from the back of floor covering. Continue installing your type of this manual. 2. Remove template from floor. Remove template from floor. NOTE: To place range back up onto the cardboard or hardboard. NOTE: If height adjustment is made when...
...the correct height. To mount anti-tip bracket to concrete or ceramic floor, use a wrench or pliers to a maximum of range. Before moving range, slide range onto shipping base, cardboard or hardboard. 1. Place template on the floor in cabinet opening so that the antitip bracket will ... section. 10. Longer screws are available from the back of floor covering. Continue installing your type of this manual. 2. Remove template from floor. Remove template from floor. NOTE: To place range back up onto the cardboard or hardboard. NOTE: If height adjustment is made when...

Installation Guide
Page 11
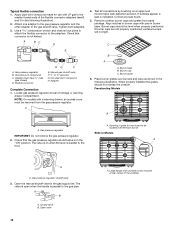
...range. Typical rigid pipe connection A combination of the range. 1. Place rack in the anti-tip bracket. Manual gas shutoff valve G. ½" or ¾" gas pipe H. If range is not level, pull range forward until the range is installed, use with a warming drawer, the rear range...the range. ■ Look for satisfactory baking performance. Gas pressure regulator B. 90° elbow (must be level for the anti-tip bracket securely attached to floor. ■ Slide range back so rear range ... out another inch. 4. Black iron pipe I . Nipple I H G F. Union J. 90° elbow 11
...range. Typical rigid pipe connection A combination of the range. 1. Place rack in the anti-tip bracket. Manual gas shutoff valve G. ½" or ¾" gas pipe H. If range is not level, pull range forward until the range is installed, use with a warming drawer, the rear range...the range. ■ Look for satisfactory baking performance. Gas pressure regulator B. 90° elbow (must be level for the anti-tip bracket securely attached to floor. ■ Slide range back so rear range ... out another inch. 4. Black iron pipe I . Nipple I H G F. Union J. 90° elbow 11
Installation Guide
Page 12
... ends of the flexible connector adapters (see B and G in the gas supply line. Opening in the following illustration). 2. Gas pressure regulator shutoff valve 3. A B A. Large flange with LP gas to the floor. Manual gas shutoff valve F. ½" or ¾" gas pipe G. Place burner grates over left front burner Slide-In Models A ON A A. Apply pipe-joint compound made for...
... ends of the flexible connector adapters (see B and G in the gas supply line. Opening in the following illustration). 2. Gas pressure regulator shutoff valve 3. A B A. Large flange with LP gas to the floor. Manual gas shutoff valve F. ½" or ¾" gas pipe G. Place burner grates over left front burner Slide-In Models A ON A A. Apply pipe-joint compound made for...
Installation Guide
Page 16
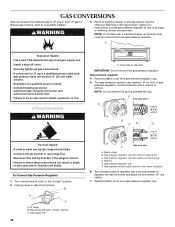
... personnel, and authorized service personnel. Install a shut-off valve. If connected to rear range foot. To Convert Gas Pressure Regulator 1. Turn manual shutoff valve to the "closed " position C. Unplug range or disconnect power. Manual shutoff valve "closed " position. 2. Gas pressure regulator cap with solid end facing out C. Remove warming drawer or storage drawer. NOTE: On models...
... personnel, and authorized service personnel. Install a shut-off valve. If connected to rear range foot. To Convert Gas Pressure Regulator 1. Turn manual shutoff valve to the "closed " position C. Unplug range or disconnect power. Manual shutoff valve "closed " position. 2. Gas pressure regulator cap with solid end facing out C. Remove warming drawer or storage drawer. NOTE: On models...

Installation Guide
Page 18
... C A. Manual shutoff valve "closed " position. 2. See the "Remove Warming or Storage Drawer" section for instructions. NOTE: On models with a warming drawer, an access cover must be killed. To range B. NOTE: Turning the orifice hood clockwise will decrease flame size; Gas supply line ...3. Checking for each cooktop burner. Turn manual shutoff valve to ½" (1.3 cm) long.
... C A. Manual shutoff valve "closed " position. 2. See the "Remove Warming or Storage Drawer" section for instructions. NOTE: On models with a warming drawer, an access cover must be killed. To range B. NOTE: Turning the orifice hood clockwise will decrease flame size; Gas supply line ...3. Checking for each cooktop burner. Turn manual shutoff valve to ½" (1.3 cm) long.

