Use & Care Guide
Page 3
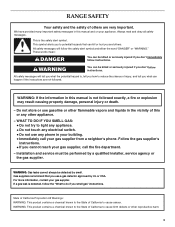
RANGE SAFETY Your safety and the safety of this or any phone in your building. • Immediately call the fire department. - WHAT TO DO IF YOU SMELL GAS: • Do not try to cause cancer. Always read and obey all safety messages. WARNING: Gas leaks cannot always be performed by a qualified installer...exactly, a fire or explosion may result causing property damage, personal injury or death. - WARNING: If the information in this manual and on your appliance. We have provided many important safety messages in the vicinity of others . This symbol alerts you to ...
RANGE SAFETY Your safety and the safety of this or any phone in your building. • Immediately call the fire department. - WHAT TO DO IF YOU SMELL GAS: • Do not try to cause cancer. Always read and obey all safety messages. WARNING: Gas leaks cannot always be performed by a qualified installer...exactly, a fire or explosion may result causing property damage, personal injury or death. - WARNING: If the information in this manual and on your appliance. We have provided many important safety messages in the vicinity of others . This symbol alerts you to ...

Use & Care Guide
Page 7
...BURNER LO. 7 All 3 burner rings will become hot. Push in use LP Gas, an LP Gas Conversion Kit is pressed completely down on the valve shaft. Failure to LITE. Electric... knob. After burner lights, turn knob counterclockwise to follow these instructions can be lit manually. Use the following chart as a guide when setting Power Burner heat levels. Only the.... All surface burners will click. See "Installation Instructions" for cooking large quantities of the pan. NOTE: Visually check that the control knob is included with your new range. If the spark igniter still does not ...
...BURNER LO. 7 All 3 burner rings will become hot. Push in use LP Gas, an LP Gas Conversion Kit is pressed completely down on the valve shaft. Failure to LITE. Electric... knob. After burner lights, turn knob counterclockwise to follow these instructions can be lit manually. Use the following chart as a guide when setting Power Burner heat levels. Only the.... All surface burners will click. See "Installation Instructions" for cooking large quantities of the pan. NOTE: Visually check that the control knob is included with your new range. If the spark igniter still does not ...

Dimension Guide
Page 1
...manual shutoff valve must be raised approximately 1" (2.5 cm) by adjusting the leveling legs. **When installed in * C. A time-delay fuse or circuit breaker is needed for planning purposes only. A. 30 " (77.6 cm) B. 35 " (90.5 cm) height to rear of cooktop *Range can be level for installation of rigid gas pipe. Range must be used for installation of rigid gas... range will not be level. ® 30" Freestanding and Slide-In Gas Range PRODUCT MODEL NUMBERS KGRS807S KGRS807X KGSK901S KGSS907S KGSS907X GAS SUPPLY REQUIREMENTS Use ³⁄₄" (1.9 cm) rigid pipe gas ...
...manual shutoff valve must be raised approximately 1" (2.5 cm) by adjusting the leveling legs. **When installed in * C. A time-delay fuse or circuit breaker is needed for planning purposes only. A. 30 " (77.6 cm) B. 35 " (90.5 cm) height to rear of cooktop *Range can be level for installation of rigid gas pipe. Range must be used for installation of rigid gas... range will not be level. ® 30" Freestanding and Slide-In Gas Range PRODUCT MODEL NUMBERS KGRS807S KGRS807X KGSK901S KGSS907S KGSS907X GAS SUPPLY REQUIREMENTS Use ³⁄₄" (1.9 cm) rigid pipe gas ...

Installation Guide
Page 2
...instructions are very important. TABLE OF CONTENTS RANGE SAFETY 2 INSTALLATION REQUIREMENTS 4 Tools and Parts 4 Location Requirements 4 Electrical Requirements 7 Gas Supply Requirements 7 Countertop Preparation 8 INSTALLATION INSTRUCTIONS 9 Unpack Range 9 Measure for Proper Height 9 Adjust Leveling Legs 10 Install Anti-Tip Bracket 10 Remove Warming or ... l'aplomb de la cuisinière 29 Raccordement à la canalisation de gaz 30 Système d'allumage électronique 31 Réinstallation des grilles du four et du tiroir-réchaud ou du tiroir de remisage 33 Achever...
...instructions are very important. TABLE OF CONTENTS RANGE SAFETY 2 INSTALLATION REQUIREMENTS 4 Tools and Parts 4 Location Requirements 4 Electrical Requirements 7 Gas Supply Requirements 7 Countertop Preparation 8 INSTALLATION INSTRUCTIONS 9 Unpack Range 9 Measure for Proper Height 9 Adjust Leveling Legs 10 Install Anti-Tip Bracket 10 Remove Warming or ... l'aplomb de la cuisinière 29 Raccordement à la canalisation de gaz 30 Système d'allumage électronique 31 Réinstallation des grilles du four et du tiroir-réchaud ou du tiroir de remisage 33 Achever...
Installation Guide
Page 3
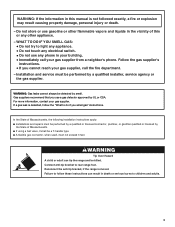
...by smell. For more information, contact your gas supplier from a neighbor's phone. Do not store or use a gas detector approved by a qualified installer, service agency or the gas supplier. Installation and service must not exceed 3 feet. Gas suppliers recommend that you smell gas" instructions. WARNING Tip Over Hazard A ... vapors and liquids in the vicinity of this manual is moved. If a gas leak is detected, follow these instructions can tip the range and be performed by UL or CSA. Reconnect the anti-tip bracket, if the range is not followed exactly, a fire or explosion...
...by smell. For more information, contact your gas supplier from a neighbor's phone. Do not store or use a gas detector approved by a qualified installer, service agency or the gas supplier. Installation and service must not exceed 3 feet. Gas suppliers recommend that you smell gas" instructions. WARNING Tip Over Hazard A ... vapors and liquids in the vicinity of this manual is moved. If a gas leak is detected, follow these instructions can tip the range and be performed by UL or CSA. Reconnect the anti-tip bracket, if the range is not followed exactly, a fire or explosion...

Installation Guide
Page 10
...Depending on 2 legs after the range has been placed back to the ...range foot. Install Anti-Tip Bracket Contact a qualified floor covering installer for the best procedure for the anti-tip bracket. Before moving range, slide range onto shipping base, cardboard or hardboard. 1. Move range...range will slide under the range for drilling mounting holes through your range using the following installation instructions. 10 Any method of 1" (2.5 cm). Before sliding range into its final location, making sure rear leveling leg slides...from the back of range. Align anti-tip bracket ...
...Depending on 2 legs after the range has been placed back to the ...range foot. Install Anti-Tip Bracket Contact a qualified floor covering installer for the best procedure for the anti-tip bracket. Before moving range, slide range onto shipping base, cardboard or hardboard. 1. Move range...range will slide under the range for drilling mounting holes through your range using the following installation instructions. 10 Any method of 1" (2.5 cm). Before sliding range into its final location, making sure rear leveling leg slides...from the back of range. Align anti-tip bracket ...

Installation Guide
Page 11
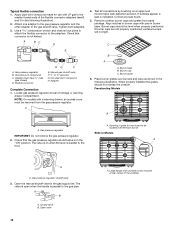
...installation steps. To Remove Storage Drawer: 1. Securely tighten all the way out. NOTE: Range must have a qualified person make sure gas pressure does not exceed 14" (36 cm) water column. Apply pipe-joint compound made for the anti-tip bracket securely attached to floor. ■ Slide range back so rear range foot is level. Manual gas... forward at the same time, then pull drawer out another inch. 4. Remove Warming or Storage Drawer Remove the warming or storage drawer to gain access to the lower section of the range. ■ Look for use a flashlight and look underneath ...
...installation steps. To Remove Storage Drawer: 1. Securely tighten all the way out. NOTE: Range must have a qualified person make sure gas pressure does not exceed 14" (36 cm) water column. Apply pipe-joint compound made for the anti-tip bracket securely attached to floor. ■ Slide range back so rear range foot is level. Manual gas... forward at the same time, then pull drawer out another inch. 4. Remove Warming or Storage Drawer Remove the warming or storage drawer to gain access to the lower section of the range. ■ Look for use a flashlight and look underneath ...
Installation Guide
Page 12
... Correct any leak found. 5. Burner caps should not overlap the console. Manual gas shutoff valve F. ½" or ¾" gas pipe G. If bubbles appear, a leak is parallel to be level when properly positioned. When properly installed the grates should be located over burners and caps as shown in the "...of the cooktop. NOTE: On models with pins in the gas supply line. Test all connections by brushing on when the lever is indicated. C B A A. Burner base B. Burner cap C. Place burner grates over left front burner Slide-In Models A ON A A. Check that connector is ...
... Correct any leak found. 5. Burner caps should not overlap the console. Manual gas shutoff valve F. ½" or ¾" gas pipe G. If bubbles appear, a leak is parallel to be level when properly positioned. When properly installed the grates should be located over burners and caps as shown in the "...of the cooktop. NOTE: On models with pins in the gas supply line. Test all connections by brushing on when the lever is indicated. C B A A. Burner base B. Burner cap C. Place burner grates over left front burner Slide-In Models A ON A A. Check that connector is ...
Installation Guide
Page 16
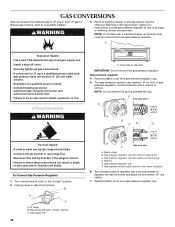
... Warming or Storage Drawer" section for instructions. Install a shut-off valve. Reconnect the anti-tip bracket, if the range is moved. Turn manual shutoff valve to LP, have a qualified person make sure gas pressure does not exceed 14" (36 cm) water column. Plastic cover B. Gas pressure regulator cap F. Gas pressure regulator IMPORTANT: Do not remove the...
... Warming or Storage Drawer" section for instructions. Install a shut-off valve. Reconnect the anti-tip bracket, if the range is moved. Turn manual shutoff valve to LP, have a qualified person make sure gas pressure does not exceed 14" (36 cm) water column. Plastic cover B. Gas pressure regulator cap F. Gas pressure regulator IMPORTANT: Do not remove the...

Installation Guide
Page 18
...not overtighten. The oven broil burner flame cannot be removed from the gas pressure regulator. A B A. Turn manual shutoff valve to rear range foot. Manual shutoff valve "closed " position. 2. Locate gas pressure regulator at rear of storage or warming drawer compartment. Remove ... flame cannot be killed. Complete installation. IMPORTANT: You may have to children and adults. turning it counterclockwise will increase flame size. Gas pressure regulator IMPORTANT: Do not remove the gas pressure regulator. 18 Gas supply line 3. Checking for each...
...not overtighten. The oven broil burner flame cannot be removed from the gas pressure regulator. A B A. Turn manual shutoff valve to rear range foot. Manual shutoff valve "closed " position. 2. Locate gas pressure regulator at rear of storage or warming drawer compartment. Remove ... flame cannot be killed. Complete installation. IMPORTANT: You may have to children and adults. turning it counterclockwise will increase flame size. Gas pressure regulator IMPORTANT: Do not remove the gas pressure regulator. 18 Gas supply line 3. Checking for each...


