
Use and Care Guide
Page 4
...children and adults. Connect anti-tip bracket to such substances. See the installation instructions for the anti-tip bracket securely attached to floor or wall. • Slide range back so rear range foot is under anti-tip bracket. WARNING Tip Over Hazard A child or adult can tip if you apply too ...much force or weight to the open door without the anti-tip bracket fastened down properly. Range Foot 4 The California Safe Drinking Water and Toxic Enforcement Act requires the Governor of California to publish a list of substances known to the State...
...children and adults. Connect anti-tip bracket to such substances. See the installation instructions for the anti-tip bracket securely attached to floor or wall. • Slide range back so rear range foot is under anti-tip bracket. WARNING Tip Over Hazard A child or adult can tip if you apply too ...much force or weight to the open door without the anti-tip bracket fastened down properly. Range Foot 4 The California Safe Drinking Water and Toxic Enforcement Act requires the Governor of California to publish a list of substances known to the State...
Use and Care Guide
Page 26
...appliance is used in the country in materials or workmanship: KITCHENAID® GAS RANGE WARRANTY LIMITED WARRANTY For one year from the date of purchase, when this appliance is operated and maintained according to instructions attached to correct defects in materials or workmanship. SECOND THROUGH FIFTH...fifth years from the date of purchase, when this major appliance is operated and maintained according to instructions attached to or furnished with the product, KitchenAid will pay for Factory Specified Parts for the following components if defective in which it was purchased. ...
...appliance is used in the country in materials or workmanship: KITCHENAID® GAS RANGE WARRANTY LIMITED WARRANTY For one year from the date of purchase, when this appliance is operated and maintained according to instructions attached to correct defects in materials or workmanship. SECOND THROUGH FIFTH...fifth years from the date of purchase, when this major appliance is operated and maintained according to instructions attached to or furnished with the product, KitchenAid will pay for Factory Specified Parts for the following components if defective in which it was purchased. ...

Installation Instructions
Page 8
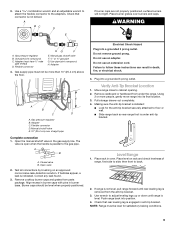
... use the wall mounting method. 3. Floor Mounting A B A. #12 x 1⁵⁄₈" screws B. Examples of range. Make Gas Connection C WARNING A. Mark edge of a qualified person include: licensed heating personnel, authorized gas company personnel, and authorized service personnel. Attach one adapter to the gas pressure regulator and the other adapter to the wall or floor with LP...
... use the wall mounting method. 3. Floor Mounting A B A. #12 x 1⁵⁄₈" screws B. Examples of range. Make Gas Connection C WARNING A. Mark edge of a qualified person include: licensed heating personnel, authorized gas company personnel, and authorized service personnel. Attach one adapter to the gas pressure regulator and the other adapter to the wall or floor with LP...
Installation Instructions
Page 9
... with pins in burner base. Gas supply pipe must have ½" male pipe thread) D. If range is not level, pull range forward until range is not kinked. Do not use an extension cord. Use pipe-joint compound. Use pipe-joint compound. Use a combination wrench and an adjustable wrench to attach the flexible connector to back...
... with pins in burner base. Gas supply pipe must have ½" male pipe thread) D. If range is not level, pull range forward until range is not kinked. Do not use an extension cord. Use pipe-joint compound. Use pipe-joint compound. Use a combination wrench and an adjustable wrench to attach the flexible connector to back...
Installation Instructions
Page 14
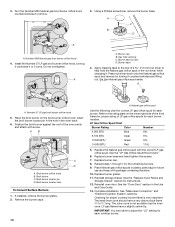
... 12. Reinstall storage drawer. Complete installation. Gas tube opening C. Number 57 LP gas broil burner orifice hood 5. Broil burner locator hole To Convert Surface Burners 1. Refer to the end of the oven cavity and attach with the correct LP gas orifice spud. Replace burner grates. 11. Reinstall... oven door. Install the Number 57 LP gas broil burner orifice hood, turning it counterclockwise and lifting out. Do not ...
... 12. Reinstall storage drawer. Complete installation. Gas tube opening C. Number 57 LP gas broil burner orifice hood 5. Broil burner locator hole To Convert Surface Burners 1. Refer to the end of the oven cavity and attach with the correct LP gas orifice spud. Replace burner grates. 11. Reinstall... oven door. Install the Number 57 LP gas broil burner orifice hood, turning it counterclockwise and lifting out. Do not ...
Installation Instructions
Page 17
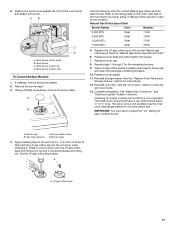
...locator hole To Convert Surface Burners 1. Remove the burner caps. 3. Refer to the end of the oven cavity and attach with correct Natural gas orifice spud. Natural Gas Orifice Spud Chart Burner Rating Color Number 5,000 BTU Clear 110N 9,200 BTU Clear 150N 12,000 BTU Clear 170N 16...screwdriver, remove the burner base. See the "Oven Door" section in the nut driver while changing it counterclockwise and lifting out. Place LP gas orifice spuds in plastic parts bag for each burner. Replace burner grates. 11. Complete installation. IMPORTANT: You may have to help hold the ...
...locator hole To Convert Surface Burners 1. Remove the burner caps. 3. Refer to the end of the oven cavity and attach with correct Natural gas orifice spud. Natural Gas Orifice Spud Chart Burner Rating Color Number 5,000 BTU Clear 110N 9,200 BTU Clear 150N 12,000 BTU Clear 170N 16...screwdriver, remove the burner base. See the "Oven Door" section in the nut driver while changing it counterclockwise and lifting out. Place LP gas orifice spuds in plastic parts bag for each burner. Replace burner grates. 11. Complete installation. IMPORTANT: You may have to help hold the ...