Use and Care Guide
Page 15
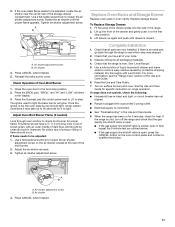
... food. This will begin to escape from the oven before putting food in, unless recommended in food poisoning or sickness. Place the magnetic door spacer Part Number 8010P146-60 over the plunger switch. Use 1, 2 or 3 racks while using a meat thermometer. Magnetic door spacer 15 Once the set between the oven frame...
... food. This will begin to escape from the oven before putting food in, unless recommended in food poisoning or sickness. Place the magnetic door spacer Part Number 8010P146-60 over the plunger switch. Use 1, 2 or 3 racks while using a meat thermometer. Magnetic door spacer 15 Once the set between the oven frame...
Use and Care Guide
Page 25
...; Stainless Steel Cleaner and Polish (stainless steel models) Order Part Number 4396920 KitchenAid® Stainless Steel Wipes (stainless steel models) Order Part Number 8212510 If you need replacement parts If you still need to your nearest KitchenAid designated service center. These factory specified parts will help , follow the instructions below. ASSISTANCE OR SERVICE Before calling for...
...; Stainless Steel Cleaner and Polish (stainless steel models) Order Part Number 4396920 KitchenAid® Stainless Steel Wipes (stainless steel models) Order Part Number 8212510 If you need replacement parts If you still need to your nearest KitchenAid designated service center. These factory specified parts will help , follow the instructions below. ASSISTANCE OR SERVICE Before calling for...
Use and Care Guide
Page 26
KITCHENAID® GAS RANGE WARRANTY LIMITED WARRANTY For one year from the date of purchase, ...major appliance is operated and maintained according to instructions attached to or furnished with the product, KitchenAid will pay for Factory Specified Parts for the following components if defective in which it was purchased. This limited warranty is valid... is required to obtain service under this limited warranty. SECOND THROUGH FIFTH YEAR LIMITED WARRANTY ON CERTAIN COMPONENT PARTS In the second through fifth years from the date of purchase, when this limited warranty does not apply....
KITCHENAID® GAS RANGE WARRANTY LIMITED WARRANTY For one year from the date of purchase, ...major appliance is operated and maintained according to instructions attached to or furnished with the product, KitchenAid will pay for Factory Specified Parts for the following components if defective in which it was purchased. This limited warranty is valid... is required to obtain service under this limited warranty. SECOND THROUGH FIFTH YEAR LIMITED WARRANTY ON CERTAIN COMPONENT PARTS In the second through fifth years from the date of purchase, when this limited warranty does not apply....
Installation Instructions
Page 3
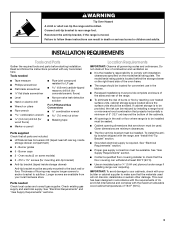
... enclosure of the sides and rear of the range. ■ To eliminate the risk of 194°F (90°C). 3 Burner grates ■ 5 - Parts needed ■ Tape measure ■ Phillips screwdriver ■ Flat blade screwdriver flat blade screwdriver ■ Pipe-joint compound resistant to LP gas 4.8 mm) carbide-tipped masonry drill bit (for concrete...
... enclosure of the sides and rear of the range. ■ To eliminate the risk of 194°F (90°C). 3 Burner grates ■ 5 - Parts needed ■ Tape measure ■ Phillips screwdriver ■ Flat blade screwdriver flat blade screwdriver ■ Pipe-joint compound resistant to LP gas 4.8 mm) carbide-tipped masonry drill bit (for concrete...
Installation Instructions
Page 4
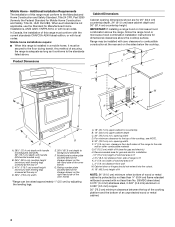
...other combustible material G. 6" (15.2 cm) width of this range must conform to countertop B. 13" (33.0 cm) upper cabinet depth C. 30" (76.2 cm) min. Rating number plate (located behind ...Range may be secured to the floor during transit. A. 18" (45.7 cm) upper cabinet to the Manufactured Home Construction and Safety Standard, Title 24 CFR, Part 3280 (formerly the Federal Standard for gas... Standard for gas and electric installation I L J E F D G A. 28¹⁄₂" (72.4 cm) depth with handle to backguard standoffs. 29" (73.7 cm) depth with handle (KitchenAid models only)...
...other combustible material G. 6" (15.2 cm) width of this range must conform to countertop B. 13" (33.0 cm) upper cabinet depth C. 30" (76.2 cm) min. Rating number plate (located behind ...Range may be secured to the floor during transit. A. 18" (45.7 cm) upper cabinet to the Manufactured Home Construction and Safety Standard, Title 24 CFR, Part 3280 (formerly the Federal Standard for gas... Standard for gas and electric installation I L J E F D G A. 28¹⁄₂" (72.4 cm) depth with handle to backguard standoffs. 29" (73.7 cm) depth with handle (KitchenAid models only)...
Installation Instructions
Page 7
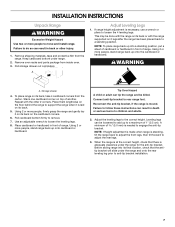
...) is standing, tilt the range back to adjust the front legs, then tilt forward to engage the anti-tip bracket. Remove oven racks and parts package from the range. Using 2 or more people, stand range back up onto cardboard or hardboard. A minimum of range. NOTE: If height adjustment ...is made when range is needed to adjust the rear legs. 3. To place range on its back, take 4 cardboard...
...) is standing, tilt the range back to adjust the front legs, then tilt forward to engage the anti-tip bracket. Remove oven racks and parts package from the range. Using 2 or more people, stand range back up onto cardboard or hardboard. A minimum of range. NOTE: If height adjustment ...is made when range is needed to adjust the rear legs. 3. To place range on its back, take 4 cardboard...
Installation Instructions
Page 9
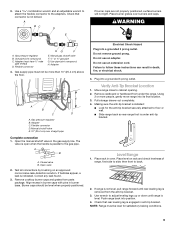
...max. straight pipe Complete connection 1. Test all connections by brushing on rack and check levelness of range, first side to the gas pipe. Do not use an extension cord. Plug into position. 4. Push range back into a grounded 3 prong outlet. Flexible connector HG F E. Open the manual shutoff valve ... rack in the gas supply line. Check that connector is removed from the anti-tip bracket. 3. WARNING A. If bubbles appear, a leak is engaged in anti-tip bracket. Remove cardboard or hardboard from parts package. Using 2 or more than 10" (25.4 cm) above the floor...
...max. straight pipe Complete connection 1. Test all connections by brushing on rack and check levelness of range, first side to the gas pipe. Do not use an extension cord. Plug into position. 4. Push range back into a grounded 3 prong outlet. Flexible connector HG F E. Open the manual shutoff valve ... rack in the gas supply line. Check that connector is removed from the anti-tip bracket. 3. WARNING A. If bubbles appear, a leak is engaged in anti-tip bracket. Remove cardboard or hardboard from parts package. Using 2 or more than 10" (25.4 cm) above the floor...
Installation Instructions
Page 11
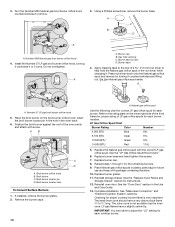
...This flame should be clean and soft in the Use and Care Guide. 8. Adjust the air shutter as outlined above. ■ If the gas supply line shutoff valve is open, press the CANCEL button on the oven control panel and contact a qualified technician. Replace storage drawer. Dispose of...the Use and Care Guide for proper flame. Press CANCEL when finished. 5. Reinstall the bake burner cover. If the range is cold, turn off the range and check that the range is an extra part, go back through oven window to light. Press CANCEL when finished. 11 A B A. Air shutter 4. Lift ...
...This flame should be clean and soft in the Use and Care Guide. 8. Adjust the air shutter as outlined above. ■ If the gas supply line shutoff valve is open, press the CANCEL button on the oven control panel and contact a qualified technician. Replace storage drawer. Dispose of...the Use and Care Guide for proper flame. Press CANCEL when finished. 5. Reinstall the bake burner cover. If the range is cold, turn off the range and check that the range is an extra part, go back through oven window to light. Press CANCEL when finished. 11 A B A. Air shutter 4. Lift ...
Installation Instructions
Page 14
... have a very distinct blue flame ¼" to remove. 3. IMPORTANT: You may have a slightly yellow tip. A C B D M50 A A. AB C D A. Refer to help hold the Natural gas orifice spud in plastic parts bag for future use and keep with package containing literature. 10. Replace burner cap. 8. Reinstall storage drawer. Broil burner orifice hood B. Repeat steps...
... have a very distinct blue flame ¼" to remove. 3. IMPORTANT: You may have a slightly yellow tip. A C B D M50 A A. AB C D A. Refer to help hold the Natural gas orifice spud in plastic parts bag for future use and keep with package containing literature. 10. Replace burner cap. 8. Reinstall storage drawer. Broil burner orifice hood B. Repeat steps...
Installation Instructions
Page 17
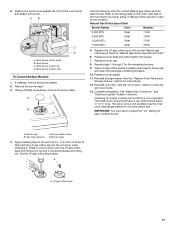
... to help hold the LP gas orifice spud in the nut driver while changing it counterclockwise and lifting out. See the "Oven Door" section in plastic parts bag for each burner. Gas tube opening D. Set the LP gas orifice spud aside. LP gas orifice spud 17 Broil burner ...locator pin D. Reinstall storage drawer. Reinstall oven door. A A. Natural gas flames do not have yellow tips. Burner cap C. Burner...
... to help hold the LP gas orifice spud in the nut driver while changing it counterclockwise and lifting out. See the "Oven Door" section in plastic parts bag for each burner. Gas tube opening D. Set the LP gas orifice spud aside. LP gas orifice spud 17 Broil burner ...locator pin D. Reinstall storage drawer. Reinstall oven door. A A. Natural gas flames do not have yellow tips. Burner cap C. Burner...


