Use and Care Guide
Page 1
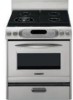
GAS RANGE Use & Care Guide For questions about features, operation/performance, parts accessories or service, call: 1-800-422-1230 In Canada, call : 1-800-807-6777 or visit our website at... www.KitchenAid.ca Table of Contents/Table des matières 2 To the installer: Please leave this book for installation... read and keep this instruction book with the unit. www.kitchenaid.com or www.KitchenAid.ca CUISINIÈRE À GAZ Guide d'utilisation et d'entretien Au Canada, pour assistance composez le 1-800-461-5681, pour installation ou service composez le 1-800-807-6777 ou visitez notre site...
GAS RANGE Use & Care Guide For questions about features, operation/performance, parts accessories or service, call: 1-800-422-1230 In Canada, call : 1-800-807-6777 or visit our website at... www.KitchenAid.ca Table of Contents/Table des matières 2 To the installer: Please leave this book for installation... read and keep this instruction book with the unit. www.kitchenaid.com or www.KitchenAid.ca CUISINIÈRE À GAZ Guide d'utilisation et d'entretien Au Canada, pour assistance composez le 1-800-461-5681, pour installation ou service composez le 1-800-807-6777 ou visitez notre site...
Use and Care Guide
Page 7
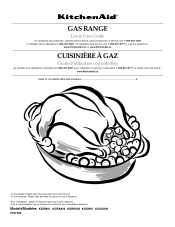
... information, contact your new range. Cooktop Controls WARNING Fire Hazard Do not let the burner flame extend beyond the edge of cooking. See "Installation Instructions" for slow cooking....the grate. s A core or base of medium-to see whether it can be used as a guide for standard ranges. Contact a trained repair specialist to check the wall receptacle to -heavy thickness. s Heats slowly,... not hear the igniter click, TURN THE BURNER OFF. Check for browning and frying. Gas, an L.P. Models with nonstick surfaces should be used under the broiler. s Good for...
... information, contact your new range. Cooktop Controls WARNING Fire Hazard Do not let the burner flame extend beyond the edge of cooking. See "Installation Instructions" for slow cooking....the grate. s A core or base of medium-to see whether it can be used as a guide for standard ranges. Contact a trained repair specialist to check the wall receptacle to -heavy thickness. s Heats slowly,... not hear the igniter click, TURN THE BURNER OFF. Check for browning and frying. Gas, an L.P. Models with nonstick surfaces should be used under the broiler. s Good for...
Installation Instructions
Page 9
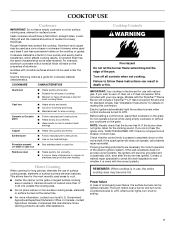
...Lift front of drawer to the floor. Level Range 1. Remove the outside the range. On Ranges Equipped with a storage drawer, pull drawer open to range. 3. Make Gas Connection WARNING Explosion Hazard Use a new CSA International approved gas supply line. 2. If installing the range in a mobile home, you have a slide...to side; Place level on rack and check levelness of securing the range is level. On models with Storage Drawers: Use a wrench and pliers to the standards in drawer guides. On Ranges Equipped with a warming drawer, the rear leg cannot be necesary to...
...Lift front of drawer to the floor. Level Range 1. Remove the outside the range. On Ranges Equipped with a storage drawer, pull drawer open to range. 3. Make Gas Connection WARNING Explosion Hazard Use a new CSA International approved gas supply line. 2. If installing the range in a mobile home, you have a slide...to side; Place level on rack and check levelness of securing the range is level. On models with Storage Drawers: Use a wrench and pliers to the standards in drawer guides. On Ranges Equipped with a warming drawer, the rear leg cannot be necesary to...
Installation Instructions
Page 12
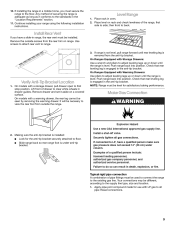
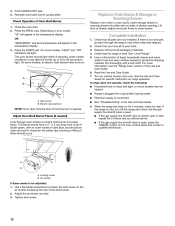
.... Use a mild solution of liquid household cleaner and warm water to see the "Range Care" section of the Use and Care Guide. 6. Read the Use and Care Guide. 7. If range does not operate, check the following: Check that all parts are now installed. Dry thoroughly with a soft cloth. Close the oven door. 2. On some models...
.... Use a mild solution of liquid household cleaner and warm water to see the "Range Care" section of the Use and Care Guide. 6. Read the Use and Care Guide. 7. If range does not operate, check the following: Check that all parts are now installed. Dry thoroughly with a soft cloth. Close the oven door. 2. On some models...


