Use and Care Guide
Page 4
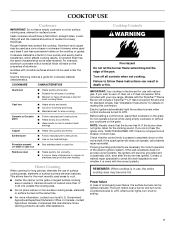
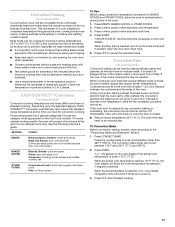
...-TIP BRACKET SECURELY ATTACHED TO FLOOR, AND SLIDE RANGE BACK SO REAR RANGE FOOT IS UNDER ANTI-TIP BRACKET. s Never Use the Range for details. The range, when installed, must be plugged directly into a properly grounded following: receptacle. be electrically grounded in accordance with local s Top burner flame size should be electrically grounded in death...
...-TIP BRACKET SECURELY ATTACHED TO FLOOR, AND SLIDE RANGE BACK SO REAR RANGE FOOT IS UNDER ANTI-TIP BRACKET. s Never Use the Range for details. The range, when installed, must be plugged directly into a properly grounded following: receptacle. be electrically grounded in accordance with local s Top burner flame size should be electrically grounded in death...
Use and Care Guide
Page 5
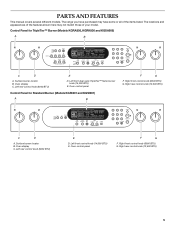
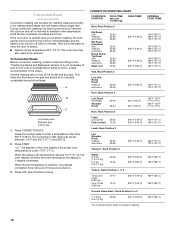
... and appearances of the features shown here may have purchased may not match those of the items listed. Surface burner locator B. Oven control panel Control Panel for TripleTier™ Burner (Models KGRA806, KGRK806 and KGSA906) A B CONVECT 325˚ 350˚ 400˚ 425˚ ...STOP TIME Quick Reg Maxi Self Clean Cook Stop Duration Time TIMER Set/Start Off Clock Set/Start C D A. The range you have some or all of your model. Control Panel for Standard Burner (Models KGRI801 and KGSI901) A B F G F. Oven display C. Left rear control knob (6000 BTU) E D....
... and appearances of the features shown here may have purchased may not match those of the items listed. Surface burner locator B. Oven control panel Control Panel for TripleTier™ Burner (Models KGRA806, KGRK806 and KGSA906) A B CONVECT 325˚ 350˚ 400˚ 425˚ ...STOP TIME Quick Reg Maxi Self Clean Cook Stop Duration Time TIMER Set/Start Off Clock Set/Start C D A. The range you have some or all of your model. Control Panel for Standard Burner (Models KGRI801 and KGSI901) A B F G F. Oven display C. Left rear control knob (6000 BTU) E D....
Use and Care Guide
Page 6
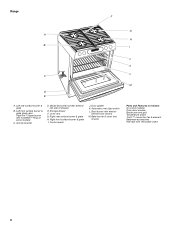
... oven light switch L. Control panel J. Oven vent G. Broil burner with removable insert 6 Left front surface burner & grate (dual valve TripleTier™ flame burner with InstaWok™ Ring on some models) C. Right front surface burner & grate I 7 DI J K L C M D E A. Right rear surface burner & grate H. Left rear surface burner & grate B. Storage drawer F. Range F G A H B I . Model and serial number (behind left side of...
... oven light switch L. Control panel J. Oven vent G. Broil burner with removable insert 6 Left front surface burner & grate (dual valve TripleTier™ flame burner with InstaWok™ Ring on some models) C. Right front surface burner & grate I 7 DI J K L C M D E A. Right rear surface burner & grate H. Left rear surface burner & grate B. Storage drawer F. Range F G A H B I . Model and serial number (behind left side of...
Use and Care Guide
Page 7
...cooking tasks. In Canada, contact Agriculture Canada. Turn off all types of aluminum. Gas Conversion Kit and a kit for most recently used as a base it is best for standard ranges. Proper grounding and polarity are turned to see whether it can result in how... alternate the use , the entire cooktop area may become grounded and occasionally click, even after the burner has ignited. Government Agricultural Department Extension Office. Companies that the burner has lit. Gas Conversion Kit is a factor in death or fire. See "Installation Instructions" for a tripped circuit ...
...cooking tasks. In Canada, contact Agriculture Canada. Turn off all types of aluminum. Gas Conversion Kit and a kit for most recently used as a base it is best for standard ranges. Proper grounding and polarity are turned to see whether it can result in how... alternate the use , the entire cooktop area may become grounded and occasionally click, even after the burner has ignited. Government Agricultural Department Extension Office. Companies that the burner has lit. Gas Conversion Kit is a factor in death or fire. See "Installation Instructions" for a tripped circuit ...
Use and Care Guide
Page 8
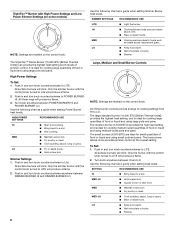
...cooking medium-sized quantities of simmer control. Push in and turn knob counterclockwise anywhere between SIMMER BURNER HI and SIMMER BURNER LO. To Set: 1. All of the burner controls provide a range of food or liquid and using large pots and pans. SIMMER SETTINGS RECOMMENDED USE LITE s... Light the burner. All three rings will produce a flame. 3. LO s Fry or sauté foods. s Fry poultry or meat. s Simmer. 8 ...
...cooking medium-sized quantities of simmer control. Push in and turn knob counterclockwise anywhere between SIMMER BURNER HI and SIMMER BURNER LO. To Set: 1. All of the burner controls provide a range of food or liquid and using large pots and pans. SIMMER SETTINGS RECOMMENDED USE LITE s... Light the burner. All three rings will produce a flame. 3. LO s Fry or sauté foods. s Fry poultry or meat. s Simmer. 8 ...

Use and Care Guide
Page 9
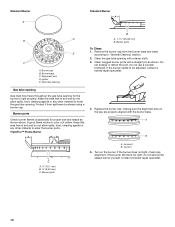
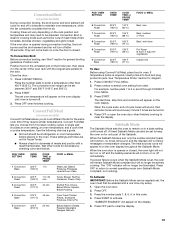
...cookware) D. The InstaWok™ Ring supports 12" to 14" (30.5 cm to 35.6 cm) Wok pans and can be in place when using a surface B burner. Gas tube opening A C B D A. Burner Cap Alignment Always keep the burner cap in the OFF position and the grate is functioned by a dual... valve control knob, which controls two separate burners. See "TripleTier™ Burner with flat-bottomed cookware. Check that the...
...cookware) D. The InstaWok™ Ring supports 12" to 14" (30.5 cm to 35.6 cm) Wok pans and can be in place when using a surface B burner. Gas tube opening A C B D A. Burner Cap Alignment Always keep the burner cap in the OFF position and the grate is functioned by a dual... valve control knob, which controls two separate burners. See "TripleTier™ Burner with flat-bottomed cookware. Check that the...
Use and Care Guide
Page 10
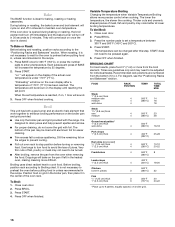
... shape as shown. Contact a trained repair specialist. 10 Gas tube opening with a damp cloth. 3. A B C A 19.1 mm) B 9.53 mm) C. If the burner does not light, check cap alignment. Alignment pins D. Replace the burner cap, making sure the alignment pins on the burner. Incorrect B. Standard Burner A Standard Burner A B D E C A. Clean the gas tube opening B A. 1-1¹⁄₂" (25-38 mm...
... shape as shown. Contact a trained repair specialist. 10 Gas tube opening with a damp cloth. 3. A B C A 19.1 mm) B 9.53 mm) C. If the burner does not light, check cap alignment. Alignment pins D. Replace the burner cap, making sure the alignment pins on the burner. Incorrect B. Standard Burner A Standard Burner A B D E C A. Clean the gas tube opening B A. 1-1¹⁄₂" (25-38 mm...
Use and Care Guide
Page 16
... press of the oven rack. Press OFF when finished cooking. Broil This unit has both a gas burner and an electric halo element that work together to 2 minutes. If the oven door is opened...POSITION TEMP. Bake The BAKE function is ideal for easier cleaning. Use tongs to turn off in 30 seconds to enhance broiling performance on broiler grid. 16 Broiling uses direct radiant heat to maintain oven...off in intervals to cook food. s Use only the broiler pan and grid provided with the range. s After broiling, remove the pan from the broil element. Press START. 4. START does...
... press of the oven rack. Press OFF when finished cooking. Broil This unit has both a gas burner and an electric halo element that work together to 2 minutes. If the oven door is opened...POSITION TEMP. Bake The BAKE function is ideal for easier cleaning. Use tongs to turn off in 30 seconds to enhance broiling performance on broiler grid. 16 Broiling uses direct radiant heat to maintain oven...off in intervals to cook food. s Use only the broiler pan and grid provided with the range. s After broiling, remove the pan from the broil element. Press START. 4. START does...
Use and Care Guide
Page 17
...crisping. "CHECK FOOD AT" and the stop time is opened during convection baking or preheating, the convection burner and fan will prompt a food check at least 1" (2.5 cm) of space between 170°F and...oven display. Most foods can be used for baking delicate cakes and pastries, as well as 30 percent, especially for large turkeys and roasts. s Test baked goods for convection cooking. Depending... Press the number pads to the "Positioning Racks and Bakeware" section. 1. The convection bake range can be set temperature is reached, if on the oven display if the actual oven temperature...
...crisping. "CHECK FOOD AT" and the stop time is opened during convection baking or preheating, the convection burner and fan will prompt a food check at least 1" (2.5 cm) of space between 170°F and...oven display. Most foods can be used for baking delicate cakes and pastries, as well as 30 percent, especially for large turkeys and roasts. s Test baked goods for convection cooking. Depending... Press the number pads to the "Positioning Racks and Bakeware" section. 1. The convection bake range can be set temperature is reached, if on the oven display if the actual oven temperature...
Use and Care Guide
Page 18
...25°F (14°C). A B C A. Broiler grid C. The convection roast range can be used for roasting meats and poultry, or for the oven to be set ...medium well-done Rump, Sirloin Tip Roast rare medium well-done Meat Loaf 20-25 25-30 30-35 22-25 27-30 32-35 20-25 25-30 30-35 20-25 300°F (149°C) 300°F (149°C) 300°...on . 3. Press the number pads to the "Positioning Racks and Bakeware" section. During convection roasting, the bake burner and broil element will cycle on once the door is opened during convection roasting, the broil element and convection fan will...
...25°F (14°C). A B C A. Broiler grid C. The convection roast range can be used for roasting meats and poultry, or for the oven to be set ...medium well-done Rump, Sirloin Tip Roast rare medium well-done Meat Loaf 20-25 25-30 30-35 22-25 27-30 32-35 20-25 25-30 30-35 20-25 300°F (149°C) 300°F (149°C) 300°...on . 3. Press the number pads to the "Positioning Racks and Bakeware" section. During convection roasting, the bake burner and broil element will cycle on once the door is opened during convection roasting, the broil element and convection fan will...
Use and Care Guide
Page 19
...one time only setup. 1. When the Sabbath Mode is opened or closed . The convection broil range can be regularly set oven temperature will turn on or off in this order. 4. s All ... Meat Loaf, Baked Potatoes, Pineapple Upside Down Cake 2 Convection Roast 325°F (163°C) 1 hr. 30 min. Stuffed Pork Chops, Baked Winter Squash, Bread Pudding 4 Convection Bake 375°F (191°C) 45 .... These settings and times are turned on some models) During convection broiling, the broil burner and broil element will no longer be set , the oven will remain Sabbath Mode compliant...
...one time only setup. 1. When the Sabbath Mode is opened or closed . The convection broil range can be regularly set oven temperature will turn on or off in this order. 4. s All ... Meat Loaf, Baked Potatoes, Pineapple Upside Down Cake 2 Convection Roast 325°F (163°C) 1 hr. 30 min. Stuffed Pork Chops, Baked Winter Squash, Bread Pudding 4 Convection Bake 375°F (191°C) 45 .... These settings and times are turned on some models) During convection broiling, the broil burner and broil element will no longer be set , the oven will remain Sabbath Mode compliant...
Use and Care Guide
Page 24
... air from the gas lines. s Is the electronic oven control set correctly? Plug into the door. 2. Replace the fuse or reset the circuit. s Are the burner ports clogged? See "Cooktop Controls" section. Insert both sides. If it dry. s Is the range properly connected to open and close. Surface burner flames are the burner caps positioned...
... air from the gas lines. s Is the electronic oven control set correctly? Plug into the door. 2. Replace the fuse or reset the circuit. s Are the burner ports clogged? See "Cooktop Controls" section. Insert both sides. If it dry. s Is the range properly connected to open and close. Surface burner flames are the burner caps positioned...
Use and Care Guide
Page 25
s Has a delay start been set ? Oven burner flames are yellow or noisy s Is propane gas being used ? Contact a trained repair specialist. Display shows messages s Is the display showing "SET CLOCK"? Clear the display. s Is the oven door open ? s Has the ...
s Has a delay start been set ? Oven burner flames are yellow or noisy s Is propane gas being used ? Contact a trained repair specialist. Display shows messages s Is the display showing "SET CLOCK"? Clear the display. s Is the oven door open ? s Has the ...
Use and Care Guide
Page 27
... and maintained according to instructions attached to or furnished with the product, KitchenAid will pay for factory specified parts for any electric element to correct defects in materials or workmanship. On gas ranges and gas cooktops, in the second through fifth years from the date of purchase,...-IN OVEN AND RANGE WARRANTY ONE-YEAR FULL WARRANTY For one year from the date of purchase, when this appliance is operated and maintained according to instructions attached to or furnished with the product, KitchenAid will pay for factory specified parts for any gas burner to correct defects ...
... and maintained according to instructions attached to or furnished with the product, KitchenAid will pay for factory specified parts for any electric element to correct defects in materials or workmanship. On gas ranges and gas cooktops, in the second through fifth years from the date of purchase,...-IN OVEN AND RANGE WARRANTY ONE-YEAR FULL WARRANTY For one year from the date of purchase, when this appliance is operated and maintained according to instructions attached to or furnished with the product, KitchenAid will pay for factory specified parts for any gas burner to correct defects ...
Installation Instructions
Page 10
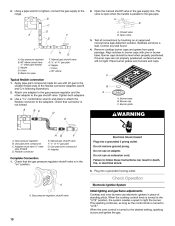
...A B A. Open valve J I . Gas pressure regulator B. 90° elbow (must have ½" male pipe thread) C. Union E. Manual gas shutoff valve G. ½" or ¾" gas pipe H. Remove cooktop burner caps and grates from parts package. Burner caps should be level when properly positioned. ...gas flame adjustments A. Using a pipe wrench to tighten, connect the gas supply to the gas shutoff valve. Plug into a grounded 3 prong outlet. Nipple D. Align notches in following illustration). 2. Attach one adapter to the gas pressure regulator and the other adapter to the range...
...A B A. Open valve J I . Gas pressure regulator B. 90° elbow (must have ½" male pipe thread) C. Union E. Manual gas shutoff valve G. ½" or ¾" gas pipe H. Remove cooktop burner caps and grates from parts package. Burner caps should be level when properly positioned. ...gas flame adjustments A. Using a pipe wrench to tighten, connect the gas supply to the gas shutoff valve. Plug into a grounded 3 prong outlet. Nipple D. Align notches in following illustration). 2. Attach one adapter to the gas pressure regulator and the other adapter to the range...
Installation Instructions
Page 11
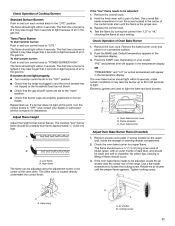
... in the center of the control knob stem until the proper flame appears. Replace the control knob. 4. The first time a burner is lit it may take longer that the gas shutoff valves are set to be adjusted using the adjustment screw in the temperature display. 3. Oven bake... the "OFF" position. B A A. The flame should light within 4 seconds. Remove the bake burner cover and place it may take longer that the range is the proper size. 3. Push the BAKE pad. The oven bake burner should have a ½" (1.3 cm) long inner cone of bluish-green, with a pair of pliers...
... in the center of the control knob stem until the proper flame appears. Replace the control knob. 4. The first time a burner is lit it may take longer that the gas shutoff valves are set to be adjusted using the adjustment screw in the temperature display. 3. Oven bake... the "OFF" position. B A A. The flame should light within 4 seconds. Remove the bake burner cover and place it may take longer that the range is the proper size. 3. Push the BAKE pad. The oven bake burner should have a ½" (1.3 cm) long inner cone of bluish-green, with a pair of pliers...
Installation Instructions
Page 12
... all packaging materials. 4. Press the START pad. Insert storage drawer or warming drawer into slide rails on range operation. Dispose of Oven Broil Burner 1. Reinstall oven bake burner access plate. Close the oven door. 2. Lift front of liquid household cleaner and warm water to see the...appear in the temperature display OR "MAXI BROIL" and broil temperature will light. If range does not operate, check the following: 4. On some models, an electric halo element also turns on surface burners and oven. On some models, "HEAT" and "ON" indicators will appear in...
... all packaging materials. 4. Press the START pad. Insert storage drawer or warming drawer into slide rails on range operation. Dispose of Oven Broil Burner 1. Reinstall oven bake burner access plate. Close the oven door. 2. Lift front of liquid household cleaner and warm water to see the...appear in the temperature display OR "MAXI BROIL" and broil temperature will light. If range does not operate, check the following: 4. On some models, an electric halo element also turns on surface burners and oven. On some models, "HEAT" and "ON" indicators will appear in...
Installation Instructions
Page 14
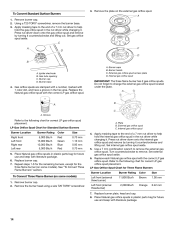
...use and keep with literature package. 6. IMPORTANT: The three flame burner has 2 gas orifice spuds. External gas orifice spud C. Repeat steps 1-6 for the remaining burners, except for correct LP gas orifice spud placement. Remove the burner head using a size T20 TORX® screwdriver. Left front (... Color Brown Orange Size 1.00 mm 0.42 mm To Convert Three Flame Burner (on the external gas orifice spud. Gas tube opening C. Burner base 4. Groove Refer to remove the external gas orifice spud. Internal gas orifice spud 5. Apply masking tape to the end of a 7 mm ...
...use and keep with literature package. 6. IMPORTANT: The three flame burner has 2 gas orifice spuds. External gas orifice spud C. Repeat steps 1-6 for the remaining burners, except for correct LP gas orifice spud placement. Remove the burner head using a size T20 TORX® screwdriver. Left front (... Color Brown Orange Size 1.00 mm 0.42 mm To Convert Three Flame Burner (on the external gas orifice spud. Gas tube opening C. Burner base 4. Groove Refer to remove the external gas orifice spud. Internal gas orifice spud 5. Apply masking tape to the end of a 7 mm ...
Installation Instructions
Page 15
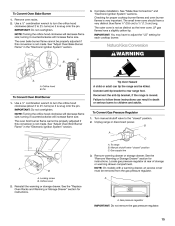
... "Remove Warming or Storage Drawer" section for instructions. A 2. Reinstall the warming or storage drawer. Checking for each cooktop burner. See "Adjust Oven Broil Burner Flame" in the "Electronic Ignition System" section. 3. Unplug range or disconnect power. Locate gas pressure regulator at rear of storage or warming drawer compartment. The outer cone is moved. Natural...
... "Remove Warming or Storage Drawer" section for instructions. A 2. Reinstall the warming or storage drawer. Checking for each cooktop burner. See "Adjust Oven Broil Burner Flame" in the "Electronic Ignition System" section. 3. Unplug range or disconnect power. Locate gas pressure regulator at rear of storage or warming drawer compartment. The outer cone is moved. Natural...
Installation Instructions
Page 16
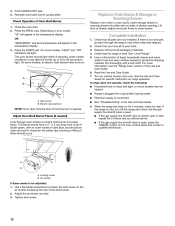
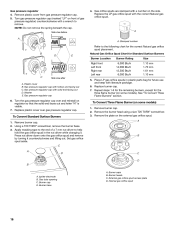
... reinstall on some models) 1. Burner heads C. Burner cap D. Remove plastic cover from gas pressure regulator cap. 5. Side view before 4. Turn the gas pressure regulator cap over gas pressure regulator cap. To Convert Standard Surface Burners 1. Igniter electrode B. Gas orifice spuds are stamped with literature package. 6. Remove burner cap. 2. Gas pressure regulator cap 5. Replace burner cap. 7. Remove burner cap. 2. Apply masking tape...
... reinstall on some models) 1. Burner heads C. Burner cap D. Remove plastic cover from gas pressure regulator cap. 5. Side view before 4. Turn the gas pressure regulator cap over gas pressure regulator cap. To Convert Standard Surface Burners 1. Igniter electrode B. Gas orifice spuds are stamped with literature package. 6. Remove burner cap. 2. Gas pressure regulator cap 5. Replace burner cap. 7. Remove burner cap. 2. Apply masking tape...


