Use & Care Guide
Page 3
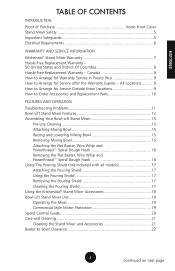
ENGLISH TABLE OF CONTENTS INTRODUCTION Proof of Purchase Inside Front Cover Stand Mixer Safety 5 Important Safeguards 5 Electrical Requirements 6 WARRANTY AND SERVICE INFORMATION Kitchenaid® Stand Mixer Warranty 7 Hassle-Free Replacement Warranty - 50 United States and District Of Columbia 8 Hassle-Free Replacement ...Shield 17 Removing the Pouring Shield 17 Cleaning the Pouring Shield 17 Using the KitchenAid® Stand Mixer Accessories 18 Bowl-Lift Stand Mixer Use 19 Operating the Mixer 19 Commercial Style Motor Protection 19 Speed Control Guide 20 Care and Cleaning 21...
ENGLISH TABLE OF CONTENTS INTRODUCTION Proof of Purchase Inside Front Cover Stand Mixer Safety 5 Important Safeguards 5 Electrical Requirements 6 WARRANTY AND SERVICE INFORMATION Kitchenaid® Stand Mixer Warranty 7 Hassle-Free Replacement Warranty - 50 United States and District Of Columbia 8 Hassle-Free Replacement ...Shield 17 Removing the Pouring Shield 17 Cleaning the Pouring Shield 17 Using the KitchenAid® Stand Mixer Accessories 18 Bowl-Lift Stand Mixer Use 19 Operating the Mixer 19 Commercial Style Motor Protection 19 Speed Control Guide 20 Care and Cleaning 21...

Use & Care Guide
Page 4
ENGLISH TABLE OF CONTENTS Mixing Tips 23 Egg Whites 24 Whipping Cream 24 Stand Mixer Attachments 25 Mounting Attachments 25 Removing Attachments 25 Stand Mixer Accessories 27 General Instructions for Mixing and Kneading Yeast Dough with the Rapid Mix Method 28 Bread Making Tips 29 Shaping a Loaf 30 RECIPES Basic White Bread 31 Whole Grain Wheat Bread 32 French Bread 33 Honey Oatmeal Bread 34 Crusty Pizza Dough 35 Basic Sweet Dough 36 Cinnamon Swirl Rounds 37 4 4
ENGLISH TABLE OF CONTENTS Mixing Tips 23 Egg Whites 24 Whipping Cream 24 Stand Mixer Attachments 25 Mounting Attachments 25 Removing Attachments 25 Stand Mixer Accessories 27 General Instructions for Mixing and Kneading Yeast Dough with the Rapid Mix Method 28 Bread Making Tips 29 Shaping a Loaf 30 RECIPES Basic White Bread 31 Whole Grain Wheat Bread 32 French Bread 33 Honey Oatmeal Bread 34 Crusty Pizza Dough 35 Basic Sweet Dough 36 Cinnamon Swirl Rounds 37 4 4
Use & Care Guide
Page 5
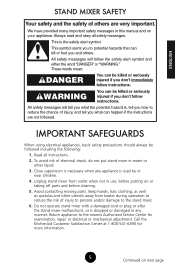
... the word "DANGER" or "WARNING." Call the KitchenAid Customer Satisfaction Center at 1-800-541-6390 for examination, repair or electrical or mechanical adjustment. Do not operate stand mixer with a damaged cord or plug or after the stand mixer malfunctions, or is , tell you how to the...You can happen if the instructions are very important. Close supervision is the safety alert symbol. Read all safety messages. ENGLISH STAND MIXER SAFETY Your safety and the safety of others . IMPORTANT SAFEGUARDS When using electrical appliances, basic safety precautions should always be killed ...
... the word "DANGER" or "WARNING." Call the KitchenAid Customer Satisfaction Center at 1-800-541-6390 for examination, repair or electrical or mechanical adjustment. Do not operate stand mixer with a damaged cord or plug or after the stand mixer malfunctions, or is , tell you how to the...You can happen if the instructions are very important. Close supervision is the safety alert symbol. Read all safety messages. ENGLISH STAND MIXER SAFETY Your safety and the safety of others . IMPORTANT SAFEGUARDS When using electrical appliances, basic safety precautions should always be killed ...

Use & Care Guide
Page 6
...ENGLISH 7. Do not use an adapter. only. SAVE THESE INSTRUCTIONS THIS PRODUCT IS DESIGNED FOR HOUSEHOLD USE ONLY. Do not use the stand mixer outdoors. 9. Other recommended attachments may cause fire, electrical shock or injury. 8. Do not remove ground prong. Failure to follow these instructions .... 10. Do not let the cord hang over edge of attachments not recommended or sold by KitchenAid may draw significantly less power. Hertz: 60 The wattage rating for your stand mixer is too short, have a qualified electrician or serviceman install an outlet near the appliance. The...
...ENGLISH 7. Do not use an adapter. only. SAVE THESE INSTRUCTIONS THIS PRODUCT IS DESIGNED FOR HOUSEHOLD USE ONLY. Do not use the stand mixer outdoors. 9. Other recommended attachments may cause fire, electrical shock or injury. 8. Do not remove ground prong. Failure to follow these instructions .... 10. Do not let the cord hang over edge of attachments not recommended or sold by KitchenAid may draw significantly less power. Hertz: 60 The wattage rating for your stand mixer is too short, have a qualified electrician or serviceman install an outlet near the appliance. The...

Use & Care Guide
Page 7
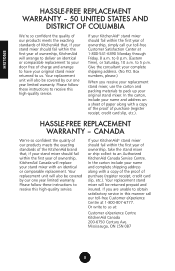
... REMEDIES IMPLIED WARRANTIES, INCLUDING TO THE EXTENT APPLICABLE WARRANTIES OF MERCHANTABILITY OR FITNESS FOR A PARTICULAR PURPOSE, ARE EXCLUDED TO THE EXTENT LEGALLY PERMISSIBLE. ENGLISH KITCHENAID® STAND MIXER WARRANTY Length of Warranty: 50 United States, the District of Columbia, Canada, and Puerto Rico: One-year limited warranty from state to state or...
... REMEDIES IMPLIED WARRANTIES, INCLUDING TO THE EXTENT APPLICABLE WARRANTIES OF MERCHANTABILITY OR FITNESS FOR A PARTICULAR PURPOSE, ARE EXCLUDED TO THE EXTENT LEGALLY PERMISSIBLE. ENGLISH KITCHENAID® STAND MIXER WARRANTY Length of Warranty: 50 United States, the District of Columbia, Canada, and Puerto Rico: One-year limited warranty from state to state or...
Use & Care Guide
Page 8
... and address on a sheet of paper along with an identical or comparable replacement. In the carton, include your KitchenAid® stand mixer should fail within the first year of ownership, simply call our toll-free Customer eXperience COernwtrreiteatto1-u8s00at-:807-67877. Your replacement...along with a copy of the proof of purchase (register receipt, credit card slip, etc.). Give the consultant your original stand mixer returned to an Authorized KitchenAid Canada Service Centre. Your replacement unit will also be returned prepaid and insured. to 8 p.m. (Eastern Time), or Saturday, ...
... and address on a sheet of paper along with an identical or comparable replacement. In the carton, include your KitchenAid® stand mixer should fail within the first year of ownership, simply call our toll-free Customer eXperience COernwtrreiteatto1-u8s00at-:807-67877. Your replacement...along with a copy of the proof of purchase (register receipt, credit card slip, etc.). Give the consultant your original stand mixer returned to an Authorized KitchenAid Canada Service Centre. Your replacement unit will also be returned prepaid and insured. to 8 p.m. (Eastern Time), or Saturday, ...
Use & Care Guide
Page 9
... calling for replacement parts and labor costs to : Customer Satisfaction Center KitchenAid Portable Appliances P.O. ENGLISH HOW TO ARRANGE FOR WARRANTY SERVICE IN PUERTO RICO Your KitchenAid® stand mixer is covered by an Authorized KitchenAid Service Center. If you are unable to obtain satisfactory service in this... Ave. Mississauga, ON L5N 0B7 HOW TO ARRANGE FOR SERVICE OUTSIDE THESE LOCATIONS Consult your local KitchenAid dealer or the store where you purchased the stand mixer for information on how to learn the location of Columbia, and Puerto Rico, call toll-free 01...
... calling for replacement parts and labor costs to : Customer Satisfaction Center KitchenAid Portable Appliances P.O. ENGLISH HOW TO ARRANGE FOR WARRANTY SERVICE IN PUERTO RICO Your KitchenAid® stand mixer is covered by an Authorized KitchenAid Service Center. If you are unable to obtain satisfactory service in this... Ave. Mississauga, ON L5N 0B7 HOW TO ARRANGE FOR SERVICE OUTSIDE THESE LOCATIONS Consult your local KitchenAid dealer or the store where you purchased the stand mixer for information on how to learn the location of Columbia, and Puerto Rico, call toll-free 01...

Use & Care Guide
Page 10
to : Customer eXperience Centre KitchenAid Canada 200-6750 Century Ave. Joseph, MI 49085-0218 To order accessories or replacement parts for your stand mixer in Mexico, call toll-free 01-800-024-17-17 (JV Distribuciones) Or 01-800-902-31-00 (Industrias Birtman) 10 10 Mississauga,... (Eastern Time), or Saturday, 10 a.m. Box 218 St. ENGLISH HOW TO ORDER ACCESSORIES AND REPLACEMENT PARTS To order accessories or replacement parts for your stand mixer in Canada, call toll-free 1-800-807-6777. to : Customer Satisfaction Center KitchenAid Portable Appliances P.O. Or write to 5 p.m.
to : Customer eXperience Centre KitchenAid Canada 200-6750 Century Ave. Joseph, MI 49085-0218 To order accessories or replacement parts for your stand mixer in Mexico, call toll-free 01-800-024-17-17 (JV Distribuciones) Or 01-800-902-31-00 (Industrias Birtman) 10 10 Mississauga,... (Eastern Time), or Saturday, 10 a.m. Box 218 St. ENGLISH HOW TO ORDER ACCESSORIES AND REPLACEMENT PARTS To order accessories or replacement parts for your stand mixer in Canada, call toll-free 1-800-807-6777. to : Customer Satisfaction Center KitchenAid Portable Appliances P.O. Or write to 5 p.m.
Use & Care Guide
Page 11
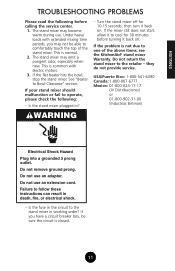
...not due to comfortably touch the top of the above items, see the KitchenAid® stand mixer Warranty. If the problem is common with extended mixing time periods, you have a circuit breaker box, be able to one of the stand mixer. USA/Puerto Rico: 1-800-541-6390 Canada: 1-800-807-6777 Mexico... operate, please check the following before turning it back on . they do not provide service. The stand mixer may become warm during use an extension cord. Is the stand mixer plugged in working order? Do not remove ground prong. See "Beater to cool for 10-15 seconds, then turn ...
...not due to comfortably touch the top of the above items, see the KitchenAid® stand mixer Warranty. If the problem is common with extended mixing time periods, you have a circuit breaker box, be able to one of the stand mixer. USA/Puerto Rico: 1-800-541-6390 Canada: 1-800-807-6777 Mexico... operate, please check the following before turning it back on . they do not provide service. The stand mixer may become warm during use an extension cord. Is the stand mixer plugged in working order? Do not remove ground prong. See "Beater to cool for 10-15 seconds, then turn ...
Use & Care Guide
Page 12
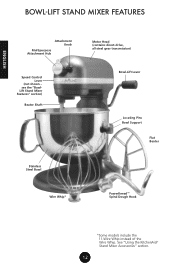
See "Using the KitchenAid® Stand Mixer Accessories" section. 12 see the "BowlLift Stand Mixer Features" section) Beater Shaft Motor Head (contains direct-drive, all-steel gear transmission) Bowl-Lift Lever Locating Pins Bowl Support Flat Beater Stainless Steel Bowl Wire Whip* PowerKnead™ Spiral Dough Hook 12 *Some models include the 11-Wire Whip instead of the Wire Whip. ENGLISH BOWL-LIFT STAND MIXER FEATURES Attachment Knob Multipurpose Attachment Hub Speed Control Lever (not shown -
See "Using the KitchenAid® Stand Mixer Accessories" section. 12 see the "BowlLift Stand Mixer Features" section) Beater Shaft Motor Head (contains direct-drive, all-steel gear transmission) Bowl-Lift Lever Locating Pins Bowl Support Flat Beater Stainless Steel Bowl Wire Whip* PowerKnead™ Spiral Dough Hook 12 *Some models include the 11-Wire Whip instead of the Wire Whip. ENGLISH BOWL-LIFT STAND MIXER FEATURES Attachment Knob Multipurpose Attachment Hub Speed Control Lever (not shown -
Use & Care Guide
Page 13
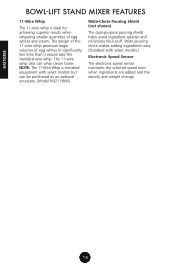
...stir to 67 different touch-points within the bowl to the selected speed. Speeds range from overheating by automatically shutting down the mixer when thermal overload is dishwasher safe. Locating Pins Pins fit through the bowl brackets to position the bowl on next page even... of the wire whip rapidly increases airflow into egg mixtures for quick, complete mixing. See the "Stand Mixer Attachments" section. Attachment Knob Knob secures stand mixer attachments to -bowl clearance. Speed Control Lever 10 mixing speeds provide versatility for stable mixing. Bowl-Height Adjustment...
...stir to 67 different touch-points within the bowl to the selected speed. Speeds range from overheating by automatically shutting down the mixer when thermal overload is dishwasher safe. Locating Pins Pins fit through the bowl brackets to position the bowl on next page even... of the wire whip rapidly increases airflow into egg mixtures for quick, complete mixing. See the "Stand Mixer Attachments" section. Attachment Knob Knob secures stand mixer attachments to -bowl clearance. Speed Control Lever 10 mixing speeds provide versatility for stable mixing. Bowl-Height Adjustment...
Use & Care Guide
Page 14
BOWL-LIFT STAND MIXER FEATURES 11-Wire Whip The 11-wire whip is standard equipment with select models.) Electronic Speed Sensor The electronic speed sensor maintains the selected speed ...
BOWL-LIFT STAND MIXER FEATURES 11-Wire Whip The 11-wire whip is standard equipment with select models.) Electronic Speed Sensor The electronic speed sensor maintains the selected speed ...
Use & Care Guide
Page 15
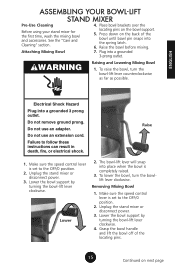
... Cleaning" section. Do not remove ground prong. Removing Mixing Bowl 1. Plug into a grounded 3 prong outlet. ASSEMBLING YOUR BOWL-LIFT STAND MIXER Pre-Use Cleaning 4. Do not use an adapter. To raise the bowl, turn the bowllift lever clockwise. ENGLISH Electrical Shock Hazard Plug into... a grounded 3-prong outlet. Lower 2. locating pins on next page Unplug the stand mixer or disconnect power. 3. WARNING Raising and Lowering Mixing Bowl 1. The bowl-lift lever will snap into the spring latch. 6. Place...
... Cleaning" section. Do not remove ground prong. Removing Mixing Bowl 1. Plug into a grounded 3 prong outlet. ASSEMBLING YOUR BOWL-LIFT STAND MIXER Pre-Use Cleaning 4. Do not use an adapter. To raise the bowl, turn the bowllift lever clockwise. ENGLISH Electrical Shock Hazard Plug into... a grounded 3-prong outlet. Lower 2. locating pins on next page Unplug the stand mixer or disconnect power. 3. WARNING Raising and Lowering Mixing Bowl 1. The bowl-lift lever will snap into the spring latch. 6. Place...
Use & Care Guide
Page 16
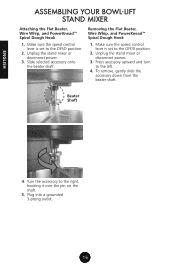
...Wire Whip, and PowerKnead™ Spiral Dough Hook 1. Make sure the speed control lever is set to the OFF/0 position. 2. Unplug the stand mixer or disconnect power. 3. Press accessory upward and turn to the right, hooking it over the pin on the shaft. 5. ENGLISH ASSEMBLING YOUR BOWL-LIFT... STAND MIXER Attaching the Flat Beater, Wire Whip, and PowerKnead™ Spiral Dough Hook 1. To remove, gently slide the accessory down from the beater shaft...
...Wire Whip, and PowerKnead™ Spiral Dough Hook 1. Make sure the speed control lever is set to the OFF/0 position. 2. Unplug the stand mixer or disconnect power. 3. Press accessory upward and turn to the right, hooking it over the pin on the shaft. 5. ENGLISH ASSEMBLING YOUR BOWL-LIFT... STAND MIXER Attaching the Flat Beater, Wire Whip, and PowerKnead™ Spiral Dough Hook 1. To remove, gently slide the accessory down from the beater shaft...
Use & Care Guide
Page 17
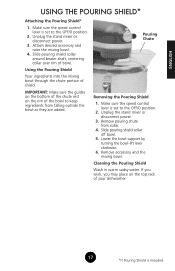
ENGLISH USING THE POURING SHIELD* Attaching the Pouring Shield* 1. Unplug the stand mixer or disconnect power. 3. Attach desired accessory and raise the mixing bowl. 4. Unplug the stand mixer or disconnect power. 3. Remove accessory and the mixing bowl. Make sure the speed control lever is set to the OFF/0 position. 2. Using the Pouring Shield...
ENGLISH USING THE POURING SHIELD* Attaching the Pouring Shield* 1. Unplug the stand mixer or disconnect power. 3. Attach desired accessory and raise the mixing bowl. 4. Unplug the stand mixer or disconnect power. 3. Remove accessory and the mixing bowl. Make sure the speed control lever is set to the OFF/0 position. 2. Using the Pouring Shield...
Use & Care Guide
Page 18
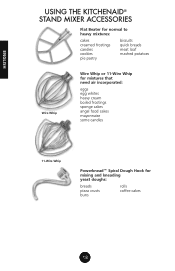
ENGLISH USING THE KITCHENAID® STAND MIXER ACCESSORIES Flat Beater for normal to heavy mixtures: cakes creamed frostings candies cookies pie pastry biscuits quick breads meat loaf mashed potatoes Wire Whip Wire Whip or 11-Wire Whip for mixtures that need air incorporated: eggs egg whites heavy cream boiled frostings sponge cakes angel food cakes mayonnaise some candies 11-Wire Whip Powerknead™ Spiral Dough Hook for mixing and kneading yeast doughs: breads pizza crusts buns rolls coffee cakes 18 18
ENGLISH USING THE KITCHENAID® STAND MIXER ACCESSORIES Flat Beater for normal to heavy mixtures: cakes creamed frostings candies cookies pie pastry biscuits quick breads meat loaf mashed potatoes Wire Whip Wire Whip or 11-Wire Whip for mixtures that need air incorporated: eggs egg whites heavy cream boiled frostings sponge cakes angel food cakes mayonnaise some candies 11-Wire Whip Powerknead™ Spiral Dough Hook for mixing and kneading yeast doughs: breads pizza crusts buns rolls coffee cakes 18 18
Use & Care Guide
Page 19
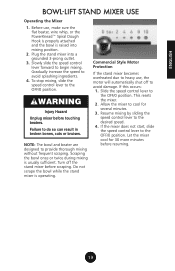
...speed control lever forward to the OFF/0 position. Scraping the bowl once or twice during mixing is operating. If this occurs: 1. If the mixer does not start, slide the speed control lever to begin mixing. Resume mixing by sliding the speed control lever to the OFF/0 position. ...wire whip, or the PowerKnead™ Spiral Dough Hook is properly attached and the bowl is raised into a grounded 3-prong outlet. 3. Allow the mixer to avoid splashing ingredients. 4. Turn off to the OFF/0 position. NOTE: The bowl and beater are designed to do so can result in broken...
...speed control lever forward to the OFF/0 position. Scraping the bowl once or twice during mixing is operating. If this occurs: 1. If the mixer does not start, slide the speed control lever to begin mixing. Resume mixing by sliding the speed control lever to the OFF/0 position. ...wire whip, or the PowerKnead™ Spiral Dough Hook is properly attached and the bowl is raised into a grounded 3-prong outlet. 3. Allow the mixer to avoid splashing ingredients. 4. Turn off to the OFF/0 position. NOTE: The bowl and beater are designed to do so can result in broken...
Use & Care Guide
Page 20
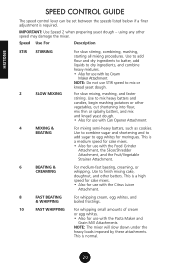
.... 4 MIXING & BEATING For mixing semi-heavy batters, such as cookies. This is required. Use to finish mixing cake, doughnut, and other speed may damage the mixer. Use to combine sugar and shortening and to add sugar to egg whites for use with Ice Cream Maker Attachment. This is a medium speed for... FAST WHIPPING For whipping small amounts of cream or egg whites. • Also for use with the Pasta Maker and Grain Mill Attachments. NOTE: The mixer will slow down under the heavy loads imposed by these attachments.
.... 4 MIXING & BEATING For mixing semi-heavy batters, such as cookies. This is required. Use to finish mixing cake, doughnut, and other speed may damage the mixer. Use to combine sugar and shortening and to add sugar to egg whites for use with Ice Cream Maker Attachment. This is a medium speed for... FAST WHIPPING For whipping small amounts of cream or egg whites. • Also for use with the Pasta Maker and Grain Mill Attachments. NOTE: The mixer will slow down under the heavy loads imposed by these attachments.
Use & Care Guide
Page 21
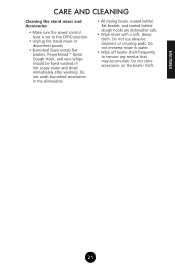
Do not wash burnished accessories in water. • Wipe off beater shaft frequently to the OFF/0 position. • Unplug the stand mixer or disconnect power. • Burnished (bare metal) flat beaters, PowerKnead™ Spiral Dough Hook, and wire whips should be hand washed ... All mixing bowls, coated (white) flat beaters, and coated (white) dough hooks are dishwasher safe. • Wipe mixer with a soft, damp cloth. ENGLISH 21 CARE AND CLEANING Cleaning the stand mixer and Accessories • Make sure the speed control lever is set to remove any residue that may accumulate. Do...
Do not wash burnished accessories in water. • Wipe off beater shaft frequently to the OFF/0 position. • Unplug the stand mixer or disconnect power. • Burnished (bare metal) flat beaters, PowerKnead™ Spiral Dough Hook, and wire whips should be hand washed ... All mixing bowls, coated (white) flat beaters, and coated (white) dough hooks are dishwasher safe. • Wipe mixer with a soft, damp cloth. ENGLISH 21 CARE AND CLEANING Cleaning the stand mixer and Accessories • Make sure the speed control lever is set to remove any residue that may accumulate. Do...
Use & Care Guide
Page 22
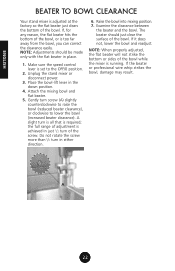
... raise the bowl (reduced beater clearance), or clockwise to the OFF/0 position. 2. If it does not, lower the bowl and readjust. Unplug the stand mixer or disconnect power. 3. the full range of adjustment is required; The beater should be made only with the flat beater in just 1/2 turn is all... that is achieved in place. 1. NOTE: When properly adjusted, the flat beater will not strike the bottom or sides of the bowl while the mixer is set to lower the bowl (increased beater clearance). If the beater or professional wire whip strikes the bowl, damage may result. Raise the bowl...
... raise the bowl (reduced beater clearance), or clockwise to the OFF/0 position. 2. If it does not, lower the bowl and readjust. Unplug the stand mixer or disconnect power. 3. the full range of adjustment is required; The beater should be made only with the flat beater in just 1/2 turn is all... that is achieved in place. 1. NOTE: When properly adjusted, the flat beater will not strike the bottom or sides of the bowl while the mixer is set to lower the bowl (increased beater clearance). If the beater or professional wire whip strikes the bowl, damage may result. Raise the bowl...


