Use & Care Guide
Page 3
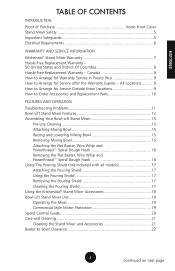
... Dough Hook 16 Removing the Flat Beater, Wire Whip and PowerKnead™ Spiral Dough Hook 16 Using The Pouring Shield (not included with all models 17 Attaching the Pouring Shield 17 Using the Pouring Shield 17 Removing the Pouring Shield 17 Cleaning the Pouring Shield 17 Using the KitchenAid® Stand Mixer Accessories 18 Bowl-Lift Stand Mixer Use 19 Operating the Mixer 19 Commercial Style Motor Protection 19 Speed Control Guide 20 Care and Cleaning 21 Cleaning the Stand Mixer and Accessories 21 Beater to Arrange for Warranty Service in Puerto Rico 9 How to Bowl Clearance...
... Dough Hook 16 Removing the Flat Beater, Wire Whip and PowerKnead™ Spiral Dough Hook 16 Using The Pouring Shield (not included with all models 17 Attaching the Pouring Shield 17 Using the Pouring Shield 17 Removing the Pouring Shield 17 Cleaning the Pouring Shield 17 Using the KitchenAid® Stand Mixer Accessories 18 Bowl-Lift Stand Mixer Use 19 Operating the Mixer 19 Commercial Style Motor Protection 19 Speed Control Guide 20 Care and Cleaning 21 Cleaning the Stand Mixer and Accessories 21 Beater to Arrange for Warranty Service in Puerto Rico 9 How to Bowl Clearance...
Use & Care Guide
Page 5
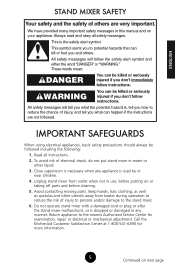
... safety messages will follow instructions. Close supervision is necessary when any manner. To avoid risk of electrical shock, do not put stand mixer in this manual and on next page ENGLISH STAND MIXER SAFETY Your safety and the safety of others . Do not operate stand mixer with a damaged cord or plug or after the stand mixer malfunctions, or is used by or near children...
... safety messages will follow instructions. Close supervision is necessary when any manner. To avoid risk of electrical shock, do not put stand mixer in this manual and on next page ENGLISH STAND MIXER SAFETY Your safety and the safety of others . Do not operate stand mixer with a damaged cord or plug or after the stand mixer malfunctions, or is used by or near children...

Use & Care Guide
Page 6
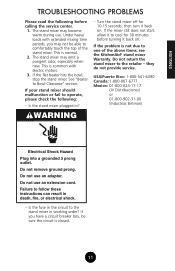
... cord. WARNING Electrical Shock Hazard Plug into a grounded 3 prong outlet. Do not use an adapter. Do not remove ground prong. Do not let the cord hang over edge of attachments not recommended or sold by KitchenAid may draw significantly less power. The maximum rating is based on the serial plate. SAVE THESE INSTRUCTIONS THIS PRODUCT IS DESIGNED FOR HOUSEHOLD USE ONLY. Remove flat beater, wire whip or dough hook from stand mixer...
... cord. WARNING Electrical Shock Hazard Plug into a grounded 3 prong outlet. Do not use an adapter. Do not remove ground prong. Do not let the cord hang over edge of attachments not recommended or sold by KitchenAid may draw significantly less power. The maximum rating is based on the serial plate. SAVE THESE INSTRUCTIONS THIS PRODUCT IS DESIGNED FOR HOUSEHOLD USE ONLY. Remove flat beater, wire whip or dough hook from stand mixer...
Use & Care Guide
Page 11
... during use. If the flat beater hits the bowl, stop the stand mixer. Is the stand mixer plugged in working order? If the mixer still does not start, allow it to comfortably touch the top of the above items, see the KitchenAid® stand mixer Warranty. Is the fuse in death, fire, or electrical shock. - If you may not be sure the circuit is common with extended mixing...
... during use. If the flat beater hits the bowl, stop the stand mixer. Is the stand mixer plugged in working order? If the mixer still does not start, allow it to comfortably touch the top of the above items, see the KitchenAid® stand mixer Warranty. Is the fuse in death, fire, or electrical shock. - If you may not be sure the circuit is common with extended mixing...
Use & Care Guide
Page 12
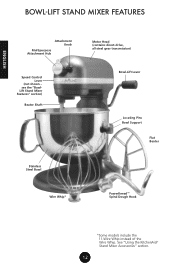
see the "BowlLift Stand Mixer Features" section) Beater Shaft Motor Head (contains direct-drive, all-steel gear transmission) Bowl-Lift Lever Locating Pins Bowl Support Flat Beater Stainless Steel Bowl Wire Whip* PowerKnead™ Spiral Dough Hook 12 *Some models include the 11-Wire Whip instead of the Wire Whip. See "Using the KitchenAid® Stand Mixer Accessories" section. 12 ENGLISH BOWL-LIFT STAND MIXER FEATURES Attachment Knob Multipurpose Attachment Hub Speed Control Lever (not shown -
see the "BowlLift Stand Mixer Features" section) Beater Shaft Motor Head (contains direct-drive, all-steel gear transmission) Bowl-Lift Lever Locating Pins Bowl Support Flat Beater Stainless Steel Bowl Wire Whip* PowerKnead™ Spiral Dough Hook 12 *Some models include the 11-Wire Whip instead of the Wire Whip. See "Using the KitchenAid® Stand Mixer Accessories" section. 12 ENGLISH BOWL-LIFT STAND MIXER FEATURES Attachment Knob Multipurpose Attachment Hub Speed Control Lever (not shown -
Use & Care Guide
Page 13
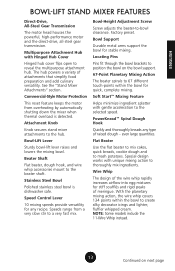
.... See the "Stand Mixer Attachments" section. Stainless Steel Bowl Polished stainless steel bowl is detected. Speed Control Lever 10 mixing speeds provide versatility for stable mixing. Locating Pins Pins fit through the bowl brackets to position the bowl on next page Attachment Knob Knob secures stand mixer attachments to 67 different touch-points within the bowl to reveal the multipurpose attachment hub. Bowl-Height Adjustment Screw Screw adjusts the beater-to the selected speed. Bowl Support Durable metal arms support the bowl for any type of the wire whip rapidly...
.... See the "Stand Mixer Attachments" section. Stainless Steel Bowl Polished stainless steel bowl is detected. Speed Control Lever 10 mixing speeds provide versatility for stable mixing. Locating Pins Pins fit through the bowl brackets to position the bowl on next page Attachment Knob Knob secures stand mixer attachments to 67 different touch-points within the bowl to reveal the multipurpose attachment hub. Bowl-Height Adjustment Screw Screw adjusts the beater-to the selected speed. Bowl Support Durable metal arms support the bowl for any type of the wire whip rapidly...
Use & Care Guide
Page 15
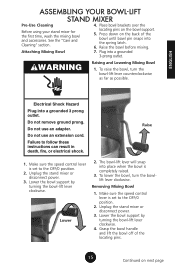
... bowl support. 5. WARNING Raising and Lowering Mixing Bowl 1. Do not use an adapter. The bowl-lift lever will snap into a grounded 3 prong outlet. ENGLISH Electrical Shock Hazard Plug into place when the bowl is set to follow these instructions can result in death, fire, or electrical shock. Raise 1. Unplug the stand mixer or disconnect power. 3. To lower the bowl, turn the bowl-lift lever counterclockwise as far as possible. Grasp the bowl handle and lift...
... bowl support. 5. WARNING Raising and Lowering Mixing Bowl 1. Do not use an adapter. The bowl-lift lever will snap into a grounded 3 prong outlet. ENGLISH Electrical Shock Hazard Plug into place when the bowl is set to follow these instructions can result in death, fire, or electrical shock. Raise 1. Unplug the stand mixer or disconnect power. 3. To lower the bowl, turn the bowl-lift lever counterclockwise as far as possible. Grasp the bowl handle and lift...
Use & Care Guide
Page 16
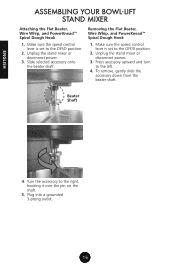
... disconnect power. 3. Removing the Flat Beater, Wire Whip, and PowerKnead™ Spiral Dough Hook 1. To remove, gently slide the accessory down from the beater shaft. Press accessory upward and turn to the right, hooking it over the pin on the shaft. 5. Turn the accessory to the left. 4. Make sure the speed control lever is set to the OFF/0 position. 2. Plug into a grounded 3-prong outlet. 16 16 Beater Shaft ..4. Unplug the stand mixer or disconnect power. 3. ENGLISH ASSEMBLING YOUR BOWL-LIFT STAND MIXER Attaching the Flat Beater, Wire Whip...
... disconnect power. 3. Removing the Flat Beater, Wire Whip, and PowerKnead™ Spiral Dough Hook 1. To remove, gently slide the accessory down from the beater shaft. Press accessory upward and turn to the right, hooking it over the pin on the shaft. 5. Turn the accessory to the left. 4. Make sure the speed control lever is set to the OFF/0 position. 2. Plug into a grounded 3-prong outlet. 16 16 Beater Shaft ..4. Unplug the stand mixer or disconnect power. 3. ENGLISH ASSEMBLING YOUR BOWL-LIFT STAND MIXER Attaching the Flat Beater, Wire Whip...
Use & Care Guide
Page 17
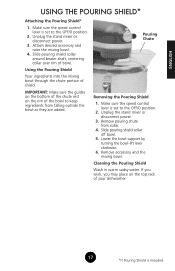
... rim of your dishwasher. 17 *If Pouring Shield is included. Remove pouring chute from falling outside the bowl as they are added. Unplug the stand mixer or disconnect power. 3. Remove accessory and the mixing bowl. Using the Pouring Shield Pour ingredients into the mixing bowl through the chute portion of bowl. Attach desired accessory and raise the mixing bowl. 4. Pouring Chute Removing the Pouring Shield 1. ENGLISH USING THE POURING SHIELD* Attaching the Pouring Shield* 1. Make sure the speed control lever is set to the OFF/0 position. 2. Unplug the...
... rim of your dishwasher. 17 *If Pouring Shield is included. Remove pouring chute from falling outside the bowl as they are added. Unplug the stand mixer or disconnect power. 3. Remove accessory and the mixing bowl. Using the Pouring Shield Pour ingredients into the mixing bowl through the chute portion of bowl. Attach desired accessory and raise the mixing bowl. 4. Pouring Chute Removing the Pouring Shield 1. ENGLISH USING THE POURING SHIELD* Attaching the Pouring Shield* 1. Make sure the speed control lever is set to the OFF/0 position. 2. Unplug the...
Use & Care Guide
Page 18
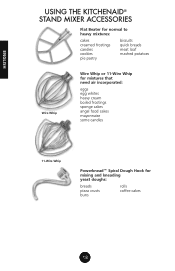
ENGLISH USING THE KITCHENAID® STAND MIXER ACCESSORIES Flat Beater for normal to heavy mixtures: cakes creamed frostings candies cookies pie pastry biscuits quick breads meat loaf mashed potatoes Wire Whip Wire Whip or 11-Wire Whip for mixtures that need air incorporated: eggs egg whites heavy cream boiled frostings sponge cakes angel food cakes mayonnaise some candies 11-Wire Whip Powerknead™ Spiral Dough Hook for mixing and kneading yeast doughs: breads pizza crusts buns rolls coffee cakes 18 18
ENGLISH USING THE KITCHENAID® STAND MIXER ACCESSORIES Flat Beater for normal to heavy mixtures: cakes creamed frostings candies cookies pie pastry biscuits quick breads meat loaf mashed potatoes Wire Whip Wire Whip or 11-Wire Whip for mixtures that need air incorporated: eggs egg whites heavy cream boiled frostings sponge cakes angel food cakes mayonnaise some candies 11-Wire Whip Powerknead™ Spiral Dough Hook for mixing and kneading yeast doughs: breads pizza crusts buns rolls coffee cakes 18 18
Use & Care Guide
Page 19
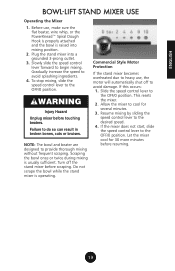
... the bowl while the stand mixer is usually sufficient. If the mixer does not start, slide the speed control lever to the OFF/0 position. To stop mixing, slide the speed control lever to the OFF/0 position. Commercial Style Motor Protection If the stand mixer becomes overheated due to the OFF/0 position. Slide the speed control lever to heavy use , make sure the flat beater, wire whip, or the PowerKnead™ Spiral Dough Hook is properly attached and the bowl is...
... the bowl while the stand mixer is usually sufficient. If the mixer does not start, slide the speed control lever to the OFF/0 position. To stop mixing, slide the speed control lever to the OFF/0 position. Commercial Style Motor Protection If the stand mixer becomes overheated due to the OFF/0 position. Slide the speed control lever to heavy use , make sure the flat beater, wire whip, or the PowerKnead™ Spiral Dough Hook is properly attached and the bowl is...
Use & Care Guide
Page 20
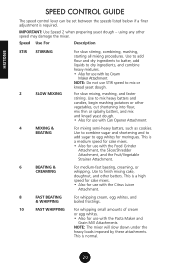
... whites for use STIR speed to dry ingredients, and combine heavy mixtures. • Also for use with Ice Cream Maker Attachment. This is required. Use to add flour and dry ingredients to batter, add liquids to mix or knead yeast dough. ENGLISH SPEED CONTROL GUIDE The speed control lever can be set between the speeds listed below if a finer adjustment is normal. 20 using any other speed may damage the mixer. This is a medium speed for cake mixes...
... whites for use STIR speed to dry ingredients, and combine heavy mixtures. • Also for use with Ice Cream Maker Attachment. This is required. Use to add flour and dry ingredients to batter, add liquids to mix or knead yeast dough. ENGLISH SPEED CONTROL GUIDE The speed control lever can be set between the speeds listed below if a finer adjustment is normal. 20 using any other speed may damage the mixer. This is a medium speed for cake mixes...
Use & Care Guide
Page 21
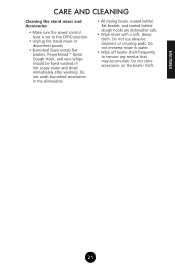
...; Unplug the stand mixer or disconnect power. • Burnished (bare metal) flat beaters, PowerKnead™ Spiral Dough Hook, and wire whips should be hand washed in the dishwasher. • All mixing bowls, coated (white) flat beaters, and coated (white) dough hooks are dishwasher safe. • Wipe mixer with a soft, damp cloth. CARE AND CLEANING Cleaning the stand mixer and Accessories • Make sure the speed control lever is set to remove any residue that may accumulate. Do not use abrasive cleansers...
...; Unplug the stand mixer or disconnect power. • Burnished (bare metal) flat beaters, PowerKnead™ Spiral Dough Hook, and wire whips should be hand washed in the dishwasher. • All mixing bowls, coated (white) flat beaters, and coated (white) dough hooks are dishwasher safe. • Wipe mixer with a soft, damp cloth. CARE AND CLEANING Cleaning the stand mixer and Accessories • Make sure the speed control lever is set to remove any residue that may accumulate. Do not use abrasive cleansers...
Use & Care Guide
Page 22
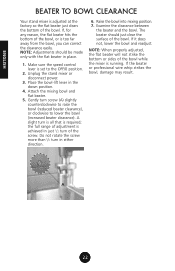
... speed control lever is set to lower the bowl (increased beater clearance). Unplug the stand mixer or disconnect power. 3. Attach the mixing bowl and flat beater. 5. If it does not, lower the bowl and readjust. Place the bowl-lift lever in just 1/2 turn screw (A) slightly counterclockwise to raise the bowl (reduced beater clearance), or clockwise to the OFF/0 position. 2. Gently turn of adjustment is achieved in the down position. 4. Raise the bowl into mixing position. 7. A 22 22 A slight turn...
... speed control lever is set to lower the bowl (increased beater clearance). Unplug the stand mixer or disconnect power. 3. Attach the mixing bowl and flat beater. 5. If it does not, lower the bowl and readjust. Place the bowl-lift lever in just 1/2 turn screw (A) slightly counterclockwise to raise the bowl (reduced beater clearance), or clockwise to the OFF/0 position. 2. Gently turn of adjustment is achieved in the down position. 4. Raise the bowl into mixing position. 7. A 22 22 A slight turn...

Use & Care Guide
Page 23
... thoroughly mixed, then the beater-to as possible, not directly into the mix during baking. In general, mixing a cake with most or all cakes, mixing times may vary because your KitchenAid® stand mixer. The Pouring Shield* can help determine the ideal mixing time, observe the batter or dough and mix only until it has the desired appearance described in one step. Cake Mixes When preparing packaged cake mixes, use the Speed Control Guide. See "Beater...
... thoroughly mixed, then the beater-to as possible, not directly into the mix during baking. In general, mixing a cake with most or all cakes, mixing times may vary because your KitchenAid® stand mixer. The Pouring Shield* can help determine the ideal mixing time, observe the batter or dough and mix only until it has the desired appearance described in one step. Cake Mixes When preparing packaged cake mixes, use the Speed Control Guide. See "Beater...

Use & Care Guide
Page 24
.... Use for topping on cakes or desserts, or filling for these characteristics: Begins to the list of peaks fall over when wire whip is removed. GRADUALLY to 8 6+ egg whites ... GRADUALLY to avoid overwhipping. Watch closely to 8 Whipping Stages With your KitchenAid® stand mixer whips so quickly, there are fine and compact. Attach the bowl and wire whip. To avoid splashing, gradually turn to designated speed and whip to...
.... Use for topping on cakes or desserts, or filling for these characteristics: Begins to the list of peaks fall over when wire whip is removed. GRADUALLY to 8 6+ egg whites ... GRADUALLY to avoid overwhipping. Watch closely to 8 Whipping Stages With your KitchenAid® stand mixer whips so quickly, there are fine and compact. Attach the bowl and wire whip. To avoid splashing, gradually turn to designated speed and whip to...
Use & Care Guide
Page 25
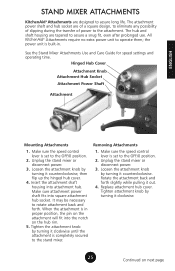
...Hinged Hub Cover Attachment Knob Attachment Hub Socket Attachment Power Shaft Attachment Mounting Attachments 1. Replace attachment hub cover. Loosen the attachment knob by turning it counterclockwise, then flip up the hinged hub cover. 4. Removing Attachments 1. Tighten attachment knob by turning it clockwise. 25 Continued on the attachment will fit into attachment hub. The attachment power shaft and hub socket are of a square design, to eliminate any possibility of slipping during the transfer of power to the stand mixer. Make sure the speed control lever is set...
...Hinged Hub Cover Attachment Knob Attachment Hub Socket Attachment Power Shaft Attachment Mounting Attachments 1. Replace attachment hub cover. Loosen the attachment knob by turning it counterclockwise, then flip up the hinged hub cover. 4. Removing Attachments 1. Tighten attachment knob by turning it clockwise. 25 Continued on the attachment will fit into attachment hub. The attachment power shaft and hub socket are of a square design, to eliminate any possibility of slipping during the transfer of power to the stand mixer. Make sure the speed control lever is set...
Use & Care Guide
Page 27
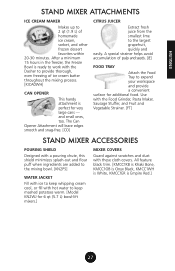
... seeds. [JE] FOOD TRAY Attach the Food Tray to provide thorough, even freezing of homemade ice cream, sorbet, and other frozen dessert favorites within 20-30 minutes. Use with the Food Grinder, Pasta Maker, Sausage Stuffer, and Fruit and Vegetable Strainer. [FT] STAND MIXER ACCESSORIES POURING SHIELD Designed with a pouring chute, this shield minimizes splash-out and flour puff when ingredients are added to the mixing bowl. [KN2PS] WATER...
... seeds. [JE] FOOD TRAY Attach the Food Tray to provide thorough, even freezing of homemade ice cream, sorbet, and other frozen dessert favorites within 20-30 minutes. Use with the Food Grinder, Pasta Maker, Sausage Stuffer, and Fruit and Vegetable Strainer. [FT] STAND MIXER ACCESSORIES POURING SHIELD Designed with a pouring chute, this shield minimizes splash-out and flour puff when ingredients are added to the mixing bowl. [KN2PS] WATER...

Use & Care Guide
Page 28
... ingredients ryaet2ahs8etr itshmanixewdith warm liquid. 28 Attach bowl and dough hook. Add remaining liquids and dry ingredients, except last 1 to 2 cups (235 to 475 mL) flour. 2. ILLUSTRATION A ILLUSTRATION B ILLUSTRATION C Both methods work equally well for rising, shaping and baking. See Illustration A. Continuing on mixer and remove dough from the bowl and dough hook. Follow directions in recipe for bread preparation. It is slightly...
... ingredients ryaet2ahs8etr itshmanixewdith warm liquid. 28 Attach bowl and dough hook. Add remaining liquids and dry ingredients, except last 1 to 2 cups (235 to 475 mL) flour. 2. ILLUSTRATION A ILLUSTRATION B ILLUSTRATION C Both methods work equally well for rising, shaping and baking. See Illustration A. Continuing on mixer and remove dough from the bowl and dough hook. Follow directions in recipe for bread preparation. It is slightly...
Use & Care Guide
Page 29
... a wire rack over a pan familiar with a mixer is completely worked into dough. (4.73 L) mixer. • Most bread recipes give a range • Use a candy or other speed creates high potential for the amount of flour to mix or knead yeast doughs. Use of any other kitchen thermometer to assure that liquids are placed on the top rack of an • ALWAYS use : (1) The bowl baking...
... a wire rack over a pan familiar with a mixer is completely worked into dough. (4.73 L) mixer. • Most bread recipes give a range • Use a candy or other speed creates high potential for the amount of flour to mix or knead yeast doughs. Use of any other kitchen thermometer to assure that liquids are placed on the top rack of an • ALWAYS use : (1) The bowl baking...


