Use & Care Guide
Page 3
...11 Bowl-Lift Stand Mixer Features 12 Assembling Your Bowl-Lift Stand Mixer 15 Pre-Use Cleaning 15 Attaching Mixing Bowl 15 Raising and Lowering Mixing Bowl 15 Removing Mixing Bowl 15 Attaching the Flat Beater, Wire Whip and PowerKnead™ Spiral Dough Hook 16 Removing the Flat Beater, ... Dough Hook 16 Using The Pouring Shield (not included with all models 17 Attaching the Pouring Shield 17 Using the Pouring Shield 17 Removing the Pouring Shield 17 Cleaning the Pouring Shield 17 Using the KitchenAid® Stand Mixer Accessories 18 Bowl-Lift Stand Mixer Use 19 Operating the ...
...11 Bowl-Lift Stand Mixer Features 12 Assembling Your Bowl-Lift Stand Mixer 15 Pre-Use Cleaning 15 Attaching Mixing Bowl 15 Raising and Lowering Mixing Bowl 15 Removing Mixing Bowl 15 Attaching the Flat Beater, Wire Whip and PowerKnead™ Spiral Dough Hook 16 Removing the Flat Beater, ... Dough Hook 16 Using The Pouring Shield (not included with all models 17 Attaching the Pouring Shield 17 Using the Pouring Shield 17 Removing the Pouring Shield 17 Cleaning the Pouring Shield 17 Using the KitchenAid® Stand Mixer Accessories 18 Bowl-Lift Stand Mixer Use 19 Operating the ...

Use & Care Guide
Page 4
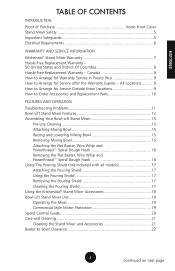
ENGLISH TABLE OF CONTENTS Mixing Tips 23 Egg Whites 24 Whipping Cream 24 Stand Mixer Attachments 25 Mounting Attachments 25 Removing Attachments 25 Stand Mixer Accessories 27 General Instructions for Mixing and Kneading Yeast Dough with the Rapid Mix Method 28 Bread Making Tips 29 Shaping a Loaf 30 RECIPES Basic White Bread 31 Whole Grain Wheat Bread 32 French Bread 33 Honey Oatmeal Bread 34 Crusty Pizza Dough 35 Basic Sweet Dough 36 Cinnamon Swirl Rounds 37 4 4
ENGLISH TABLE OF CONTENTS Mixing Tips 23 Egg Whites 24 Whipping Cream 24 Stand Mixer Attachments 25 Mounting Attachments 25 Removing Attachments 25 Stand Mixer Accessories 27 General Instructions for Mixing and Kneading Yeast Dough with the Rapid Mix Method 28 Bread Making Tips 29 Shaping a Loaf 30 RECIPES Basic White Bread 31 Whole Grain Wheat Bread 32 French Bread 33 Honey Oatmeal Bread 34 Crusty Pizza Dough 35 Basic Sweet Dough 36 Cinnamon Swirl Rounds 37 4 4

Use & Care Guide
Page 6
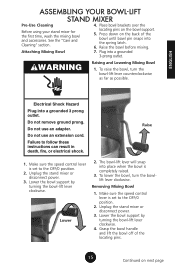
... cause fire, electrical shock or injury. 8. WARNING Electrical Shock Hazard Plug into a grounded 3 prong outlet. The maximum rating is printed on the attachment that draws the greatest load (power). Do not use an extension cord. Do not use an adapter. Hertz: 60 The wattage rating for your stand ... Volts: 120 A.C. Do not use an extension cord. The use of table or counter. 10. only. Do not let the cord hang over edge of attachments not recommended or sold by KitchenAid may draw significantly less power.
... cause fire, electrical shock or injury. 8. WARNING Electrical Shock Hazard Plug into a grounded 3 prong outlet. The maximum rating is printed on the attachment that draws the greatest load (power). Do not use an extension cord. Do not use an adapter. Hertz: 60 The wattage rating for your stand ... Volts: 120 A.C. Do not use an extension cord. The use of table or counter. 10. only. Do not let the cord hang over edge of attachments not recommended or sold by KitchenAid may draw significantly less power.
Use & Care Guide
Page 12
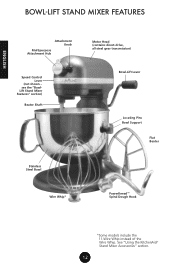
ENGLISH BOWL-LIFT STAND MIXER FEATURES Attachment Knob Multipurpose Attachment Hub Speed Control Lever (not shown - See "Using the KitchenAid® Stand Mixer Accessories" section. 12 see the "BowlLift Stand Mixer Features" section) Beater Shaft Motor Head (contains direct-drive, all-steel gear transmission) Bowl-Lift Lever Locating Pins Bowl Support Flat Beater Stainless Steel Bowl Wire Whip* PowerKnead™ Spiral Dough Hook 12 *Some models include the 11-Wire Whip instead of the Wire Whip.
ENGLISH BOWL-LIFT STAND MIXER FEATURES Attachment Knob Multipurpose Attachment Hub Speed Control Lever (not shown - See "Using the KitchenAid® Stand Mixer Accessories" section. 12 see the "BowlLift Stand Mixer Features" section) Beater Shaft Motor Head (contains direct-drive, all-steel gear transmission) Bowl-Lift Lever Locating Pins Bowl Support Flat Beater Stainless Steel Bowl Wire Whip* PowerKnead™ Spiral Dough Hook 12 *Some models include the 11-Wire Whip instead of the Wire Whip.
Use & Care Guide
Page 13
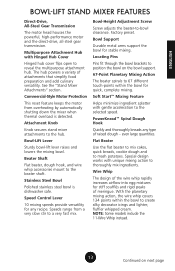
...complete mixing. PowerKnead™ Spiral Dough Hook Quickly and thoroughly kneads any recipe. Multipurpose Attachment Hub with unique mixing action to reveal the multipurpose attachment hub. See the "Stand Mixer Attachments" section. Attachment Knob Knob secures stand mixer attachments to -bowl clearance. Soft Start™ Mixing Feature Helps minimize ingredient splatter with gentle... Shaft Flat beater, dough hook, and wire whip accessories mount to position the bowl on next page The hub powers a variety of attachments that simplify food preparation and add culinary versatility.
...complete mixing. PowerKnead™ Spiral Dough Hook Quickly and thoroughly kneads any recipe. Multipurpose Attachment Hub with unique mixing action to reveal the multipurpose attachment hub. See the "Stand Mixer Attachments" section. Attachment Knob Knob secures stand mixer attachments to -bowl clearance. Soft Start™ Mixing Feature Helps minimize ingredient splatter with gentle... Shaft Flat beater, dough hook, and wire whip accessories mount to position the bowl on next page The hub powers a variety of attachments that simplify food preparation and add culinary versatility.
Use & Care Guide
Page 15
... on the bowl support. 5. WARNING Raising and Lowering Mixing Bowl 1. Do not use an adapter. locating pins on next page Raise the bowl before mixing. Attaching Mixing Bowl 7. Do not use an extension cord. Make sure the speed control lever is set to the OFF/0 position. 2. Removing Mixing Bowl 1. Grasp the...
... on the bowl support. 5. WARNING Raising and Lowering Mixing Bowl 1. Do not use an adapter. locating pins on next page Raise the bowl before mixing. Attaching Mixing Bowl 7. Do not use an extension cord. Make sure the speed control lever is set to the OFF/0 position. 2. Removing Mixing Bowl 1. Grasp the...
Use & Care Guide
Page 16
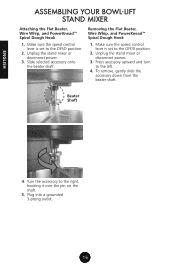
... accessory onto the beater shaft. Unplug the stand mixer or disconnect power. 3. Turn the accessory to the left. 4. ENGLISH ASSEMBLING YOUR BOWL-LIFT STAND MIXER Attaching the Flat Beater, Wire Whip, and PowerKnead™ Spiral Dough Hook 1. Press accessory upward and turn to the right, hooking it over the pin on...
... accessory onto the beater shaft. Unplug the stand mixer or disconnect power. 3. Turn the accessory to the left. 4. ENGLISH ASSEMBLING YOUR BOWL-LIFT STAND MIXER Attaching the Flat Beater, Wire Whip, and PowerKnead™ Spiral Dough Hook 1. Press accessory upward and turn to the right, hooking it over the pin on...
Use & Care Guide
Page 17
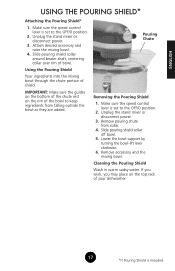
... of shield. Remove pouring chute from falling outside the bowl as they are added. Lower the bowl support by turning the bowl-lift lever clockwise. 6. Attach desired accessory and raise the mixing bowl. 4. Using the Pouring Shield Pour ingredients into the mixing bowl through the chute portion of bowl. Unplug the... mixing bowl. Make sure the speed control lever is set to the OFF/0 position. 2. Slide pouring shield collar off bowl. 5. ENGLISH USING THE POURING SHIELD* Attaching the Pouring Shield* 1.
... of shield. Remove pouring chute from falling outside the bowl as they are added. Lower the bowl support by turning the bowl-lift lever clockwise. 6. Attach desired accessory and raise the mixing bowl. 4. Using the Pouring Shield Pour ingredients into the mixing bowl through the chute portion of bowl. Unplug the... mixing bowl. Make sure the speed control lever is set to the OFF/0 position. 2. Slide pouring shield collar off bowl. 5. ENGLISH USING THE POURING SHIELD* Attaching the Pouring Shield* 1.
Use & Care Guide
Page 19
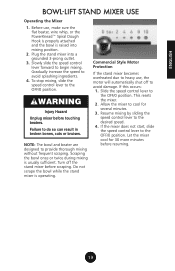
... avoid splashing ingredients. 4. Allow the mixer to heavy use , make sure the flat beater, wire whip, or the PowerKnead™ Spiral Dough Hook is properly attached and the bowl is usually sufficient. Gradually increase the speed to the OFF/0 position. If the mixer does not start, slide the speed control lever...
... avoid splashing ingredients. 4. Allow the mixer to heavy use , make sure the flat beater, wire whip, or the PowerKnead™ Spiral Dough Hook is properly attached and the bowl is usually sufficient. Gradually increase the speed to the OFF/0 position. If the mixer does not start, slide the speed control lever...
Use & Care Guide
Page 20
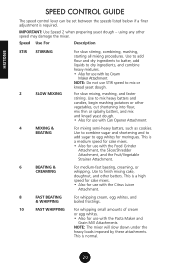
...whites for meringues. This is a medium speed for cake mixes. • Also for use with the Food Grinder Attachment, the Slicer/Shredder Attachment, and the Fruit/Vegetable Strainer Attachment. 6 BEATING & CREAMING For medium-fast beating, creaming, or whipping. Use to combine sugar and shortening and ...to add sugar to dry ingredients, and combine heavy mixtures. • Also for use with Can Opener Attachment. 4 MIXING & BEATING For mixing semi-heavy batters, such as cookies. For slow mixing, mashing, and faster stirring. Use to mix...
...whites for meringues. This is a medium speed for cake mixes. • Also for use with the Food Grinder Attachment, the Slicer/Shredder Attachment, and the Fruit/Vegetable Strainer Attachment. 6 BEATING & CREAMING For medium-fast beating, creaming, or whipping. Use to combine sugar and shortening and ...to add sugar to dry ingredients, and combine heavy mixtures. • Also for use with Can Opener Attachment. 4 MIXING & BEATING For mixing semi-heavy batters, such as cookies. For slow mixing, mashing, and faster stirring. Use to mix...
Use & Care Guide
Page 22
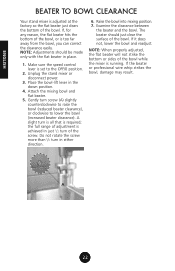
Attach the mixing bowl and flat beater. 5. Raise the bowl into mixing position. 7. If it does not, lower the bowl and readjust. If, for any reason, ...
Attach the mixing bowl and flat beater. 5. Raise the bowl into mixing position. 7. If it does not, lower the bowl and readjust. If, for any reason, ...

Use & Care Guide
Page 24
...chart below : AMOUNT SPEED 1/4 - 3/4 cup..........GRADUALLY to 10 (60 mL - 175 mL) 1+ cup GRADUALLY to 8 Whipping Stages With your KitchenAid® stand mixer whips so quickly, there are speckled and dull in stiff, s2ha4rp peaks when wire whip is thick and custard-like. Because your...stages. Use for topping on cakes or desserts, or filling for these characteristics: Begins to 10 2-4 egg whites ... AMOUNT SPEED 1 egg white ... Attach the bowl and wire whip. GRADUALLY to 8 (235 mL +) Whipping Stages Watch the cream closely during whipping. See chart below . Watch closely ...
...chart below : AMOUNT SPEED 1/4 - 3/4 cup..........GRADUALLY to 10 (60 mL - 175 mL) 1+ cup GRADUALLY to 8 Whipping Stages With your KitchenAid® stand mixer whips so quickly, there are speckled and dull in stiff, s2ha4rp peaks when wire whip is thick and custard-like. Because your...stages. Use for topping on cakes or desserts, or filling for these characteristics: Begins to 10 2-4 egg whites ... AMOUNT SPEED 1 egg white ... Attach the bowl and wire whip. GRADUALLY to 8 (235 mL +) Whipping Stages Watch the cream closely during whipping. See chart below . Watch closely ...
Use & Care Guide
Page 25
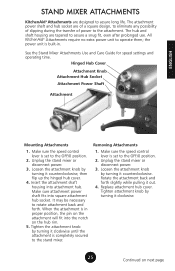
... of power to operate them; Insert the attachment shaft housing into square attachment hub socket. Replace attachment hub cover. Removing Attachments 1. Loosen the attachment knob by turning it clockwise. 25 Continued on the hub rim. 5. ENGLISH STAND MIXER ATTACHMENTS KitchenAid® Attachments are designed to rotate attachment back and forth. All KitchenAid® Attachments require no extra power unit to the...
... of power to operate them; Insert the attachment shaft housing into square attachment hub socket. Replace attachment hub cover. Removing Attachments 1. Loosen the attachment knob by turning it clockwise. 25 Continued on the hub rim. 5. ENGLISH STAND MIXER ATTACHMENTS KitchenAid® Attachments are designed to rotate attachment back and forth. All KitchenAid® Attachments require no extra power unit to the...

Use & Care Guide
Page 26
... coarse and fine grinder plates, and combination food pusher/wrench. [FGA] SAUSAGE STUFFER Prepare sausages that burst with the Pasta Sheet Roller Attachment [KPSA] (sold separately). [KRAV] PASTA CUTTER COMPANION SET Accommodates pasta sheets produced by the Pasta Sheet Roller [KPSA] or the ... separately.] [SSA] 26 Accommodates 6-inch wide pasta sheets produced with delectable flavor and nutrition. The Sausage Stuffer requires the Food Grinder Attachment [FGA sold separately) to extra-fine consistency. Includes cleaning brush. [KGMA] SLICER AND SHREDDER Cuts thick or thin slices of firm...
... coarse and fine grinder plates, and combination food pusher/wrench. [FGA] SAUSAGE STUFFER Prepare sausages that burst with the Pasta Sheet Roller Attachment [KPSA] (sold separately). [KRAV] PASTA CUTTER COMPANION SET Accommodates pasta sheets produced by the Pasta Sheet Roller [KPSA] or the ... separately.] [SSA] 26 Accommodates 6-inch wide pasta sheets produced with delectable flavor and nutrition. The Sausage Stuffer requires the Food Grinder Attachment [FGA sold separately) to extra-fine consistency. Includes cleaning brush. [KGMA] SLICER AND SHREDDER Cuts thick or thin slices of firm...
Use & Care Guide
Page 27
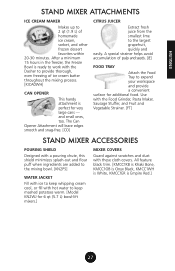
...trim. [KMCC1KB is Khaki Bone, KMCC1OB is Onyx Black, KMCC1WH is White, KMCC1ER is perfect for very large cans - ENGLISH STAND MIXER ATTACHMENTS ICE CREAM MAKER Makes up to expand your workspace and provide a convenient surface for additional food. A special strainer helps avoid accumulation of pulp... and seeds. [JE] FOOD TRAY Attach the Food Tray to 2 qt (1.9 L) of ice cream batter throughout the mixing process. [KICA0WH] CAN OPENER This handy attachment is Empire Red.] 27 After a minimum 15 hours in the freezer, the Freeze ...
...trim. [KMCC1KB is Khaki Bone, KMCC1OB is Onyx Black, KMCC1WH is White, KMCC1ER is perfect for very large cans - ENGLISH STAND MIXER ATTACHMENTS ICE CREAM MAKER Makes up to expand your workspace and provide a convenient surface for additional food. A special strainer helps avoid accumulation of pulp... and seeds. [JE] FOOD TRAY Attach the Food Tray to 2 qt (1.9 L) of ice cream batter throughout the mixing process. [KICA0WH] CAN OPENER This handy attachment is Empire Red.] 27 After a minimum 15 hours in the freezer, the Freeze ...

Use & Care Guide
Page 28
... seconds, or until ingredients are added too quickly, they will form a pool around the dough hook and slow down mixing process. 4. See Illustration A. See Illustration B. Attach bowl and dough hook. Continuing on Speed 2 for rising, shaping and baking. Mix until dough is smooth and elastic. Follow directions in recipe for 2 more...
... seconds, or until ingredients are added too quickly, they will form a pool around the dough hook and slow down mixing process. 4. See Illustration A. See Illustration B. Attach bowl and dough hook. Continuing on Speed 2 for rising, shaping and baking. Mix until dough is smooth and elastic. Follow directions in recipe for 2 more...

Use & Care Guide
Page 31
... from draft, about 2 minutes longer, or until golden brown. Punch dough down and divide in greased bowl, turning to grease top. Let rise in bulk. Attach bowl and dough hook to 7 cups (1.735 L). Yield: 32 servings (16 slices per loaf). 31 Heat over low heat until doubled in greased 81/2 x 41...
... from draft, about 2 minutes longer, or until golden brown. Punch dough down and divide in greased bowl, turning to grease top. Let rise in bulk. Attach bowl and dough hook to 7 cups (1.735 L). Yield: 32 servings (16 slices per loaf). 31 Heat over low heat until doubled in greased 81/2 x 41...

Use & Care Guide
Page 32
... (105°F to 115°F [40°C to 46°C]) 2 packages active dry yeast 5-6 cups (1.2 to 30 minutes longer. Add yeast and let mixture stand. Attach bowl and dough hook to flour mixture and mix about 1 hour, or until dough starts to clean sides of flour specified or a dry loaf will...
... (105°F to 115°F [40°C to 46°C]) 2 packages active dry yeast 5-6 cups (1.2 to 30 minutes longer. Add yeast and let mixture stand. Attach bowl and dough hook to flour mixture and mix about 1 hour, or until dough starts to clean sides of flour specified or a dry loaf will...
Use & Care Guide
Page 33
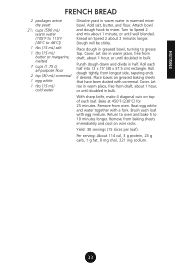
... mix about 1 hour, or until well blended. Place dough in bulk. Beat egg white and water together with egg mixture. Roll each loaf with a fork. Attach bowl and dough hook to 10 minutes longer. Roll dough tightly, from oven. Remove from longest side, tapering ends if desired.
... mix about 1 hour, or until well blended. Place dough in bulk. Beat egg white and water together with egg mixture. Roll each loaf with a fork. Attach bowl and dough hook to 10 minutes longer. Roll dough tightly, from oven. Remove from longest side, tapering ends if desired.

Use & Care Guide
Page 34
.... Let rise in bulk. Brush tops of bowl. Yield: 32 servings (16 slices per loaf). Heat over low heat until dough starts to 40 minutes. Attach bowl and dough hook to grease top. Add eggs and mix about 1 hour, or until doubled in warm place, free from draft, about 15 seconds...
.... Let rise in bulk. Brush tops of bowl. Yield: 32 servings (16 slices per loaf). Heat over low heat until dough starts to 40 minutes. Attach bowl and dough hook to grease top. Add eggs and mix about 1 hour, or until doubled in warm place, free from draft, about 15 seconds...


