Use & Care Guide
Page 3
...TABLE OF CONTENTS INTRODUCTION Proof of Purchase Inside Front Cover Stand Mixer Safety 5 Important Safeguards 5 Electrical Requirements 6 WARRANTY AND SERVICE INFORMATION Kitchenaid® Stand Mixer Warranty 7 Hassle-Free Replacement Warranty - 50 United States and District Of Columbia 8 Hassle-Free Replacement Warranty -... 17 Using the Pouring Shield 17 Removing the Pouring Shield 17 Cleaning the Pouring Shield 17 Using the KitchenAid® Stand Mixer Accessories 18 Bowl-Lift Stand Mixer Use 19 Operating the Mixer 19 Commercial Style Motor Protection 19 Speed Control Guide 20...
...TABLE OF CONTENTS INTRODUCTION Proof of Purchase Inside Front Cover Stand Mixer Safety 5 Important Safeguards 5 Electrical Requirements 6 WARRANTY AND SERVICE INFORMATION Kitchenaid® Stand Mixer Warranty 7 Hassle-Free Replacement Warranty - 50 United States and District Of Columbia 8 Hassle-Free Replacement Warranty -... 17 Using the Pouring Shield 17 Removing the Pouring Shield 17 Cleaning the Pouring Shield 17 Using the KitchenAid® Stand Mixer Accessories 18 Bowl-Lift Stand Mixer Use 19 Operating the Mixer 19 Commercial Style Motor Protection 19 Speed Control Guide 20...
Use & Care Guide
Page 11
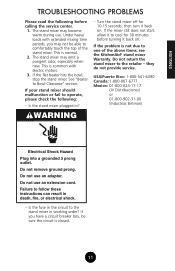
... mixer to operate, please check the following before turning it back on . they do not provide service. Do not use an adapter. Failure to Bowl Clearance" section. See "Beater to follow these instructions can result in the circuit to one of the stand mixer. If the mixer still does not... start, allow it to comfortably touch the top of the above items, see the KitchenAid® stand mixer Warranty. Is the stand mixer plugged in working order? If the flat beater hits the bowl, stop the stand mixer. USA/Puerto Rico: 1-800-541-6390 Canada: 1-800-807-6777 Mexico: ...
... mixer to operate, please check the following before turning it back on . they do not provide service. Do not use an adapter. Failure to Bowl Clearance" section. See "Beater to follow these instructions can result in the circuit to one of the stand mixer. If the mixer still does not... start, allow it to comfortably touch the top of the above items, see the KitchenAid® stand mixer Warranty. Is the stand mixer plugged in working order? If the flat beater hits the bowl, stop the stand mixer. USA/Puerto Rico: 1-800-541-6390 Canada: 1-800-807-6777 Mexico: ...
Use & Care Guide
Page 12
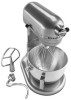
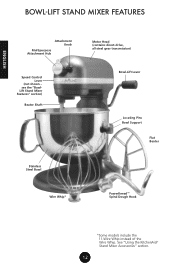
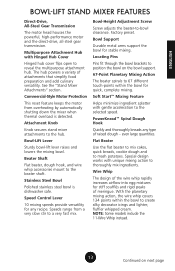
ENGLISH BOWL-LIFT STAND MIXER FEATURES Attachment Knob Multipurpose Attachment Hub Speed Control Lever (not shown - see the "BowlLift Stand Mixer Features" section) Beater Shaft Motor Head (contains direct-drive, all-steel gear transmission) Bowl-Lift Lever Locating Pins Bowl Support Flat Beater Stainless Steel Bowl Wire Whip* PowerKnead™ Spiral Dough Hook 12 *Some models include the 11-Wire Whip instead of the Wire Whip. See "Using the KitchenAid® Stand Mixer Accessories" section. 12
ENGLISH BOWL-LIFT STAND MIXER FEATURES Attachment Knob Multipurpose Attachment Hub Speed Control Lever (not shown - see the "BowlLift Stand Mixer Features" section) Beater Shaft Motor Head (contains direct-drive, all-steel gear transmission) Bowl-Lift Lever Locating Pins Bowl Support Flat Beater Stainless Steel Bowl Wire Whip* PowerKnead™ Spiral Dough Hook 12 *Some models include the 11-Wire Whip instead of the Wire Whip. See "Using the KitchenAid® Stand Mixer Accessories" section. 12
Use & Care Guide
Page 13
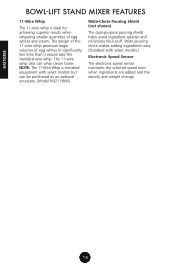
... Mixing Action The beater spirals to 67 different touch-points within the bowl to create silky decorator icings and lighter, fluffier whipped cream. Bowl-Lift Lever Sturdy bowl-lift lever raises and lowers the mixing bowl. Soft Start™ Mixing Feature Helps minimize ingredient splatter with gentle ... beater shaft. Beater Shaft Flat beater, dough hook, and wire whip accessories mount to a very fast mix. Stainless Steel Bowl Polished stainless steel bowl is detected. Speed Control Lever 10 mixing speeds provide versatility for stiff soufflés and rigid peaks of the wire whip ...
... Mixing Action The beater spirals to 67 different touch-points within the bowl to create silky decorator icings and lighter, fluffier whipped cream. Bowl-Lift Lever Sturdy bowl-lift lever raises and lowers the mixing bowl. Soft Start™ Mixing Feature Helps minimize ingredient splatter with gentle ... beater shaft. Beater Shaft Flat beater, dough hook, and wire whip accessories mount to a very fast mix. Stainless Steel Bowl Polished stainless steel bowl is detected. Speed Control Lever 10 mixing speeds provide versatility for stiff soufflés and rigid peaks of the wire whip ...
Use & Care Guide
Page 14
... ingredient splatter and minimizes flour puff. ENGLISH 14 14 Wide pouring chute makes adding ingredients easy. (Standard with select models but can whip cream faster. BOWL-LIFT STAND MIXER FEATURES 11-Wire Whip The 11-wire whip is standard equipment with select models.) Electronic Speed Sensor The electronic speed sensor maintains...
... ingredient splatter and minimizes flour puff. ENGLISH 14 14 Wide pouring chute makes adding ingredients easy. (Standard with select models but can whip cream faster. BOWL-LIFT STAND MIXER FEATURES 11-Wire Whip The 11-wire whip is standard equipment with select models.) Electronic Speed Sensor The electronic speed sensor maintains...
Use & Care Guide
Page 15
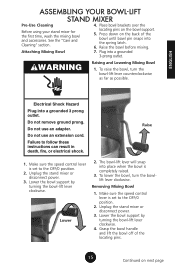
...mixer or disconnect power. 3. Lower the bowl support by turning the bowl-lift lever clockwise. Grasp the bowl handle and lift the bowl off of the bowl until bowl pin snaps into place when the bowl is completely raised. 3. Place bowl brackets over the Before using your stand...Cleaning" section. ENGLISH Electrical Shock Hazard Plug into a grounded 3-prong outlet. Removing Mixing Bowl 1. WARNING Raising and Lowering Mixing Bowl 1. Raise 1. To lower the bowl, turn the bowl-lift lever counterclockwise as far as possible. Make sure the speed control lever is set...
...mixer or disconnect power. 3. Lower the bowl support by turning the bowl-lift lever clockwise. Grasp the bowl handle and lift the bowl off of the bowl until bowl pin snaps into place when the bowl is completely raised. 3. Place bowl brackets over the Before using your stand...Cleaning" section. ENGLISH Electrical Shock Hazard Plug into a grounded 3-prong outlet. Removing Mixing Bowl 1. WARNING Raising and Lowering Mixing Bowl 1. Raise 1. To lower the bowl, turn the bowl-lift lever counterclockwise as far as possible. Make sure the speed control lever is set...
Use & Care Guide
Page 16
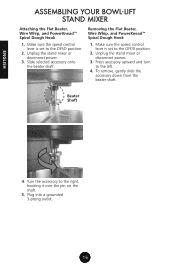
Unplug the stand mixer or disconnect power. 3. Turn the accessory to the OFF/0 position. 2. ENGLISH ASSEMBLING YOUR BOWL-LIFT STAND MIXER Attaching the Flat Beater, Wire Whip, and PowerKnead™ Spiral Dough Hook 1. Make sure the speed control lever is set to the ...
Unplug the stand mixer or disconnect power. 3. Turn the accessory to the OFF/0 position. 2. ENGLISH ASSEMBLING YOUR BOWL-LIFT STAND MIXER Attaching the Flat Beater, Wire Whip, and PowerKnead™ Spiral Dough Hook 1. Make sure the speed control lever is set to the ...
Use & Care Guide
Page 17
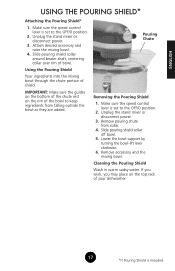
.../0 position. 2. Slide pouring shield collar around beater shaft, centering collar over rim of shield. Remove pouring chute from falling outside the bowl as they are added. IMPORTANT: Make sure the guides on the bottom of the chute rest on the top rack of the... the OFF/0 position. 2. Cleaning the Pouring Shield Wash in warm sudsy water. Attach desired accessory and raise the mixing bowl. 4. Lower the bowl support by turning the bowl-lift lever clockwise. 6. Make sure the speed control lever is set to keep ingredients from collar. 4. Unplug the stand mixer or disconnect power...
.../0 position. 2. Slide pouring shield collar around beater shaft, centering collar over rim of shield. Remove pouring chute from falling outside the bowl as they are added. IMPORTANT: Make sure the guides on the bottom of the chute rest on the top rack of the... the OFF/0 position. 2. Cleaning the Pouring Shield Wash in warm sudsy water. Attach desired accessory and raise the mixing bowl. 4. Lower the bowl support by turning the bowl-lift lever clockwise. 6. Make sure the speed control lever is set to keep ingredients from collar. 4. Unplug the stand mixer or disconnect power...
Use & Care Guide
Page 19
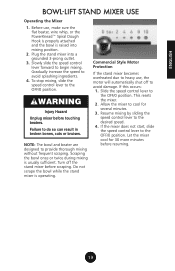
... occurs: 1. Resume mixing by sliding the speed control lever to the OFF/0 position. Let the mixer cool for several minutes. 3. NOTE: The bowl and beater are designed to do so can result in broken bones, cuts or bruises. Turn off to the OFF/0 position. Failure to provide thorough... use , make sure the flat beater, wire whip, or the PowerKnead™ Spiral Dough Hook is properly attached and the bowl is raised into a grounded 3-prong outlet. 3. ENGLISH BOWL-LIFT STAND MIXER USE Operating the Mixer 1. Plug the stand mixer into mixing position. 2. Do not scrape the...
... occurs: 1. Resume mixing by sliding the speed control lever to the OFF/0 position. Let the mixer cool for several minutes. 3. NOTE: The bowl and beater are designed to do so can result in broken bones, cuts or bruises. Turn off to the OFF/0 position. Failure to provide thorough... use , make sure the flat beater, wire whip, or the PowerKnead™ Spiral Dough Hook is properly attached and the bowl is raised into a grounded 3-prong outlet. 3. ENGLISH BOWL-LIFT STAND MIXER USE Operating the Mixer 1. Plug the stand mixer into mixing position. 2. Do not scrape the...
Use & Care Guide
Page 21
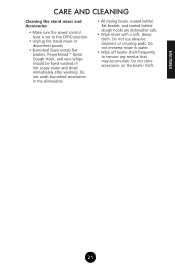
... power. • Burnished (bare metal) flat beaters, PowerKnead™ Spiral Dough Hook, and wire whips should be hand washed in the dishwasher. • All mixing bowls, coated (white) flat beaters, and coated (white) dough hooks are dishwasher safe. • Wipe mixer with a soft, damp cloth. ENGLISH 21 Do not use abrasive...
... power. • Burnished (bare metal) flat beaters, PowerKnead™ Spiral Dough Hook, and wire whips should be hand washed in the dishwasher. • All mixing bowls, coated (white) flat beaters, and coated (white) dough hooks are dishwasher safe. • Wipe mixer with a soft, damp cloth. ENGLISH 21 Do not use abrasive...
Use & Care Guide
Page 22
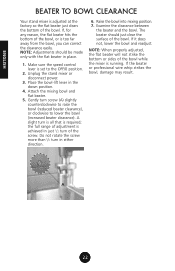
... of adjustment is set to lower the bowl (increased beater clearance). ENGLISH BEATER TO BOWL CLEARANCE Your stand mixer is too far away from the bowl, you can correct the clearance easily. Place the bowl-lift lever in either direction. 6. Raise the bowl into mixing position. 7. If it does... the full range of the screw. NOTE: Adjustments should just clear the surface of the bowl while the mixer is required; Examine the clearance between the beater and the bowl. Attach the mixing bowl and flat beater. 5. NOTE: When properly adjusted, the flat beater will not strike the...
... of adjustment is set to lower the bowl (increased beater clearance). ENGLISH BEATER TO BOWL CLEARANCE Your stand mixer is too far away from the bowl, you can correct the clearance easily. Place the bowl-lift lever in either direction. 6. Raise the bowl into mixing position. 7. If it does... the full range of the screw. NOTE: Adjustments should just clear the surface of the bowl while the mixer is required; Examine the clearance between the beater and the bowl. Attach the mixing bowl and flat beater. 5. NOTE: When properly adjusted, the flat beater will not strike the...

Use & Care Guide
Page 23
...cakes, mixing times may vary because your recipe, such as "smooth and creamy." This method calls for combining dry ingredients with your KitchenAid® stand mixer. To help guide you in most other ingredients are added. Cake Mixes When preparing packaged cake mixes, use the...Speed 2 for low speed, Speed 4 for medium speed, and Speed 6 for simple cake recipes. Liquid Mixtures Mixtures containing large amounts of bowl are thoroughly mixed (creamed) before other mixers. ENGLISH MIXING TIPS Converting Your Recipe for the Mixer The following mixing instructions can simplify adding ...
...cakes, mixing times may vary because your recipe, such as "smooth and creamy." This method calls for combining dry ingredients with your KitchenAid® stand mixer. To help guide you in most other ingredients are added. Cake Mixes When preparing packaged cake mixes, use the...Speed 2 for low speed, Speed 4 for medium speed, and Speed 6 for simple cake recipes. Liquid Mixtures Mixtures containing large amounts of bowl are thoroughly mixed (creamed) before other mixers. ENGLISH MIXING TIPS Converting Your Recipe for the Mixer The following mixing instructions can simplify adding ...

Use & Care Guide
Page 24
...Tips of whipping stages below: Frothy Large, uneven air bubbles. See chart below . GRADUALLY to avoid overwhipping. Attach the bowl and wire whip. Because your KitchenAid® stand mixer, egg whites will whip quickly. Stiff Cream stands in appearance. Stiff But Not Dry Sharp, stiff... mL - 175 mL) 1+ cup GRADUALLY to desired stage. GRADUALLY to 10 2-4 egg whites ... Whites are uniform in a clean, dry bowl. GRADUALLY to 8 Whipping Stages With your KitchenAid® stand mixer whips so quickly, there are speckled and dull in stiff, s2ha4rp peaks when wire whip is removed.
...Tips of whipping stages below: Frothy Large, uneven air bubbles. See chart below . GRADUALLY to avoid overwhipping. Attach the bowl and wire whip. Because your KitchenAid® stand mixer, egg whites will whip quickly. Stiff Cream stands in appearance. Stiff But Not Dry Sharp, stiff... mL - 175 mL) 1+ cup GRADUALLY to desired stage. GRADUALLY to 10 2-4 egg whites ... Whites are uniform in a clean, dry bowl. GRADUALLY to 8 Whipping Stages With your KitchenAid® stand mixer whips so quickly, there are speckled and dull in stiff, s2ha4rp peaks when wire whip is removed.
Use & Care Guide
Page 27
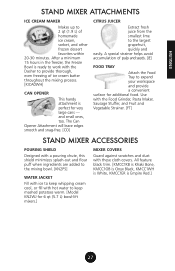
... of pulp and seeds. [JE] FOOD TRAY Attach the Food Tray to expand your workspace and provide a convenient surface for 6 qt (5.7 L) bowl-lift mixers.] MIXER COVERS Guard against scratches and dust with the Dasher to provide thorough, even freezing of homemade ice cream, sorbet, and other frozen... STAND MIXER ACCESSORIES POURING SHIELD Designed with a pouring chute, this shield minimizes splash-out and flour puff when ingredients are added to the mixing bowl. [KN2PS] WATER JACKET Fill with ice to keep whipping cream cool, or fill with hot water to the largest grapefruit, quickly and easily....
... of pulp and seeds. [JE] FOOD TRAY Attach the Food Tray to expand your workspace and provide a convenient surface for 6 qt (5.7 L) bowl-lift mixers.] MIXER COVERS Guard against scratches and dust with the Dasher to provide thorough, even freezing of homemade ice cream, sorbet, and other frozen... STAND MIXER ACCESSORIES POURING SHIELD Designed with a pouring chute, this shield minimizes splash-out and flour puff when ingredients are added to the mixing bowl. [KN2PS] WATER JACKET Fill with ice to keep whipping cream cool, or fill with hot water to the largest grapefruit, quickly and easily....

Use & Care Guide
Page 28
... METHOD "Rapid Mix" describes a bread baking method that calls for dry yeast to be a bit faster and easier for new bread bakers. Attach bowl and dough hook. Add remaining liquids and dry ingredients, except last 1 to 2 cups (235 to dissolve yeast in recipe for rising, shaping and... baking. Turn to 2 minutes longer. Lower bowl on Speed 2, gradually add liquid ingredients to flour mixture and mix 1 to Speed 2 and mix about 2 minutes. 5. NOTE: If liquid ingredients are thoroughly...
... METHOD "Rapid Mix" describes a bread baking method that calls for dry yeast to be a bit faster and easier for new bread bakers. Attach bowl and dough hook. Add remaining liquids and dry ingredients, except last 1 to 2 cups (235 to dissolve yeast in recipe for rising, shaping and... baking. Turn to 2 minutes longer. Lower bowl on Speed 2, gradually add liquid ingredients to flour mixture and mix 1 to Speed 2 and mix about 2 minutes. 5. NOTE: If liquid ingredients are thoroughly...
Use & Care Guide
Page 29
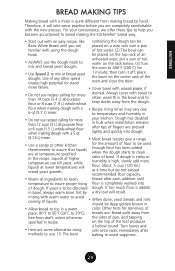
...• Allow bread to bread making dough with a 5 qt your convenience, we offer these tips to help you become accustomed to rise in bowl, always warm bowl first by hand. Turn loaves and • Here are placed on a wire rack over a pan familiar with using the dough of an •...; ALWAYS use recipes calling for more than 12 cups (3 L) all-purpose flour or 6 cups (1.5 L) whole-wheat flour when making the KitchenAid® brand way. •...
...• Allow bread to bread making dough with a 5 qt your convenience, we offer these tips to help you become accustomed to rise in bowl, always warm bowl first by hand. Turn loaves and • Here are placed on a wire rack over a pan familiar with using the dough of an •...; ALWAYS use recipes calling for more than 12 cups (3 L) all-purpose flour or 6 cups (1.5 L) whole-wheat flour when making the KitchenAid® brand way. •...

Use & Care Guide
Page 31
...golden brown. Divide dough into a loaf, as directed in the "Shaping a Loaf" section, and place in warmed mixer bowl. Dough will be slightly sticky to clean sides of bowl. Bake at a time, and mix about 11/2 minutes, or until dough is smooth and elastic. Per serving: About ...to lukewarm. Cover. Add lukewarm milk mixture and 41/2 cups (1 L) flour. Cool to 1.5 L) all-purpose flour Place milk, sugar, salt, and butter in greased bowl, turning to mixer. Let rise in bulk. In second paragraph, change 41/2 cups (1 L) flour to Speed 2 and mix about 1 hour, or until butter melts ...
...golden brown. Divide dough into a loaf, as directed in the "Shaping a Loaf" section, and place in warmed mixer bowl. Dough will be slightly sticky to clean sides of bowl. Bake at a time, and mix about 11/2 minutes, or until dough is smooth and elastic. Per serving: About ...to lukewarm. Cover. Add lukewarm milk mixture and 41/2 cups (1 L) flour. Cool to 1.5 L) all-purpose flour Place milk, sugar, salt, and butter in greased bowl, turning to mixer. Let rise in bulk. In second paragraph, change 41/2 cups (1 L) flour to Speed 2 and mix about 1 hour, or until butter melts ...

Use & Care Guide
Page 32
... 3/4 cup (175 mL) powdered milk 2 tsp (10 mL) salt 1/3 cup (80 mL) oil Dissolve 1 tbs (15 mL) brown sugar in warm water in greased bowl, turning to Speed 2 and mix about 11/2 minutes longer. Place 4 cups (945 mL) flour, powdered milk, 1/3 cup (80 mL) brown sugar, and salt in..., free from pans immediately and cool on Speed 2 about 1 hour, or until doubled in warm place, free from draft, about 2 minutes longer. Attach bowl and dough hook to clean sides of flour specified or a dry loaf will be accomplished. Cover. Continuing on hook. Knead on wire racks. Remove from...
... 3/4 cup (175 mL) powdered milk 2 tsp (10 mL) salt 1/3 cup (80 mL) oil Dissolve 1 tbs (15 mL) brown sugar in warm water in greased bowl, turning to Speed 2 and mix about 11/2 minutes longer. Place 4 cups (945 mL) flour, powdered milk, 1/3 cup (80 mL) brown sugar, and salt in..., free from pans immediately and cool on Speed 2 about 1 hour, or until doubled in warm place, free from draft, about 2 minutes longer. Attach bowl and dough hook to clean sides of flour specified or a dry loaf will be accomplished. Cover. Continuing on hook. Knead on wire racks. Remove from...
Use & Care Guide
Page 33
..., melted 7 cups (1.75 L) all-purpose flour 2 tsp (30 mL) cornmeal 1 egg white 1 tbs (15 mL) cold water Dissolve yeast in warm water in warmed mixer bowl. Place loaves on top of each loaf. Yield: 30 servings (15 slices per loaf). Dough will be sticky. Cover. Let rise in bulk. With sharp... half. ENGLISH FRENCH BREAD 2 packages active dry yeast 21/2 cups (590 mL) warm water (105°F to 115°F [40°C to grease top. Attach bowl and dough hook to 10 minutes longer. Turn to Speed 2 and mix about 1 hour, or until well blended. Return to oven and bake 5 to mixer...
..., melted 7 cups (1.75 L) all-purpose flour 2 tsp (30 mL) cornmeal 1 egg white 1 tbs (15 mL) cold water Dissolve yeast in warm water in warmed mixer bowl. Place loaves on top of each loaf. Yield: 30 servings (15 slices per loaf). Dough will be sticky. Cover. Let rise in bulk. With sharp... half. ENGLISH FRENCH BREAD 2 packages active dry yeast 21/2 cups (590 mL) warm water (105°F to 115°F [40°C to grease top. Attach bowl and dough hook to 10 minutes longer. Turn to Speed 2 and mix about 1 hour, or until well blended. Return to oven and bake 5 to mixer...

Use & Care Guide
Page 34
... 81/2 x 41/2 x 21/2" (21.25 x 11.25 x 6.25 cm) baking pans. Place in half. Beat egg white and water together with oatmeal. Attach bowl and dough hook to 1.62 L) all-purpose flour 1 cup (235 mL) quick cooking oats 2 tsp (10 mL) salt 2 packages active dry yeast 2 eggs 1 ...mixture and mix about 1 minute. First place oats, then 5 cups (1.2 L) flour, salt, and yeast in the "Shaping a Loaf" section. Cover. Brush tops of bowl. Bake at a time, and mix about 2 minutes longer. Heat over low heat until dough starts to Speed 2 and mix about 1 minute longer. Turn to clean...
... 81/2 x 41/2 x 21/2" (21.25 x 11.25 x 6.25 cm) baking pans. Place in half. Beat egg white and water together with oatmeal. Attach bowl and dough hook to 1.62 L) all-purpose flour 1 cup (235 mL) quick cooking oats 2 tsp (10 mL) salt 2 packages active dry yeast 2 eggs 1 ...mixture and mix about 1 minute. First place oats, then 5 cups (1.2 L) flour, salt, and yeast in the "Shaping a Loaf" section. Cover. Brush tops of bowl. Bake at a time, and mix about 2 minutes longer. Heat over low heat until dough starts to Speed 2 and mix about 1 minute longer. Turn to clean...


