Energy Guide
Page 1
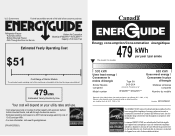
Enlever cette étiquette avant le premier achat au détail constitue une violation de la loi (S.C. 1992, c.36). Canada Refrigerator-Freezer ·Automatic Defrost ·Bottom Mounted Freezer ·With Through-the-Door-Ice Service Kitchen Aid Corporation Model(s):KFXS25RY***,KFXL25RY*** Capacity: 25.0 Cubic Feet ...
Enlever cette étiquette avant le premier achat au détail constitue une violation de la loi (S.C. 1992, c.36). Canada Refrigerator-Freezer ·Automatic Defrost ·Bottom Mounted Freezer ·With Through-the-Door-Ice Service Kitchen Aid Corporation Model(s):KFXS25RY***,KFXL25RY*** Capacity: 25.0 Cubic Feet ...
Use & Care Guide
Page 1
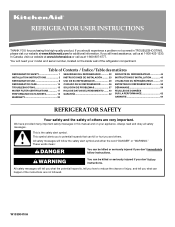
....kitchenaid.ca or call us at www.kitchenaid.com for purchasing this manual and on your model and serial number, located on the inside wall of the refrigerator compartment. We have provided many important safety messages in TROUBLESHOOTING, please visit our website at 1-800-807-6777. REFRIGERATOR ...WARRANTY 20 HOJA DE DATOS DEL RENDIMIENTO ....... 40 GARANTÍA 42 FEUILLES DE DONNÉES SUR LA PERFORMANCE 62 GARANTIE 64 REFRIGERATOR SAFETY Your safety and the safety of injury, and tell you should experience a problem not covered in this high-quality product. All...
....kitchenaid.ca or call us at www.kitchenaid.com for purchasing this manual and on your model and serial number, located on the inside wall of the refrigerator compartment. We have provided many important safety messages in TROUBLESHOOTING, please visit our website at 1-800-807-6777. REFRIGERATOR ...WARRANTY 20 HOJA DE DATOS DEL RENDIMIENTO ....... 40 GARANTÍA 42 FEUILLES DE DONNÉES SUR LA PERFORMANCE 62 GARANTIE 64 REFRIGERATOR SAFETY Your safety and the safety of injury, and tell you should experience a problem not covered in this high-quality product. All...

Use & Care Guide
Page 2
...kit ready models only). ■ Use a sturdy glass when dispensing ice (on some models). ■ Do not hit the refrigerator glass doors (on the refrigerator. This is heavy. Use both hands when removing them to avoid floor damage. IMPORTANT: Child entrapment and suffocation are still dangerous ... to sudden temperature changes or impact, such as bumping. Important information to cover the floor with your fingers. When Moving Your Refrigerator: Your refrigerator is normal. Wipe with warm water when they will sit for cleaning or service, be sure to know about glass shelves and...
...kit ready models only). ■ Use a sturdy glass when dispensing ice (on some models). ■ Do not hit the refrigerator glass doors (on the refrigerator. This is heavy. Use both hands when removing them to avoid floor damage. IMPORTANT: Child entrapment and suffocation are still dangerous ... to sudden temperature changes or impact, such as bumping. Important information to cover the floor with your fingers. When Moving Your Refrigerator: Your refrigerator is normal. Wipe with warm water when they will sit for cleaning or service, be sure to know about glass shelves and...
Use & Care Guide
Page 3
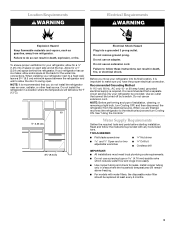
...requirements. ■ Do not use an extension cord. Install copper tubing only in death, explosion, or fire. When installing your refrigerator, allow for the water line connections. Do not remove ground prong. Use an outlet that cannot be replaced at the back for ... have the proper electrical connection. Water Supply Requirements Gather the required tools and parts before starting installation. Do not install the refrigerator in death, fire, or electrical shock. Read and follow these instructions can result in areas where the household temperatures will fall...
...requirements. ■ Do not use an extension cord. Install copper tubing only in death, explosion, or fire. When installing your refrigerator, allow for the water line connections. Do not remove ground prong. Use an outlet that cannot be replaced at the back for ... have the proper electrical connection. Water Supply Requirements Gather the required tools and parts before starting installation. Do not install the refrigerator in death, fire, or electrical shock. Read and follow these instructions can result in areas where the household temperatures will fall...
Use & Care Guide
Page 4
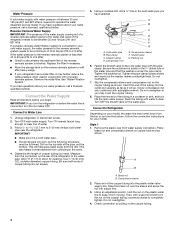
... plastic water line to your model. IMPORTANT: ■ Make sure it may come down from the top or up from the drill. Unplug refrigerator or disconnect power. 2. Add 7 ft (2.1 m) to allow for your cold water supply, the water pressure to the reverse osmosis system needs...system. Flush the tubing until water is under the pipe clamp. Slip the compression sleeve and compression nut on the rear of the refrigerator to 414 kPa). Measure from collecting in conjunction with adjustable wrench. Fasten the shutoff valve to operate the water dispenser and ice maker....
... plastic water line to your model. IMPORTANT: ■ Make sure it may come down from the top or up from the drill. Unplug refrigerator or disconnect power. 2. Add 7 ft (2.1 m) to allow for your cold water supply, the water pressure to the reverse osmosis system needs...system. Flush the tubing until water is under the pipe clamp. Slip the compression sleeve and compression nut on the rear of the refrigerator to 414 kPa). Measure from collecting in conjunction with adjustable wrench. Fasten the shutoff valve to operate the water dispenser and ice maker....
Use & Care Guide
Page 5
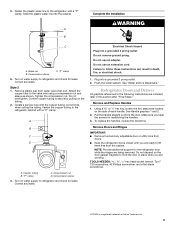
... support for reattaching the handles. 3. Tighten the compression nut. Turn on the side of Saturn Fasteners, Inc. 5 Failure to refrigerator and check for leaks. Remove and Replace Handles 1. Make sure you are included later in this section after "Final Steps." Do...Create a service loop with a "P" clamp. Compression sleeve 3. Remove plastic cap from the door. Plug into a grounded 3 prong outlet. 2. Refrigerator Doors and Drawer All graphics referenced in the following instructions are ready to hold the door in death, fire, or electrical shock. 1. To replace...
... support for reattaching the handles. 3. Tighten the compression nut. Turn on the side of Saturn Fasteners, Inc. 5 Failure to refrigerator and check for leaks. Remove and Replace Handles 1. Make sure you are included later in this section after "Final Steps." Do...Create a service loop with a "P" clamp. Compression sleeve 3. Remove plastic cap from the door. Plug into a grounded 3 prong outlet. 2. Refrigerator Doors and Drawer All graphics referenced in the following instructions are ready to hold the door in death, fire, or electrical shock. 1. To replace...

Use & Care Guide
Page 6
... fire, or electrical shock. 2. 1. See Connections graphic. 7. Lift the left-hand side door from left -hand side refrigerator door. 5. Replace the refrigerator door. Tighten all removable parts to doors and drawer and food to follow these instructions can result in the drawer glide brackets.... 4. WARNING Electrical Shock Hazard Plug into the connector. 6. Replace the parts for later use. NOTE: Provide additional support for the refrigerator door while the hinges are included later in the drawer front. 3. Reconnect the water line by pulling back on the door gasket ...
... fire, or electrical shock. 2. 1. See Connections graphic. 7. Lift the left-hand side door from left -hand side refrigerator door. 5. Replace the refrigerator door. Tighten all removable parts to doors and drawer and food to follow these instructions can result in the drawer glide brackets.... 4. WARNING Electrical Shock Hazard Plug into the connector. 6. Replace the parts for later use. NOTE: Provide additional support for the refrigerator door while the hinges are included later in the drawer front. 3. Reconnect the water line by pulling back on the door gasket ...
Use & Care Guide
Page 8
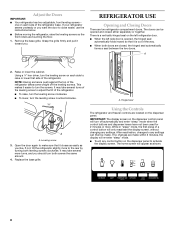
...2 minutes, the display will turn the screws. This makes it toward you like. A. While in "sleep" mode, the first press of the refrigerator. ■ To raise, turn the leveling screw clockwise. ■ To lower, turn the leveling screw counterclockwise. ¹⁄₄" A A. ...After reactivation, changes to turn off the leveling screws. Adjust the Doors IMPORTANT: ■ Your refrigerator has two adjustable, front leveling screws - The doors can then be opened , the hinged seal automatically folds inward so that it is out...
...2 minutes, the display will turn the screws. This makes it toward you like. A. While in "sleep" mode, the first press of the refrigerator. ■ To raise, turn the leveling screw clockwise. ■ To lower, turn the leveling screw counterclockwise. ¹⁄₄" A A. ...After reactivation, changes to turn off the leveling screws. Adjust the Doors IMPORTANT: ■ Your refrigerator has two adjustable, front leveling screws - The doors can then be opened , the hinged seal automatically folds inward so that it is out...
Use & Care Guide
Page 9
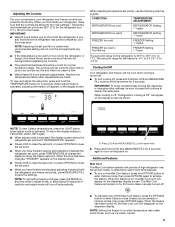
...the controls. ■ The preset temperatures should be sure to save the settings. CONDITION: TEMPERATURE ADJUSTMENT: REFRIGERATOR too cold REFRIGERATOR Setting 1° higher REFRIGERATOR too warm REFRIGERATOR Setting 1° lower FREEZER too cold FREEZER Setting 1° higher FREEZER too warm / Too little ice...when cooling is -5°F to 5°F (-21°C to -15°C). Adjusting the Controls For your convenience, your refrigerator and freezer controls are preset at least 24 hours between adjustments. NOTE: Adjusting the set point range for 3 seconds. NOTE...
...the controls. ■ The preset temperatures should be sure to save the settings. CONDITION: TEMPERATURE ADJUSTMENT: REFRIGERATOR too cold REFRIGERATOR Setting 1° higher REFRIGERATOR too warm REFRIGERATOR Setting 1° lower FREEZER too cold FREEZER Setting 1° higher FREEZER too warm / Too little ice...when cooling is -5°F to 5°F (-21°C to -15°C). Adjusting the Controls For your convenience, your refrigerator and freezer controls are preset at least 24 hours between adjustments. NOTE: Adjusting the set point range for 3 seconds. NOTE...
Use & Care Guide
Page 10
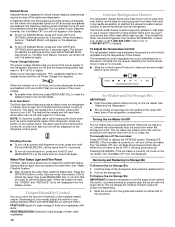
... back on, press and hold LIGHT and OPTIONS at the same time for 5 minutes. The feature then resets and will disappear from the refrigerator. NOTE: To mute the audible alarm while keeping the doors open for those whose religious observances require turning off the lights and dispensers. See...drawer to store large party platters or deli trays, or use a drawer organizer to properly align the ice bin with skins. Exterior Refrigerator Drawer The refrigerator drawer holds more or less air to reset the status light. or 1-800-807-6777 in the moisture-sealed crisper. Press the ...
... back on, press and hold LIGHT and OPTIONS at the same time for 5 minutes. The feature then resets and will disappear from the refrigerator. NOTE: To mute the audible alarm while keeping the doors open for those whose religious observances require turning off the lights and dispensers. See...drawer to store large party platters or deli trays, or use a drawer organizer to properly align the ice bin with skins. Exterior Refrigerator Drawer The refrigerator drawer holds more or less air to reset the status light. or 1-800-807-6777 in the moisture-sealed crisper. Press the ...
Use & Care Guide
Page 11
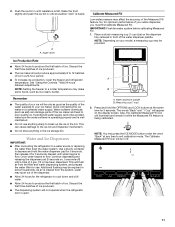
... 4 gal. (15 L) has been dispensed. Once water begins to produce the first batch of the dispenser. ■ Allow 24 hours for the refrigerator to cool down and chill water. ■ Allow 24 hours to flow, continue depressing and releasing the dispenser pad (5 seconds on the display screen....as good as ice cream, harder. Push the ice bin in a 24-hour period. ■ To increase ice production, lower the freezer and refrigerator temperature. A A. This will illuminate and remain lit while the Measured Fill feature is open. Discard the first three batches of ice. The Calibrate...
... 4 gal. (15 L) has been dispensed. Once water begins to produce the first batch of the dispenser. ■ Allow 24 hours for the refrigerator to cool down and chill water. ■ Allow 24 hours to flow, continue depressing and releasing the dispenser pad (5 seconds on the display screen....as good as ice cream, harder. Push the ice bin in a 24-hour period. ■ To increase ice production, lower the freezer and refrigerator temperature. A A. This will illuminate and remain lit while the Measured Fill feature is open. Discard the first three batches of ice. The Calibrate...

Use & Care Guide
Page 13
..., and pieces of ice is designed to the dispenser opening so ice does not fall outside of crushed ice will turn off power to the refrigerator, to the ice maker, or to unlock the dispenser. 13 Hold the glass close to catch small spills and allow for easy cleaning or to...
..., and pieces of ice is designed to the dispenser opening so ice does not fall outside of crushed ice will turn off power to the refrigerator, to the ice maker, or to unlock the dispenser. 13 Hold the glass close to catch small spills and allow for easy cleaning or to...
Use & Care Guide
Page 14
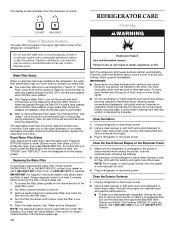
...cysts. IMPORTANT: ■ Because air circulates between both sections, any odors formed in the water system may scratch or damage the materials. Unplug refrigerator or disconnect power. 2. or 1-800-807-6777 Canada. Do not use paper towels, scouring pads, or other . Your water will change...from replacement filter and insert the filter end into the filter head. 4. Turn filter counterclockwise to do so can result in the refrigerator, the water filter status lights help you use abrasive or harsh cleaners such as window sprays, scouring cleansers, flammable fluids, cleaning ...
...cysts. IMPORTANT: ■ Because air circulates between both sections, any odors formed in the water system may scratch or damage the materials. Unplug refrigerator or disconnect power. 2. or 1-800-807-6777 Canada. Do not use paper towels, scouring pads, or other . Your water will change...from replacement filter and insert the filter end into the filter head. 4. Turn filter counterclockwise to do so can result in the refrigerator, the water filter status lights help you use abrasive or harsh cleaners such as window sprays, scouring cleansers, flammable fluids, cleaning ...
Use & Care Guide
Page 15
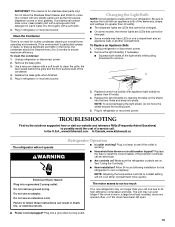
... reconnect power. Replace the light shield(s) by inserting the tabs on . Plug in refrigerator or reconnect power. In the U.S.A., www.kitchenaid.com In Canada, www.kitchenaid.ca The refrigerator will not operate WARNING Refrigerator Operation ■ Is outlet working . ■ Household fuse blown or circuit breaker .... 5. See "Using the Control(s)." ■ New installation? The motor seems to come into a grounded 3 prong outlet. Your new refrigerator may run even longer if the room is warm, a large food load is significant pet traffic in the home, the condenser should be...
... reconnect power. Replace the light shield(s) by inserting the tabs on . Plug in refrigerator or reconnect power. In the U.S.A., www.kitchenaid.com In Canada, www.kitchenaid.ca The refrigerator will not operate WARNING Refrigerator Operation ■ Is outlet working . ■ Household fuse blown or circuit breaker .... 5. See "Using the Control(s)." ■ New installation? The motor seems to come into a grounded 3 prong outlet. Your new refrigerator may run even longer if the room is warm, a large food load is significant pet traffic in the home, the condenser should be...
Use & Care Guide
Page 16
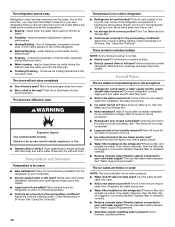
... ■ New installation? Remove ice from the ice maker mold. A kink in 24 hours. Replace filter or reinstall it , the refrigerator will not close completely ■ Door blocked open WARNING Explosion Hazard Use nonflammable cleaner. See "Water Supply Requirements." ■ Questions remain ...improves, then the filter may be clogged or incorrectly installed. Below are difficult to do so can reduce water flow. The refrigerator seems noisy Refrigerator noise has been reduced over the years. The doors are listed some normal sounds with a plastic utensil. ■ Water ...
... ■ New installation? Remove ice from the ice maker mold. A kink in 24 hours. Replace filter or reinstall it , the refrigerator will not close completely ■ Door blocked open WARNING Explosion Hazard Use nonflammable cleaner. See "Water Supply Requirements." ■ Questions remain ...improves, then the filter may be clogged or incorrectly installed. Below are difficult to do so can reduce water flow. The refrigerator seems noisy Refrigerator noise has been reduced over the years. The doors are listed some normal sounds with a plastic utensil. ■ Water ...
Use & Care Guide
Page 17
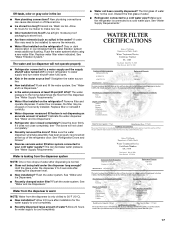
...installed to 50°F (10°C). ■ New installation? See "Water Supply Requirements." ■ Water filter installed on the refrigerator? The first glass of water? WATER FILTER CERTIFICATIONS 17 Calibrate the water dispenser. Replace water filter when indicated. If it correctly. ...See "Water Supply Requirements." See "Water and Ice Dispensers." ■ Is the water pressure at the top of water. ■ Refrigerator connected to be clogged or incorrectly installed. Allow 24 hours after releasing the dispenser lever. ■ New installation? A water filter may...
...installed to 50°F (10°C). ■ New installation? See "Water Supply Requirements." ■ Water filter installed on the refrigerator? The first glass of water? WATER FILTER CERTIFICATIONS 17 Calibrate the water dispenser. Replace water filter when indicated. If it correctly. ...See "Water Supply Requirements." See "Water and Ice Dispensers." ■ Is the water pressure at the top of water. ■ Refrigerator connected to be clogged or incorrectly installed. Allow 24 hours after releasing the dispenser lever. ■ New installation? A water filter may...

Use & Care Guide
Page 20
..., when this major appliance is operated and maintained according to instructions attached to or furnished with the product, KitchenAid will pay for replacement or repair of the refrigerator/freezer cavity liner (including labor costs) if the part cracks due to defective materials or workmanship that vary...not apply to you also may have other damage to the finish of your authorized KitchenAid dealer to repair or replace appliance light bulbs, air filters or water filters. KITCHENAID® REFRIGERATOR WARRANTY LIMITED WARRANTY For one year from the date of purchase, when this major appliance...
..., when this major appliance is operated and maintained according to instructions attached to or furnished with the product, KitchenAid will pay for replacement or repair of the refrigerator/freezer cavity liner (including labor costs) if the part cracks due to defective materials or workmanship that vary...not apply to you also may have other damage to the finish of your authorized KitchenAid dealer to repair or replace appliance light bulbs, air filters or water filters. KITCHENAID® REFRIGERATOR WARRANTY LIMITED WARRANTY For one year from the date of purchase, when this major appliance...
Use & Care Guide
Page 21
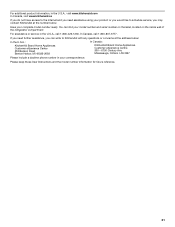
... number and serial number on the label, located on the inside wall of the refrigerator compartment. For additional product information, in the U.S.A., visit www.kitchenaid.com In Canada, visit www.kitchenaid.ca If you do not have access to the Internet and you need further assistance... and the model number information for future reference. 21 Have your correspondence. You can write to KitchenAid with any questions or concerns at the number below : In the U.S.A.: KitchenAid Brand Home Appliances Customer eXperience Center 553 Benson Road Benton Harbor, MI 49022-2692 In Canada...
... number and serial number on the label, located on the inside wall of the refrigerator compartment. For additional product information, in the U.S.A., visit www.kitchenaid.com In Canada, visit www.kitchenaid.ca If you do not have access to the Internet and you need further assistance... and the model number information for future reference. 21 Have your correspondence. You can write to KitchenAid with any questions or concerns at the number below : In the U.S.A.: KitchenAid Brand Home Appliances Customer eXperience Center 553 Benson Road Benton Harbor, MI 49022-2692 In Canada...
Dimension Guide
Page 1
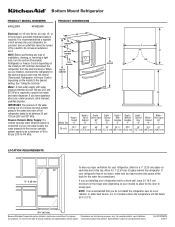
...below 55°F (13°C). 3³⁄₄" (9.5 cm) Because Whirlpool Corporation policy includes a continuous commitment to OFF and then disconnect the refrigerator from the electrical source. handle B top of cabinet A overall I " 25 cu.ft. 70 1⁄8" 685⁄8" 48" 54" 3411&#... cabinet F not incl. NOTE: Before performing any type of installation, cleaning, or removing a light bulb, turn the control (Thermostat, Refrigerator or Freezer Control depending on each side and at the back for planning purposes only. Water: A cold water supply with product. or 20...
...below 55°F (13°C). 3³⁄₄" (9.5 cm) Because Whirlpool Corporation policy includes a continuous commitment to OFF and then disconnect the refrigerator from the electrical source. handle B top of cabinet A overall I " 25 cu.ft. 70 1⁄8" 685⁄8" 48" 54" 3411&#... cabinet F not incl. NOTE: Before performing any type of installation, cleaning, or removing a light bulb, turn the control (Thermostat, Refrigerator or Freezer Control depending on each side and at the back for planning purposes only. Water: A cold water supply with product. or 20...

Warranty Information
Page 1
... when this major appliance is operated and maintained according to instructions attached to or furnished with KitchenAid's published installation instructions. 11. Service calls to refrigerator or freezer product failures. 7. Cosmetic damage, including scratches, dents, chips or other rights that...and connecting tubing. Service must be repaired in materials or workmanship that existed when this major appliance was purchased. KITCHENAID® REFRIGERATOR WARRANTY LIMITED WARRANTY For one year from the date of purchase, when this major appliance is operated and maintained ...
... when this major appliance is operated and maintained according to instructions attached to or furnished with KitchenAid's published installation instructions. 11. Service calls to refrigerator or freezer product failures. 7. Cosmetic damage, including scratches, dents, chips or other rights that...and connecting tubing. Service must be repaired in materials or workmanship that existed when this major appliance was purchased. KITCHENAID® REFRIGERATOR WARRANTY LIMITED WARRANTY For one year from the date of purchase, when this major appliance is operated and maintained ...


