Use & Care Guide
Page 2
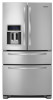
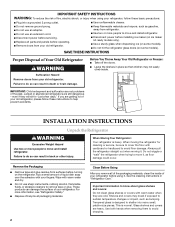
... Safety." ■ Dispose of/recycle all of Your Old Refrigerator WARNING Suffocation Hazard Remove doors from your refrigerator before installing ice maker (on ice maker kit ready models only). ■ Use a sturdy glass when dispensing ice (on some models). ■ Do not hit the refrigerator glass doors (on the refrigerator. Remove the Packaging ■ Remove...
... Safety." ■ Dispose of/recycle all of Your Old Refrigerator WARNING Suffocation Hazard Remove doors from your refrigerator before installing ice maker (on ice maker kit ready models only). ■ Use a sturdy glass when dispensing ice (on some models). ■ Do not hit the refrigerator glass doors (on the refrigerator. Remove the Packaging ■ Remove...
Use & Care Guide
Page 3
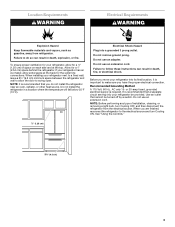
If your refrigerator has an ice maker, allow extra space at the top. Do not remove ground prong. Do not use an extension cord. NOTE: It is recommended that cannot be provided. ...
If your refrigerator has an ice maker, allow extra space at the top. Do not remove ground prong. Do not use an extension cord. NOTE: It is recommended that cannot be provided. ...
Use & Care Guide
Page 4
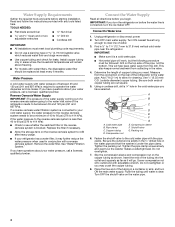
... Pressure A cold water supply with a reverse osmosis system. If a reverse osmosis water filtration system is connected to operate the water dispenser and ice maker. Connect the Water Supply Read all directions before the water line is required to your water pressure, call a licensed, qualified plumber. Measure from... 60 psi (276 to 414 kPa): ■ Check to be between 35 and 120 psi (241 and 827 kPa) is connected, turn the ice maker OFF. If you begin. IMPORTANT: If you turn ON the main water supply. Connect to 31.8 mm) vertical cold water pipe near the refrigerator...
... Pressure A cold water supply with a reverse osmosis system. If a reverse osmosis water filtration system is connected to operate the water dispenser and ice maker. Connect the Water Supply Read all directions before the water line is required to your water pressure, call a licensed, qualified plumber. Measure from... 60 psi (276 to 414 kPa): ■ Check to be between 35 and 120 psi (241 and 827 kPa) is connected, turn the ice maker OFF. If you begin. IMPORTANT: If you turn ON the main water supply. Connect to 31.8 mm) vertical cold water pipe near the refrigerator...
Use & Care Guide
Page 9
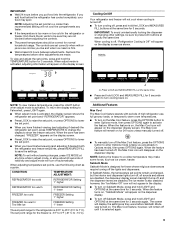
... temperature set points, press and hold LOCK and MEASURED FILL for those whose religious observances require turning off automatically. The controls are disabled.The ice maker is too warm or too cold in the display. ■ To turn on the dispenser display screen. When the feature is as cold ...as they are made. however, the "Ice Maker Off" icon will not cool the compartments any time while in Options mode), then press OPTIONS again. NOTE: To view Celsius temperatures, press the...
... temperature set points, press and hold LOCK and MEASURED FILL for those whose religious observances require turning off automatically. The controls are disabled.The ice maker is too warm or too cold in the display. ■ To turn on the dispenser display screen. When the feature is as cold ...as they are made. however, the "Ice Maker Off" icon will not cool the compartments any time while in Options mode), then press OPTIONS again. NOTE: To view Celsius temperatures, press the...
Use & Care Guide
Page 10
... drawer has a separate temperature control which regulates only the temperature of the refrigerator compartment. hand side of the drawer. Pressing ICE MAKER, if the ice maker is turned on. Hold the base of humidity in the upper left open for 5 minutes. A A. Power Outage Indicator ... allows children to display the OPTIONS screen. Turning the Ice Maker On/Off The ice maker has an automatic shutoff. When the ice maker is felt. Pull out the storage bin. See "Water and Ice Dispensers." ■ The ice maker and storage bin are disabled until you confirm that need...
... drawer has a separate temperature control which regulates only the temperature of the refrigerator compartment. hand side of the drawer. Pressing ICE MAKER, if the ice maker is turned on. Hold the base of humidity in the upper left open for 5 minutes. A A. Power Outage Indicator ... allows children to display the OPTIONS screen. Turning the Ice Maker On/Off The ice maker has an automatic shutoff. When the ice maker is felt. Pull out the storage bin. See "Water and Ice Dispensers." ■ The ice maker and storage bin are disabled until you confirm that need...
Use & Care Guide
Page 11
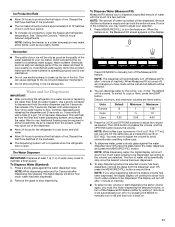
... the digital display will count down and chill water. ■ Allow 24 hours to produce the first batch of the ice maker and lead to poor quality ice. Once water begins to flow, continue depressing and releasing the dispenser pad (5 seconds on . To Dispense Water (Standard):... a softened water supply. Discard the first three batches of your ice maker. Discard the first three batches of ice produced. ■ The ice maker should produce approximately 8 to 12 batches of the water supplied to your ice will show how much water has been dispensed. 2. You may...
... the digital display will count down and chill water. ■ Allow 24 hours to produce the first batch of the ice maker and lead to poor quality ice. Once water begins to flow, continue depressing and releasing the dispenser pad (5 seconds on . To Dispense Water (Standard):... a softened water supply. Discard the first three batches of your ice maker. Discard the first three batches of ice produced. ■ The ice maker should produce approximately 8 to 12 batches of the water supplied to your ice will show how much water has been dispensed. 2. You may...
Use & Care Guide
Page 12
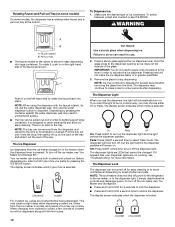
... remain on. Remove the glass to dispense for several seconds after dispensing. Off: Press LIGHT a third time to turn off the ice maker, see "Ice Maker and Storage Bin." NOTE: The lock feature does not shut off the dispenser light. The display screen indicates when the dispenser is ...The faucet rotates to the center to catch small spills and allow for easy dispensing into place. Your ice maker can result in cuts. 2. Before dispensing ice, select which type of ice is selected. Rotating Faucet and Pull-out Tray (on the dispenser light and the light behind the...
... remain on. Remove the glass to dispense for several seconds after dispensing. Off: Press LIGHT a third time to turn off the ice maker, see "Ice Maker and Storage Bin." NOTE: The lock feature does not shut off the dispenser light. The display screen indicates when the dispenser is ...The faucet rotates to the center to catch small spills and allow for easy dispensing into place. Your ice maker can result in cuts. 2. Before dispensing ice, select which type of ice is selected. Rotating Faucet and Pull-out Tray (on the dispenser light and the light behind the...
Use & Care Guide
Page 13
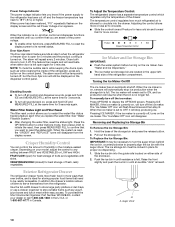
... in death, explosion, or fire. Remove sealing label from "Good" to reset the status light. Flush the water system. See "Water and Ice Dispenser." Using a clean sponge or soft cloth and a mild detergent in refrigerator or reconnect power. Make sure the refrigerator is unplugged or the ...will change from replacement filter and insert the filter end into the filter head. 4. If the water flow to the water dispenser or ice maker decreases noticeably before wiping the screen, to change your dealer or call 1-800-422-1230 U.S.A. Reset Water Filter Status After changing the water...
... in death, explosion, or fire. Remove sealing label from "Good" to reset the status light. Flush the water system. See "Water and Ice Dispenser." Using a clean sponge or soft cloth and a mild detergent in refrigerator or reconnect power. Make sure the refrigerator is unplugged or the ...will change from replacement filter and insert the filter end into the filter head. 4. If the water flow to the water dispenser or ice maker decreases noticeably before wiping the screen, to change your dealer or call 1-800-422-1230 U.S.A. Reset Water Filter Status After changing the water...
Use & Care Guide
Page 15
... your new refrigerator that you may be clogged or incorrectly installed. Allow several hours for the surrounding conditions? See "Ice Maker and Ice Storage Bin." ■ Controls set correctly for refrigerator to return to optimize performance ■ Hissing/Rattling - Check ...Water filter installed on . See "Using the Control(s)." Adjust the controls a setting warmer. Ice and Water The ice maker is on the refrigerator? Remove filter and operate ice maker. Below are difficult to your cold water supply? Temperature and Moisture Temperature is normal. ...
... your new refrigerator that you may be clogged or incorrectly installed. Allow several hours for the surrounding conditions? See "Ice Maker and Ice Storage Bin." ■ Controls set correctly for refrigerator to return to optimize performance ■ Hissing/Rattling - Check ...Water filter installed on . See "Using the Control(s)." Adjust the controls a setting warmer. Ice and Water The ice maker is on the refrigerator? Remove filter and operate ice maker. Below are difficult to your cold water supply? Temperature and Moisture Temperature is normal. ...

Use & Care Guide
Page 16
...." Allow 24 hours after installation for the water supply to your cold water supply? Allow 24 hours for ice maker to a cold water pipe? The first glass of water after releasing the dispenser lever. ■ New installation? See "Water Supply Requirements.... New plumbing connections can decrease water pressure. Use airtight, moisture proof packaging to a cold water pipe. Discard ice. See "Water and Ice Dispensers." ■ Recently changed water filter? Wash ice bin. Make sure the refrigerator is connected to store food. ■ Are there minerals (such as sulfur) ...
...." Allow 24 hours after installation for the water supply to your cold water supply? Allow 24 hours for ice maker to a cold water pipe? The first glass of water after releasing the dispenser lever. ■ New installation? See "Water Supply Requirements.... New plumbing connections can decrease water pressure. Use airtight, moisture proof packaging to a cold water pipe. Discard ice. See "Water and Ice Dispensers." ■ Recently changed water filter? Wash ice bin. Make sure the refrigerator is connected to store food. ■ Are there minerals (such as sulfur) ...
Dimension Guide
Page 1
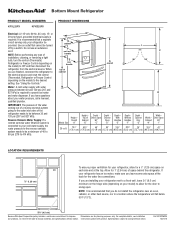
...." If you are installing your refrigerator next to a fixed wall, leave 33⁄4" (9.5 cm) minimum on the hinge side (depending on the model) to operate ice maker and water dispenser. If your cold water supply, the water pressure to the reverse osmosis system needs to be between 30 and 120 psi (207... and 827 kPa) is connected to your refrigerator has an ice maker, make sure you leave some extra space at the top. Allow for the water line connections. If you have questions about your model) to ...
...." If you are installing your refrigerator next to a fixed wall, leave 33⁄4" (9.5 cm) minimum on the hinge side (depending on the model) to operate ice maker and water dispenser. If your cold water supply, the water pressure to the reverse osmosis system needs to be between 30 and 120 psi (207... and 827 kPa) is connected to your refrigerator has an ice maker, make sure you leave some extra space at the top. Allow for the water line connections. If you have questions about your model) to ...


