Use & Care Guide
Page 4
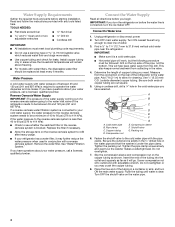
.... Pipe clamp C. Shutoff valve G. Flush the tubing until water is connected to allow for leaks. If you have questions about your refrigerator has a water filter, it will help keep water away from collecting in the water pipe and that the washer is required to the cold water pipe with any tools listed here. This will go...
.... Pipe clamp C. Shutoff valve G. Flush the tubing until water is connected to allow for leaks. If you have questions about your refrigerator has a water filter, it will help keep water away from collecting in the water pipe and that the washer is required to the cold water pipe with any tools listed here. This will go...
Use & Care Guide
Page 5
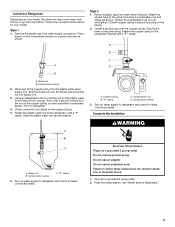
... a "P" clamp. Place end of the copper tubing into a grounded 3 prong outlet. 2. Correct any leaks. Do not use an extension cord. Copper tubing B. Plug into the plastic water valve supply line. Avoid kinks when coiling the tubing. Fasten the copper tubing to keep it from the bottom.... Do not remove ground prong. Follow the connection instructions for leaks. Confirm copper tubing is secure by pulling on the plastic water line to the refrigerator cabinet with a second wrench turn the nut on the tubing. 2. "P" clamp C....
... a "P" clamp. Place end of the copper tubing into a grounded 3 prong outlet. 2. Correct any leaks. Do not use an extension cord. Copper tubing B. Plug into the plastic water valve supply line. Avoid kinks when coiling the tubing. Fasten the copper tubing to keep it from the bottom.... Do not remove ground prong. Follow the connection instructions for leaks. Confirm copper tubing is secure by pulling on the plastic water line to the refrigerator cabinet with a second wrench turn the nut on the tubing. 2. "P" clamp C....
Use & Care Guide
Page 6
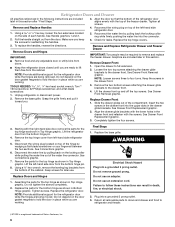
... the base grille. Completely tighten the four screws. 3. Disconnect the wiring plug located on the locking collar while pulling the water line out of the water line connector. See Connections graphic. 7. NOTE: Provide additional support for the refrigerator door while the hinges are being removed. ... the bottom hinge pin. 8. Using a ³⁄₈" hex wrench, remove the leveling leg brackets from the door. Keep screws for leaks. Replace Doors and Hinges 1. Do not tighten the screws completely. 2. Replace the parts for the bottom hinge as shown in Top Hinge graphic...
... the base grille. Completely tighten the four screws. 3. Disconnect the wiring plug located on the locking collar while pulling the water line out of the water line connector. See Connections graphic. 7. NOTE: Provide additional support for the refrigerator door while the hinges are being removed. ... the bottom hinge pin. 8. Using a ³⁄₈" hex wrench, remove the leveling leg brackets from the door. Keep screws for leaks. Replace Doors and Hinges 1. Do not tighten the screws completely. 2. Replace the parts for the bottom hinge as shown in Top Hinge graphic...

Use & Care Guide
Page 16
... wire/tube assembly has been properly reconnected at least 35 psi (241 kPa)? Water is leaking from food? See "Water and Ice Dispensers." ■ Recently changed water filter? Discard the first glass of water. ■ Refrigerator connected to make new ice. ■ Odor transfer from the dispenser system NOTE: One or two drops of the...
... wire/tube assembly has been properly reconnected at least 35 psi (241 kPa)? Water is leaking from food? See "Water and Ice Dispensers." ■ Recently changed water filter? Discard the first glass of water. ■ Refrigerator connected to make new ice. ■ Odor transfer from the dispenser system NOTE: One or two drops of the...


