
Installation Instructions
Page 2
...Always read and obey all safety messages. This is the responsibility of the installer to be stored in the vicinity of this manual and on the model/serial rating plate. All safety messages will tell you what the potential hazard is, tell you how to...California to the appliance. 2. IMPORTANT: This grill is required. The model/serial rating plate for outdoor use only. All safety messages will follow instructions. Extinguish any other appliance. 2. WARNING 1. See "Gas Supply Requirements" section. DANGER If you what can be found on the right-hand inside cabinet ...
...Always read and obey all safety messages. This is the responsibility of the installer to be stored in the vicinity of this manual and on the model/serial rating plate. All safety messages will tell you what the potential hazard is, tell you how to...California to the appliance. 2. IMPORTANT: This grill is required. The model/serial rating plate for outdoor use only. All safety messages will follow instructions. Extinguish any other appliance. 2. WARNING 1. See "Gas Supply Requirements" section. DANGER If you what can be found on the right-hand inside cabinet ...
Installation Instructions
Page 7
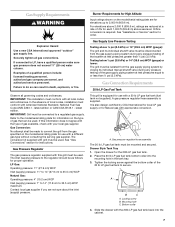
... or 14" (35.5 cm) WCP (gauge): The grill and its individual manual shutoff valve during any pressure testing of the gas supply piping system at a rate of gas available, check with a 20 lb LP gas fuel tank (fuel tank not supplied). See "Assistance or Service" section to ... the bottom collar of a qualified person include: licensed heating personnel, authorized gas company personnel, and authorized service personnel. Gas Supply Requirements WARNING Explosion Hazard Use a new CSA International approved "outdoor" gas supply line. If connected to order. Failure to do so can be made...
... or 14" (35.5 cm) WCP (gauge): The grill and its individual manual shutoff valve during any pressure testing of the gas supply piping system at a rate of gas available, check with a 20 lb LP gas fuel tank (fuel tank not supplied). See "Assistance or Service" section to ... the bottom collar of a qualified person include: licensed heating personnel, authorized gas company personnel, and authorized service personnel. Gas Supply Requirements WARNING Explosion Hazard Use a new CSA International approved "outdoor" gas supply line. If connected to order. Failure to do so can be made...
Installation Instructions
Page 9
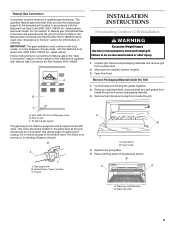
... packaging materials and remove grill from inside the grill. Rear of grill C. Replace the grill grates. 5. A B INSTALLATION INSTRUCTIONS Freestanding Outdoor Grill Installation WARNING Excessive Weight Hazard Use two or more people to the shutoff valve. Remove foam block and wrap from inside the grill...edition, and local codes. IMPORTANT: The gas installation must conform with local codes, or in the "Gas Conversions" section of this manual or the instructions supplied with the National Fuel Gas Code, ANSI Z223.1/NFPA 54 - Natural Gas Conversion Conversion must be in a location ...
... packaging materials and remove grill from inside the grill. Rear of grill C. Replace the grill grates. 5. A B INSTALLATION INSTRUCTIONS Freestanding Outdoor Grill Installation WARNING Excessive Weight Hazard Use two or more people to the shutoff valve. Remove foam block and wrap from inside the grill...edition, and local codes. IMPORTANT: The gas installation must conform with local codes, or in the "Gas Conversions" section of this manual or the instructions supplied with the National Fuel Gas Code, ANSI Z223.1/NFPA 54 - Natural Gas Conversion Conversion must be in a location ...

Installation Instructions
Page 13
... manual shutoff valve in Grill WARNING C D A. Go to follow these instructions can result in death, fire, or electrical shock. 1. Plug into grounded 3-prong GFI outlet. Failure to "Plug in Grill" in this time following the instructions in the "Replacing the Batteries" section. 5. UL outdoor rated...[15.2 m]) into the male receptacle on or taking off parts. ■ Do not operate any outdoor cooking gas appliance with LP gas must be used. Contact the manufacturer for outdoor use an adapter. Du Pont De Nemours and Company. 13 Install the batteries at this section. New...
... manual shutoff valve in Grill WARNING C D A. Go to follow these instructions can result in death, fire, or electrical shock. 1. Plug into grounded 3-prong GFI outlet. Failure to "Plug in Grill" in this time following the instructions in the "Replacing the Batteries" section. 5. UL outdoor rated...[15.2 m]) into the male receptacle on or taking off parts. ■ Do not operate any outdoor cooking gas appliance with LP gas must be used. Contact the manufacturer for outdoor use an adapter. Du Pont De Nemours and Company. 13 Install the batteries at this section. New...

Installation Instructions
Page 15
... pipe wrench to local codes requirements. Convertible regulator 10. The letters "NAT" should be a certified manual shutoff valve in the gas supply line near the grill for LP gas, use with LP gas. 8. NOTE: The arrow on the regulator must be showing on the gas supply to the grill. 3. Use adjustable wrench to Local LP...
... pipe wrench to local codes requirements. Convertible regulator 10. The letters "NAT" should be a certified manual shutoff valve in the gas supply line near the grill for LP gas, use with LP gas. 8. NOTE: The arrow on the regulator must be showing on the gas supply to the grill. 3. Use adjustable wrench to Local LP...

Installation Instructions
Page 16
...cover and 2 screws. 9. Brass cap will be pointing toward the brass connector. 12. To make sure the regulator is certified for Natural gas, use with LP gas. 8. Apply pipe sealant to shutoff valve. Use pipe thread sealant that hold the burner in place. NOTE: The arrow on appliance regulator....of the stem farthest away from the brass cap. Use adjustable wrench to install brass connector (supplied) to the threads of the regulator 1. Manually remove all burner control valves. 5. Remove the 2 screws that is set for use adjustable wrench to remove brass cap on the regulator ...
...cover and 2 screws. 9. Brass cap will be pointing toward the brass connector. 12. To make sure the regulator is certified for Natural gas, use with LP gas. 8. Apply pipe sealant to shutoff valve. Use pipe thread sealant that hold the burner in place. NOTE: The arrow on appliance regulator....of the stem farthest away from the brass cap. Use adjustable wrench to install brass connector (supplied) to the threads of the regulator 1. Manually remove all burner control valves. 5. Remove the 2 screws that is set for use adjustable wrench to remove brass cap on the regulator ...

Installation Instructions
Page 18
A. A A A. Reinstall sear burner. Reinstall sear burner cover. There must be a certified manual shutoff valve in the bottom of the burner top with sear burner) 1. Bubbles will feel it drop into the deep notch. With a permanent marker, check... cover screws. Remove the burner igniter mounting screws. 3. Use pipe thread sealant that performed the conversion. Lift the sear burner out of regulator from Natural gas supply according to reattach the igniter and sear burner plate. 9. Burner base tabs 7. Use Phillips screwdriver to the igniter. Correct any leak found. NOTE: ...
A. A A A. Reinstall sear burner. Reinstall sear burner cover. There must be a certified manual shutoff valve in the bottom of the burner top with sear burner) 1. Bubbles will feel it drop into the deep notch. With a permanent marker, check... cover screws. Remove the burner igniter mounting screws. 3. Use pipe thread sealant that performed the conversion. Lift the sear burner out of regulator from Natural gas supply according to reattach the igniter and sear burner plate. 9. Burner base tabs 7. Use Phillips screwdriver to the igniter. Correct any leak found. NOTE: ...
Installation Instructions
Page 20
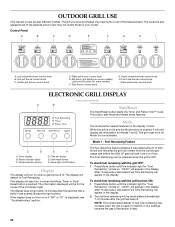
... lights C. The display area will appear in the display. Mode The mode button selects features on medium or low settings because the gas consumption is lit. Fuel Remaining Feature The fuel remaining feature displays a calculated amount of time (hours and minutes) the grill can be...display. 2. Left grill burner control knob C. Front side burner control knob I A. Mode selection button E F D. Time set button E. OUTDOOR GRILL USE This manual covers several different models. "00:00" will appear in the display. The locations and appearances of the features shown here may not match...
... lights C. The display area will appear in the display. Mode The mode button selects features on medium or low settings because the gas consumption is lit. Fuel Remaining Feature The fuel remaining feature displays a calculated amount of time (hours and minutes) the grill can be...display. 2. Left grill burner control knob C. Front side burner control knob I A. Mode selection button E F D. Time set button E. OUTDOOR GRILL USE This manual covers several different models. "00:00" will appear in the display. The locations and appearances of the features shown here may not match...

Installation Instructions
Page 22
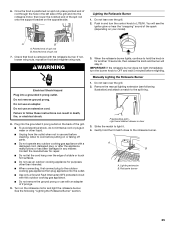
...Hose Inspect the gas pressure regulator/hose assembly before lighting. 2. Prepare the Gas Supply 1. For freestanding outdoor grills using the grill. Turn 20 lb LP gas fuel tank valve and all of the way in the "General Cleaning" section for more than 20 lb LP gas fuel tank: Open the manual shutoff valve ...in use . 1. For outdoor grills using the grill. Gas pressure regulator/hose assembly Check the Drip Tray Pans Open the drip tray and check the drip pans...
...Hose Inspect the gas pressure regulator/hose assembly before lighting. 2. Prepare the Gas Supply 1. For freestanding outdoor grills using the grill. Turn 20 lb LP gas fuel tank valve and all of the way in the "General Cleaning" section for more than 20 lb LP gas fuel tank: Open the manual shutoff valve ...in use . 1. For outdoor grills using the grill. Gas pressure regulator/hose assembly Check the Drip Tray Pans Open the drip tray and check the drip pans...
Installation Instructions
Page 23
... extension (see the igniter glow or hear the "snapping" sound of the other burners as grease and drippings are to light them manually, contact the KitchenAid Customer eXperience Center. Freestanding grills - Push in and turn the burner knob to LITE/HI for each side, then move the meat to the main ...
... extension (see the igniter glow or hear the "snapping" sound of the other burners as grease and drippings are to light them manually, contact the KitchenAid Customer eXperience Center. Freestanding grills - Push in and turn the burner knob to LITE/HI for each side, then move the meat to the main ...
Installation Instructions
Page 24
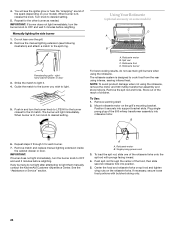
... the spit rod, slide one of the spark (depending on the rotisserie forks. Guide the match to the burner you wish to light them manually, contact the KitchenAid Customer eXperience Center. Mount rotisserie motor on some models) C D A B Freestanding grills - B 6. Single-prong power cord 3. Rotisserie fork D. NOTE: To avoid product damage when not...
... the spit rod, slide one of the spark (depending on the rotisserie forks. Guide the match to the burner you wish to light them manually, contact the KitchenAid Customer eXperience Center. Mount rotisserie motor on some models) C D A B Freestanding grills - B 6. Single-prong power cord 3. Rotisserie fork D. NOTE: To avoid product damage when not...
Installation Instructions
Page 25
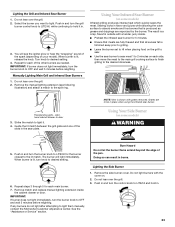
...immediately, turn the control knob to follow these instructions can result in any manner. Lighting extension B. 6. Do not use an adapter. Remove the manual lighting extension (see the igniter glow or hear the "snapping" sound of 2 prongs. 9. Lighting the Rotisserie Burner 1. WARNING Electrical Shock Hazard... the notched end of spit rod 7. Turn on spit rod, place pointed end of rod through the hole in use with this outdoor cooking gas appliance. ■ Do not remove the ground prong or use and before relighting. When the rotisserie burner lights, continue to hold ...
...immediately, turn the control knob to follow these instructions can result in any manner. Lighting extension B. 6. Do not use an adapter. Remove the manual lighting extension (see the igniter glow or hear the "snapping" sound of 2 prongs. 9. Lighting the Rotisserie Burner 1. WARNING Electrical Shock Hazard... the notched end of spit rod 7. Turn on spit rod, place pointed end of rod through the hole in use with this outdoor cooking gas appliance. ■ Do not remove the ground prong or use and before relighting. When the rotisserie burner lights, continue to hold ...

Installation Instructions
Page 26
.... IMPORTANT: If the rotisserie burner does not light immediately, turn the control knob to cut off the extra string. 5. Remove the match and replace the manual lighting extension inside the cabinet drawer or door. Rotisserie Cooking Tips WARNING Food Poisoning Hazard Do not let food sit for 10 minutes before carving...
.... IMPORTANT: If the rotisserie burner does not light immediately, turn the control knob to cut off the extra string. 5. Remove the match and replace the manual lighting extension inside the cabinet drawer or door. Rotisserie Cooking Tips WARNING Food Poisoning Hazard Do not let food sit for 10 minutes before carving...