User Guide
Page 5
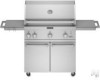
...Convertible regulator set for 11" WCP LP gas (attached to combustible construction for built-in and freestanding outdoor grills: ■ A minimum of the grill and any combustible construction. Select a location that provides minimum exposure to order. 5 Rotisserie (accessory)* If you equip your grill... nipple for connection to remove tiedowns) ■ Level ■ Noncorrosive leakdetection solution Parts Supplied ■ Gas pressure regulator/hose assembly set for the rotisserie motor. WARNING Fire Hazard Do not use grill near grill. Do not obstruct flow of the grill is...
...Convertible regulator set for 11" WCP LP gas (attached to combustible construction for built-in and freestanding outdoor grills: ■ A minimum of the grill and any combustible construction. Select a location that provides minimum exposure to order. 5 Rotisserie (accessory)* If you equip your grill... nipple for connection to remove tiedowns) ■ Level ■ Noncorrosive leakdetection solution Parts Supplied ■ Gas pressure regulator/hose assembly set for the rotisserie motor. WARNING Fire Hazard Do not use grill near grill. Do not obstruct flow of the grill is...
User Guide
Page 14
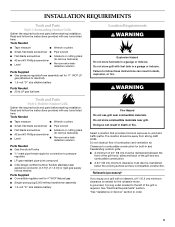
... CSA International approved "outdoor" gas supply line. Securely tighten all packaging material. Use pipejoint compound on brackets as shown. Make Gas Connection NOTE: If grill has been converted to LP gas, follow instructions in back to connect to the grill. In the absence of /recycle all gas connections. B A A A. Warming shelf 6. Style 2 - Remove rotisserie skewer (on some...
... CSA International approved "outdoor" gas supply line. Securely tighten all packaging material. Use pipejoint compound on brackets as shown. Make Gas Connection NOTE: If grill has been converted to LP gas, follow instructions in back to connect to the grill. In the absence of /recycle all gas connections. B A A A. Warming shelf 6. Style 2 - Remove rotisserie skewer (on some...
User Guide
Page 16
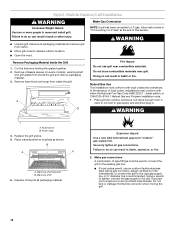
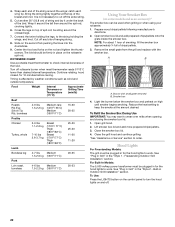
...20 lb LP gas fuel tank B. Wait a few minutes for gas to "Check and Adjust the Burners" section. Test all connections by dirt, debris, insect nests, etc. Bubbles will have cooled. Correct any leak found. 5. Go to move through 8 for most efficient operation. NOTE: The rotisserie burner cannot be...stem with no carbon or soot deposits appear. A B C A. Install the 20 lb LP gas fuel tank into the shaft. 6. Install battery at this time following the instructions in the "Outdoor Grill Use" section. 4. Check and Adjust the Burners The burners are tested and factory-set ...
...20 lb LP gas fuel tank B. Wait a few minutes for gas to "Check and Adjust the Burners" section. Test all connections by dirt, debris, insect nests, etc. Bubbles will have cooled. Correct any leak found. 5. Go to move through 8 for most efficient operation. NOTE: The rotisserie burner cannot be...stem with no carbon or soot deposits appear. A B C A. Install the 20 lb LP gas fuel tank into the shaft. 6. Install battery at this time following the instructions in the "Outdoor Grill Use" section. 4. Check and Adjust the Burners The burners are tested and factory-set ...
User Guide
Page 17
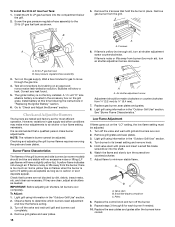
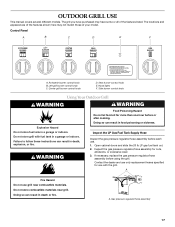
...with the grill. Failure to follow these instructions can result in death or fire. Doing so can result in food poisoning or sickness. Rotisserie burner control knob B. Sear burner control knob E. A Fire Hazard Do not use . 1. The locations and appearances of the features.... Do not store combustible materials near combustible materials. Open cabinet doors and slide the 20 lb LP gas fuel tank out. 2. Contact the dealer and use only replacement hoses specified for cuts, abrasions, or excessive wear. 3. OUTDOOR GRILL USE This manual covers several different models.
...with the grill. Failure to follow these instructions can result in death or fire. Doing so can result in food poisoning or sickness. Rotisserie burner control knob B. Sear burner control knob E. A Fire Hazard Do not use . 1. The locations and appearances of the features.... Do not store combustible materials near combustible materials. Open cabinet doors and slide the 20 lb LP gas fuel tank out. 2. Contact the dealer and use only replacement hoses specified for cuts, abrasions, or excessive wear. 3. OUTDOOR GRILL USE This manual covers several different models.

User Guide
Page 20
... To load the spit rod, slide one of the spit rod onto the support bracket on the opposite side. Center the food and rotisserie forks on spit rod and tighten wing nuts on spit rod, place pointed end of rod through the center of the food, then ... transformer into support bracket slots. Single-prong power cord 3. Do not use an extension cord. Remove spit rod and forks. To Use: 1. Rotisserie motor B. Using Your Rotisserie (Optional Accessory) A rotisserie kit can result in death, fire, or electrical shock. 8. Spit rod C. A B A. Push spit rod through the hole in the "...
... To load the spit rod, slide one of the spit rod onto the support bracket on the opposite side. Center the food and rotisserie forks on spit rod and tighten wing nuts on spit rod, place pointed end of rod through the center of the food, then ... transformer into support bracket slots. Single-prong power cord 3. Do not use an extension cord. Remove spit rod and forks. To Use: 1. Rotisserie motor B. Using Your Rotisserie (Optional Accessory) A rotisserie kit can result in death, fire, or electrical shock. 8. Spit rod C. A B A. Push spit rod through the hole in the "...

User Guide
Page 21
...center of butcher's string and center it under the food to OFF and wait 5 minutes before or after the knob is released. Lighting the Rotisserie Burner 1. Remove the match and replace the manual lighting extension inside the cabinet door. Doing so can be closed , but when using the...the knob in for searing the outside and sealing in front of the spark until the knob is released. 3. A B A. Tighten the screw to the rotisserie burner. You will hear the "snapping" sound of cooking to LITE/HI. Trussing Poultry for more than one of the spark. 5. Do not lean over...
...center of butcher's string and center it under the food to OFF and wait 5 minutes before or after the knob is released. Lighting the Rotisserie Burner 1. Remove the match and replace the manual lighting extension inside the cabinet door. Doing so can be closed , but when using the...the knob in for searing the outside and sealing in front of the spark until the knob is released. 3. A B A. Tighten the screw to the rotisserie burner. You will hear the "snapping" sound of cooking to LITE/HI. Trussing Poultry for more than one of the spark. 5. Do not lean over...
User Guide
Page 22
...188; full of the food. Hood Lights For Freestanding Models; Cross the legs on high until smoker begins smoking. Cut off rotisserie burner when meat thermometer reads 5°F/3°C lower than desired internal temperature. Turn off any bits of spit rod; Smoker box...Press the LIGHTS button on the control panel to work . A B A. ROTISSERIE CHART Use a portable meat thermometer to order. Open grill hood. 2. catch each end of the bird. See "Plug in Grill" in Outdoor Grill Installation" section. Close the grill hood and continue grilling. *See "...
...188; full of the food. Hood Lights For Freestanding Models; Cross the legs on high until smoker begins smoking. Cut off rotisserie burner when meat thermometer reads 5°F/3°C lower than desired internal temperature. Turn off any bits of spit rod; Smoker box...Press the LIGHTS button on the control panel to work . A B A. ROTISSERIE CHART Use a portable meat thermometer to order. Open grill hood. 2. catch each end of the bird. See "Plug in Grill" in Outdoor Grill Installation" section. Close the grill hood and continue grilling. *See "...

User Guide
Page 23
...may be necessary to cook the food. During Grilling ■ Turn foods only once. TIPS FOR OUTDOOR GRILLING WARNING Food Poisoning Hazard Do not let food sit for foods that seals natural juices in a...above lighted burners. Grill Size Burner Burner Burner 1 2 3 27" (68.6 cm) grill ON OFF - 36" (91.4 cm) grill ON OFF ON 23 If hood is no need to test doneness. Indirect Heat For...grill burners) 10 minutes. Cooking Methods For optimal use of time on high (use the back rotisserie burner for a short period of time. Hood position can result in the up or down ....
...may be necessary to cook the food. During Grilling ■ Turn foods only once. TIPS FOR OUTDOOR GRILLING WARNING Food Poisoning Hazard Do not let food sit for foods that seals natural juices in a...above lighted burners. Grill Size Burner Burner Burner 1 2 3 27" (68.6 cm) grill ON OFF - 36" (91.4 cm) grill ON OFF ON 23 If hood is no need to test doneness. Indirect Heat For...grill burners) 10 minutes. Cooking Methods For optimal use of time on high (use the back rotisserie burner for a short period of time. Hood position can result in the up or down ....
User Guide
Page 28
...abrasive cleaner. Do not spray cleaner directly onto panel. Cleaning Method: ■ Clean around knobs, do not use only factory specified parts. ROTISSERIE SPIT ROD AND FORKS Cleaning Method: ■ Wash with : ■ Features and specifications on our full line of an unnecessary service ...you can also look in the off position? These factory specified parts will operate ■ Is the main or regulator gas shutoff valve in your nearest KitchenAid designated service center. In the U.S.A. For further assistance If you need help us or your telephone directory Yellow Pages. ...
...abrasive cleaner. Do not spray cleaner directly onto panel. Cleaning Method: ■ Clean around knobs, do not use only factory specified parts. ROTISSERIE SPIT ROD AND FORKS Cleaning Method: ■ Wash with : ■ Features and specifications on our full line of an unnecessary service ...you can also look in the off position? These factory specified parts will operate ■ Is the main or regulator gas shutoff valve in your nearest KitchenAid designated service center. In the U.S.A. For further assistance If you need help us or your telephone directory Yellow Pages. ...
User Guide
Page 29
...Part Number 8212699 36" (91.4 cm): Order Part Number 8212700 48" (121.9 cm) [36" (91.4 cm) grill with side burner]: Order Part Number 8212701 Rotisserie Kits 27" Rotisserie Kit: Order Part Number KFKU271TSS 36" Rotisserie Kit: Order Part Number KFKU361TSS Smoker Box Order Part Number KBDU271TSS KitchenAid® Stainless Steel...In the second through fifth years from the date of purchase, when this outdoor product is operated and maintained according to instructions attached to or furnished with the product, KitchenAid brand of purchase when this limited warranty does not apply. For further ...
...Part Number 8212699 36" (91.4 cm): Order Part Number 8212700 48" (121.9 cm) [36" (91.4 cm) grill with side burner]: Order Part Number 8212701 Rotisserie Kits 27" Rotisserie Kit: Order Part Number KFKU271TSS 36" Rotisserie Kit: Order Part Number KFKU361TSS Smoker Box Order Part Number KBDU271TSS KitchenAid® Stainless Steel...In the second through fifth years from the date of purchase, when this outdoor product is operated and maintained according to instructions attached to or furnished with the product, KitchenAid brand of purchase when this limited warranty does not apply. For further ...