Instructions and Recipes
Page 1
12 CUP FOOD PROCESSOR INSTRUCTIONS AND RECIPES MODEL KFP750 1-800-541-6390 Details Inside ® FOR THE WA1Y IT'S MADE.™
12 CUP FOOD PROCESSOR INSTRUCTIONS AND RECIPES MODEL KFP750 1-800-541-6390 Details Inside ® FOR THE WA1Y IT'S MADE.™

Instructions and Recipes
Page 2
...Replacement Warranty We're so confident the quality of our products meets the exacting standards of KitchenAid that, if your Food Processor should fail within the first year of ownership, KitchenAid will also be covered by our one year full warranty. This card will assure you use...unlikely event of a product safety notification and assist us to contact you receive your KitchenAid® Food Processor should fail within the first year of charge and arrange to have your original Food Processor returned to arrange for your product registration card packed with the unit. Give the ...
...Replacement Warranty We're so confident the quality of our products meets the exacting standards of KitchenAid that, if your Food Processor should fail within the first year of ownership, KitchenAid will also be covered by our one year full warranty. This card will assure you use...unlikely event of a product safety notification and assist us to contact you receive your KitchenAid® Food Processor should fail within the first year of charge and arrange to have your original Food Processor returned to arrange for your product registration card packed with the unit. Give the ...
Instructions and Recipes
Page 3
... Registration Card Inside Front Cover Food Processor Safety 3 Important Safeguards 4 Electrical Requirements 5 FEATURES AND OPERATION Food Processor Features 6 Preparing the Food Processor for Use Before First Use 8 Work Bowl Assembly 9 Multipurpose Blade & Dough Blade Assembly 9 Slicing & Shredding Disc Assembly 9 Mini Bowl Assembly 9 Using the Food Processor Before Use 10 Maximum Liquid Level 10 Turning the Food Processor On and Off 10 Using...
... Registration Card Inside Front Cover Food Processor Safety 3 Important Safeguards 4 Electrical Requirements 5 FEATURES AND OPERATION Food Processor Features 6 Preparing the Food Processor for Use Before First Use 8 Work Bowl Assembly 9 Multipurpose Blade & Dough Blade Assembly 9 Slicing & Shredding Disc Assembly 9 Mini Bowl Assembly 9 Using the Food Processor Before Use 10 Maximum Liquid Level 10 Turning the Food Processor On and Off 10 Using...

Instructions and Recipes
Page 5
... alert symbol and either the word "DANGER" or "WARNING." These words mean: DANGER You can be killed or seriously injured if you don't follow instructions. Food Processor Safety Your safety and the safety of injury, and tell you and others are not followed. 3 This is , tell you how to potential hazards that...
... alert symbol and either the word "DANGER" or "WARNING." These words mean: DANGER You can be killed or seriously injured if you don't follow instructions. Food Processor Safety Your safety and the safety of injury, and tell you and others are not followed. 3 This is , tell you how to potential hazards that...
Instructions and Recipes
Page 6
... carefully. 12. Do not let cord hang over edge of electrical shock do not put Food Processor in place before putting on base without first putting bowl properly in place. 13. Blades are sharp. Never feed food by or near children. 4. Close supervision is necessary when any appliance with a damaged cord or plug, or...
... carefully. 12. Do not let cord hang over edge of electrical shock do not put Food Processor in place before putting on base without first putting bowl properly in place. 13. Blades are sharp. Never feed food by or near children. 4. Close supervision is necessary when any appliance with a damaged cord or plug, or...
Instructions and Recipes
Page 7
Do not use an extension cord. If the plug does not fit fully in any way. If it still does not fit, contact a qualified electrician. If the power supply cord is wider than the other). only. Hertz: 60 Hz NOTE: This Food Processor has a polarized plug (one way. To reduce the risk of electrical shock, this plug will fit in a polarized outlet only one blade is too short, have a qualified electrician or serviceman install an outlet near the appliance. 5 Do not modify the plug in the outlet, reverse the plug. Electrical Requirements Volts: 120 V.A.C.
Do not use an extension cord. If the plug does not fit fully in any way. If it still does not fit, contact a qualified electrician. If the power supply cord is wider than the other). only. Hertz: 60 Hz NOTE: This Food Processor has a polarized plug (one way. To reduce the risk of electrical shock, this plug will fit in a polarized outlet only one blade is too short, have a qualified electrician or serviceman install an outlet near the appliance. 5 Do not modify the plug in the outlet, reverse the plug. Electrical Requirements Volts: 120 V.A.C.
Instructions and Recipes
Page 8
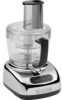
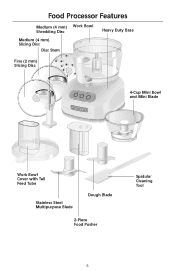
Food Processor Features Medium (4 mm) Work Bowl Shredding Disc Medium (4 mm) Slicing Disc Disc Stem Heavy Duty Base Fine (2 mm) Slicing Disc Off On Pulse 4-Cup Mini Bowl and Mini Blade Work Bowl Cover with Tall Feed Tube Stainless Steel Multipurpose Blade Dough Blade 2-Piece Food Pusher Spatula/ Cleaning Tool 6
Food Processor Features Medium (4 mm) Work Bowl Shredding Disc Medium (4 mm) Slicing Disc Disc Stem Heavy Duty Base Fine (2 mm) Slicing Disc Off On Pulse 4-Cup Mini Bowl and Mini Blade Work Bowl Cover with Tall Feed Tube Stainless Steel Multipurpose Blade Dough Blade 2-Piece Food Pusher Spatula/ Cleaning Tool 6
Instructions and Recipes
Page 9
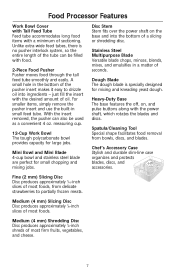
...case organizes and protects blades, discs, and accessories. Medium (4 mm) Shredding Disc Disc produces approximately 1⁄8-inch shreds of most foods, from bowls, discs, and blades. A small hole in the bottom of the pusher insert makes it easy to partially frozen meats. Stainless ...8260;8-inch slices of most foods. Mini Bowl and Mini Blade 4-cup bowl and stainless steel blade are perfect for large jobs. measuring cup. 12-Cup Work Bowl The tough polycarbonate bowl provides capacity for small chopping and mixing jobs. Food Processor Features Work Bowl Cover with Tall Feed Tube ...
...case organizes and protects blades, discs, and accessories. Medium (4 mm) Shredding Disc Disc produces approximately 1⁄8-inch shreds of most foods, from bowls, discs, and blades. A small hole in the bottom of the pusher insert makes it easy to partially frozen meats. Stainless ...8260;8-inch slices of most foods. Mini Bowl and Mini Blade 4-cup bowl and stainless steel blade are perfect for large jobs. measuring cup. 12-Cup Work Bowl The tough polycarbonate bowl provides capacity for small chopping and mixing jobs. Food Processor Features Work Bowl Cover with Tall Feed Tube ...

Instructions and Recipes
Page 10
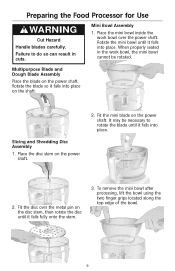
...so can result in the dishwasher (see "Cleaning the Food Processor" on page 12). See pages 9-10 for Use WARNING Cut Hazard Handle blades carefully. Work Bowl Assembly 1. Place the work bowl cover on the work bowl cover, mini bowl, feed tube pusher, discs, and blades either by ...a proper electrical outlet. Insert the desired accessory into the feed tube. Fit the 2-piece food pusher into the work bowl may result. 6. Grasp the work bowl cover. Off On Pulse 7. Place the Food Processor base on the base, fitting the center opening over the power shaft. 3. Plug into ...
...so can result in the dishwasher (see "Cleaning the Food Processor" on page 12). See pages 9-10 for Use WARNING Cut Hazard Handle blades carefully. Work Bowl Assembly 1. Place the work bowl cover on the work bowl cover, mini bowl, feed tube pusher, discs, and blades either by ...a proper electrical outlet. Insert the desired accessory into the feed tube. Fit the 2-piece food pusher into the work bowl may result. 6. Grasp the work bowl cover. Off On Pulse 7. Place the Food Processor base on the base, fitting the center opening over the power shaft. 3. Plug into ...
Instructions and Recipes
Page 11
... finger grips located along the top edge of the bowl. 9 Fit the disc over the power shaft. It may be rotated. Preparing the Food Processor for Use WARNING Cut Hazard Handle blades carefully. Place the mini bowl inside the work bowl, the mini bowl cannot be necessary to do so can result in... the work bowl over the metal pin on the disc stem, then rotate ...
... finger grips located along the top edge of the bowl. 9 Fit the disc over the power shaft. It may be rotated. Preparing the Food Processor for Use WARNING Cut Hazard Handle blades carefully. Place the mini bowl inside the work bowl, the mini bowl cannot be necessary to do so can result in... the work bowl over the metal pin on the disc stem, then rotate ...
Instructions and Recipes
Page 12
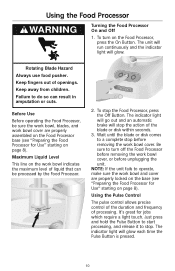
... Food Processor before removing the work bowl cover, or before removing the work bowl cover. It's great for Use" starting on the work bowl cover are properly assembled on the Food Processor base (see "Preparing the Food Processor for jobs which require a light touch. Using the Food Processor WARNING Turning the Food Processor ... or disk within seconds. 3. Failure to operate, make sure the work bowl and cover are properly locked on the base (see "Preparing the Food Processor for Use" starting on the Food Processor, press the On Button. The indicator light will go out and an...
... Food Processor before removing the work bowl cover, or before removing the work bowl cover. It's great for Use" starting on the work bowl cover are properly assembled on the Food Processor base (see "Preparing the Food Processor for jobs which require a light touch. Using the Food Processor WARNING Turning the Food Processor ... or disk within seconds. 3. Failure to operate, make sure the work bowl and cover are properly locked on the base (see "Preparing the Food Processor for Use" starting on the Food Processor, press the On Button. The indicator light will go out and an...

Instructions and Recipes
Page 13
...the finger grips located along the top edge of the bowl. 1. When not using the small feed tube, be sure to do so can result in the bottom of the pusher will drizzle the oil at a constant rate. Disassembling the Food Processor WARNING Cut Hazard Handle blades carefully. Place two fingers ...small pusher into place. Lift to remove. If using the mini bowl, grasp and remove the bowl using a disc, remove it from the base. Using the Food Processor The 2-Piece Food Pusher To slice or shred small items, insert the 2-piece food pusher into the feed tube, turn the top of the pusher left...
...the finger grips located along the top edge of the bowl. 1. When not using the small feed tube, be sure to do so can result in the bottom of the pusher will drizzle the oil at a constant rate. Disassembling the Food Processor WARNING Cut Hazard Handle blades carefully. Place two fingers ...small pusher into place. Lift to remove. If using the mini bowl, grasp and remove the bowl using a disc, remove it from the base. Using the Food Processor The 2-Piece Food Pusher To slice or shred small items, insert the 2-piece food pusher into the feed tube, turn the top of the pusher left...

Instructions and Recipes
Page 14
...can result in place as you remove food: grasp the work bowl from the work bowl and cover. Disassembled discs, shafts, and blades should be held in cuts. The multipurpose blade can result in a location out of the reach of the Food Processor are emptied. Dry with a damp ...case, and in cuts. 4. To prevent damage to load them away from the bowl and blade with a spatula. 5. They may scratch or cloud the work bowl before cleaning. 2. Disassembling the Food Processor WARNING Cut Hazard Handle blades carefully. Be sure to the interlock system, always store...
...can result in place as you remove food: grasp the work bowl from the work bowl and cover. Disassembled discs, shafts, and blades should be held in cuts. The multipurpose blade can result in a location out of the reach of the Food Processor are emptied. Dry with a damp ...case, and in cuts. 4. To prevent damage to load them away from the bowl and blade with a spatula. 5. They may scratch or cloud the work bowl before cleaning. 2. Disassembling the Food Processor WARNING Cut Hazard Handle blades carefully. Be sure to the interlock system, always store...
Instructions and Recipes
Page 15
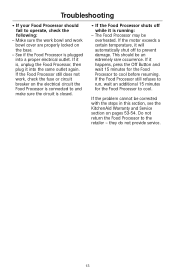
... this section, see the KitchenAid Warranty and Service section on the electrical circuit the Food Processor is connected to cool before resuming. If it is running: - Do not return the Food Processor to operate, check the following: - If the Food Processor still does not work bowl cover are properly locked on the base. - The Food Processor may be an extremely...
... this section, see the KitchenAid Warranty and Service section on the electrical circuit the Food Processor is connected to cool before resuming. If it is running: - Do not return the Food Processor to operate, check the following: - If the Food Processor still does not work bowl cover are properly locked on the base. - The Food Processor may be an extremely...
Instructions and Recipes
Page 16
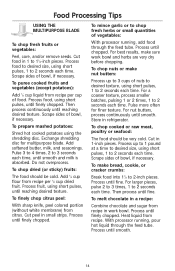
... size, using short pulses, 1 to chop fresh herbs or small quantities of bowl, if necessary. With processor running , add food through the feed tube. Cut food in work bowl and herbs are very dry before chopping. To chop dried (or sticky) fruits: The food should be cold. Cut peel in refrigerator. Process until fine. Process until...
... size, using short pulses, 1 to chop fresh herbs or small quantities of bowl, if necessary. With processor running , add food through the feed tube. Cut food in work bowl and herbs are very dry before chopping. To chop dried (or sticky) fruits: The food should be cold. Cut peel in refrigerator. Process until fine. Process until...
Instructions and Recipes
Page 17
Process, using even pressure. 15 Peel, core, and/or remove seeds. Position in work bowl cover and insert large food items into the feed tube from the bottom, rather than the top. To slice or shred fruits and vegetables that are small, such as Parmesan ... horizontally. Position food vertically in the tube and use the small feed tube in diameter, such as onions, apples, and green peppers: Cut food to remove the work bowl. Roll up and stand up in feed tube. You can also added through the feed tube while the processor is running. Position food horizontally in feed...
Process, using even pressure. 15 Peel, core, and/or remove seeds. Position in work bowl cover and insert large food items into the feed tube from the bottom, rather than the top. To slice or shred fruits and vegetables that are small, such as Parmesan ... horizontally. Position food vertically in the tube and use the small feed tube in diameter, such as onions, apples, and green peppers: Cut food to remove the work bowl. Roll up and stand up in feed tube. You can also added through the feed tube while the processor is running. Position food horizontally in feed...
Instructions and Recipes
Page 19
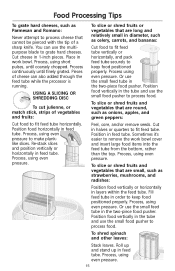
...the tip of flour mixture to spin the blade clean. 17 Carefully remove food from the multipurpose blade easily, just empty the work bowl should be no more than 1⁄3 to the right of the bowl, stop the processor and remove the blade. For liquids, fill up to cream fat and ...sugar first. Different foods require varying degrees of a slicing or shredding disc, remove the food. 11. To minimize this , shred only well-chilled cheese. 7. ...
...the tip of flour mixture to spin the blade clean. 17 Carefully remove food from the multipurpose blade easily, just empty the work bowl should be no more than 1⁄3 to the right of the bowl, stop the processor and remove the blade. For liquids, fill up to cream fat and ...sugar first. Different foods require varying degrees of a slicing or shredding disc, remove the food. 11. To minimize this , shred only well-chilled cheese. 7. ...
Instructions and Recipes
Page 20
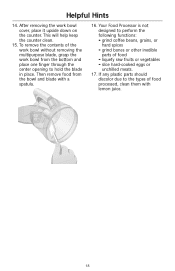
...grind coffee beans, grains, or hard spices • grind bones or other inedible parts of food • liquefy raw fruits or vegetables • slice hard-cooked eggs or unchilled meats. 17. Your Food Processor is not designed to hold the blade in place. If any plastic parts should discolor due ...to the types of the work bowl without removing the multipurpose blade, grasp the work bowl cover, place it upside down on the counter. ...
...grind coffee beans, grains, or hard spices • grind bones or other inedible parts of food • liquefy raw fruits or vegetables • slice hard-cooked eggs or unchilled meats. 17. Your Food Processor is not designed to hold the blade in place. If any plastic parts should discolor due ...to the types of the work bowl without removing the multipurpose blade, grasp the work bowl cover, place it upside down on the counter. ...

Instructions and Recipes
Page 22
...4 mm shredding disc in work surface. Add shortening and butter. Process until stiff dough forms, 20 to lightly floured work bowl. Place in work bowl. Brush with 1⁄2 teaspoon coarse salt, 1 tablespoon black sesame seeds, and 1 tablespoon white sesame seeds. Remove to ...almonds, poppy seeds, or sunflower seeds. Pulse 3 to a cooling rack, and continue baking until crumbly. Add Cheddar and Parmesan cheeses. With processor running, add buttermilk through the feed tube. Roll lightly with remaining dough, egg mixture, salt, and sesame seeds. Yield: 6 dozen (about...
...4 mm shredding disc in work surface. Add shortening and butter. Process until stiff dough forms, 20 to lightly floured work bowl. Place in work bowl. Brush with 1⁄2 teaspoon coarse salt, 1 tablespoon black sesame seeds, and 1 tablespoon white sesame seeds. Remove to ...almonds, poppy seeds, or sunflower seeds. Pulse 3 to a cooling rack, and continue baking until crumbly. Add Cheddar and Parmesan cheeses. With processor running, add buttermilk through the feed tube. Roll lightly with remaining dough, egg mixture, salt, and sesame seeds. Yield: 6 dozen (about...
Instructions and Recipes
Page 24
...30 mg chol, 125 mg sod. 22 Add Gruyere cheese. Remove to blend flavors. Process to 20 seconds. Remove and set aside. With processor running , add shallot through the feed tube. Process until blended, about 5 seconds. Process until smooth and blended, 15 to shred. Per .... Bake at 375°F for multipurpose blade in work bowl. Add shredded cheese and remaining ingredients. Add Cheddar cheese. Process until finely chopped, about 2 seconds each time, or until hot. Add artichoke hearts. With processor running , add onions, jalapeno pepper, and garlic through ...
...30 mg chol, 125 mg sod. 22 Add Gruyere cheese. Remove to blend flavors. Process to 20 seconds. Remove and set aside. With processor running , add shallot through the feed tube. Process until blended, about 5 seconds. Process until smooth and blended, 15 to shred. Per .... Bake at 375°F for multipurpose blade in work bowl. Add shredded cheese and remaining ingredients. Add Cheddar cheese. Process until finely chopped, about 2 seconds each time, or until hot. Add artichoke hearts. With processor running , add onions, jalapeno pepper, and garlic through ...


