

Use & Care Guide
Page 2
... how to arrange for your personal records: Model Number Serial Number Date Purchased Store Name This card will enable us to contact you receive your replacement Food Processor, use your Food Processor, please fill out and mail your original Food Processor. Please follow these instructions to 8 p.m. (Eastern Time), or Saturday, 10 a.m. to us in -warranty service. This card does not verify your name and...
... how to arrange for your personal records: Model Number Serial Number Date Purchased Store Name This card will enable us to contact you receive your replacement Food Processor, use your Food Processor, please fill out and mail your original Food Processor. Please follow these instructions to 8 p.m. (Eastern Time), or Saturday, 10 a.m. to us in -warranty service. This card does not verify your name and...
Use & Care Guide
Page 3
... Front Cover Food Processor Safety 3 Important Safeguards 4 Electrical Requirements 5 FEATURES AND OPERATION Food Processor Features 6 Preparing the Food Processor for Use Before First Use 8 Work Bowl Assembly 8 Multipurpose Blade Assembly 9 Reversible Slicing/Shredding Disc Assembly 9 Mini Bowl and Mini Blade Assembly 10 Citrus Press Assembly 10 Using the Food Processor Before Use 12 Maximum Liquid Level 12 Turning the Food Processor On and Off 12 Using the Pulse Control 12 Disassembling the Food Processor 13 CARE AND CLEANING Cleaning the Food Processor 14 Troubleshooting 15...
... Front Cover Food Processor Safety 3 Important Safeguards 4 Electrical Requirements 5 FEATURES AND OPERATION Food Processor Features 6 Preparing the Food Processor for Use Before First Use 8 Work Bowl Assembly 8 Multipurpose Blade Assembly 9 Reversible Slicing/Shredding Disc Assembly 9 Mini Bowl and Mini Blade Assembly 10 Citrus Press Assembly 10 Using the Food Processor Before Use 12 Maximum Liquid Level 12 Turning the Food Processor On and Off 12 Using the Pulse Control 12 Disassembling the Food Processor 13 CARE AND CLEANING Cleaning the Food Processor 14 Troubleshooting 15...
Use & Care Guide
Page 6
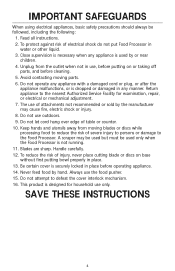
... of table or counter. 10. Handle carefully. 12. Return appliance to defeat the cover interlock mechanism. 16. Blades are sharp. SAVE THESE INSTRUCTIONS 4 IMPORTANT SAFEGUARDS When using electrical appliances, basic safety precautions should always be used only when the Food Processor is not running. 11. Unplug from moving parts. 6. Be certain cover is securely locked in place before cleaning. 5. Do not attempt to...
... of table or counter. 10. Handle carefully. 12. Return appliance to defeat the cover interlock mechanism. 16. Blades are sharp. SAVE THESE INSTRUCTIONS 4 IMPORTANT SAFEGUARDS When using electrical appliances, basic safety precautions should always be used only when the Food Processor is not running. 11. Unplug from moving parts. 6. Be certain cover is securely locked in place before cleaning. 5. Do not attempt to...
Use & Care Guide
Page 8
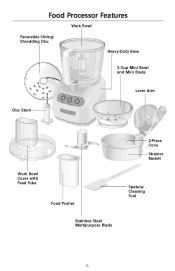
Food Processor Features Work Bowl Reversible Slicing/ Shredding Disc Heavy-Duty Base 3-Cup Mini Bowl and Mini Blade Disc Stem Off On Pulse Lever Arm Work Bowl Cover with Feed Tube Food Pusher Stainless Steel Multipurpose Blade 2-Piece Cone Strainer Basket Spatula/ Cleaning Tool 6
Food Processor Features Work Bowl Reversible Slicing/ Shredding Disc Heavy-Duty Base 3-Cup Mini Bowl and Mini Blade Disc Stem Off On Pulse Lever Arm Work Bowl Cover with Feed Tube Food Pusher Stainless Steel Multipurpose Blade 2-Piece Cone Strainer Basket Spatula/ Cleaning Tool 6
Use & Care Guide
Page 9
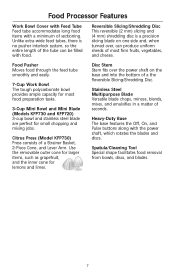
...-wide feed tubes, there is a precision slicing blade on one side and, when turned over the power shaft on the base and into the bottom of a the Reversible Slicing/Shredding Disc. Citrus Press (Model KFP730) Press consists of sectioning. Disc Stem Stem fits over , can be filled with food. Food Processor Features Work Bowl Cover with Feed Tube Feed tube accommodates long food items with a minimum of a Strainer Basket, 2-Piece Cone, and Lever Arm. Stainless Steel Multipurpose Blade Versatile blade chops...
...-wide feed tubes, there is a precision slicing blade on one side and, when turned over the power shaft on the base and into the bottom of a the Reversible Slicing/Shredding Disc. Citrus Press (Model KFP730) Press consists of sectioning. Disc Stem Stem fits over , can be filled with food. Food Processor Features Work Bowl Cover with Feed Tube Feed tube accommodates long food items with a minimum of a Strainer Basket, 2-Piece Cone, and Lever Arm. Stainless Steel Multipurpose Blade Versatile blade chops...

Use & Care Guide
Page 10
Place the Food Processor base on page 14). With the handle just to the right until it is locked on the base, and fit the center opening over the power shaft. 3. Grasp the work bowl handle and turn the cover to the left of center, place the work bowl cover, mini bowl, feed tube pusher, discs, and blades either by hand or in cuts. Place the work bowl cover on the work bowl. Insert the desired blade or disc into position. 4. Do...
Place the Food Processor base on page 14). With the handle just to the right until it is locked on the base, and fit the center opening over the power shaft. 3. Grasp the work bowl handle and turn the cover to the left of center, place the work bowl cover, mini bowl, feed tube pusher, discs, and blades either by hand or in cuts. Place the work bowl cover on the work bowl. Insert the desired blade or disc into position. 4. Do...
Use & Care Guide
Page 11
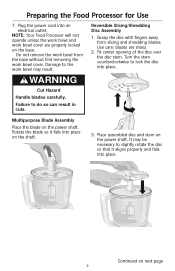
.... Reversible Slicing/Shredding Disc Assembly 1. Use care; WARNING Cut Hazard Handle blades carefully. Place assembled disc and stem on the power shaft. Rotate the blade so it aligns properly and falls into place. Failure to the work bowl may be necessary to lock the disc into place. Multipurpose Blade Assembly Place the blade on the power shaft. Preparing the Food Processor for Use 7. Plug the power cord into place on the shaft. 3. NOTE: Your Food Processor will not operate unless the work bowl and work bowl cover...
.... Reversible Slicing/Shredding Disc Assembly 1. Use care; WARNING Cut Hazard Handle blades carefully. Place assembled disc and stem on the power shaft. Rotate the blade so it aligns properly and falls into place. Failure to the work bowl may be necessary to lock the disc into place. Multipurpose Blade Assembly Place the blade on the power shaft. Preparing the Food Processor for Use 7. Plug the power cord into place on the shaft. 3. NOTE: Your Food Processor will not operate unless the work bowl and work bowl cover...

Use & Care Guide
Page 12
... into the handle. 2. Mini Bowl and Mini Blade Assembly 1. Rotate the mini bowl until the clip locks into place. Preparing the Food Processor for grapefruit, oranges and other large fruits. Citrus Press Assembly and Use 1. It may be necessary to reveal a smaller, inner cone that's perfect for lemons and limes. 10 Failure to the left of the bowl. Place the mini bowl inside the work bowl on the power shaft. Place...
... into the handle. 2. Mini Bowl and Mini Blade Assembly 1. Rotate the mini bowl until the clip locks into place. Preparing the Food Processor for grapefruit, oranges and other large fruits. Citrus Press Assembly and Use 1. It may be necessary to reveal a smaller, inner cone that's perfect for lemons and limes. 10 Failure to the left of the bowl. Place the mini bowl inside the work bowl on the power shaft. Place...

Use & Care Guide
Page 13
... lever arm down position, holding the fruit on lever arm from the strainer basket for Use 5. Operate the citrus press by turning it without the clip-on the cone. 8. Remove the work bowl. 12. Operate the citrus press only when the lever arm is fully extracted, press the Off button.... the lever arm to rotate the cone until it falls into desired container. 13. NOTE: Use of the strainer basket. Preparing the Food Processor for cleaning, pull the clip at the bottom of the basket. Open the lid and place the cone inside the strainer basket, over the power shaft.
... lever arm down position, holding the fruit on lever arm from the strainer basket for Use 5. Operate the citrus press by turning it without the clip-on the cone. 8. Remove the work bowl. 12. Operate the citrus press only when the lever arm is fully extracted, press the Off button.... the lever arm to rotate the cone until it falls into desired container. 13. NOTE: Use of the strainer basket. Preparing the Food Processor for cleaning, pull the clip at the bottom of the basket. Open the lid and place the cone inside the strainer basket, over the power shaft.

Use & Care Guide
Page 14
... so can be sure the work bowl, blades, and work bowl and cover are properly locked on the base (see "Preparing the Food Processor for jobs that can result in amputation or cuts. Before Use Before operating the Food Processor, be processed by the Food Processor. Using the Food Processor WARNING Turning the Food Processor On and Off 1. The indicator light will go out and an automatic brake will stop before removing the work bowl cover, or before removing the work bowl cover.
... so can be sure the work bowl, blades, and work bowl and cover are properly locked on the base (see "Preparing the Food Processor for jobs that can result in amputation or cuts. Before Use Before operating the Food Processor, be processed by the Food Processor. Using the Food Processor WARNING Turning the Food Processor On and Off 1. The indicator light will go out and an automatic brake will stop before removing the work bowl cover, or before removing the work bowl cover.
Use & Care Guide
Page 15
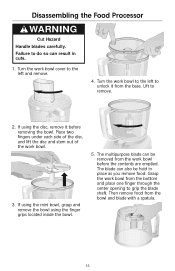
... the blade shaft. Disassembling the Food Processor WARNING Cut Hazard Handle blades carefully. The blade can also be removed from the base. Lift to the left and remove. 4. The multipurpose blade can result in place as you remove food: Grasp the work bowl from the bowl and blade with a spatula. 13 Failure to unlock it before the contents are emptied. Turn the work bowl before removing the bowl. If using the mini bowl, grasp and remove the bowl using the disc, remove...
... the blade shaft. Disassembling the Food Processor WARNING Cut Hazard Handle blades carefully. The blade can also be removed from the base. Lift to the left and remove. 4. The multipurpose blade can result in place as you remove food: Grasp the work bowl from the bowl and blade with a spatula. 13 Failure to unlock it before the contents are emptied. Turn the work bowl before removing the bowl. If using the mini bowl, grasp and remove the bowl using the disc, remove...
Use & Care Guide
Page 18
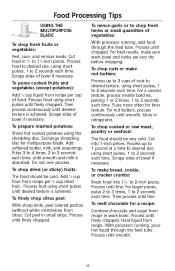
... liquid through the feed tube. Heat liquid from citrus. Process until fine. To chop nuts or make sure work bowl. Store in 1- Cut into 11⁄2- With processor running , add food through the feed tube. Add 1⁄4 cup flour from recipe per 1⁄2 cup dried fruit. To mince garlic or to 2 seconds each time. to 11⁄2-inch pieces. Food Processing Tips USING THE MULTIPURPOSE BLADE To chop fresh fruits...
... liquid through the feed tube. Heat liquid from citrus. Process until fine. To chop nuts or make sure work bowl. Store in 1- Cut into 11⁄2- With processor running , add food through the feed tube. Add 1⁄4 cup flour from recipe per 1⁄2 cup dried fruit. To mince garlic or to 2 seconds each time. to 11⁄2-inch pieces. Food Processing Tips USING THE MULTIPURPOSE BLADE To chop fresh fruits...
Use & Care Guide
Page 20
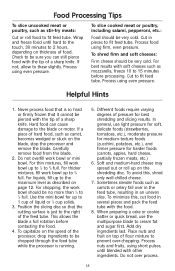
..., use light pressure for soft, delicate foods (strawberries, tomatoes, etc.), moderate pressure for medium-texture foods (zucchini, potatoes, etc.), and firmer pressure for best shredding and slicing results. Process nuts and fruits, using even pressure. Cut to cream fat and sugar first. In general, use the multipurpose blade to fit feed tube. Cut in pieces to prevent over-chopping. Carefully remove food from the blade. 2. Do not overfill work bowl...
..., use light pressure for soft, delicate foods (strawberries, tomatoes, etc.), moderate pressure for medium-texture foods (zucchini, potatoes, etc.), and firmer pressure for best shredding and slicing results. Process nuts and fruits, using even pressure. Cut to cream fat and sugar first. In general, use the multipurpose blade to fit feed tube. Cut in pieces to prevent over-chopping. Carefully remove food from the blade. 2. Do not overfill work bowl...
Use & Care Guide
Page 21
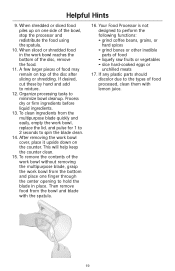
...-cooked eggs or unchilled meats 17. This will help keep the counter clean. 15. After removing the work bowl, replace the lid, and pulse for 1 to 2 seconds to hold the blade in the work bowl from the bottom and place one side of the bowl, stop the processor and redistribute the food using the spatula. 10. Then remove food from the multipurpose blade quickly and easily, empty the work bowl cover...
...-cooked eggs or unchilled meats 17. This will help keep the counter clean. 15. After removing the work bowl, replace the lid, and pulse for 1 to 2 seconds to hold the blade in the work bowl from the bottom and place one side of the bowl, stop the processor and redistribute the food using the spatula. 10. Then remove food from the multipurpose blade quickly and easily, empty the work bowl cover...

Use & Care Guide
Page 24
... Position reversible slicing/shredding disc in Dutch oven or large saucepan over cabbage. Melt butter in work bowl to 15 minutes, until smooth and thick. Spoon into 6 individual oven-proof soup bowls. Set aside. Add broth, sherry, and Worcestershire sauce. Add cabbage and onion, cutting to 3 minutes, until cheese is melted and bubbly. In mini work bowl and mini blade for 2 to fit feed tube if...
... Position reversible slicing/shredding disc in Dutch oven or large saucepan over cabbage. Melt butter in work bowl to 15 minutes, until smooth and thick. Spoon into 6 individual oven-proof soup bowls. Set aside. Add broth, sherry, and Worcestershire sauce. Add cabbage and onion, cutting to 3 minutes, until cheese is melted and bubbly. In mini work bowl and mini blade for 2 to fit feed tube if...
Use & Care Guide
Page 25
...stirring occasionally. Cook 2 to shred. Exchange multipurpose blade for reversible slicing/shredding disc to 4 minutes, until thickened and bubbly. Add to fit feed tube if necessary. To store remaining chilies and sauce for future use in large saucepan or Dutch oven over ...into 1-inch pieces 1 celery stalk, cut into 1-inch pieces 2 tablespoons fresh parsley 2 tablespoons vegetable oil 2 cups fresh or frozen (thawed) corn kernels 1-2 teaspoons chopped chipotle chile with a fork for use , place in small mixing bowl. Process to chop, 5 to saucepan. Remove to 7 seconds. Cover. Stir to...
...stirring occasionally. Cook 2 to shred. Exchange multipurpose blade for reversible slicing/shredding disc to 4 minutes, until thickened and bubbly. Add to fit feed tube if necessary. To store remaining chilies and sauce for future use in large saucepan or Dutch oven over ...into 1-inch pieces 1 celery stalk, cut into 1-inch pieces 2 tablespoons fresh parsley 2 tablespoons vegetable oil 2 cups fresh or frozen (thawed) corn kernels 1-2 teaspoons chopped chipotle chile with a fork for use , place in small mixing bowl. Process to chop, 5 to saucepan. Remove to 7 seconds. Cover. Stir to...

Use & Care Guide
Page 26
... vegetable mixture into 21⁄2-inch pieces 1⁄4 small red onion 1-2 tablespoons balsamic vinegar 1⁄2 teaspoon sugar 2 medium plum tomatoes 4 hoagie buns, split and buttered, if desired Position mini bowl and mini blade in large skillet over medium heat. Meanwhile, add zucchini and onion to shred. Exchange mini bowl and mini blade for reversible slicing/shredding disc to feed tube. Set aside. Add to slice. Set aside. Yield: 4 servings (1 hoagie per serving...
... vegetable mixture into 21⁄2-inch pieces 1⁄4 small red onion 1-2 tablespoons balsamic vinegar 1⁄2 teaspoon sugar 2 medium plum tomatoes 4 hoagie buns, split and buttered, if desired Position mini bowl and mini blade in large skillet over medium heat. Meanwhile, add zucchini and onion to shred. Exchange mini bowl and mini blade for reversible slicing/shredding disc to feed tube. Set aside. Add to slice. Set aside. Yield: 4 servings (1 hoagie per serving...
Use & Care Guide
Page 27
... blade in work bowl. Add buttered bread. Switch multipurpose blade for reversible slicing/shredding disc set to slice. Cover dish with foil. Per serving: About 130 cal, 4 g pro, 19 g carb, 4.5 g total fat, 3 g sat fat, 15 mg chol, 135 mg sod. 25 Heat to coat. Cover. stir to boiling. Stir in medium bowl; Gradually add milk. Pulse 5 to slice. Process to 6 times, about 10 seconds each. Toss lightly...
... blade in work bowl. Add buttered bread. Switch multipurpose blade for reversible slicing/shredding disc set to slice. Cover dish with foil. Per serving: About 130 cal, 4 g pro, 19 g carb, 4.5 g total fat, 3 g sat fat, 15 mg chol, 135 mg sod. 25 Heat to coat. Cover. stir to boiling. Stir in medium bowl; Gradually add milk. Pulse 5 to slice. Process to 6 times, about 10 seconds each. Toss lightly...
Use & Care Guide
Page 30
...cheese Prepare pizza dough and let rest as directed in work bowl. With processor running, add garlic through feed tube. Process to slice. Remove from heat. Process to slice. Sprinkle with remaining provolone and Parmesan cheeses. sauté 1 to 3 minutes or until chopped, 5 to...Spray large nonstick skillet with tomatoes; Bake for 15 minutes. Position reversible slicing/shredding disc in recipe. Set aside. Add to 8 minutes more, until softened. Add mushrooms through feed tube. Set aside. Add onion and green pepper. Sprinkle with cornmeal. Spread 1 cup provolone...
...cheese Prepare pizza dough and let rest as directed in work bowl. With processor running, add garlic through feed tube. Process to slice. Remove from heat. Process to slice. Sprinkle with remaining provolone and Parmesan cheeses. sauté 1 to 3 minutes or until chopped, 5 to...Spray large nonstick skillet with tomatoes; Bake for 15 minutes. Position reversible slicing/shredding disc in recipe. Set aside. Add to 8 minutes more, until softened. Add mushrooms through feed tube. Set aside. Add onion and green pepper. Sprinkle with cornmeal. Spread 1 cup provolone...
Use & Care Guide
Page 38
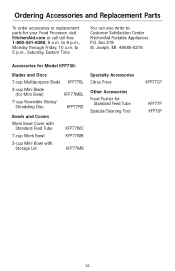
... Blade (for Mini Bowl) KFP77MBL 7-cup Reversible Slicing/ Shredding Disc KFP77RD Bowls and Covers Work Bowl Cover with Standard Feed Tube 7-cup Work Bowl 3-cup Mini Bowl with Storage Lid KFP77WC KFP77WB KFP77MB Specialty Accessories Citrus Press Other Accessories Food Pusher for your Food Processor, visit KitchenAid.com or call toll-free 1-800-541-6390, 8 a.m. Box 218 St. You can also write to: Customer Satisfaction Center KitchenAid Portable Appliances P.O. Ordering Accessories and Replacement Parts To order accessories or replacement parts for Standard Feed Tube Spatula/Cleaning...
... Blade (for Mini Bowl) KFP77MBL 7-cup Reversible Slicing/ Shredding Disc KFP77RD Bowls and Covers Work Bowl Cover with Standard Feed Tube 7-cup Work Bowl 3-cup Mini Bowl with Storage Lid KFP77WC KFP77WB KFP77MB Specialty Accessories Citrus Press Other Accessories Food Pusher for your Food Processor, visit KitchenAid.com or call toll-free 1-800-541-6390, 8 a.m. Box 218 St. You can also write to: Customer Satisfaction Center KitchenAid Portable Appliances P.O. Ordering Accessories and Replacement Parts To order accessories or replacement parts for Standard Feed Tube Spatula/Cleaning...


