Warranty Information
Page 1
... of purchase. KitchenAid Will Not Pay for Your Choice of: Hassle-Free Replacement of your Food Processor to arrange for Food Processor operated outside the 50 United States, District of Columbia, Puerto Rico, and Canada. Any shipping or handling costs to the purchaser and any succeeding owner for Food Processor operated in materials and workmanship. IF THIS PRODUCT FAILS TO WORK AS WARRANTED, CUSTOMER'S SOLE...
... of purchase. KitchenAid Will Not Pay for Your Choice of: Hassle-Free Replacement of your Food Processor to arrange for Food Processor operated outside the 50 United States, District of Columbia, Puerto Rico, and Canada. Any shipping or handling costs to the purchaser and any succeeding owner for Food Processor operated in materials and workmanship. IF THIS PRODUCT FAILS TO WORK AS WARRANTED, CUSTOMER'S SOLE...

Warranty Information
Page 2
... KitchenAid Canada 200 - 6750 Century Ave. Or write to initiate the claim. Please follow these instructions to order accessories or replacement parts, call our toll-free Customer eXperience Center at 1-800-807-6777. Mississauga, ON L5N 0B7 Arranging for information on how to pack up your replacement Food Processor, use the carton and packing materials to obtain service. Give the consultant your Food Processor...
... KitchenAid Canada 200 - 6750 Century Ave. Or write to initiate the claim. Please follow these instructions to order accessories or replacement parts, call our toll-free Customer eXperience Center at 1-800-807-6777. Mississauga, ON L5N 0B7 Arranging for information on how to pack up your replacement Food Processor, use the carton and packing materials to obtain service. Give the consultant your Food Processor...
Use & Care Guide
Page 3
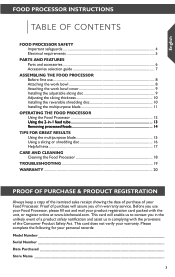
... bowl 8 Attaching the work bowl cover 9 Installing the adjustable slicing disc 9 Adjusting the slicing thickness 10 Installing the reversible shredding disc 10 Installing the multipurpose blade 11 OPERATING THE FOOD PROCESSOR Using the Food Processor 12 Using the 2-in-1 feed tube 13 Removing processed foods 14 TIPS FOR GREAT RESULTS Using the multipurpose blade 15 Using a slicing or shredding disc 16 Helpful hints...17 CARE AND CLEANING Cleaning the Food Processor 18 TROUBLESHOOTING 19 WARRANTY...20 PROOF OF PURCHASE & PRODUCT REGISTRATION Always keep a copy of the itemized sales...
... bowl 8 Attaching the work bowl cover 9 Installing the adjustable slicing disc 9 Adjusting the slicing thickness 10 Installing the reversible shredding disc 10 Installing the multipurpose blade 11 OPERATING THE FOOD PROCESSOR Using the Food Processor 12 Using the 2-in-1 feed tube 13 Removing processed foods 14 TIPS FOR GREAT RESULTS Using the multipurpose blade 15 Using a slicing or shredding disc 16 Helpful hints...17 CARE AND CLEANING Cleaning the Food Processor 18 TROUBLESHOOTING 19 WARRANTY...20 PROOF OF PURCHASE & PRODUCT REGISTRATION Always keep a copy of the itemized sales...
Use & Care Guide
Page 4
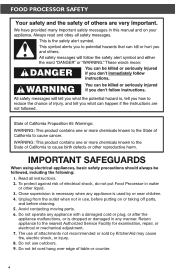
...instructions. 2. To protect against risk of electrical shock, do not put Food Processor in any manner. Do not use of table or counter. 4 FOOD PROCESSOR SAFETY IMPORTANT SAFEGUARDS When using electrical appliances, basic safety precautions should always be followed, including the following: 1. Avoid contacting moving parts. 6. Do not operate...the appliance malfunctions, or is used by KitchenAid may cause fire, electric shock, or injury. 8. The use outdoors. 9. Return appliance to the nearest Authorized Service Facility for examination, repair, or electrical or mechanical ...
...instructions. 2. To protect against risk of electrical shock, do not put Food Processor in any manner. Do not use of table or counter. 4 FOOD PROCESSOR SAFETY IMPORTANT SAFEGUARDS When using electrical appliances, basic safety precautions should always be followed, including the following: 1. Avoid contacting moving parts. 6. Do not operate...the appliance malfunctions, or is used by KitchenAid may cause fire, electric shock, or injury. 8. The use outdoors. 9. Return appliance to the nearest Authorized Service Facility for examination, repair, or electrical or mechanical ...

Use & Care Guide
Page 5
... food pusher. 15. SAVE THESE INSTRUCTIONS Electrical requirements Voltage: 120 VAC Frequency: 60 Hz NOTE: This Food Processor is not running. 11. Always use only. This product is securely locked in place. 13. If it still does not fit, contact a qualified electrician. English FOOD PROCESSOR SAFETY 10. Handle carefully. 12. Blades are sharp. A scraper may be used but must be used only when the Food Processor...
... food pusher. 15. SAVE THESE INSTRUCTIONS Electrical requirements Voltage: 120 VAC Frequency: 60 Hz NOTE: This Food Processor is not running. 11. Always use only. This product is securely locked in place. 13. If it still does not fit, contact a qualified electrician. English FOOD PROCESSOR SAFETY 10. Handle carefully. 12. Blades are sharp. A scraper may be used but must be used only when the Food Processor...

Use & Care Guide
Page 6
PARTS AND FEATURES Parts and accessories Externally adjustable slicing disc (thin to thick) Reversible (2 mm and 4 mm) shredding disc 2-piece food pusher Disc adapter Work bowl cover with 2-in-1 feed tube Multipurpose stainless steel blade 7-cup (1.7 L) work bowl Externally adjustable slicing control Heavy-duty base 6
PARTS AND FEATURES Parts and accessories Externally adjustable slicing disc (thin to thick) Reversible (2 mm and 4 mm) shredding disc 2-piece food pusher Disc adapter Work bowl cover with 2-in-1 feed tube Multipurpose stainless steel blade 7-cup (1.7 L) work bowl Externally adjustable slicing control Heavy-duty base 6
Use & Care Guide
Page 8
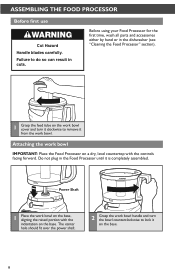
... "Cleaning the Food Processor" section). 1 Grasp the feed tube on the base. 8 Failure to lock it on the work bowl cover and turn the bowl counterclockwise to do so can result in cuts. The center hole should fit over the power shaft. 2 Grasp the work bowl IMPORTANT: Place the Food Processor on the base. Attaching the work bowl handle and turn it clockwise to remove it is completely assembled. Power Shaft 1 Place the work bowl. ASSEMBLING THE FOOD PROCESSOR Before first use Cut Hazard Handle blades carefully...
... "Cleaning the Food Processor" section). 1 Grasp the feed tube on the base. 8 Failure to lock it on the work bowl cover and turn the bowl counterclockwise to do so can result in cuts. The center hole should fit over the power shaft. 2 Grasp the work bowl IMPORTANT: Place the Food Processor on the base. Attaching the work bowl handle and turn it clockwise to remove it is completely assembled. Power Shaft 1 Place the work bowl. ASSEMBLING THE FOOD PROCESSOR Before first use Cut Hazard Handle blades carefully...
Use & Care Guide
Page 9
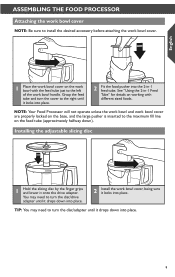
... right until it locks into place. 9 English ASSEMBLING THE FOOD PROCESSOR Attaching the work bowl cover NOTE: Be sure to install the desired accessory before attaching the work bowl cover. 1 Place the work bowl cover on the work bowl with the feed tube just to the left of the work bowl cover are properly locked on the base, and the large pusher is inserted to the maximum fill line on working with different sized foods. Grasp the feed tube and turn the disc/adapter until it onto the drive adapter.
... right until it locks into place. 9 English ASSEMBLING THE FOOD PROCESSOR Attaching the work bowl cover NOTE: Be sure to install the desired accessory before attaching the work bowl cover. 1 Place the work bowl cover on the work bowl with the feed tube just to the left of the work bowl cover are properly locked on the base, and the large pusher is inserted to the maximum fill line on working with different sized foods. Grasp the feed tube and turn the disc/adapter until it onto the drive adapter.
Use & Care Guide
Page 10
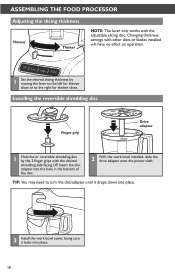
... desired shredding side facing UP. TIP: You may need to the right for thinner slices or to turn the disc/adapter until it drops down into place. 3 Install the work bowl cover, being sure it locks into the hole in the bottom of the disc. 2 With the work bowl installed, slide the drive adapter onto the power shaft. Changing thickness settings with other discs or blades installed will have no effect on operation. 1 Set the desired slicing...
... desired shredding side facing UP. TIP: You may need to the right for thinner slices or to turn the disc/adapter until it drops down into place. 3 Install the work bowl cover, being sure it locks into the hole in the bottom of the disc. 2 With the work bowl installed, slide the drive adapter onto the power shaft. Changing thickness settings with other discs or blades installed will have no effect on operation. 1 Set the desired slicing...

Use & Care Guide
Page 11
English ASSEMBLING THE FOOD PROCESSOR Installing the multipurpose blade 1 Place the blade on the multipurpose blade until it is down as far as it locks into place on the power shaft. 2 Push to lock: Press down firmly on the power shaft. The multipurpose blade features an internal seal that fits tightly over the center of the work bowl. 3 Install the work bowl cover, being sure it will go. Rotate the blade so it falls into place. 11
English ASSEMBLING THE FOOD PROCESSOR Installing the multipurpose blade 1 Place the blade on the multipurpose blade until it is down as far as it locks into place on the power shaft. 2 Push to lock: Press down firmly on the power shaft. The multipurpose blade features an internal seal that fits tightly over the center of the work bowl. 3 Install the work bowl cover, being sure it will go. Rotate the blade so it falls into place. 11
Use & Care Guide
Page 12
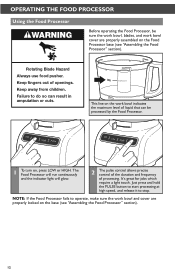
... press and hold the PULSE button to start processing at high speed, and release it to operate, make sure the work bowl cover are properly locked on the base (see "Assembling the Food Processor" section). Failure to do so can be sure the work bowl, blades, and work bowl and cover are properly assembled on , press LOW or HIGH. Rotating Blade Hazard Always use food pusher. The Food Processor will run continuously and the indicator...
... press and hold the PULSE button to start processing at high speed, and release it to operate, make sure the work bowl cover are properly locked on the base (see "Assembling the Food Processor" section). Failure to do so can be sure the work bowl, blades, and work bowl and cover are properly assembled on , press LOW or HIGH. Rotating Blade Hazard Always use food pusher. The Food Processor will run continuously and the indicator...
Use & Care Guide
Page 13
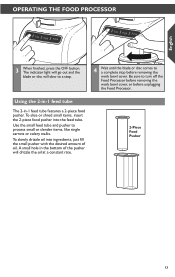
... of oil. Use the small feed tube and pusher to turn off the Food Processor before removing the work bowl cover, or before removing the work bowl cover. To slice or shred small items, insert the 2-piece food pusher into ingredients, just fill the small pusher with the desired amount of the pusher will slow to a stop. 4 Wait until the blade or disc comes to a complete stop before unplugging the Food Processor. To slowly drizzle oil into the feed tube. English OPERATING THE FOOD PROCESSOR 3 When finished...
... of oil. Use the small feed tube and pusher to turn off the Food Processor before removing the work bowl cover, or before removing the work bowl cover. To slice or shred small items, insert the 2-piece food pusher into ingredients, just fill the small pusher with the desired amount of the pusher will slow to a stop. 4 Wait until the blade or disc comes to a complete stop before unplugging the Food Processor. To slowly drizzle oil into the feed tube. English OPERATING THE FOOD PROCESSOR 3 When finished...
Use & Care Guide
Page 14
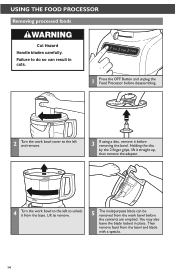
... work bowl before removing the bowl. Lift to the left and remove. 3 If using a disc, remove it from the base. Failure to unlock it before the contents are emptied. Holding the disc by the 2 finger grips, lift it straight up, then remove the adapter. 4 Turn the work bowl cover to the left to do so can be removed from the bowl and blade with a spatula. 14 USING THE FOOD PROCESSOR Removing processed foods Cut Hazard Handle blades carefully...
... work bowl before removing the bowl. Lift to the left and remove. 3 If using a disc, remove it from the base. Failure to unlock it before the contents are emptied. Holding the disc by the 2 finger grips, lift it straight up, then remove the adapter. 4 Turn the work bowl cover to the left to do so can be removed from the bowl and blade with a spatula. 14 USING THE FOOD PROCESSOR Removing processed foods Cut Hazard Handle blades carefully...

Use & Care Guide
Page 15
... Using the multipurpose blade Cut Hazard Handle blades carefully. Failure to do so can use the multi-purpose blade to 2-inch (3.75-5 cm) pieces. Add softened butter, milk, and seasonings. For best results, make bread, cookie, or cracker crumbs: Break food into 11/2 to grate hard cheeses. Process up to desired texture, using the shredding disc. Process until fine. With processor running , add food through the feed tube. You can result in work bowl...
... Using the multipurpose blade Cut Hazard Handle blades carefully. Failure to do so can use the multi-purpose blade to 2-inch (3.75-5 cm) pieces. Add softened butter, milk, and seasonings. For best results, make bread, cookie, or cracker crumbs: Break food into 11/2 to grate hard cheeses. Process up to desired texture, using the shredding disc. Process until fine. With processor running , add food through the feed tube. You can result in work bowl...

Use & Care Guide
Page 16
... shredding disc To slice or shred fruits or vegetables that are round, such as onions, apples, and green peppers: Peel, core, and remove seeds. Or use the small feed tube in the two-piece food pusher. Fill feed tube in diameter, such as stir-fry meats: Cut or roll food to fit feed tube. For best results with the food pusher. Process using even pressure with the food pusher. Process using even pressure with the food pusher. Process using...
... shredding disc To slice or shred fruits or vegetables that are round, such as onions, apples, and green peppers: Peel, core, and remove seeds. Or use the small feed tube in the two-piece food pusher. Fill feed tube in diameter, such as stir-fry meats: Cut or roll food to fit feed tube. For best results with the food pusher. Process using even pressure with the food pusher. Process using even pressure with the food pusher. Process using...
Use & Care Guide
Page 17
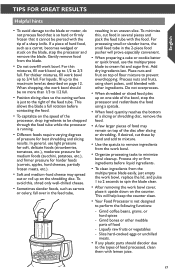
... the disc after slicing or shredding. Liquefy raw fruits or vegetables -- English TIPS FOR GREAT RESULTS Helpful hints • To avoid damage to the blade or motor, do not process food that it upside down on the counter. When chopping, the work bowl should discolor due to spin the blade clean. • After removing the work bowl up on the blade, stop the processor and redistribute the food using short...
... the disc after slicing or shredding. Liquefy raw fruits or vegetables -- English TIPS FOR GREAT RESULTS Helpful hints • To avoid damage to the blade or motor, do not process food that it upside down on the counter. When chopping, the work bowl should discolor due to spin the blade clean. • After removing the work bowl up on the blade, stop the processor and redistribute the food using short...
Use & Care Guide
Page 18
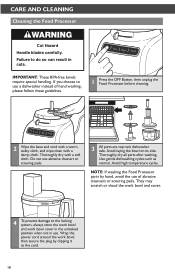
..., then unplug the Food Processor before cleaning. 2 Wipe the base and cord with a warm, sudsy cloth, and wipe clean with a soft cloth. Thoroughly dry all parts after washing. Wrap the power cord around the work bowl cover in the unlocked position when not in cuts. CARE AND CLEANING Cleaning the Food Processor Cut Hazard Handle blades carefully. Thoroughly dry with a damp cloth. Failure to use abrasive cleaners or scouring...
..., then unplug the Food Processor before cleaning. 2 Wipe the base and cord with a warm, sudsy cloth, and wipe clean with a soft cloth. Thoroughly dry all parts after washing. Wrap the power cord around the work bowl cover in the unlocked position when not in cuts. CARE AND CLEANING Cleaning the Food Processor Cut Hazard Handle blades carefully. Thoroughly dry with a damp cloth. Failure to use abrasive cleaners or scouring...
Use & Care Guide
Page 19
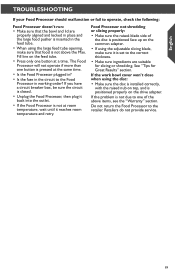
... work bowl cover won't close when using the disc: • Make sure the disc is installed correctly, with the raised nub on top, and is positioned properly on the common adapter. • If using the large feed tube opening, make sure it reaches room temperature and retry. Retailers do not provide service. 19 See "Tips for slicing or shredding. English TROUBLESHOOTING If your Food Processor should malfunction or fail to operate...
... work bowl cover won't close when using the disc: • Make sure the disc is installed correctly, with the raised nub on top, and is positioned properly on the common adapter. • If using the large feed tube opening, make sure it reaches room temperature and retry. Retailers do not provide service. 19 See "Tips for slicing or shredding. English TROUBLESHOOTING If your Food Processor should malfunction or fail to operate...

Use & Care Guide
Page 20
...-Free Replacement of your Food Processor to deliver your Food Processor. LIMITATION OF REMEDIES IMPLIED WARRANTIES, INCLUDING TO THE EXTENT APPLICABLE WARRANTIES OF MERCHANTABILITY OR FITNESS FOR A PARTICULAR PURPOSE, ARE EXCLUDED TO THE EXTENT LEGALLY PERMISSIBLE. Damage resulting from date of purchase. C. Any shipping or handling costs to an Authorized Service Center. Replacement parts or repair labor costs for service, or call the Customer...
...-Free Replacement of your Food Processor to deliver your Food Processor. LIMITATION OF REMEDIES IMPLIED WARRANTIES, INCLUDING TO THE EXTENT APPLICABLE WARRANTIES OF MERCHANTABILITY OR FITNESS FOR A PARTICULAR PURPOSE, ARE EXCLUDED TO THE EXTENT LEGALLY PERMISSIBLE. Damage resulting from date of purchase. C. Any shipping or handling costs to an Authorized Service Center. Replacement parts or repair labor costs for service, or call the Customer...

Use & Care Guide
Page 21
... receive this quality service. Please follow these instructions to order accessories or replacement parts, call . In the carton include your original Food Processor. Your replacement Food Processor will be returned prepaid and insured. Box 218, St. Joseph, MI 49085-0218 Outside the United States and Puerto Rico: Consult your local KitchenAid dealer or the store where you receive your replacement Food Processor, use the carton and...
... receive this quality service. Please follow these instructions to order accessories or replacement parts, call . In the carton include your original Food Processor. Your replacement Food Processor will be returned prepaid and insured. Box 218, St. Joseph, MI 49085-0218 Outside the United States and Puerto Rico: Consult your local KitchenAid dealer or the store where you receive your replacement Food Processor, use the carton and...


