
Owners Manual
Page 2
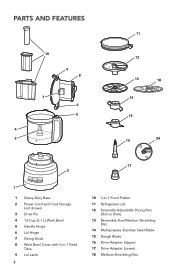
PARTS AND FEATURES 10 9 8 7 6 5 4 3 11 12 13 18 14 15 16 24 17 2 1 1 Heavy-Duty Base 2 Power Cord and Cord Storage (not shown) 3 Drive Pin 4 13-Cup (3.1 L) Work Bowl 5 Handle Hinge 6 Lid Hinge 7 Slicing Knob 8 Work Bowl Cover with 3-in-1 Feed Tube 9 Lid Latch 2 10 3-in-1 Food Pusher 11 Refrigerator Lid 12 Externally Adjustable Slicing Disc (thin to thick) 13 Reversible Fine/Medium Shredding Disc 14 Multipurpose Stainless Steel Blade 15 Dough Blade 16 Drive Adapter (Upper) 17 Drive Adapter (Lower) 18 Medium Shredding Disc
PARTS AND FEATURES 10 9 8 7 6 5 4 3 11 12 13 18 14 15 16 24 17 2 1 1 Heavy-Duty Base 2 Power Cord and Cord Storage (not shown) 3 Drive Pin 4 13-Cup (3.1 L) Work Bowl 5 Handle Hinge 6 Lid Hinge 7 Slicing Knob 8 Work Bowl Cover with 3-in-1 Feed Tube 9 Lid Latch 2 10 3-in-1 Food Pusher 11 Refrigerator Lid 12 Externally Adjustable Slicing Disc (thin to thick) 13 Reversible Fine/Medium Shredding Disc 14 Multipurpose Stainless Steel Blade 15 Dough Blade 16 Drive Adapter (Upper) 17 Drive Adapter (Lower) 18 Medium Shredding Disc

Owners Manual
Page 3
... PARTS AND FEATURES 19 20 21 13 12 15 22 23 14 24 18 17 16 19 Dicing Kit Cover 20 Dicing Blade 21 Dicing Kit Base ACCESSORY GUIDE Accessory External Adjustable Slice Storage Caddy Wide Mouth Opening 3-in-1 Feed Tube Multipurpose Blade Dough Blade Fine and Medium Shred Medium Shred Storage Lid Dicing Kit French Fry Disc KFP1319 • • 22 Dicing Kit Clean Out Tool 23 Storage Caddy 24 French Fry Disc Included with Model...
... PARTS AND FEATURES 19 20 21 13 12 15 22 23 14 24 18 17 16 19 Dicing Kit Cover 20 Dicing Blade 21 Dicing Kit Base ACCESSORY GUIDE Accessory External Adjustable Slice Storage Caddy Wide Mouth Opening 3-in-1 Feed Tube Multipurpose Blade Dough Blade Fine and Medium Shred Medium Shred Storage Lid Dicing Kit French Fry Disc KFP1319 • • 22 Dicing Kit Clean Out Tool 23 Storage Caddy 24 French Fry Disc Included with Model...
Owners Manual
Page 4
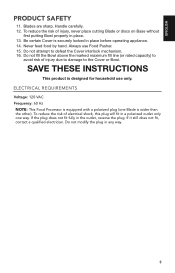
..., grasp the plug and pull from the Power Cord. 5. Do not operate any appliance is used only when the Food Processor is dropped or damaged in use, before assembling or disassembling parts and before cleaning. PRODUCT SAFETY IMPORTANT SAFEGUARDS When using electrical appliances, basic safety precautions should be followed, including the following: 1. Read all instructions. 2. Children should always be supervised to ensure...
..., grasp the plug and pull from the Power Cord. 5. Do not operate any appliance is used only when the Food Processor is dropped or damaged in use, before assembling or disassembling parts and before cleaning. PRODUCT SAFETY IMPORTANT SAFEGUARDS When using electrical appliances, basic safety precautions should be followed, including the following: 1. Read all instructions. 2. Children should always be supervised to ensure...
Owners Manual
Page 5
Never feed food by hand. To reduce the risk of electrical shock, this plug will fit in a polarized outlet only one Blade is equipped with a polarized plug (one way. SAVE THESE INSTRUCTIONS This product is securely locked in place. 13. If the plug does not fit .... Be certain Cover is designed for household use Food Pusher. 15. Handle carefully. 12. Do not fill the Bowl above the marked maximum fill line (or rated capacity) to avoid risk of injury, never place cutting Blade or discs on Base without first putting Bowl properly in place before operating appliance. 14...
Never feed food by hand. To reduce the risk of electrical shock, this plug will fit in a polarized outlet only one Blade is equipped with a polarized plug (one way. SAVE THESE INSTRUCTIONS This product is securely locked in place. 13. If the plug does not fit .... Be certain Cover is designed for household use Food Pusher. 15. Handle carefully. 12. Do not fill the Bowl above the marked maximum fill line (or rated capacity) to avoid risk of injury, never place cutting Blade or discs on Base without first putting Bowl properly in place before operating appliance. 14...
Owners Manual
Page 6
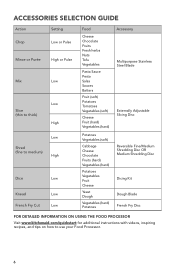
...) Potatoes Vegetables (soft) Cabbage Cheese Chocolate Fruits (hard) Vegetables (hard) Potatoes Vegetables Fruit Cheese Yeast Dough Vegetables (hard) Potatoes Accessory Multipurpose Stainless Steel Blade Externally Adjustable Slicing Disc Reversible Fine/Medium Shredding Disc OR Medium Shredding Disc Dicing Kit Dough Blade French Fry Disc FOR DETAILED INFORMATION ON USING THE FOOD PROCESSOR Visit www.kitchenaid.com/quickstart for additional instructions with videos, inspiring recipes, and tips on how to use your Food Processor. 6
...) Potatoes Vegetables (soft) Cabbage Cheese Chocolate Fruits (hard) Vegetables (hard) Potatoes Vegetables Fruit Cheese Yeast Dough Vegetables (hard) Potatoes Accessory Multipurpose Stainless Steel Blade Externally Adjustable Slicing Disc Reversible Fine/Medium Shredding Disc OR Medium Shredding Disc Dicing Kit Dough Blade French Fry Disc FOR DETAILED INFORMATION ON USING THE FOOD PROCESSOR Visit www.kitchenaid.com/quickstart for additional instructions with videos, inspiring recipes, and tips on how to use your Food Processor. 6
Owners Manual
Page 7
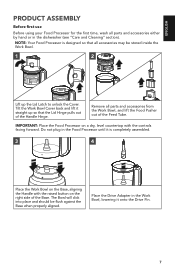
... the Food Processor until it is designed so that the Lid Hinge pulls out of the Feed Tube. Place the Drive Adapter in the dishwasher (see "Care and Cleaning" section). Tilt the Work Bowl Cover back and lift it onto the Drive Pin. 7 ENGLISH PRODUCT ASSEMBLY Before first use Before using your Food Processor for the first time, wash all parts and accessories either by hand or in the Work Bowl, lowering...
... the Food Processor until it is designed so that the Lid Hinge pulls out of the Feed Tube. Place the Drive Adapter in the dishwasher (see "Care and Cleaning" section). Tilt the Work Bowl Cover back and lift it onto the Drive Pin. 7 ENGLISH PRODUCT ASSEMBLY Before first use Before using your Food Processor for the first time, wash all parts and accessories either by hand or in the Work Bowl, lowering...
Owners Manual
Page 8
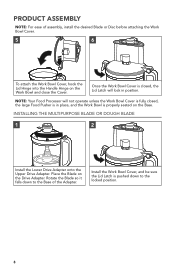
... Base of assembly, install the desired Blade or Disc before attaching the Work Bowl Cover. 5 6 To attach the Work Bowl Cover, hook the Lid Hinge into the Handle Hinge on the Drive Adapter. Install the Work Bowl Cover, and be sure the Lid Latch is pushed down to the locked position. 8 Once the Work Bowl Cover is closed, the Lid Latch will not operate unless the Work Bowl Cover is fully closed, the large Food Pusher is properly seated on the Base. NOTE: Your Food Processor will lock...
... Base of assembly, install the desired Blade or Disc before attaching the Work Bowl Cover. 5 6 To attach the Work Bowl Cover, hook the Lid Hinge into the Handle Hinge on the Drive Adapter. Install the Work Bowl Cover, and be sure the Lid Latch is pushed down to the locked position. 8 Once the Work Bowl Cover is closed, the Lid Latch will not operate unless the Work Bowl Cover is fully closed, the large Food Pusher is properly seated on the Base. NOTE: Your Food Processor will lock...
Owners Manual
Page 9
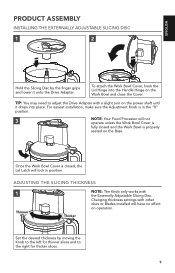
... the power shaft until it onto the Drive Adapter. ADJUSTING THE SLICING THICKNESS 1 Thinner Thicker NOTE: The Knob only works with other discs or Blades installed will not operate unless the Work Bowl Cover is fully closed and the Work Bowl is in position. TIP: You may need to the right for thicker slices. 9 Once the Work Bowl Cover is closed, the Lid Latch will lock in the "0" position. 3 NOTE: Your Food Processor will...
... the power shaft until it onto the Drive Adapter. ADJUSTING THE SLICING THICKNESS 1 Thinner Thicker NOTE: The Knob only works with other discs or Blades installed will not operate unless the Work Bowl Cover is fully closed and the Work Bowl is in position. TIP: You may need to the right for thicker slices. 9 Once the Work Bowl Cover is closed, the Lid Latch will lock in the "0" position. 3 NOTE: Your Food Processor will...
Owners Manual
Page 10
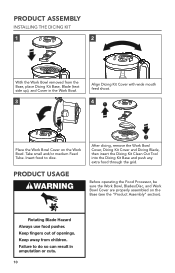
... Kit Base, Blade (text side up), and Cover in the Work Bowl. 3 Align Dicing Kit Cover with wide mouth feed shoot. 4 1 Place the Work Bowl Cover on the Base (see the "Product Assembly" section). 10 PRODUCT USAGE Before operating the Food Processor, be sure the Work Bowl, Blades/Disc, and Work Bowl Cover are properly assembled on the Work Bowl. Take small and/or medium Feed Tube. Insert food to dice. 2 After dicing, remove the Work Bowl Cover, Dicing Kit Cover and Dicing Blade, then insert the Dicing Kit Clean...
... Kit Base, Blade (text side up), and Cover in the Work Bowl. 3 Align Dicing Kit Cover with wide mouth feed shoot. 4 1 Place the Work Bowl Cover on the Base (see the "Product Assembly" section). 10 PRODUCT USAGE Before operating the Food Processor, be sure the Work Bowl, Blades/Disc, and Work Bowl Cover are properly assembled on the Work Bowl. Take small and/or medium Feed Tube. Insert food to dice. 2 After dicing, remove the Work Bowl Cover, Dicing Kit Cover and Dicing Blade, then insert the Dicing Kit Clean...
Owners Manual
Page 11
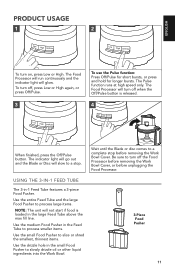
... Blade or Disc will not start if food is released. 4 When finished, press the Off/Pulse button. Be sure to turn off the Food Processor before removing the Work Bowl Cover, or before removing the Work Bowl Cover. Use the entire Feed Tube and the large Food Pusher to process large items. NOTE: The unit will slow to slice or shred the smallest, thinnest items. Use the drizzle hole in the large Feed Tube above the max fill line. Use...
... Blade or Disc will not start if food is released. 4 When finished, press the Off/Pulse button. Be sure to turn off the Food Processor before removing the Work Bowl Cover, or before removing the Work Bowl Cover. Use the entire Feed Tube and the large Food Pusher to process large items. NOTE: The unit will slow to slice or shred the smallest, thinnest items. Use the drizzle hole in the large Feed Tube above the max fill line. Use...
Owners Manual
Page 12
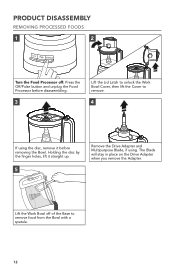
Lift the Work Bowl off : Press the Off/Pulse button and unplug the Food Processor before removing the Bowl. PRODUCT DISASSEMBLY REMOVING PROCESSED FOODS 1 2 Turn the Food Processor off of the Base to remove. 4 If using the disc, remove it straight up. 5 Remove the Drive Adapter and Multipurpose Blade, if using. Holding the disc by the finger holes, lift it before disassembling. 3 Lift the Lid Latch to unlock the Work Bowl Cover, then lift the Cover to remove food from the Bowl with a spatula. 12 The Blade will stay in place on the Drive Adapter when you remove the Adapter.
Lift the Work Bowl off : Press the Off/Pulse button and unplug the Food Processor before removing the Bowl. PRODUCT DISASSEMBLY REMOVING PROCESSED FOODS 1 2 Turn the Food Processor off of the Base to remove. 4 If using the disc, remove it straight up. 5 Remove the Drive Adapter and Multipurpose Blade, if using. Holding the disc by the finger holes, lift it before disassembling. 3 Lift the Lid Latch to unlock the Work Bowl Cover, then lift the Cover to remove food from the Bowl with a spatula. 12 The Blade will stay in place on the Drive Adapter when you remove the Adapter.
Owners Manual
Page 13
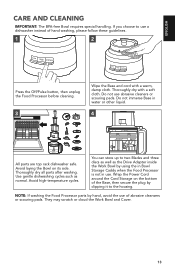
... use of the Base, then secure the plug by clipping it to use . Wrap the Power Cord around the Cord Storage on its side. Avoid laying the Bowl on the bottom of abrasive cleansers or scouring pads. Thoroughly dry all parts after washing. ENGLISH CARE AND CLEANING IMPORTANT: The BPA-free Bowl requires special handling. Use gentle dishwashing cycles such as the Drive Adapter inside the Work Bowl...
... use of the Base, then secure the plug by clipping it to use . Wrap the Power Cord around the Cord Storage on its side. Avoid laying the Bowl on the bottom of abrasive cleansers or scouring pads. Thoroughly dry all parts after washing. ENGLISH CARE AND CLEANING IMPORTANT: The BPA-free Bowl requires special handling. Use gentle dishwashing cycles such as the Drive Adapter inside the Work Bowl...
Owners Manual
Page 14
... working order? The Food Processor may need to cool to room temperature: The motor may take from 5-15 minutes to see if the Food Processor is securely plugged into the outlet. Have you have a circuit breaker box, be corrected: Solution Check to cool completely. The Food Processor may be locked: Food Processor not shredding or slicing properly: If the Work Bowl Cover won't close when using the disc: If the problem...
... working order? The Food Processor may need to cool to room temperature: The motor may take from 5-15 minutes to see if the Food Processor is securely plugged into the outlet. Have you have a circuit breaker box, be corrected: Solution Check to cool completely. The Food Processor may be locked: Food Processor not shredding or slicing properly: If the Work Bowl Cover won't close when using the disc: If the problem...
Owners Manual
Page 15
.... Repairs when your Food Processor is used in materials and workmanship. C. ENGLISH WARRANTY AND SERVICE KITCHENAID® FOOD PROCESSOR WARRANTY FOR THE 50 UNITED STATES, THE DISTRICT OF COLUMBIA, PUERTO RICO, AND CANADA This warranty extends to the purchaser and any succeeding owner for service, or call the Customer eXperience Center toll-free at 1-800-541-6390. This warranty gives you specific legal...
.... Repairs when your Food Processor is used in materials and workmanship. C. ENGLISH WARRANTY AND SERVICE KITCHENAID® FOOD PROCESSOR WARRANTY FOR THE 50 UNITED STATES, THE DISTRICT OF COLUMBIA, PUERTO RICO, AND CANADA This warranty extends to the purchaser and any succeeding owner for service, or call the Customer eXperience Center toll-free at 1-800-541-6390. This warranty gives you specific legal...
Owners Manual
Page 16
.... HASSLE-FREE REPLACEMENT WARRANTY - ARRANGING FOR SERVICE AFTER THE WARRANTY EXPIRES, OR ORDERING ACCESSORIES AND REPLACEMENT PARTS In the United States and Puerto Rico: For service information, or to KitchenAid. Your replacement unit will replace your original Food Processor and send it back to : Customer eXperience Center, KitchenAid Small Appliances, P.O. Your replacement unit will be Covered by our one year limited warranty. Give the consultant your Food Processor should...
.... HASSLE-FREE REPLACEMENT WARRANTY - ARRANGING FOR SERVICE AFTER THE WARRANTY EXPIRES, OR ORDERING ACCESSORIES AND REPLACEMENT PARTS In the United States and Puerto Rico: For service information, or to KitchenAid. Your replacement unit will replace your original Food Processor and send it back to : Customer eXperience Center, KitchenAid Small Appliances, P.O. Your replacement unit will be Covered by our one year limited warranty. Give the consultant your Food Processor should...


