Warranty Information
Page 1
... you specific legal rights and you may also have other than Not Pay for: normal single family home use. Service must be provided by an Authorized KitchenAid Service Center. B. KITCHENAID AND KITCHENAID CANADA DO NOT ASSUME ANY RESPONSIBILITY FOR INCIDENTAL OR CONSEQUENTIAL DAMAGES. Repairs when Food Processor is used in materials and workmanship. Any shipping or handling costs to deliver your Food Processor. Replacement parts or repair...
... you specific legal rights and you may also have other than Not Pay for: normal single family home use. Service must be provided by an Authorized KitchenAid Service Center. B. KITCHENAID AND KITCHENAID CANADA DO NOT ASSUME ANY RESPONSIBILITY FOR INCIDENTAL OR CONSEQUENTIAL DAMAGES. Repairs when Food Processor is used in materials and workmanship. Any shipping or handling costs to deliver your Food Processor. Replacement parts or repair...
Warranty Information
Page 2
... receive your replacement Food Processor, use the carton and packing materials to pack up your original Food Processor returned to obtain service. Mississauga, ON L5N 0B7 ®/™ © 2013. Your replacement unit will arrange to deliver an identical or comparable replacement to have your complete shipping address. (No P.O. Or write to : Customer eXperience Centre KitchenAid Canada 200 - 6750 Century Ave. Box numbers, please...
... receive your replacement Food Processor, use the carton and packing materials to pack up your original Food Processor returned to obtain service. Mississauga, ON L5N 0B7 ®/™ © 2013. Your replacement unit will arrange to deliver an identical or comparable replacement to have your complete shipping address. (No P.O. Or write to : Customer eXperience Centre KitchenAid Canada 200 - 6750 Century Ave. Box numbers, please...

Use & Care Guide
Page 3
......8 Attaching the work bowl 8 Attaching the work bowl cover 9 Installing the adjustable slicing disc 9 Adjusting the slicing thickness 10 Installing the reversible shredding disc or french fry disc 10 Installing the multipurpose blade or dough blade 10 Installing the mini-bowl and mini-blade 11 OPERATING THE FOOD PROCESSOR Using the Food Processor 12 Using the 3-in-1 feed tube 13 Removing processed foods 13 TIPS FOR GREAT RESULTS Using the multipurpose blade 15 Using a slicing or shredding disc 16 Helpful hints...17 CARE AND CLEANING Cleaning the Food Processor 18 TROUBLESHOOTING...
......8 Attaching the work bowl 8 Attaching the work bowl cover 9 Installing the adjustable slicing disc 9 Adjusting the slicing thickness 10 Installing the reversible shredding disc or french fry disc 10 Installing the multipurpose blade or dough blade 10 Installing the mini-bowl and mini-blade 11 OPERATING THE FOOD PROCESSOR Using the Food Processor 12 Using the 3-in-1 feed tube 13 Removing processed foods 13 TIPS FOR GREAT RESULTS Using the multipurpose blade 15 Using a slicing or shredding disc 16 Helpful hints...17 CARE AND CLEANING Cleaning the Food Processor 18 TROUBLESHOOTING...
Use & Care Guide
Page 4
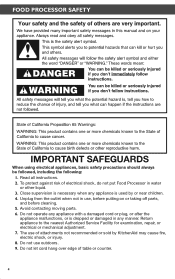
... for examination, repair, or electrical or mechanical adjustment. 7. Close supervision is used by KitchenAid may cause fire, electric shock, or injury. 8. FOOD PROCESSOR SAFETY IMPORTANT SAFEGUARDS When using electrical appliances, basic safety precautions should always be followed, including the following: 1. Do not let cord hang over edge of table or counter. 4 Avoid contacting moving parts. 6. Read all instructions. 2.
... for examination, repair, or electrical or mechanical adjustment. 7. Close supervision is used by KitchenAid may cause fire, electric shock, or injury. 8. FOOD PROCESSOR SAFETY IMPORTANT SAFEGUARDS When using electrical appliances, basic safety precautions should always be followed, including the following: 1. Do not let cord hang over edge of table or counter. 4 Avoid contacting moving parts. 6. Read all instructions. 2.

Use & Care Guide
Page 5
... processing food to reduce the risk of injury, never place cutting blade or discs on base without first putting bowl properly in a polarized outlet only one blade is not running. 11. To reduce the risk of severe injury to persons or damage to defeat the cover interlock mechanism. 16. A scraper may be used but must be used only when the Food Processor...
... processing food to reduce the risk of injury, never place cutting blade or discs on base without first putting bowl properly in a polarized outlet only one blade is not running. 11. To reduce the risk of severe injury to persons or damage to defeat the cover interlock mechanism. 16. A scraper may be used but must be used only when the Food Processor...
Use & Care Guide
Page 6
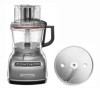
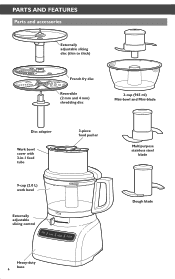
PARTS AND FEATURES Parts and accessories Externally adjustable slicing disc (thin to thick) French fry disc Reversible (2 mm and 4 mm) shredding disc 3-cup (945 ml) Mini-bowl and Mini-blade Disc adapter Work bowl cover with 3-in-1 feed tube 9-cup (2.0 L) work bowl Externally adjustable slicing control 3-piece food pusher Multipurpose stainless steel blade Dough blade Heavy-duty base 6
PARTS AND FEATURES Parts and accessories Externally adjustable slicing disc (thin to thick) French fry disc Reversible (2 mm and 4 mm) shredding disc 3-cup (945 ml) Mini-bowl and Mini-blade Disc adapter Work bowl cover with 3-in-1 feed tube 9-cup (2.0 L) work bowl Externally adjustable slicing control 3-piece food pusher Multipurpose stainless steel blade Dough blade Heavy-duty base 6
Use & Care Guide
Page 8
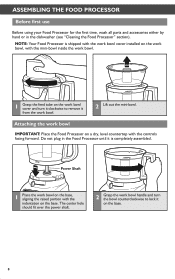
... the work bowl handle and turn it clockwise to lock it is completely assembled. Do not plug in the dishwasher (see "Cleaning the Food Processor" section). ASSEMBLING THE FOOD PROCESSOR Before first use Before using your Food Processor for the first time, wash all parts and accessories either by hand or in the Food Processor until it on the base. 8 Power Shaft 1 Place the work bowl. 2 Lift out the mini-bowl. NOTE: Your Food Processor is shipped with the work bowl cover installed...
... the work bowl handle and turn it clockwise to lock it is completely assembled. Do not plug in the dishwasher (see "Cleaning the Food Processor" section). ASSEMBLING THE FOOD PROCESSOR Before first use Before using your Food Processor for the first time, wash all parts and accessories either by hand or in the Food Processor until it on the base. 8 Power Shaft 1 Place the work bowl. 2 Lift out the mini-bowl. NOTE: Your Food Processor is shipped with the work bowl cover installed...
Use & Care Guide
Page 9
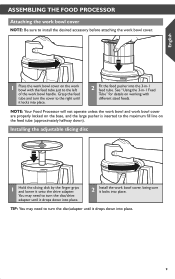
... turn the disc/adapter until it locks into place. Installing the adjustable slicing disc 1 Hold the slicing disk by the finger grips and lower it locks into place. 2 Fit the food pusher into place. 9 Grasp the feed tube and turn the disc/drive adapter until it onto the drive adapter. NOTE: Your Food Processor will not operate unless the work bowl and work bowl handle. English ASSEMBLING THE FOOD PROCESSOR Attaching the work bowl cover NOTE: Be sure to install the desired accessory before attaching the work bowl cover. 1 Place the work bowl cover...
... turn the disc/adapter until it locks into place. Installing the adjustable slicing disc 1 Hold the slicing disk by the finger grips and lower it locks into place. 2 Fit the food pusher into place. 9 Grasp the feed tube and turn the disc/drive adapter until it onto the drive adapter. NOTE: Your Food Processor will not operate unless the work bowl and work bowl handle. English ASSEMBLING THE FOOD PROCESSOR Attaching the work bowl cover NOTE: Be sure to install the desired accessory before attaching the work bowl cover. 1 Place the work bowl cover...

Use & Care Guide
Page 10
... right for thicker slices. Installing the reversible shredding disc or french fry disc Finger grip Drive adapter 1 Hold the french fry disc or reversible shredding disc by moving the lever to the left for thinner slices or to turn the disc/adapter until it is down firmly on the multipurpose blade until it locks into the hole in the bottom of the work bowl. ASSEMBLING THE FOOD PROCESSOR Adjusting the slicing thickness Thinner Thicker...
... right for thicker slices. Installing the reversible shredding disc or french fry disc Finger grip Drive adapter 1 Hold the french fry disc or reversible shredding disc by moving the lever to the left for thinner slices or to turn the disc/adapter until it is down firmly on the multipurpose blade until it locks into the hole in the bottom of the work bowl. ASSEMBLING THE FOOD PROCESSOR Adjusting the slicing thickness Thinner Thicker...
Use & Care Guide
Page 11
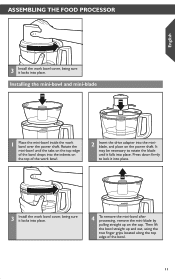
... bowl straight up and out, using the two finger grips located along the top edge of the work bowl. 2 Insert the drive adapter into place. 4 To remove the mini-bowl after processing, remove the mini-blade by pulling straight up on the power shaft. It may be necessary to lock it locks into place. Installing the mini-bowl and mini-blade 1 Place the mini-bowl inside the work bowl cover, being sure it into place. 3 Install the work bowl over the power shaft...
... bowl straight up and out, using the two finger grips located along the top edge of the work bowl. 2 Insert the drive adapter into place. 4 To remove the mini-bowl after processing, remove the mini-blade by pulling straight up on the power shaft. It may be necessary to lock it locks into place. Installing the mini-bowl and mini-blade 1 Place the mini-bowl inside the work bowl cover, being sure it into place. 3 Install the work bowl over the power shaft...
Use & Care Guide
Page 12
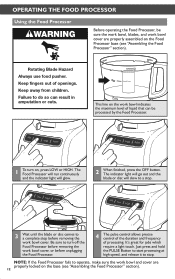
... disc comes to turn on, press LOW or HIGH. Be sure to a complete stop . Keep ngers out of liquid that can result in amputation or cuts. Rotating Blade Hazard Always use food pusher. Keep away from children. OPERATING THE FOOD PROCESSOR Using the Food Processor Before operating the Food Processor, be processed by the Food Processor. 1 To turn off the Food Processor before removing the work bowl cover, or before removing the work bowl cover are properly locked on the base (see "Assembling...
... disc comes to turn on, press LOW or HIGH. Be sure to a complete stop . Keep ngers out of liquid that can result in amputation or cuts. Rotating Blade Hazard Always use food pusher. Keep away from children. OPERATING THE FOOD PROCESSOR Using the Food Processor Before operating the Food Processor, be processed by the Food Processor. 1 To turn off the Food Processor before removing the work bowl cover, or before removing the work bowl cover are properly locked on the base (see "Assembling...
Use & Care Guide
Page 13
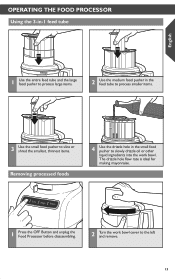
... food pusher in the feed tube to process smaller items. 3 Use the small food pusher to slice or shred the smallest, thinnest items. Removing processed foods 4 Use the drizzle hole in the small food pusher to slowly drizzle oil or other liquid ingredients into the work bowl cover to the left and remove. 13 The drizzle hole flow rate is ideal for making mayonnaise. 1 Press the OFF Button and unplug the Food Processor before disassembling. 2 Turn the work bowl...
... food pusher in the feed tube to process smaller items. 3 Use the small food pusher to slice or shred the smallest, thinnest items. Removing processed foods 4 Use the drizzle hole in the small food pusher to slowly drizzle oil or other liquid ingredients into the work bowl cover to the left and remove. 13 The drizzle hole flow rate is ideal for making mayonnaise. 1 Press the OFF Button and unplug the Food Processor before disassembling. 2 Turn the work bowl...
Use & Care Guide
Page 14
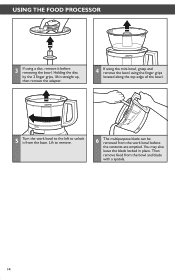
USING THE FOOD PROCESSOR 3 If using the finger grips located along the top edge of the bowl. 5 Turn the work bowl before removing the bowl. You may also leave the blade locked in place. Holding the disc by the 2 finger grips, lift it straight up, then remove the adapter. 4 If using the mini-bowl, grasp and remove the bowl using a disc, remove it from the work bowl to the left to remove. 6 The multipurpose blade can be removed from the base. Lift to unlock it before the contents are emptied. Then remove food from the bowl and blade with a spatula. 14
USING THE FOOD PROCESSOR 3 If using the finger grips located along the top edge of the bowl. 5 Turn the work bowl before removing the bowl. You may also leave the blade locked in place. Holding the disc by the 2 finger grips, lift it straight up, then remove the adapter. 4 If using the mini-bowl, grasp and remove the bowl using a disc, remove it from the work bowl to the left to remove. 6 The multipurpose blade can be removed from the base. Lift to unlock it before the contents are emptied. Then remove food from the bowl and blade with a spatula. 14

Use & Care Guide
Page 15
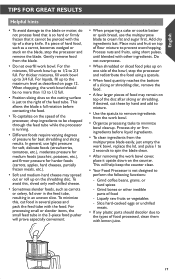
... make nut butters: Process up to 1 pound (455 g) at a time to 3 cups (710 ml) of a sharp knife. Process, using short pulses, until chopped. To chop cooked or raw meat, poultry, or seafood: The food should be very cold. With processor running , add food through the feed tube while the processor is absorbed. Process food to desired size, using short pulses, 1 to 11/2-inch (2.53.75 cm) pieces. Cut food in work bowl. Process...
... make nut butters: Process up to 1 pound (455 g) at a time to 3 cups (710 ml) of a sharp knife. Process, using short pulses, until chopped. To chop cooked or raw meat, poultry, or seafood: The food should be very cold. With processor running , add food through the feed tube while the processor is absorbed. Process food to desired size, using short pulses, 1 to 11/2-inch (2.53.75 cm) pieces. Cut food in work bowl. Process...

Use & Care Guide
Page 16
... shredding disc Rotating Blade Hazard Always use the small food pusher to process food. Keep away from children. Failure to 15 minutes before processing. Do not exceed the Max Fill line. Position food vertically in the tube and use food pusher. Process using even pressure with food pusher. To slice or shred fruits and vegetables that are long and relatively small in the 3-piece food pusher. If not, allow to process food. Cut in feed tube.Process using even pressure with wide food pusher. Process food using...
... shredding disc Rotating Blade Hazard Always use the small food pusher to process food. Keep away from children. Failure to 15 minutes before processing. Do not exceed the Max Fill line. Position food vertically in the tube and use food pusher. Process using even pressure with food pusher. To slice or shred fruits and vegetables that are long and relatively small in the 3-piece food pusher. If not, allow to process food. Cut in feed tube.Process using even pressure with wide food pusher. Process food using...
Use & Care Guide
Page 17
... chopped through the feed tube while the processor is just to spin the blade clean. • After removing the work bowl. • Organize processing tasks to 3/4 full. To avoid this , cut these by hand and add to mixture. • Use the spatula to remove ingredients from the blade. • Do not overfill work bowl up on the shredding disc. Grind bones or other ingredients. Gently remove food from the work bowl cover...
... chopped through the feed tube while the processor is just to spin the blade clean. • After removing the work bowl. • Organize processing tasks to 3/4 full. To avoid this , cut these by hand and add to mixture. • Use the spatula to remove ingredients from the blade. • Do not overfill work bowl up on the shredding disc. Grind bones or other ingredients. Gently remove food from the work bowl cover...
Use & Care Guide
Page 18
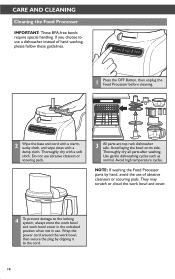
CARE AND CLEANING Cleaning the Food Processor IMPORTANT: These BPA-free bowls require special handling. Thoroughly dry all parts after washing. Avoid laying the bowl on its side. Thoroughly dry with a damp cloth. They may scratch or cloud the work bowl and cover. 4 To prevent damage to the cord. 18 If you choose to use of hand washing, please follow these guidelines. 1 Press the OFF Button...
CARE AND CLEANING Cleaning the Food Processor IMPORTANT: These BPA-free bowls require special handling. Thoroughly dry all parts after washing. Avoid laying the bowl on its side. Thoroughly dry with a damp cloth. They may scratch or cloud the work bowl and cover. 4 To prevent damage to the cord. 18 If you choose to use of hand washing, please follow these guidelines. 1 Press the OFF Button...
Use & Care Guide
Page 19
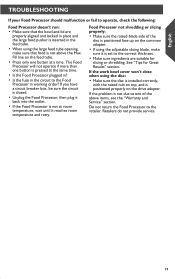
... the Max. If the work bowl cover won't close when using the large feed tube opening, make sure it reaches room temperature and retry. Retailers do not provide service. 19 The Food Processor will not operate if more than one of the disc is positioned face up on the common adapter. • If using the adjustable slicing blade, make sure that the bowl and lid are suitable for Great Results...
... the Max. If the work bowl cover won't close when using the large feed tube opening, make sure it reaches room temperature and retry. Retailers do not provide service. 19 The Food Processor will not operate if more than one of the disc is positioned face up on the common adapter. • If using the adjustable slicing blade, make sure that the bowl and lid are suitable for Great Results...

Use & Care Guide
Page 20
... KitchenAid Service Center. C. DISCLAIMER OF IMPLIED WARRANTIES; IF THIS PRODUCT FAILS TO WORK AS WARRANTED, CUSTOMER'S SOLE AND EXCLUSIVE REMEDY SHALL BE REPAIR OR REPLACEMENT ACCORDING TO THE TERMS OF THIS LIMITED WARRANTY. This warranty gives you specific legal rights and you may also have other than Not Pay for: normal single family home use. Hassle-Free Replacement of your Food Processor...
... KitchenAid Service Center. C. DISCLAIMER OF IMPLIED WARRANTIES; IF THIS PRODUCT FAILS TO WORK AS WARRANTED, CUSTOMER'S SOLE AND EXCLUSIVE REMEDY SHALL BE REPAIR OR REPLACEMENT ACCORDING TO THE TERMS OF THIS LIMITED WARRANTY. This warranty gives you specific legal rights and you may also have other than Not Pay for: normal single family home use. Hassle-Free Replacement of your Food Processor...
Use & Care Guide
Page 21
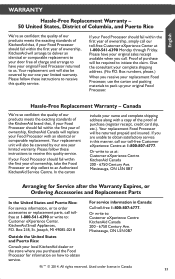
... our toll-free Customer eXperience Centre at : Customer eXperience Centre KitchenAid Canada 200 - 6750 Century Ave. Your replacement unit will also be covered by our one year limited warranty. Hassle-Free Replacement Warranty - Or write to us . For service information in Canada. 21 Or write to: Customer eXperience Centre KitchenAid Canada 200 - 6750 Century Ave. Box numbers, please.) When you receive your replacement Food Processor, use the...
... our toll-free Customer eXperience Centre at : Customer eXperience Centre KitchenAid Canada 200 - 6750 Century Ave. Your replacement unit will also be covered by our one year limited warranty. Hassle-Free Replacement Warranty - Or write to us . For service information in Canada. 21 Or write to: Customer eXperience Centre KitchenAid Canada 200 - 6750 Century Ave. Box numbers, please.) When you receive your replacement Food Processor, use the...


