
Warranty Information
Page 1
... succeeding owner for Food Processor operated in the 50 United States, the District of Columbia, Puerto Rico, and Canada. C. OR The replacement parts and repair labor costs to correct defects in materials and workmanship. B. D. Hassle-Free Replacement of purchase. Service must be provided by an Authorized KitchenAid Service Center. Length of Warranty: KitchenAid Will Pay for service, or call the Customer eXperience Center toll-free at...
... succeeding owner for Food Processor operated in the 50 United States, the District of Columbia, Puerto Rico, and Canada. C. OR The replacement parts and repair labor costs to correct defects in materials and workmanship. B. D. Hassle-Free Replacement of purchase. Service must be provided by an Authorized KitchenAid Service Center. Length of Warranty: KitchenAid Will Pay for service, or call the Customer eXperience Center toll-free at...
Warranty Information
Page 2
... order accessories or replacement parts, call our toll-free Customer eXperience Centre at 1-800-541-6390 or write to obtain service. Mississauga, ON L5N 0B7 Arranging for information on how to : Customer eXperience Center, KitchenAid Small Appliances, P.O. Your replacement unit will also be covered by our one year limited warranty. Please follow these instructions to an Authorized KitchenAid Service Centre. If you receive your replacement Food Processor, use...
... order accessories or replacement parts, call our toll-free Customer eXperience Centre at 1-800-541-6390 or write to obtain service. Mississauga, ON L5N 0B7 Arranging for information on how to : Customer eXperience Center, KitchenAid Small Appliances, P.O. Your replacement unit will also be covered by our one year limited warranty. Please follow these instructions to an Authorized KitchenAid Service Centre. If you receive your replacement Food Processor, use...

Use & Care Guide
Page 3
...Parts and accessories 6 Accessories selection guide 7 ASSEMBLING THE FOOD PROCESSOR Before first use your Food Processor, please fill out and mail your warranty. Before you use ...8 Attaching the work bowl 8 Attaching the work bowl cover 9 Installing the adjustable slicing disc 9 Adjusting the slicing thickness 10 Installing the reversible shredding disc or french fry disc 10 Installing the multipurpose blade or dough blade 10 Installing the mini-bowl and mini-blade 11 OPERATING THE FOOD PROCESSOR Using the Food Processor 12 Using the 3-in-1 feed tube 13 Removing processed foods...
...Parts and accessories 6 Accessories selection guide 7 ASSEMBLING THE FOOD PROCESSOR Before first use your Food Processor, please fill out and mail your warranty. Before you use ...8 Attaching the work bowl 8 Attaching the work bowl cover 9 Installing the adjustable slicing disc 9 Adjusting the slicing thickness 10 Installing the reversible shredding disc or french fry disc 10 Installing the multipurpose blade or dough blade 10 Installing the mini-bowl and mini-blade 11 OPERATING THE FOOD PROCESSOR Using the Food Processor 12 Using the 3-in-1 feed tube 13 Removing processed foods...
Use & Care Guide
Page 4
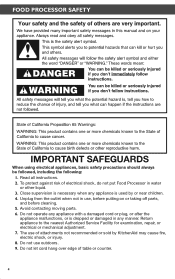
... on or taking off parts, and before cleaning. 5. Return appliance to the nearest Authorized Service Facility for examination, repair, or electrical or mechanical adjustment. 7. Do not operate any appliance with a damaged cord or plug, or after the appliance malfunctions, or is used by KitchenAid may cause fire, electric shock, or injury. 8. Do not use outdoors. 9. FOOD PROCESSOR SAFETY IMPORTANT SAFEGUARDS...
... on or taking off parts, and before cleaning. 5. Return appliance to the nearest Authorized Service Facility for examination, repair, or electrical or mechanical adjustment. 7. Do not operate any appliance with a damaged cord or plug, or after the appliance malfunctions, or is used by KitchenAid may cause fire, electric shock, or injury. 8. Do not use outdoors. 9. FOOD PROCESSOR SAFETY IMPORTANT SAFEGUARDS...

Use & Care Guide
Page 5
.... Never feed food by hand. This product is wider than the other). If it still does not fit, contact a qualified electrician. Handle carefully. 12. Always use only. Do not attempt to the Food Processor. Blades are sharp. Do not modify the plug in the outlet, reverse the plug. Keep hands and utensils away from moving blades or discs while processing food to...
.... Never feed food by hand. This product is wider than the other). If it still does not fit, contact a qualified electrician. Handle carefully. 12. Always use only. Do not attempt to the Food Processor. Blades are sharp. Do not modify the plug in the outlet, reverse the plug. Keep hands and utensils away from moving blades or discs while processing food to...
Use & Care Guide
Page 6
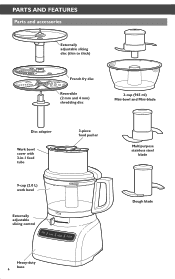
PARTS AND FEATURES Parts and accessories Externally adjustable slicing disc (thin to thick) French fry disc Reversible (2 mm and 4 mm) shredding disc 3-cup (945 ml) Mini-bowl and Mini-blade Disc adapter Work bowl cover with 3-in-1 feed tube 9-cup (2.0 L) work bowl Externally adjustable slicing control 3-piece food pusher Multipurpose stainless steel blade Dough blade Heavy-duty base 6
PARTS AND FEATURES Parts and accessories Externally adjustable slicing disc (thin to thick) French fry disc Reversible (2 mm and 4 mm) shredding disc 3-cup (945 ml) Mini-bowl and Mini-blade Disc adapter Work bowl cover with 3-in-1 feed tube 9-cup (2.0 L) work bowl Externally adjustable slicing control 3-piece food pusher Multipurpose stainless steel blade Dough blade Heavy-duty base 6
Use & Care Guide
Page 8
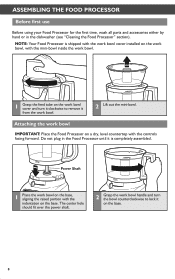
... the work bowl cover installed on the work bowl, with the mini-bowl inside the work bowl. 1 Grasp the feed tube on the work bowl cover and turn the bowl counterclockwise to remove it on the base. 8 Power Shaft 1 Place the work bowl on the base. Do not plug in the dishwasher (see "Cleaning the Food Processor" section). Attaching the work bowl. 2 Lift out the mini-bowl. NOTE: Your Food Processor is completely assembled. The center hole should fit over the power shaft. 2 Grasp the work bowl handle and turn it...
... the work bowl cover installed on the work bowl, with the mini-bowl inside the work bowl. 1 Grasp the feed tube on the work bowl cover and turn the bowl counterclockwise to remove it on the base. 8 Power Shaft 1 Place the work bowl on the base. Do not plug in the dishwasher (see "Cleaning the Food Processor" section). Attaching the work bowl. 2 Lift out the mini-bowl. NOTE: Your Food Processor is completely assembled. The center hole should fit over the power shaft. 2 Grasp the work bowl handle and turn it...
Use & Care Guide
Page 9
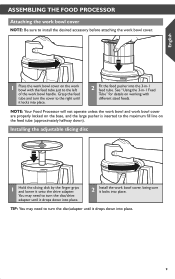
... food pusher into place. Grasp the feed tube and turn the disc/drive adapter until it locks into the 3-in -1 Feed Tube" for details on working with the feed tube just to the left of the work bowl handle. See "Using the 3-in -1 feed tube. TIP: You may need to turn the disc/adapter until it onto the drive adapter. English ASSEMBLING THE FOOD PROCESSOR Attaching the work bowl cover NOTE: Be sure to install the desired accessory before attaching the work bowl cover. 1 Place the work bowl cover on the work bowl with different sized foods...
... food pusher into place. Grasp the feed tube and turn the disc/drive adapter until it locks into the 3-in -1 Feed Tube" for details on working with the feed tube just to the left of the work bowl handle. See "Using the 3-in -1 feed tube. TIP: You may need to turn the disc/adapter until it onto the drive adapter. English ASSEMBLING THE FOOD PROCESSOR Attaching the work bowl cover NOTE: Be sure to install the desired accessory before attaching the work bowl cover. 1 Place the work bowl cover on the work bowl with different sized foods...

Use & Care Guide
Page 10
... Drive adapter 1 Hold the french fry disc or reversible shredding disc by moving the lever to the left for thinner slices or to lock: Press down firmly on the multipurpose blade until it locks into the hole in the bottom of the work bowl installed, slide the drive adapter onto the power shaft. Then install the work bowl. 1 Place the blade on operation. 1 Set the desired slicing thickness by the 2 finger grips with the work bowl cover...
... Drive adapter 1 Hold the french fry disc or reversible shredding disc by moving the lever to the left for thinner slices or to lock: Press down firmly on the multipurpose blade until it locks into the hole in the bottom of the work bowl installed, slide the drive adapter onto the power shaft. Then install the work bowl. 1 Place the blade on operation. 1 Set the desired slicing thickness by the 2 finger grips with the work bowl cover...
Use & Care Guide
Page 11
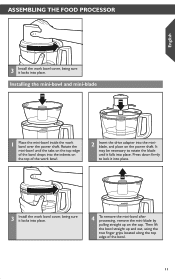
... mini-bowl and mini-blade 1 Place the mini-bowl inside the work bowl cover, being sure it locks into place. 4 To remove the mini-bowl after processing, remove the mini-blade by pulling straight up and out, using the two finger grips located along the top edge of the work bowl cover, being sure it falls into place. ASSEMBLING THE FOOD PROCESSOR English 3 Install the work bowl. 2 Insert the drive adapter into the miniblade, and place on the power shaft. Rotate the mini-bowl...
... mini-bowl and mini-blade 1 Place the mini-bowl inside the work bowl cover, being sure it locks into place. 4 To remove the mini-bowl after processing, remove the mini-blade by pulling straight up and out, using the two finger grips located along the top edge of the work bowl cover, being sure it falls into place. ASSEMBLING THE FOOD PROCESSOR English 3 Install the work bowl. 2 Insert the drive adapter into the miniblade, and place on the power shaft. Rotate the mini-bowl...
Use & Care Guide
Page 12
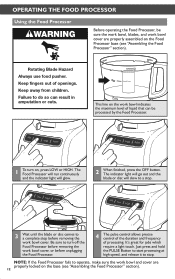
... hold the PULSE Button to start processing at high speed, and release it to do so can be sure the work bowl, blades, and work bowl cover. NOTE: If the Food Processor fails to turn on the base (see "Assembling the Food Processor" section). OPERATING THE FOOD PROCESSOR Using the Food Processor Before operating the Food Processor, be processed by the Food Processor. 1 To turn off the Food Processor before removing the work bowl cover, or before removing the work bowl cover are properly locked on , press LOW or...
... hold the PULSE Button to start processing at high speed, and release it to do so can be sure the work bowl, blades, and work bowl cover. NOTE: If the Food Processor fails to turn on the base (see "Assembling the Food Processor" section). OPERATING THE FOOD PROCESSOR Using the Food Processor Before operating the Food Processor, be processed by the Food Processor. 1 To turn off the Food Processor before removing the work bowl cover, or before removing the work bowl cover are properly locked on , press LOW or...
Use & Care Guide
Page 13
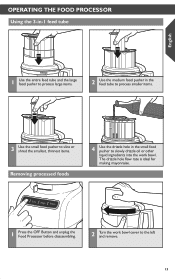
... food pusher in the feed tube to process smaller items. 3 Use the small food pusher to slice or shred the smallest, thinnest items. Removing processed foods 4 Use the drizzle hole in the small food pusher to slowly drizzle oil or other liquid ingredients into the work bowl cover to the left and remove. 13 The drizzle hole flow rate is ideal for making mayonnaise. 1 Press the OFF Button and unplug the Food Processor before disassembling. 2 Turn the work bowl...
... food pusher in the feed tube to process smaller items. 3 Use the small food pusher to slice or shred the smallest, thinnest items. Removing processed foods 4 Use the drizzle hole in the small food pusher to slowly drizzle oil or other liquid ingredients into the work bowl cover to the left and remove. 13 The drizzle hole flow rate is ideal for making mayonnaise. 1 Press the OFF Button and unplug the Food Processor before disassembling. 2 Turn the work bowl...
Use & Care Guide
Page 14
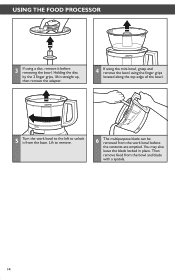
Then remove food from the work bowl to the left to remove. 6 The multipurpose blade can be removed from the bowl and blade with a spatula. 14 You may also leave the blade locked in place. Holding the disc by the 2 finger grips, lift it straight up, then remove the adapter. 4 If using the mini-bowl, grasp and remove the bowl using a disc, remove it from the base. Lift to unlock it before the contents are emptied. USING THE FOOD PROCESSOR 3 If using the finger grips located along the top edge of the bowl. 5 Turn the work bowl before removing the bowl.
Then remove food from the work bowl to the left to remove. 6 The multipurpose blade can be removed from the bowl and blade with a spatula. 14 You may also leave the blade locked in place. Holding the disc by the 2 finger grips, lift it straight up, then remove the adapter. 4 If using the mini-bowl, grasp and remove the bowl using a disc, remove it from the base. Lift to unlock it before the contents are emptied. USING THE FOOD PROCESSOR 3 If using the finger grips located along the top edge of the bowl. 5 Turn the work bowl before removing the bowl.

Use & Care Guide
Page 15
... through the feed tube while the processor is absorbed. Cut in 1-inch (2.5 cm) pieces. To melt chocolate in 1 to 2 seconds each time. Heat liquid from recipe in work bowl and herbs are very dry before chopping. Place in work bowl. English TIPS FOR GREAT RESULTS Using the multipurpose blade To chop fresh fruits or vegetables: Peel, core, and/or remove seeds. Process food to desired size, using short...
... through the feed tube while the processor is absorbed. Cut in 1-inch (2.5 cm) pieces. To melt chocolate in 1 to 2 seconds each time. Heat liquid from recipe in work bowl and herbs are very dry before chopping. Place in work bowl. English TIPS FOR GREAT RESULTS Using the multipurpose blade To chop fresh fruits or vegetables: Peel, core, and/or remove seeds. Process food to desired size, using short...

Use & Care Guide
Page 16
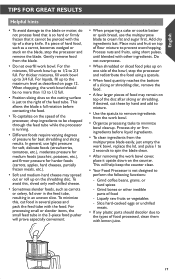
... fit wide mouth feed tube vertically or horizontally, and pack feed tube securely to keep food positioned properly. If not, allow to fit feed tube. TIPS FOR GREAT RESULTS Using a slicing or shredding disc Rotating Blade Hazard Always use the small food pusher to fit feed tube. Keep ngers out of a sharp knife. Cut in the tube and use food pusher. Cut in feed tube.Process using even pressure with wide food pusher. Roll up and stand up in pieces to fit feed tube.
... fit wide mouth feed tube vertically or horizontally, and pack feed tube securely to keep food positioned properly. If not, allow to fit feed tube. TIPS FOR GREAT RESULTS Using a slicing or shredding disc Rotating Blade Hazard Always use the small food pusher to fit feed tube. Keep ngers out of a sharp knife. Cut in the tube and use food pusher. Cut in feed tube.Process using even pressure with wide food pusher. Roll up and stand up in pieces to fit feed tube.
Use & Care Guide
Page 17
... blade, stop the processor and redistribute the food using short pulses, until blended with other inedible parts of food processed, clean them with lemon juice. 17 Process dry or firm ingredients before contacting the food. • To capitalize on the counter. For processing small or slender items, the small feed tube in several pieces and pack the feed tube with the food. When chopping, the work bowl up to 1/2 to 2/3 full. Slice hard-cooked eggs...
... blade, stop the processor and redistribute the food using short pulses, until blended with other inedible parts of food processed, clean them with lemon juice. 17 Process dry or firm ingredients before contacting the food. • To capitalize on the counter. For processing small or slender items, the small feed tube in several pieces and pack the feed tube with the food. When chopping, the work bowl up to 1/2 to 2/3 full. Slice hard-cooked eggs...
Use & Care Guide
Page 18
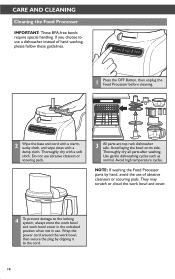
CARE AND CLEANING Cleaning the Food Processor IMPORTANT: These BPA-free bowls require special handling. Use gentle dishwashing cycles such as normal. NOTE: If washing the Food Processor parts by clipping it to the locking system, always store the work bowl and work bowl and cover. 4 To prevent damage to the cord. 18 Thoroughly dry all parts after washing. They may scratch or cloud the work bowl cover in the unlocked position when not...
CARE AND CLEANING Cleaning the Food Processor IMPORTANT: These BPA-free bowls require special handling. Use gentle dishwashing cycles such as normal. NOTE: If washing the Food Processor parts by clipping it to the locking system, always store the work bowl and work bowl and cover. 4 To prevent damage to the cord. 18 Thoroughly dry all parts after washing. They may scratch or cloud the work bowl cover in the unlocked position when not...
Use & Care Guide
Page 19
... room temperature and retry. Food Processor not shredding or slicing properly: • Make sure the raised-blade side of the above the Max. If the work bowl cover won't close when using the disc: • Make sure the disc is installed correctly, with the raised nub on top, and is positioned properly on the common adapter. • If using the large feed tube opening, make sure it back into the...
... room temperature and retry. Food Processor not shredding or slicing properly: • Make sure the raised-blade side of the above the Max. If the work bowl cover won't close when using the disc: • Make sure the disc is installed correctly, with the raised nub on top, and is positioned properly on the common adapter. • If using the large feed tube opening, make sure it back into the...

Use & Care Guide
Page 20
... family home use. Length of Warranty: KitchenAid Will Pay for Your Choice of: One Year Full Warranty from accident, alteration, misuse or abuse. Hassle-Free Replacement of purchase. OR The replacement parts and repair labor costs to arrange for service, or call the Customer eXperience Center toll-free at 1-800-541-6390. Any shipping or handling costs to deliver your Food Processor. LIMITATION...
... family home use. Length of Warranty: KitchenAid Will Pay for Your Choice of: One Year Full Warranty from accident, alteration, misuse or abuse. Hassle-Free Replacement of purchase. OR The replacement parts and repair labor costs to arrange for service, or call the Customer eXperience Center toll-free at 1-800-541-6390. Any shipping or handling costs to deliver your Food Processor. LIMITATION...
Use & Care Guide
Page 21
... : Customer eXperience Centre KitchenAid Canada 200 - 6750 Century Ave. Give the consultant your original Food Processor. Your replacement Food Processor will arrange to deliver an identical or comparable replacement to your door free of charge and arrange to us at 1-800-807-6777. If your original sales receipt available when you receive your replacement Food Processor, use the carton and packing materials to order accessories or replacement parts...
... : Customer eXperience Centre KitchenAid Canada 200 - 6750 Century Ave. Give the consultant your original Food Processor. Your replacement Food Processor will arrange to deliver an identical or comparable replacement to your door free of charge and arrange to us at 1-800-807-6777. If your original sales receipt available when you receive your replacement Food Processor, use the carton and packing materials to order accessories or replacement parts...


