Owners Manual
Page 2
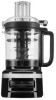
PARTS AND FEATURES 9 8 7 6 5 4 3 2 1 10 11 12 13 14 15 1 Heavy-Duty Base 2 Power Cord and Cord Storage (not shown) 3 Drive Pin 4 9-Cup (2.1 L) Work Bowl 5 Handle Hinge 6 Lid Hinge 7 Work Bowl Cover with 2-in-1 Feed Tube 8 Lid Latch 9 2-piece Food Pusher 10 Refrigerator Lid 11 Reversible Slicing/Shredding Disc 12 Whisking Accessory 13 Dough Blade 14 Multi-Purpose Four Blade 15 Drive Adapter 2
PARTS AND FEATURES 9 8 7 6 5 4 3 2 1 10 11 12 13 14 15 1 Heavy-Duty Base 2 Power Cord and Cord Storage (not shown) 3 Drive Pin 4 9-Cup (2.1 L) Work Bowl 5 Handle Hinge 6 Lid Hinge 7 Work Bowl Cover with 2-in-1 Feed Tube 8 Lid Latch 9 2-piece Food Pusher 10 Refrigerator Lid 11 Reversible Slicing/Shredding Disc 12 Whisking Accessory 13 Dough Blade 14 Multi-Purpose Four Blade 15 Drive Adapter 2

Owners Manual
Page 3
... of experience and knowledge, unless they do not put Food Processor in use outdoors. 9. Do not use , before assembling or disassembling parts and before cleaning. ENGLISH PRODUCT SAFETY IMPORTANT SAFEGUARDS When using electrical appliances, basic safety precautions should be supervised to ensure that they are closely supervised and instructed concerning use of attachments not recommended or sold by or near children. To...
... of experience and knowledge, unless they do not put Food Processor in use outdoors. 9. Do not use , before assembling or disassembling parts and before cleaning. ENGLISH PRODUCT SAFETY IMPORTANT SAFEGUARDS When using electrical appliances, basic safety precautions should be supervised to ensure that they are closely supervised and instructed concerning use of attachments not recommended or sold by or near children. To...
Owners Manual
Page 4
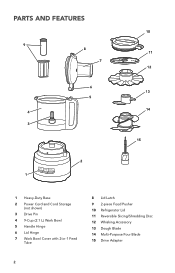
Never feed food by hand. Always use only. If it still does not fit, contact a qualified electrician. Handle carefully. 12. ELECTRICAL REQUIREMENTS Voltage: 120 VAC Frequency: 60 Hz NOTE: This Food Processor is wider than the other). Blades are sharp. Do not fill the Bowl above the marked maximum fill line (or rated capacity) to avoid risk of injury due...
Never feed food by hand. Always use only. If it still does not fit, contact a qualified electrician. Handle carefully. 12. ELECTRICAL REQUIREMENTS Voltage: 120 VAC Frequency: 60 Hz NOTE: This Food Processor is wider than the other). Blades are sharp. Do not fill the Bowl above the marked maximum fill line (or rated capacity) to avoid risk of injury due...
Owners Manual
Page 5
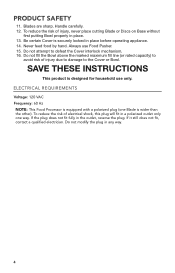
...ACCESSORIES SELECTION GUIDE Action Whisking/ Whipping Chop Mince or Purée Mix Slice Shred (medium) Knead Setting Low or High Low or Pulse High or Pulse Low Low High Low High Pulse/High Food Accessory Cream, Eggs... (hard) Yeast Dough Whisk Accessory Multi-Purpose Four Blade Reversible Slicing/ Shredding Disc (slicing side) Reversible Slicing/ Shredding Disc (shredding side) Dough Blade FOR DETAILED INFORMATION ON USING THE FOOD PROCESSOR Visit www.kitchenaid.com/quickstart for additional instructions with videos, inspiring recipes, and tips on how to use your Food Processor. 5
...ACCESSORIES SELECTION GUIDE Action Whisking/ Whipping Chop Mince or Purée Mix Slice Shred (medium) Knead Setting Low or High Low or Pulse High or Pulse Low Low High Low High Pulse/High Food Accessory Cream, Eggs... (hard) Yeast Dough Whisk Accessory Multi-Purpose Four Blade Reversible Slicing/ Shredding Disc (slicing side) Reversible Slicing/ Shredding Disc (shredding side) Dough Blade FOR DETAILED INFORMATION ON USING THE FOOD PROCESSOR Visit www.kitchenaid.com/quickstart for additional instructions with videos, inspiring recipes, and tips on how to use your Food Processor. 5
Owners Manual
Page 6
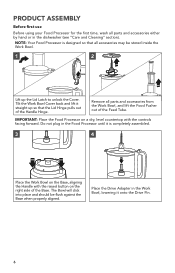
... Base when properly aligned. NOTE: Your Food Processor is completely assembled. 3 4 Place the Work Bowl on the Base, aligning the Handle with the raised button on a dry, level countertop with the controls facing forward. Place the Drive Adapter in the dishwasher (see "Care and Cleaning" section). Remove all parts and accessories from the Work Bowl, and lift the Food Pusher out of the Handle Hinge. PRODUCT ASSEMBLY Before first use Before using your Food Processor...
... Base when properly aligned. NOTE: Your Food Processor is completely assembled. 3 4 Place the Work Bowl on the Base, aligning the Handle with the raised button on a dry, level countertop with the controls facing forward. Place the Drive Adapter in the dishwasher (see "Care and Cleaning" section). Remove all parts and accessories from the Work Bowl, and lift the Food Pusher out of the Handle Hinge. PRODUCT ASSEMBLY Before first use Before using your Food Processor...
Owners Manual
Page 7
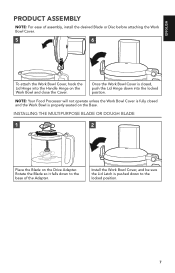
... the Adapter. NOTE: Your Food Processor will not operate unless the Work Bowl Cover is fully closed , push the Lid Hinge down to the base of assembly, install the desired Blade or Disc before attaching the Work Bowl Cover. 5 6 To attach the Work Bowl Cover, hook the Lid Hinge into the locked position. INSTALLING THE MULTIPURPOSE BLADE OR DOUGH BLADE 1 2 Place the Blade on the Base. Install the Work Bowl Cover, and be sure the Lid Latch is properly seated on the Drive Adapter. Rotate the Blade...
... the Adapter. NOTE: Your Food Processor will not operate unless the Work Bowl Cover is fully closed , push the Lid Hinge down to the base of assembly, install the desired Blade or Disc before attaching the Work Bowl Cover. 5 6 To attach the Work Bowl Cover, hook the Lid Hinge into the locked position. INSTALLING THE MULTIPURPOSE BLADE OR DOUGH BLADE 1 2 Place the Blade on the Base. Install the Work Bowl Cover, and be sure the Lid Latch is properly seated on the Drive Adapter. Rotate the Blade...
Owners Manual
Page 8
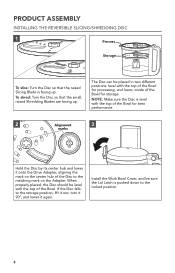
... onto the Drive Adapter, aligning the mark on the Adapter. The Disc can be level with the top of the Bowl. To shred: Turn the Disc so that the raised Slicing Blade is facing up . NOTE: Make sure the Disc is level with the top of the Bowl for storage. PRODUCT ASSEMBLY INSTALLING THE REVERSIBLE SLICING/SHREDDING DISC 1 Process Storage To slice: Turn the Disc so that the small, raised Shredding Blades are facing up . Install the Work Bowl Cover, and...
... onto the Drive Adapter, aligning the mark on the Adapter. The Disc can be level with the top of the Bowl. To shred: Turn the Disc so that the raised Slicing Blade is facing up . NOTE: Make sure the Disc is level with the top of the Bowl for storage. PRODUCT ASSEMBLY INSTALLING THE REVERSIBLE SLICING/SHREDDING DISC 1 Process Storage To slice: Turn the Disc so that the small, raised Shredding Blades are facing up . Install the Work Bowl Cover, and...

Owners Manual
Page 9
... Off/Pulse button. Failure to turn off the Food Processor before removing the Work Bowl Cover, or before removing the Work Bowl Cover. The indicator light will go out and the Blade or Disc will slow to a complete stop . Keep ngers out of openings. To turn off , press Low or High again, or press Off/Pulse. 3 To use food pusher. Wait until the Blade or Disc comes to a stop before unplugging the Food Processor. 9
... Off/Pulse button. Failure to turn off the Food Processor before removing the Work Bowl Cover, or before removing the Work Bowl Cover. The indicator light will go out and the Blade or Disc will slow to a complete stop . Keep ngers out of openings. To turn off , press Low or High again, or press Off/Pulse. 3 To use food pusher. Wait until the Blade or Disc comes to a stop before unplugging the Food Processor. 9

Owners Manual
Page 10
.... Use the small feed tube and pusher to remove. 4 If using . To slowly drizzle oil into the feed tube. To slice or shred small items, insert the 2-piece food pusher into ingredients, just fill the small pusher with the desired amount of the pusher will stay in -1 feed tube features a 2-piece food pusher. REMOVING PROCESSED FOODS 1 2 2-piece food pusher Turn the Food Processor off: Press the Off/Pulse button and unplug the Food Processor before disassembling. 3 Lift the Lid Latch to unlock the Work Bowl Cover, then lift the Cover to process small...
.... Use the small feed tube and pusher to remove. 4 If using . To slowly drizzle oil into the feed tube. To slice or shred small items, insert the 2-piece food pusher into ingredients, just fill the small pusher with the desired amount of the pusher will stay in -1 feed tube features a 2-piece food pusher. REMOVING PROCESSED FOODS 1 2 2-piece food pusher Turn the Food Processor off: Press the Off/Pulse button and unplug the Food Processor before disassembling. 3 Lift the Lid Latch to unlock the Work Bowl Cover, then lift the Cover to process small...

Owners Manual
Page 11
... recipe in Work Bowl. Process until finely grated. Cut into 1½-2 inch (3.75-5 cm) pieces. To make sure Work Bowl and herbs are smooth and milk is running. 11 With processor running , add food through the feed tube. Process continuously until finely chopped. Pieces of cheese can use the Multipurpose Four Blade to chop fresh herbs or small quantities of vegetables: With processor running , pour hot liquid through the feed tube. Process until...
... recipe in Work Bowl. Process until finely grated. Cut into 1½-2 inch (3.75-5 cm) pieces. To make sure Work Bowl and herbs are smooth and milk is running. 11 With processor running , add food through the feed tube. Process continuously until finely chopped. Pieces of cheese can use the Multipurpose Four Blade to chop fresh herbs or small quantities of vegetables: With processor running , pour hot liquid through the feed tube. Process until...
Owners Manual
Page 12
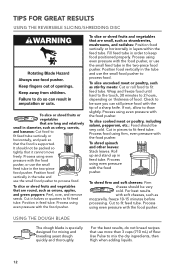
... small food pusher to keep food positioned properly. Position food vertically in the two-piece food pusher. To slice or shred fruits and vegetables that it cannot move freely. To slice cooked meat or poultry, including salami, pepperoni, etc.: Food should be very cold. Use Pulse to fit feed tube. To shred spinach and other leaves: Stack leaves. For best results with the food pusher. USING THE DOUGH BLADE The dough blade is supported. Process using...
... small food pusher to keep food positioned properly. Position food vertically in the two-piece food pusher. To slice or shred fruits and vegetables that it cannot move freely. To slice cooked meat or poultry, including salami, pepperoni, etc.: Food should be very cold. Use Pulse to fit feed tube. To shred spinach and other leaves: Stack leaves. For best results with the food pusher. USING THE DOUGH BLADE The dough blade is supported. Process using...
Owners Manual
Page 13
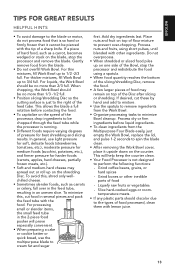
... - Slice hard-cooked eggs or roomtemperature meats. • If any plastic parts should be no more than 2/3 full. Place nuts and fruit on the blade, stop the processor and redistribute the food using short pulses, until blended with the food. If a piece of the Disc after slicing or shredding. For processing small or slender items, the small feed tube in several pieces and pack the feed tube with other inedible parts of...
... - Slice hard-cooked eggs or roomtemperature meats. • If any plastic parts should be no more than 2/3 full. Place nuts and fruit on the blade, stop the processor and redistribute the food using short pulses, until blended with the food. If a piece of the Disc after slicing or shredding. For processing small or slender items, the small feed tube in several pieces and pack the feed tube with other inedible parts of...
Owners Manual
Page 14
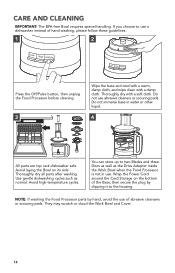
... Food Processor parts by clipping it to use of hand washing, please follow these guidelines. 1 2 Press the Off/Pulse button, then unplug the Food Processor before cleaning. 3 Wipe the base and cord with a warm, damp cloth, and wipe clean with a soft cloth. CARE AND CLEANING IMPORTANT: The BPA-free Bowl requires special handling. Do not use . Use gentle dishwashing cycles such as the Drive Adapter inside the Work Bowl when the Food Processor...
... Food Processor parts by clipping it to use of hand washing, please follow these guidelines. 1 2 Press the Off/Pulse button, then unplug the Food Processor before cleaning. 3 Wipe the base and cord with a warm, damp cloth, and wipe clean with a soft cloth. CARE AND CLEANING IMPORTANT: The BPA-free Bowl requires special handling. Do not use . Use gentle dishwashing cycles such as the Drive Adapter inside the Work Bowl when the Food Processor...

Owners Manual
Page 15
... Lid are suitable for Great Results" section. The Food Processor may be locked: Food Processor not shredding or slicing properly: If the Work Bowl Cover won't close when using the Disc: If the problem cannot be sure the circuit is closed. Make sure the Disc is positioned face up on the Drive Adapter. See the "Tips for slicing or shredding. Do not return the Food Processor to reset the motor. Make sure the Disc is installed...
... Lid are suitable for Great Results" section. The Food Processor may be locked: Food Processor not shredding or slicing properly: If the Work Bowl Cover won't close when using the Disc: If the problem cannot be sure the circuit is closed. Make sure the Disc is positioned face up on the Drive Adapter. See the "Tips for slicing or shredding. Do not return the Food Processor to reset the motor. Make sure the Disc is installed...
Owners Manual
Page 16
... and any succeeding owner for Food Processors operated in the 50 United States, the District of your Food Processor. OR The replacement parts and repair labor costs to an Authorized Service Center. A. C. LIMITATION OF REMEDIES IMPLIED WARRANTIES, INCLUDING TO THE EXTENT APPLICABLE WARRANTIES OF MERCHANTABILITY OR FITNESS FOR A PARTICULAR PURPOSE, ARE EXCLUDED TO THE EXTENT LEGALLY PERMISSIBLE. Hassle-Free Replacement of Columbia, Puerto...
... and any succeeding owner for Food Processors operated in the 50 United States, the District of your Food Processor. OR The replacement parts and repair labor costs to an Authorized Service Center. A. C. LIMITATION OF REMEDIES IMPLIED WARRANTIES, INCLUDING TO THE EXTENT APPLICABLE WARRANTIES OF MERCHANTABILITY OR FITNESS FOR A PARTICULAR PURPOSE, ARE EXCLUDED TO THE EXTENT LEGALLY PERMISSIBLE. Hassle-Free Replacement of Columbia, Puerto...
Owners Manual
Page 17
... KitchenAid brand that , if your Food Processor should fail within the first year of ownership, KitchenAid will arrange to deliver an identical or comparable replacement to your door free of charge and arrange to have your original sales receipt available when you purchased the Food Processor for information on how to : Customer eXperience Center, KitchenAid Small Appliances, P.O. Box 218, St. ENGLISH WARRANTY AND SERVICE HASSLE-FREE REPLACEMENT...
... KitchenAid brand that , if your Food Processor should fail within the first year of ownership, KitchenAid will arrange to deliver an identical or comparable replacement to your door free of charge and arrange to have your original sales receipt available when you purchased the Food Processor for information on how to : Customer eXperience Center, KitchenAid Small Appliances, P.O. Box 218, St. ENGLISH WARRANTY AND SERVICE HASSLE-FREE REPLACEMENT...


