Owners Manual
Page 2
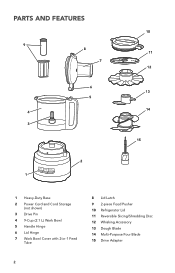
PARTS AND FEATURES 9 8 7 6 5 4 3 2 1 10 11 12 13 14 15 1 Heavy-Duty Base 2 Power Cord and Cord Storage (not shown) 3 Drive Pin 4 9-Cup (2.1 L) Work Bowl 5 Handle Hinge 6 Lid Hinge 7 Work Bowl Cover with 2-in-1 Feed Tube 8 Lid Latch 9 2-piece Food Pusher 10 Refrigerator Lid 11 Reversible Slicing/Shredding Disc 12 Whisking Accessory 13 Dough Blade 14 Multi-Purpose Four Blade 15 Drive Adapter 2
PARTS AND FEATURES 9 8 7 6 5 4 3 2 1 10 11 12 13 14 15 1 Heavy-Duty Base 2 Power Cord and Cord Storage (not shown) 3 Drive Pin 4 9-Cup (2.1 L) Work Bowl 5 Handle Hinge 6 Lid Hinge 7 Work Bowl Cover with 2-in-1 Feed Tube 8 Lid Latch 9 2-piece Food Pusher 10 Refrigerator Lid 11 Reversible Slicing/Shredding Disc 12 Whisking Accessory 13 Dough Blade 14 Multi-Purpose Four Blade 15 Drive Adapter 2

Owners Manual
Page 3
... followed, including the following: 1. Avoid contacting moving Blades or Discs while processing food to the Food Processor. Do not operate any manner. To protect against risk of table or counter. 10. Children should always be supervised to the nearest Authorized Service Facility for their safety. Do not use , before assembling or disassembling parts and before cleaning. Keep hands and utensils away from the...
... followed, including the following: 1. Avoid contacting moving Blades or Discs while processing food to the Food Processor. Do not operate any manner. To protect against risk of table or counter. 10. Children should always be supervised to the nearest Authorized Service Facility for their safety. Do not use , before assembling or disassembling parts and before cleaning. Keep hands and utensils away from the...
Owners Manual
Page 4
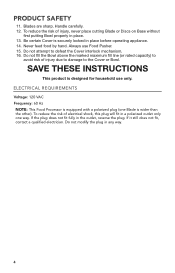
... use Food Pusher. 15. Never feed food by hand. Do not attempt to the Cover or Bowl. To reduce the risk of injury, never place cutting Blade or Discs on Base without first putting Bowl properly in place. 13. To reduce the risk of electrical shock, this plug will fit in place before operating appliance. 14. SAVE THESE INSTRUCTIONS This product is securely locked...
... use Food Pusher. 15. Never feed food by hand. Do not attempt to the Cover or Bowl. To reduce the risk of injury, never place cutting Blade or Discs on Base without first putting Bowl properly in place. 13. To reduce the risk of electrical shock, this plug will fit in place before operating appliance. 14. SAVE THESE INSTRUCTIONS This product is securely locked...
Owners Manual
Page 5
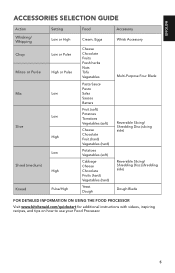
...ACCESSORIES SELECTION GUIDE Action Whisking/ Whipping Chop Mince or Purée Mix Slice Shred (medium) Knead Setting Low or High Low or Pulse High or Pulse Low Low High Low High Pulse/High Food Accessory Cream, Eggs... (hard) Yeast Dough Whisk Accessory Multi-Purpose Four Blade Reversible Slicing/ Shredding Disc (slicing side) Reversible Slicing/ Shredding Disc (shredding side) Dough Blade FOR DETAILED INFORMATION ON USING THE FOOD PROCESSOR Visit www.kitchenaid.com/quickstart for additional instructions with videos, inspiring recipes, and tips on how to use your Food Processor. 5
...ACCESSORIES SELECTION GUIDE Action Whisking/ Whipping Chop Mince or Purée Mix Slice Shred (medium) Knead Setting Low or High Low or Pulse High or Pulse Low Low High Low High Pulse/High Food Accessory Cream, Eggs... (hard) Yeast Dough Whisk Accessory Multi-Purpose Four Blade Reversible Slicing/ Shredding Disc (slicing side) Reversible Slicing/ Shredding Disc (shredding side) Dough Blade FOR DETAILED INFORMATION ON USING THE FOOD PROCESSOR Visit www.kitchenaid.com/quickstart for additional instructions with videos, inspiring recipes, and tips on how to use your Food Processor. 5
Owners Manual
Page 6
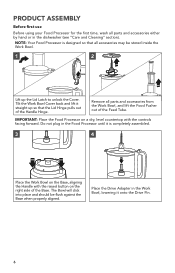
... in the Food Processor until it onto the Drive Pin. 6 The Bowl will click into place and should be stored inside the Work Bowl. 1 2 Lift up so that all parts and accessories either by hand or in the Work Bowl, lowering it is designed so that the Lid Hinge pulls out of the Feed Tube. Place the Drive Adapter in the dishwasher (see "Care and Cleaning" section).
... in the Food Processor until it onto the Drive Pin. 6 The Bowl will click into place and should be stored inside the Work Bowl. 1 2 Lift up so that all parts and accessories either by hand or in the Work Bowl, lowering it is designed so that the Lid Hinge pulls out of the Feed Tube. Place the Drive Adapter in the dishwasher (see "Care and Cleaning" section).
Owners Manual
Page 7
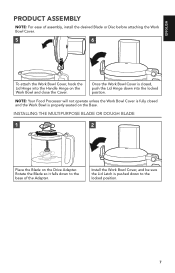
... Disc before attaching the Work Bowl Cover. 5 6 To attach the Work Bowl Cover, hook the Lid Hinge into the locked position. Install the Work Bowl Cover, and be sure the Lid Latch is closed and the Work Bowl is properly seated on the Work Bowl and close the Cover. ENGLISH PRODUCT ASSEMBLY NOTE: For ease of the Adapter. Once the Work Bowl Cover is pushed down into the Handle Hinge on the Base. INSTALLING THE MULTIPURPOSE BLADE OR DOUGH BLADE 1 2 Place the Blade...
... Disc before attaching the Work Bowl Cover. 5 6 To attach the Work Bowl Cover, hook the Lid Hinge into the locked position. Install the Work Bowl Cover, and be sure the Lid Latch is closed and the Work Bowl is properly seated on the Work Bowl and close the Cover. ENGLISH PRODUCT ASSEMBLY NOTE: For ease of the Adapter. Once the Work Bowl Cover is pushed down into the Handle Hinge on the Base. INSTALLING THE MULTIPURPOSE BLADE OR DOUGH BLADE 1 2 Place the Blade...
Owners Manual
Page 8
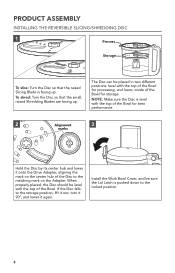
To shred: Turn the Disc so that the raised Slicing Blade is pushed down to the locked position. 8 Install the Work Bowl Cover, and be sure the Lid Latch is facing up . NOTE: Make sure the Disc is level with the top of the Bowl. If the Disc falls to the storage position, lift it out, turn it 90°, and lower it onto the Drive Adapter, aligning the mark...
To shred: Turn the Disc so that the raised Slicing Blade is pushed down to the locked position. 8 Install the Work Bowl Cover, and be sure the Lid Latch is facing up . NOTE: Make sure the Disc is level with the top of the Bowl. If the Disc falls to the storage position, lift it out, turn it 90°, and lower it onto the Drive Adapter, aligning the mark...

Owners Manual
Page 9
... Blade or Disc will slow to a complete stop . The Food Processor will run continuously and the indicator light will turn on the Base (see the "Product Assembly" section). The Pulse function runs at high speed only. Wait until the Blade or Disc comes to a stop before unplugging the Food Processor. 9 The Food Processor will glow. ENGLISH PRODUCT USAGE Before operating the Food Processor, be sure the Work Bowl, Blades/Disc, and Work Bowl Cover are properly assembled...
... Blade or Disc will slow to a complete stop . The Food Processor will run continuously and the indicator light will turn on the Base (see the "Product Assembly" section). The Pulse function runs at high speed only. Wait until the Blade or Disc comes to a stop before unplugging the Food Processor. 9 The Food Processor will glow. ENGLISH PRODUCT USAGE Before operating the Food Processor, be sure the Work Bowl, Blades/Disc, and Work Bowl Cover are properly assembled...

Owners Manual
Page 10
... remove the Adapter. 10 Remove the Drive Adapter and Accessory, if using the Disc, remove it straight up. A small hole in the bottom of oil. The Blade will drizzle the oil at a constant rate. To slowly drizzle oil into the feed tube. REMOVING PROCESSED FOODS 1 2 2-piece food pusher Turn the Food Processor off: Press the Off/Pulse button and unplug the Food Processor before disassembling. 3 Lift the Lid Latch to unlock the Work Bowl Cover, then lift the Cover to process small...
... remove the Adapter. 10 Remove the Drive Adapter and Accessory, if using the Disc, remove it straight up. A small hole in the bottom of oil. The Blade will drizzle the oil at a constant rate. To slowly drizzle oil into the feed tube. REMOVING PROCESSED FOODS 1 2 2-piece food pusher Turn the Food Processor off: Press the Off/Pulse button and unplug the Food Processor before disassembling. 3 Lift the Lid Latch to unlock the Work Bowl Cover, then lift the Cover to process small...

Owners Manual
Page 11
...) pieces. ENGLISH PRODUCT USAGE 5 Lift the Work Bowl off of the Base to remove food from recipe per cup (235 mL) of food. Scrape sides of Bowl, if necessary. Add softened butter, milk, and seasonings. Do not overprocess. To chop nuts or make sure Work Bowl and herbs are smooth and milk is running , pour hot liquid through the feed tube. Scrape sides of cheese can use the...
...) pieces. ENGLISH PRODUCT USAGE 5 Lift the Work Bowl off of the Base to remove food from recipe per cup (235 mL) of food. Scrape sides of Bowl, if necessary. Add softened butter, milk, and seasonings. Do not overprocess. To chop nuts or make sure Work Bowl and herbs are smooth and milk is running , pour hot liquid through the feed tube. Scrape sides of cheese can use the...
Owners Manual
Page 12
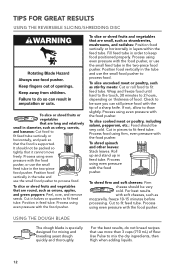
... strawberries, mushrooms, and radishes: Position food vertically or horizontally in the two-piece food pusher. Use Pulse to 2 hours, depending on thickness of food. USING THE DOUGH BLADE The dough blade is supported. For best results with the food pusher, or use the small food pusher to fit feed tube. To slice or shred fruits and vegetables that use the small feed tube in feed tube. Process using even pressure with the food pusher, or use more than 3 cups (710 mL) of a sharp knife...
... strawberries, mushrooms, and radishes: Position food vertically or horizontally in the two-piece food pusher. Use Pulse to 2 hours, depending on thickness of food. USING THE DOUGH BLADE The dough blade is supported. For best results with the food pusher, or use the small food pusher to fit feed tube. To slice or shred fruits and vegetables that use the small feed tube in feed tube. Process using even pressure with the food pusher, or use more than 3 cups (710 mL) of a sharp knife...
Owners Manual
Page 13
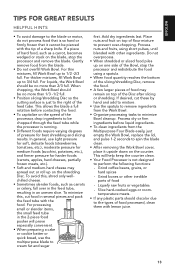
... the blade clean. • After removing the Work Bowl cover, place it cannot be chopped through the feed tube while the processor is not designed to the types of a sharp knife. To minimize this , shred only wellchilled cheese. • Sometimes slender foods, such as a carrot, becomes wedged or stuck on the blade, stop the processor and redistribute the food using short pulses, until blended with the tip of food processed, clean them...
... the blade clean. • After removing the Work Bowl cover, place it cannot be chopped through the feed tube while the processor is not designed to the types of a sharp knife. To minimize this , shred only wellchilled cheese. • Sometimes slender foods, such as a carrot, becomes wedged or stuck on the blade, stop the processor and redistribute the food using short pulses, until blended with the tip of food processed, clean them...
Owners Manual
Page 14
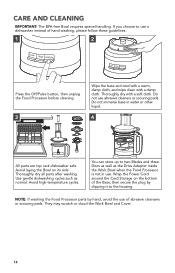
.... Do not immerse base in use abrasive cleaners or scouring pads. You can store up to two Blades and three Discs as well as normal. CARE AND CLEANING IMPORTANT: The BPA-free Bowl requires special handling. Do not use . Use gentle dishwashing cycles such as the Drive Adapter inside the Work Bowl when the Food Processor is not in water or other liquid. 4 All parts are top rack dishwasher...
.... Do not immerse base in use abrasive cleaners or scouring pads. You can store up to two Blades and three Discs as well as normal. CARE AND CLEANING IMPORTANT: The BPA-free Bowl requires special handling. Do not use . Use gentle dishwashing cycles such as the Drive Adapter inside the Work Bowl when the Food Processor is not in water or other liquid. 4 All parts are top rack dishwasher...

Owners Manual
Page 15
... Bowl). The Food Processor may be locked: Food Processor not shredding or slicing properly: If the Work Bowl Cover won't close when using the Disc: If the problem cannot be sure the circuit is closed. Make sure the Disc is installed correctly, and is securely plugged into the outlet. Have you have a circuit breaker box, be corrected: Solution Check to see if the Food Processor is positioned properly on the Drive Adapter. Make...
... Bowl). The Food Processor may be locked: Food Processor not shredding or slicing properly: If the Work Bowl Cover won't close when using the Disc: If the problem cannot be sure the circuit is closed. Make sure the Disc is installed correctly, and is securely plugged into the outlet. Have you have a circuit breaker box, be corrected: Solution Check to see if the Food Processor is positioned properly on the Drive Adapter. Make...
Owners Manual
Page 16
... to province. 16 Replacement parts or repair labor costs for Food Processor operated outside the 50 United States, District of your Food Processor. Repairs when your Food Processor to arrange for service, or call the Customer eXperience Center toll-free at 1-800-541-6390. Any shipping or handling costs to deliver your Food Processor is used in materials and workmanship. C. B. This warranty gives you specific legal rights and you...
... to province. 16 Replacement parts or repair labor costs for Food Processor operated outside the 50 United States, District of your Food Processor. Repairs when your Food Processor to arrange for service, or call the Customer eXperience Center toll-free at 1-800-541-6390. Any shipping or handling costs to deliver your Food Processor is used in materials and workmanship. C. B. This warranty gives you specific legal rights and you...
Owners Manual
Page 17
... ORDERING ACCESSORIES AND REPLACEMENT PARTS In the United States and Puerto Rico: For service information, or to : Customer eXperience Center, KitchenAid Small Appliances, P.O. Give the consultant your complete shipping address. If your Food Processor should fail within the first year of ownership, simply call our toll-free Customer eXperience Center at 1-800-541-6390 or write to order accessories or replacement parts, call toll-free...
... ORDERING ACCESSORIES AND REPLACEMENT PARTS In the United States and Puerto Rico: For service information, or to : Customer eXperience Center, KitchenAid Small Appliances, P.O. Give the consultant your complete shipping address. If your Food Processor should fail within the first year of ownership, simply call our toll-free Customer eXperience Center at 1-800-541-6390 or write to order accessories or replacement parts, call toll-free...


