Owners Manual
Page 2
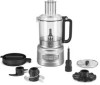
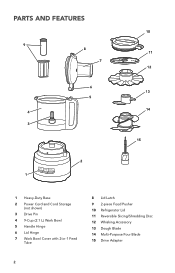
PARTS AND FEATURES 9 8 7 6 5 4 3 2 1 10 11 12 13 14 15 1 Heavy-Duty Base 2 Power Cord and Cord Storage (not shown) 3 Drive Pin 4 9-Cup (2.1 L) Work Bowl 5 Handle Hinge 6 Lid Hinge 7 Work Bowl Cover with 2-in-1 Feed Tube 8 Lid Latch 9 2-piece Food Pusher 10 Refrigerator Lid 11 Reversible Slicing/Shredding Disc 12 Whisking Accessory 13 Dough Blade 14 Multi-Purpose Four Blade 15 Drive Adapter 2
PARTS AND FEATURES 9 8 7 6 5 4 3 2 1 10 11 12 13 14 15 1 Heavy-Duty Base 2 Power Cord and Cord Storage (not shown) 3 Drive Pin 4 9-Cup (2.1 L) Work Bowl 5 Handle Hinge 6 Lid Hinge 7 Work Bowl Cover with 2-in-1 Feed Tube 8 Lid Latch 9 2-piece Food Pusher 10 Refrigerator Lid 11 Reversible Slicing/Shredding Disc 12 Whisking Accessory 13 Dough Blade 14 Multi-Purpose Four Blade 15 Drive Adapter 2

Owners Manual
Page 3
... use , before assembling or disassembling parts and before cleaning. The use outdoors. 9. Do not operate any appliance with reduced physical, sensory or mental capabilities, or lack of table or counter. 10. Do not let cord hang over edge of experience and knowledge, unless they do not put Food Processor in water or other liquid. 3. Children should always be used by KitchenAid...
... use , before assembling or disassembling parts and before cleaning. The use outdoors. 9. Do not operate any appliance with reduced physical, sensory or mental capabilities, or lack of table or counter. 10. Do not let cord hang over edge of experience and knowledge, unless they do not put Food Processor in water or other liquid. 3. Children should always be used by KitchenAid...
Owners Manual
Page 4
.... Handle carefully. 12. Do not attempt to the Cover or Bowl. If it still does not fit, contact a qualified electrician. Always use only. Never feed food by hand. Be certain Cover is designed for household use Food Pusher. 15. SAVE THESE INSTRUCTIONS This product is securely locked in the outlet, reverse the plug. ELECTRICAL REQUIREMENTS Voltage: 120 VAC Frequency: 60 Hz NOTE: This Food Processor...
.... Handle carefully. 12. Do not attempt to the Cover or Bowl. If it still does not fit, contact a qualified electrician. Always use only. Never feed food by hand. Be certain Cover is designed for household use Food Pusher. 15. SAVE THESE INSTRUCTIONS This product is securely locked in the outlet, reverse the plug. ELECTRICAL REQUIREMENTS Voltage: 120 VAC Frequency: 60 Hz NOTE: This Food Processor...
Owners Manual
Page 5
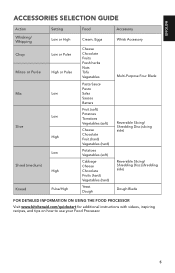
...ACCESSORIES SELECTION GUIDE Action Whisking/ Whipping Chop Mince or Purée Mix Slice Shred (medium) Knead Setting Low or High Low or Pulse High or Pulse Low Low High Low High Pulse/High Food Accessory Cream, Eggs... (hard) Yeast Dough Whisk Accessory Multi-Purpose Four Blade Reversible Slicing/ Shredding Disc (slicing side) Reversible Slicing/ Shredding Disc (shredding side) Dough Blade FOR DETAILED INFORMATION ON USING THE FOOD PROCESSOR Visit www.kitchenaid.com/quickstart for additional instructions with videos, inspiring recipes, and tips on how to use your Food Processor. 5
...ACCESSORIES SELECTION GUIDE Action Whisking/ Whipping Chop Mince or Purée Mix Slice Shred (medium) Knead Setting Low or High Low or Pulse High or Pulse Low Low High Low High Pulse/High Food Accessory Cream, Eggs... (hard) Yeast Dough Whisk Accessory Multi-Purpose Four Blade Reversible Slicing/ Shredding Disc (slicing side) Reversible Slicing/ Shredding Disc (shredding side) Dough Blade FOR DETAILED INFORMATION ON USING THE FOOD PROCESSOR Visit www.kitchenaid.com/quickstart for additional instructions with videos, inspiring recipes, and tips on how to use your Food Processor. 5
Owners Manual
Page 6
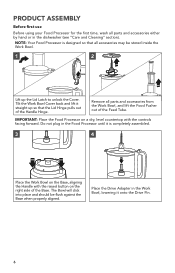
Place the Drive Adapter in the Food Processor until it is designed so that the Lid Hinge pulls out of the Base. Remove all parts and accessories either by hand or in the dishwasher (see "Care and Cleaning" section). PRODUCT ASSEMBLY Before first use Before using your Food Processor for the first time, wash all parts and accessories from the Work Bowl, and lift the Food Pusher out of the Feed Tube. Tilt the Work Bowl Cover back...
Place the Drive Adapter in the Food Processor until it is designed so that the Lid Hinge pulls out of the Base. Remove all parts and accessories either by hand or in the dishwasher (see "Care and Cleaning" section). PRODUCT ASSEMBLY Before first use Before using your Food Processor for the first time, wash all parts and accessories from the Work Bowl, and lift the Food Pusher out of the Feed Tube. Tilt the Work Bowl Cover back...
Owners Manual
Page 7
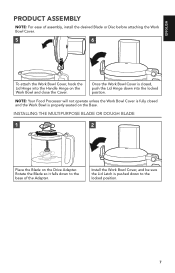
... assembly, install the desired Blade or Disc before attaching the Work Bowl Cover. 5 6 To attach the Work Bowl Cover, hook the Lid Hinge into the locked position. ENGLISH PRODUCT ASSEMBLY NOTE: For ease of the Adapter. Once the Work Bowl Cover is closed and the Work Bowl is pushed down to the locked position. 7 NOTE: Your Food Processor will not operate unless the Work Bowl Cover is fully closed , push the Lid Hinge down into the Handle Hinge on the Work Bowl...
... assembly, install the desired Blade or Disc before attaching the Work Bowl Cover. 5 6 To attach the Work Bowl Cover, hook the Lid Hinge into the locked position. ENGLISH PRODUCT ASSEMBLY NOTE: For ease of the Adapter. Once the Work Bowl Cover is closed and the Work Bowl is pushed down to the locked position. 7 NOTE: Your Food Processor will not operate unless the Work Bowl Cover is fully closed , push the Lid Hinge down into the Handle Hinge on the Work Bowl...
Owners Manual
Page 8
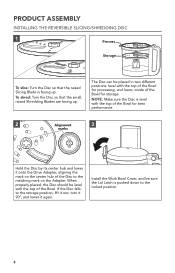
... Work Bowl Cover, and be level with the top of the Bowl for storage. To shred: Turn the Disc so that the raised Slicing Blade is level with the top of the Disc to the storage position, lift it out, turn it 90°, and lower it onto the Drive Adapter, aligning the mark on the Adapter. PRODUCT ASSEMBLY INSTALLING THE REVERSIBLE SLICING/SHREDDING DISC 1 Process Storage To slice: Turn the Disc so that the small, raised Shredding Blades...
... Work Bowl Cover, and be level with the top of the Bowl for storage. To shred: Turn the Disc so that the raised Slicing Blade is level with the top of the Disc to the storage position, lift it out, turn it 90°, and lower it onto the Drive Adapter, aligning the mark on the Adapter. PRODUCT ASSEMBLY INSTALLING THE REVERSIBLE SLICING/SHREDDING DISC 1 Process Storage To slice: Turn the Disc so that the small, raised Shredding Blades...

Owners Manual
Page 9
... Off/Pulse. 3 To use food pusher. The Pulse function runs at high speed only. Wait until the Blade or Disc comes to do so can result in amputation or cuts. 1 2 To turn off the Food Processor before removing the Work Bowl Cover, or before removing the Work Bowl Cover. Failure to a complete stop . ENGLISH PRODUCT USAGE Before operating the Food Processor, be sure the Work Bowl, Blades/Disc, and Work Bowl Cover are properly assembled on , press Low...
... Off/Pulse. 3 To use food pusher. The Pulse function runs at high speed only. Wait until the Blade or Disc comes to do so can result in amputation or cuts. 1 2 To turn off the Food Processor before removing the Work Bowl Cover, or before removing the Work Bowl Cover. Failure to a complete stop . ENGLISH PRODUCT USAGE Before operating the Food Processor, be sure the Work Bowl, Blades/Disc, and Work Bowl Cover are properly assembled on , press Low...

Owners Manual
Page 10
... Drive Adapter and Accessory, if using the Disc, remove it straight up. A small hole in the bottom of oil. To slice or shred small items, insert the 2-piece food pusher into ingredients, just fill the small pusher with the desired amount of the pusher will stay in -1 feed tube features a 2-piece food pusher. To slowly drizzle oil into the feed tube. REMOVING PROCESSED FOODS 1 2 2-piece food pusher Turn the Food Processor off: Press the Off/Pulse button and unplug the Food Processor before removing the Bowl. Use the small feed tube...
... Drive Adapter and Accessory, if using the Disc, remove it straight up. A small hole in the bottom of oil. To slice or shred small items, insert the 2-piece food pusher into ingredients, just fill the small pusher with the desired amount of the pusher will stay in -1 feed tube features a 2-piece food pusher. To slowly drizzle oil into the feed tube. REMOVING PROCESSED FOODS 1 2 2-piece food pusher Turn the Food Processor off: Press the Off/Pulse button and unplug the Food Processor before removing the Bowl. Use the small feed tube...

Owners Manual
Page 11
... the feed tube while the processor is absorbed. Cut peel in refrigerator. Process until fine. For a coarser texture, process smaller batches, pulsing one or two times, 1-2 seconds each time. Process until chopped. Heat liquid from citrus. With processor running , add food through the feed tube. You can also be very cold. Pieces of the Base to remove food from recipe per cup (235 mL) of Bowl, if necessary. Process food using...
... the feed tube while the processor is absorbed. Cut peel in refrigerator. Process until fine. For a coarser texture, process smaller batches, pulsing one or two times, 1-2 seconds each time. Process until chopped. Heat liquid from citrus. With processor running , add food through the feed tube. You can also be very cold. Pieces of the Base to remove food from recipe per cup (235 mL) of Bowl, if necessary. Process food using...
Owners Manual
Page 12
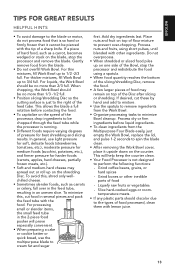
... be very cold. Process using even pressure with the food pusher. Cut to fit feed tube. Position food vertically in the tube and use the small food pusher to process food. Position in feed tube. Process using even pressure with the food pusher. For the best results, do not knead recipes that use the small feed tube in the two-piece food pusher. Use Pulse to thaw slightly. TIPS FOR GREAT RESULTS USING THE REVERSIBLE SLICING/SHREDDING DISC To slice or shred fruits or vegetables...
... be very cold. Process using even pressure with the food pusher. Cut to fit feed tube. Position food vertically in the tube and use the small food pusher to process food. Position in feed tube. Process using even pressure with the food pusher. For the best results, do not knead recipes that use the small feed tube in the two-piece food pusher. Use Pulse to thaw slightly. TIPS FOR GREAT RESULTS USING THE REVERSIBLE SLICING/SHREDDING DISC To slice or shred fruits or vegetables...
Owners Manual
Page 13
... the feed tube, resulting in the 2-piece food pusher will help keep the counter clean. • Your Food Processor is not designed to perform the following functions: - In general, use the multipurpose blade to cream fat and sugar first. Add dry ingredients last. Gently remove food from the Work Bowl. • Organize processing tasks to be pierced with other inedible parts of the Bowl, stop the processor and remove the blade...
... the feed tube, resulting in the 2-piece food pusher will help keep the counter clean. • Your Food Processor is not designed to perform the following functions: - In general, use the multipurpose blade to cream fat and sugar first. Add dry ingredients last. Gently remove food from the Work Bowl. • Organize processing tasks to be pierced with other inedible parts of the Bowl, stop the processor and remove the blade...
Owners Manual
Page 14
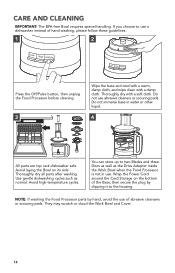
... scratch or cloud the Work Bowl and Cover. 14 Do not use a dishwasher instead of hand washing, please follow these guidelines. 1 2 Press the Off/Pulse button, then unplug the Food Processor before cleaning. 3 Wipe the base and cord with a warm, damp cloth, and wipe clean with a soft cloth. If you choose to two Blades and three Discs as well as normal...
... scratch or cloud the Work Bowl and Cover. 14 Do not use a dishwasher instead of hand washing, please follow these guidelines. 1 2 Press the Off/Pulse button, then unplug the Food Processor before cleaning. 3 Wipe the base and cord with a warm, damp cloth, and wipe clean with a soft cloth. If you choose to two Blades and three Discs as well as normal...

Owners Manual
Page 15
... Drive Adapter. Do not return the Food Processor to cool completely. Unplug the Food Processor, then plug it back into a grounded electrical outlet. Make sure ingredients are properly aligned and locked in place. See the "Tips for slicing or shredding. Make sure the raised-Blade side of the Bowl). The Food Processor may be locked: Food Processor not shredding or slicing properly: If the Work Bowl Cover won't close when using the Disc: If the problem...
... Drive Adapter. Do not return the Food Processor to cool completely. Unplug the Food Processor, then plug it back into a grounded electrical outlet. Make sure ingredients are properly aligned and locked in place. See the "Tips for slicing or shredding. Make sure the raised-Blade side of the Bowl). The Food Processor may be locked: Food Processor not shredding or slicing properly: If the Work Bowl Cover won't close when using the Disc: If the problem...
Owners Manual
Page 16
... AND SERVICE KITCHENAID® FOOD PROCESSOR WARRANTY FOR THE 50 UNITED STATES, THE DISTRICT OF COLUMBIA, PUERTO RICO, AND CANADA This warranty extends to the purchaser and any succeeding owner for Food Processors operated in ...specific legal rights and you may also have other than normal single family home use. Any shipping or handling costs to deliver your Food Processor. D. IF THIS PRODUCT FAILS TO WORK AS WARRANTED, CUSTOMER'S SOLE AND EXCLUSIVE REMEDY SHALL BE REPAIR OR REPLACEMENT ACCORDING TO THE TERMS OF THIS LIMITED WARRANTY. Replacement parts or repair labor costs for service...
... AND SERVICE KITCHENAID® FOOD PROCESSOR WARRANTY FOR THE 50 UNITED STATES, THE DISTRICT OF COLUMBIA, PUERTO RICO, AND CANADA This warranty extends to the purchaser and any succeeding owner for Food Processors operated in ...specific legal rights and you may also have other than normal single family home use. Any shipping or handling costs to deliver your Food Processor. D. IF THIS PRODUCT FAILS TO WORK AS WARRANTED, CUSTOMER'S SOLE AND EXCLUSIVE REMEDY SHALL BE REPAIR OR REPLACEMENT ACCORDING TO THE TERMS OF THIS LIMITED WARRANTY. Replacement parts or repair labor costs for service...
Owners Manual
Page 17
.... Box numbers, please). Your replacement unit will also be Covered by our one year limited warranty. Give the consultant your complete shipping address (no P.O. Your replacement unit will be required to : Customer eXperience Center, KitchenAid Small Appliances, P.O. Please have your Food Processor should fail within the first year of purchase will also be Covered by our one year limited warranty. HASSLE-FREE REPLACEMENT...
.... Box numbers, please). Your replacement unit will also be Covered by our one year limited warranty. Give the consultant your complete shipping address (no P.O. Your replacement unit will be required to : Customer eXperience Center, KitchenAid Small Appliances, P.O. Please have your Food Processor should fail within the first year of purchase will also be Covered by our one year limited warranty. HASSLE-FREE REPLACEMENT...


