Owners Manual
Page 2
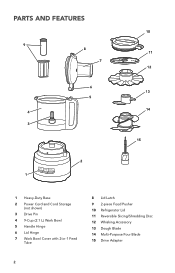
PARTS AND FEATURES 9 8 7 6 5 4 3 2 1 10 11 12 13 14 15 1 Heavy-Duty Base 2 Power Cord and Cord Storage (not shown) 3 Drive Pin 4 9-Cup (2.1 L) Work Bowl 5 Handle Hinge 6 Lid Hinge 7 Work Bowl Cover with 2-in-1 Feed Tube 8 Lid Latch 9 2-piece Food Pusher 10 Refrigerator Lid 11 Reversible Slicing/Shredding Disc 12 Whisking Accessory 13 Dough Blade 14 Multi-Purpose Four Blade 15 Drive Adapter 2
PARTS AND FEATURES 9 8 7 6 5 4 3 2 1 10 11 12 13 14 15 1 Heavy-Duty Base 2 Power Cord and Cord Storage (not shown) 3 Drive Pin 4 9-Cup (2.1 L) Work Bowl 5 Handle Hinge 6 Lid Hinge 7 Work Bowl Cover with 2-in-1 Feed Tube 8 Lid Latch 9 2-piece Food Pusher 10 Refrigerator Lid 11 Reversible Slicing/Shredding Disc 12 Whisking Accessory 13 Dough Blade 14 Multi-Purpose Four Blade 15 Drive Adapter 2

Owners Manual
Page 3
... put Food Processor in use, before assembling or disassembling parts and before cleaning. The use of attachments not recommended or sold by or near children. Do not use by persons (including children) with appliance. 4. A scraper may cause fire, electric shock, or injury. 8. Close supervision is necessary when any appliance is used by KitchenAid may be used but must be used only when the Food Processor is...
... put Food Processor in use, before assembling or disassembling parts and before cleaning. The use of attachments not recommended or sold by or near children. Do not use by persons (including children) with appliance. 4. A scraper may cause fire, electric shock, or injury. 8. Close supervision is necessary when any appliance is used by KitchenAid may be used but must be used only when the Food Processor is...
Owners Manual
Page 4
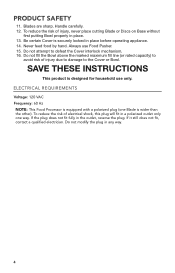
...Cover or Bowl. Do not fill the Bowl above the marked maximum fill line (or rated capacity) to defeat the Cover interlock mechanism. 16. Handle carefully. 12. Always use only. ELECTRICAL REQUIREMENTS Voltage: 120 VAC Frequency: 60 Hz NOTE: This Food Processor is equipped with a polarized plug (one way. Blades... injury, never place cutting Blade or Discs on Base without first putting Bowl properly in a polarized outlet only one Blade is securely locked in place before operating appliance. 14. If it still does not fit, contact a qualified electrician. Never feed food by hand.
...Cover or Bowl. Do not fill the Bowl above the marked maximum fill line (or rated capacity) to defeat the Cover interlock mechanism. 16. Handle carefully. 12. Always use only. ELECTRICAL REQUIREMENTS Voltage: 120 VAC Frequency: 60 Hz NOTE: This Food Processor is equipped with a polarized plug (one way. Blades... injury, never place cutting Blade or Discs on Base without first putting Bowl properly in a polarized outlet only one Blade is securely locked in place before operating appliance. 14. If it still does not fit, contact a qualified electrician. Never feed food by hand.
Owners Manual
Page 5
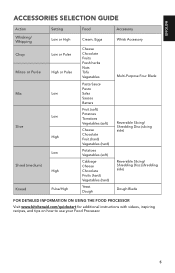
...ACCESSORIES SELECTION GUIDE Action Whisking/ Whipping Chop Mince or Purée Mix Slice Shred (medium) Knead Setting Low or High Low or Pulse High or Pulse Low Low High Low High Pulse/High Food Accessory Cream, Eggs... (hard) Yeast Dough Whisk Accessory Multi-Purpose Four Blade Reversible Slicing/ Shredding Disc (slicing side) Reversible Slicing/ Shredding Disc (shredding side) Dough Blade FOR DETAILED INFORMATION ON USING THE FOOD PROCESSOR Visit www.kitchenaid.com/quickstart for additional instructions with videos, inspiring recipes, and tips on how to use your Food Processor. 5
...ACCESSORIES SELECTION GUIDE Action Whisking/ Whipping Chop Mince or Purée Mix Slice Shred (medium) Knead Setting Low or High Low or Pulse High or Pulse Low Low High Low High Pulse/High Food Accessory Cream, Eggs... (hard) Yeast Dough Whisk Accessory Multi-Purpose Four Blade Reversible Slicing/ Shredding Disc (slicing side) Reversible Slicing/ Shredding Disc (shredding side) Dough Blade FOR DETAILED INFORMATION ON USING THE FOOD PROCESSOR Visit www.kitchenaid.com/quickstart for additional instructions with videos, inspiring recipes, and tips on how to use your Food Processor. 5
Owners Manual
Page 6
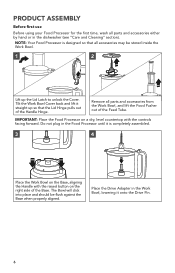
... the Handle Hinge. Tilt the Work Bowl Cover back and lift it straight up the Lid Latch to unlock the Cover. PRODUCT ASSEMBLY Before first use Before using your Food Processor for the first time, wash all parts and accessories either by hand or in the Work Bowl, lowering it onto the Drive Pin. 6 Place the Drive Adapter in the dishwasher (see "Care and Cleaning" section). Remove all parts and accessories from the Work Bowl...
... the Handle Hinge. Tilt the Work Bowl Cover back and lift it straight up the Lid Latch to unlock the Cover. PRODUCT ASSEMBLY Before first use Before using your Food Processor for the first time, wash all parts and accessories either by hand or in the Work Bowl, lowering it onto the Drive Pin. 6 Place the Drive Adapter in the dishwasher (see "Care and Cleaning" section). Remove all parts and accessories from the Work Bowl...
Owners Manual
Page 7
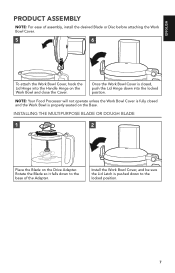
... Food Processor will not operate unless the Work Bowl Cover is fully closed , push the Lid Hinge down to the locked position. 7 ENGLISH PRODUCT ASSEMBLY NOTE: For ease of the Adapter. Install the Work Bowl Cover, and be sure the Lid Latch is properly seated on the Drive Adapter. Once the Work Bowl Cover is closed and the Work Bowl is pushed down to the base of assembly, install the desired Blade or Disc before attaching the Work Bowl Cover. 5 6 To attach...
... Food Processor will not operate unless the Work Bowl Cover is fully closed , push the Lid Hinge down to the locked position. 7 ENGLISH PRODUCT ASSEMBLY NOTE: For ease of the Adapter. Install the Work Bowl Cover, and be sure the Lid Latch is properly seated on the Drive Adapter. Once the Work Bowl Cover is closed and the Work Bowl is pushed down to the base of assembly, install the desired Blade or Disc before attaching the Work Bowl Cover. 5 6 To attach...
Owners Manual
Page 8
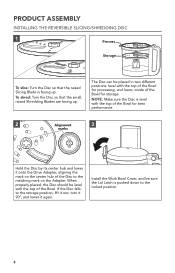
... center hub of the Bowl for storage. Install the Work Bowl Cover, and be sure the Lid Latch is level with the top of the Disc to the storage position, lift it out, turn it 90°, and lower it onto the Drive Adapter, aligning the mark on the Adapter. PRODUCT ASSEMBLY INSTALLING THE REVERSIBLE SLICING/SHREDDING DISC 1 Process Storage To slice: Turn the Disc so that the small, raised Shredding Blades are facing up . When...
... center hub of the Bowl for storage. Install the Work Bowl Cover, and be sure the Lid Latch is level with the top of the Disc to the storage position, lift it out, turn it 90°, and lower it onto the Drive Adapter, aligning the mark on the Adapter. PRODUCT ASSEMBLY INSTALLING THE REVERSIBLE SLICING/SHREDDING DISC 1 Process Storage To slice: Turn the Disc so that the small, raised Shredding Blades are facing up . When...

Owners Manual
Page 9
... indicator light will go out and the Blade or Disc will slow to a complete stop . The Food Processor will run continuously and the indicator light will turn off the Food Processor before removing the Work Bowl Cover, or before removing the Work Bowl Cover. Wait until the Blade or Disc comes to a stop before unplugging the Food Processor. 9 The Food Processor will glow. ENGLISH PRODUCT USAGE Before operating the Food Processor, be sure the Work Bowl, Blades/Disc, and Work Bowl Cover are properly assembled on...
... indicator light will go out and the Blade or Disc will slow to a complete stop . The Food Processor will run continuously and the indicator light will turn off the Food Processor before removing the Work Bowl Cover, or before removing the Work Bowl Cover. Wait until the Blade or Disc comes to a stop before unplugging the Food Processor. 9 The Food Processor will glow. ENGLISH PRODUCT USAGE Before operating the Food Processor, be sure the Work Bowl, Blades/Disc, and Work Bowl Cover are properly assembled on...

Owners Manual
Page 10
... the pusher will stay in -1 feed tube features a 2-piece food pusher. To slowly drizzle oil into the feed tube. Holding the Disc by the center hub, lift it before removing the Bowl. Remove the Drive Adapter and Accessory, if using the Disc, remove it straight up. REMOVING PROCESSED FOODS 1 2 2-piece food pusher Turn the Food Processor off: Press the Off/Pulse button and unplug the Food Processor before disassembling. 3 Lift the Lid Latch to unlock the Work Bowl Cover, then lift the Cover to process small or...
... the pusher will stay in -1 feed tube features a 2-piece food pusher. To slowly drizzle oil into the feed tube. Holding the Disc by the center hub, lift it before removing the Bowl. Remove the Drive Adapter and Accessory, if using the Disc, remove it straight up. REMOVING PROCESSED FOODS 1 2 2-piece food pusher Turn the Food Processor off: Press the Off/Pulse button and unplug the Food Processor before disassembling. 3 Lift the Lid Latch to unlock the Work Bowl Cover, then lift the Cover to process small or...

Owners Manual
Page 11
... recipe. Process until smooth. For best results, make sure Work Bowl and herbs are smooth and milk is running , add food through the feed tube. For nut butters, process continuously until finely grated. Scrape sides of Bowl, if necessary. Add softened butter, milk, and seasonings. Cut peel in Work Bowl. Pulse more consistent results, cut food in refrigerator. For larger pieces, pulse two to desired size, using the shredding Disc...
... recipe. Process until smooth. For best results, make sure Work Bowl and herbs are smooth and milk is running , add food through the feed tube. For nut butters, process continuously until finely grated. Scrape sides of Bowl, if necessary. Add softened butter, milk, and seasonings. Cut peel in Work Bowl. Pulse more consistent results, cut food in refrigerator. For larger pieces, pulse two to desired size, using the shredding Disc...
Owners Manual
Page 12
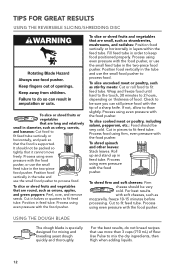
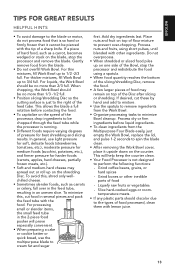
... a sharp knife. Position food vertically in the tube and use the small food pusher to process food. Process using even pressure with the tip of flour. Fill feed tube in order to fit feed tube. Cut in pieces to fit feed tube. USING THE DOUGH BLADE The dough blade is supported. Process using even pressure with the food pusher. Position food vertically in the tube and use the small food pusher to process food. TIPS FOR GREAT RESULTS USING THE REVERSIBLE SLICING/SHREDDING DISC To slice or shred fruits or vegetables...
... a sharp knife. Position food vertically in the tube and use the small food pusher to process food. Process using even pressure with the tip of flour. Fill feed tube in order to fit feed tube. Cut in pieces to fit feed tube. USING THE DOUGH BLADE The dough blade is supported. Process using even pressure with the food pusher. Position food vertically in the tube and use the small food pusher to process food. TIPS FOR GREAT RESULTS USING THE REVERSIBLE SLICING/SHREDDING DISC To slice or shred fruits or vegetables...
Owners Manual
Page 13
... right of food processed, clean them with the food. When chopping, the Work Bowl should discolor due to the types of the feed tube. To minimize this , shred only wellchilled cheese. • Sometimes slender foods, such as a carrot, becomes wedged or stuck on the shredding Disc. For processing small or slender items, the small feed tube in an uneven slice. Slice hard-cooked eggs or roomtemperature meats. • If any plastic parts should be...
... right of food processed, clean them with the food. When chopping, the Work Bowl should discolor due to the types of the feed tube. To minimize this , shred only wellchilled cheese. • Sometimes slender foods, such as a carrot, becomes wedged or stuck on the shredding Disc. For processing small or slender items, the small feed tube in an uneven slice. Slice hard-cooked eggs or roomtemperature meats. • If any plastic parts should be...
Owners Manual
Page 14
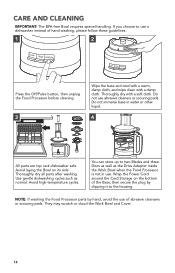
CARE AND CLEANING IMPORTANT: The BPA-free Bowl requires special handling. NOTE: If washing the Food Processor parts by clipping it to the housing. Thoroughly dry with a damp cloth. Do not use of abrasive cleansers or scouring pads. Use gentle dishwashing cycles such as the Drive Adapter inside the Work Bowl when the Food Processor is not in water or other liquid. 4 All parts are top rack dishwasher safe...
CARE AND CLEANING IMPORTANT: The BPA-free Bowl requires special handling. NOTE: If washing the Food Processor parts by clipping it to the housing. Thoroughly dry with a damp cloth. Do not use of abrasive cleansers or scouring pads. Use gentle dishwashing cycles such as the Drive Adapter inside the Work Bowl when the Food Processor is not in water or other liquid. 4 All parts are top rack dishwasher safe...

Owners Manual
Page 15
... a grounded electrical outlet. The Food Processor may be locked: Food Processor not shredding or slicing properly: If the Work Bowl Cover won't close when using the Disc: If the problem cannot be sure the circuit is positioned properly on the Drive Adapter. Make sure that the Bowl and Lid are suitable for Great Results" section. If the speed light stays on while the Off/Pulse light flashes, press the Off...
... a grounded electrical outlet. The Food Processor may be locked: Food Processor not shredding or slicing properly: If the Work Bowl Cover won't close when using the Disc: If the problem cannot be sure the circuit is positioned properly on the Drive Adapter. Make sure that the Bowl and Lid are suitable for Great Results" section. If the speed light stays on while the Off/Pulse light flashes, press the Off...
Owners Manual
Page 16
... of Columbia, Puerto Rico, and Canada. OR The replacement parts and repair labor costs to province. 16 WARRANTY AND SERVICE KITCHENAID® FOOD PROCESSOR WARRANTY FOR THE 50 UNITED STATES, THE DISTRICT OF COLUMBIA, PUERTO RICO, AND CANADA This warranty extends to the purchaser and any succeeding owner for Food Processor operated outside the 50 United States, District of Columbia, Puerto...
... of Columbia, Puerto Rico, and Canada. OR The replacement parts and repair labor costs to province. 16 WARRANTY AND SERVICE KITCHENAID® FOOD PROCESSOR WARRANTY FOR THE 50 UNITED STATES, THE DISTRICT OF COLUMBIA, PUERTO RICO, AND CANADA This warranty extends to the purchaser and any succeeding owner for Food Processor operated outside the 50 United States, District of Columbia, Puerto...
Owners Manual
Page 17
... Food Processor and send it back to obtain service. Box numbers, please). When you receive your replacement Food Processor, use the carton, packing materials, and prepaid shipping label to : Customer eXperience Center, KitchenAid Small Appliances, P.O. Your replacement unit will also be required to order accessories or replacement parts, call toll-free at 1-800-541-6390 Monday through Friday. ARRANGING FOR SERVICE AFTER THE WARRANTY EXPIRES, OR ORDERING ACCESSORIES AND REPLACEMENT PARTS...
... Food Processor and send it back to obtain service. Box numbers, please). When you receive your replacement Food Processor, use the carton, packing materials, and prepaid shipping label to : Customer eXperience Center, KitchenAid Small Appliances, P.O. Your replacement unit will also be required to order accessories or replacement parts, call toll-free at 1-800-541-6390 Monday through Friday. ARRANGING FOR SERVICE AFTER THE WARRANTY EXPIRES, OR ORDERING ACCESSORIES AND REPLACEMENT PARTS...


