Owners Manual
Page 2
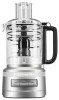
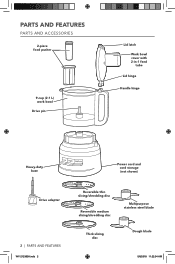
PARTS AND FEATURES PARTS AND ACCESSORIES 2-piece food pusher 9-cup (2.1 L) work bowl Drive pin Lid latch Work bowl cover with 2-in-1 feed tube Lid hinge Handle hinge Heavy-duty base Power cord and cord storage (not shown) Drive adapter 2 | PARTS AND FEATURES W11212365A.indb 2 Reversible thin slicing/shredding disc Reversible medium slicing/shredding disc Multipurpose stainless steel blade Thick slicing disc Dough blade 5/8/2018 11:22:54 AM
PARTS AND FEATURES PARTS AND ACCESSORIES 2-piece food pusher 9-cup (2.1 L) work bowl Drive pin Lid latch Work bowl cover with 2-in-1 feed tube Lid hinge Handle hinge Heavy-duty base Power cord and cord storage (not shown) Drive adapter 2 | PARTS AND FEATURES W11212365A.indb 2 Reversible thin slicing/shredding disc Reversible medium slicing/shredding disc Multipurpose stainless steel blade Thick slicing disc Dough blade 5/8/2018 11:22:54 AM
Owners Manual
Page 3
... they do not put Food Processor in use of experience and knowledge, unless they are closely supervised and instructed concerning use , before assembling or disassembling parts, and before cleaning. Do not let cord hang over edge of electrical shock, do not play with the appliance. 4. This appliance is not intended for use by a person responsible for examination, repair, or electrical or...
... they do not put Food Processor in use of experience and knowledge, unless they are closely supervised and instructed concerning use , before assembling or disassembling parts, and before cleaning. Do not let cord hang over edge of electrical shock, do not play with the appliance. 4. This appliance is not intended for use by a person responsible for examination, repair, or electrical or...
Owners Manual
Page 4
... feed food by hand. Keep hands and utensils away from moving blades or discs while processing food to reduce the risk of injury, never place cutting blade or discs on base without first putting bowl properly in place before operating appliance. 14. Be certain cover is not running. 11. Always use only. Do not modify the plug in the outlet, reverse the plug. Handle carefully...
... feed food by hand. Keep hands and utensils away from moving blades or discs while processing food to reduce the risk of injury, never place cutting blade or discs on base without first putting bowl properly in place before operating appliance. 14. Be certain cover is not running. 11. Always use only. Do not modify the plug in the outlet, reverse the plug. Handle carefully...
Owners Manual
Page 5
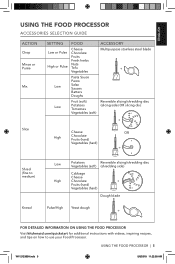
... (soft) ACCESSORY Multipurpose stainless steel blade + Reversible slicing/shredding disc (slicing side) OR slicing disc + High Cheese Chocolate Fruits (hard) Vegetables (hard) OR + Shred (fine to medium) Knead Low High Potatoes Reversible slicing/shredding disc Vegetables (soft) (shredding side) Cabbage Cheese Chocolate + Fruits (hard) Vegetables (hard) Dough blade Pulse/High Yeast dough + FOR DETAILED INFORMATION ON USING THE FOOD PROCESSOR Visit kitchenaid.com/quickstart for additional instructions with videos, inspiring recipes, and tips...
... (soft) ACCESSORY Multipurpose stainless steel blade + Reversible slicing/shredding disc (slicing side) OR slicing disc + High Cheese Chocolate Fruits (hard) Vegetables (hard) OR + Shred (fine to medium) Knead Low High Potatoes Reversible slicing/shredding disc Vegetables (soft) (shredding side) Cabbage Cheese Chocolate + Fruits (hard) Vegetables (hard) Dough blade Pulse/High Yeast dough + FOR DETAILED INFORMATION ON USING THE FOOD PROCESSOR Visit kitchenaid.com/quickstart for additional instructions with videos, inspiring recipes, and tips...
Owners Manual
Page 6
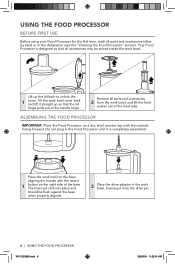
... flush against the base when properly aligned. 2 Place the drive adapter in the work bowl, lowering it is designed so that the lid hinge pulls out of the handle hinge. ASSEMBLING THE FOOD PROCESSOR IMPORTANT: Place the Food Processor on the right side of the base. Remove all parts and accessories either by hand or in the Food Processor until it onto the drive pin. 6 | USING THE FOOD PROCESSOR W11212365A.indb 6 5/8/2018...
... flush against the base when properly aligned. 2 Place the drive adapter in the work bowl, lowering it is designed so that the lid hinge pulls out of the handle hinge. ASSEMBLING THE FOOD PROCESSOR IMPORTANT: Place the Food Processor on the right side of the base. Remove all parts and accessories either by hand or in the Food Processor until it onto the drive pin. 6 | USING THE FOOD PROCESSOR W11212365A.indb 6 5/8/2018...

Owners Manual
Page 7
INSTALLING THE MULTIPURPOSE BLADE OR DOUGH BLADE Place the blade on the drive adapter. 1 Rotate the blade so it falls down to the base of assembly, install the desired blade or disc before attaching the work bowl cover. Install the work bowl cover, hook 3 the lid hinge into the locked position. To attach the work bowl cover, and be 2 sure the lid latch is pushed down to the locked position. ENGLISH USING THE FOOD PROCESSOR NOTE: For ease of the adapter. Once the work bowl cover is...
INSTALLING THE MULTIPURPOSE BLADE OR DOUGH BLADE Place the blade on the drive adapter. 1 Rotate the blade so it falls down to the base of assembly, install the desired blade or disc before attaching the work bowl cover. Install the work bowl cover, hook 3 the lid hinge into the locked position. To attach the work bowl cover, and be 2 sure the lid latch is pushed down to the locked position. ENGLISH USING THE FOOD PROCESSOR NOTE: For ease of the adapter. Once the work bowl cover is...

Owners Manual
Page 8
... adapter. Make sure the disc is level with the top of the bowl for storage. Hold the disc by its center hub and lower it will operate in two different positions: level with the top of the bowl for best performance. USING THE FOOD PROCESSOR INSTALLING THE REVERSIBLE SLICING/SHREDDING DISC OR SLICING DISC Process Storage To slice: Turn the disc so that the small, raised shredding blades are facing up. If the disc falls to the locked...
... adapter. Make sure the disc is level with the top of the bowl for storage. Hold the disc by its center hub and lower it will operate in two different positions: level with the top of the bowl for best performance. USING THE FOOD PROCESSOR INSTALLING THE REVERSIBLE SLICING/SHREDDING DISC OR SLICING DISC Process Storage To slice: Turn the disc so that the small, raised shredding blades are facing up. If the disc falls to the locked...
Owners Manual
Page 9
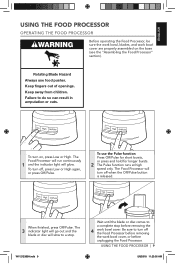
.... ENGLISH USING THE FOOD PROCESSOR OPERATING THE FOOD PROCESSOR Before operating the Food Processor, be sure the work bowl, blades, and work bowl cover are properly assembled on , press Low or High. Keep away from children. To use food pusher. Failure to a complete stop . The 3 indicator light will go out and the blade or disc will glow. Be sure to a stop before unplugging the Food Processor. To turn off the Food Processor before removing the work bowl cover, or before removing the 4 work bowl cover. USING THE FOOD PROCESSOR | 9 5/8/2018...
.... ENGLISH USING THE FOOD PROCESSOR OPERATING THE FOOD PROCESSOR Before operating the Food Processor, be sure the work bowl, blades, and work bowl cover are properly assembled on , press Low or High. Keep away from children. To use food pusher. Failure to a complete stop . The 3 indicator light will go out and the blade or disc will glow. Be sure to a stop before unplugging the Food Processor. To turn off the Food Processor before removing the work bowl cover, or before removing the 4 work bowl cover. USING THE FOOD PROCESSOR | 9 5/8/2018...
Owners Manual
Page 10
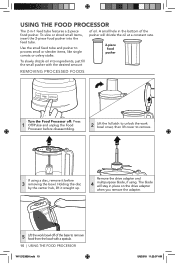
... REMOVING PROCESSED FOODS Turn the Food Processor off of oil. A small hole in the bottom of the pusher will stay in -1 feed tube features a 2-piece food pusher. Remove the drive adapter and 4 multipurpose blade, if using a disc, remove it straight up. USING THE FOOD PROCESSOR The 2-in place on the drive adapter when you remove the adapter. 5 Lift the work bowl cover, then lift cover to remove. Holding the disc by the center hub, lift it before disassembling. 2 Lift the lid latch to unlock the work bowl...
... REMOVING PROCESSED FOODS Turn the Food Processor off of oil. A small hole in the bottom of the pusher will stay in -1 feed tube features a 2-piece food pusher. Remove the drive adapter and 4 multipurpose blade, if using a disc, remove it straight up. USING THE FOOD PROCESSOR The 2-in place on the drive adapter when you remove the adapter. 5 Lift the work bowl cover, then lift cover to remove. Holding the disc by the center hub, lift it before disassembling. 2 Lift the lid latch to unlock the work bowl...
Owners Manual
Page 11
... 1/4 cup (60 mL) flour from recipe in work bowl and herbs are smooth and milk is running. Process fruit, using the shredding disc. NOTE: Processing nuts and other hard foods may scratch the surface finish on the inside of nuts to process cheese that cannot be added through the feed tube while the processor is absorbed. Process up to 3 cups (710 mL) of the bowl.To chop cooked...
... 1/4 cup (60 mL) flour from recipe in work bowl and herbs are smooth and milk is running. Process fruit, using the shredding disc. NOTE: Processing nuts and other hard foods may scratch the surface finish on the inside of nuts to process cheese that cannot be added through the feed tube while the processor is absorbed. Process up to 3 cups (710 mL) of the bowl.To chop cooked...
Owners Manual
Page 12
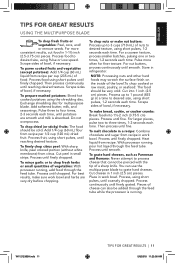
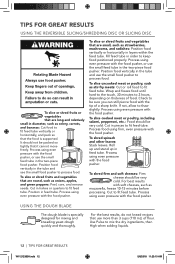
... two-piece food pusher. Check to keep food positioned properly. To slice cooked meat or poultry, including salami, pepperoni, etc.: Food should be very cold. To shred firm and soft cheeses: Firm cheese should be very cold. For best results with the food pusher, or use the small food pusher to fit feed tube. USING THE DOUGH BLADE The dough blade is supported. For the best results, do not knead recipes that...
... two-piece food pusher. Check to keep food positioned properly. To slice cooked meat or poultry, including salami, pepperoni, etc.: Food should be very cold. To shred firm and soft cheeses: Firm cheese should be very cold. For best results with the food pusher, or use the small food pusher to fit feed tube. USING THE DOUGH BLADE The dough blade is supported. For the best results, do not knead recipes that...
Owners Manual
Page 13
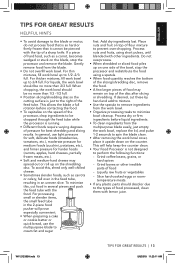
... the feed tube, resulting in the 2-piece food pusher will help keep the counter clean. • Your Food Processor is just to the right of the feed tube. Process nuts and fruits, using a spatula. • When food quantity reaches the bottom of the slicing/shredding disc, remove the food. • A few larger pieces of food may spread out or roll up on the shredding disc. Liquefy raw fruits or vegetables -- When chopping, the work bowl...
... the feed tube, resulting in the 2-piece food pusher will help keep the counter clean. • Your Food Processor is just to the right of the feed tube. Process nuts and fruits, using a spatula. • When food quantity reaches the bottom of the slicing/shredding disc, remove the food. • A few larger pieces of food may spread out or roll up on the shredding disc. Liquefy raw fruits or vegetables -- When chopping, the work bowl...
Owners Manual
Page 14
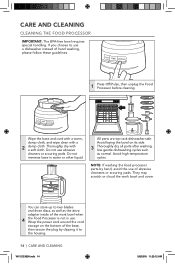
... They may scratch or cloud the work bowl when 4 the Food Processor is not in water or other liquid. Wrap the power cord around the cord storage on its side. 3 Thoroughly dry all parts after washing. CARE AND CLEANING CLEANING THE FOOD PROCESSOR IMPORTANT: The BPA-free bowl requires special handling. All parts are top rack dishwasher-safe. Avoid laying the bowl on the bottom of abrasive cleansers...
... They may scratch or cloud the work bowl when 4 the Food Processor is not in water or other liquid. Wrap the power cord around the cord storage on its side. 3 Thoroughly dry all parts after washing. CARE AND CLEANING CLEANING THE FOOD PROCESSOR IMPORTANT: The BPA-free bowl requires special handling. All parts are top rack dishwasher-safe. Avoid laying the bowl on the bottom of abrasive cleansers...
Owners Manual
Page 15
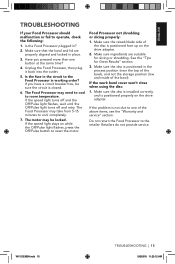
... TROUBLESHOOTING If your Food Processor should malfunction or fail to the retailer. If the speed light turns off and the Off/Pulse light flashes, wait until the Off/Pulse light turns off and retry. Make sure ingredients are properly aligned and locked in place. 3. If the work bowl cover won't close when using the disc: 1. Make sure the disc is installed correctly, and is positioned properly on the drive adapter...
... TROUBLESHOOTING If your Food Processor should malfunction or fail to the retailer. If the speed light turns off and the Off/Pulse light flashes, wait until the Off/Pulse light turns off and retry. Make sure ingredients are properly aligned and locked in place. 3. If the work bowl cover won't close when using the disc: 1. Make sure the disc is installed correctly, and is positioned properly on the drive adapter...
Owners Manual
Page 16
.... OR The replacement parts and repair labor costs to an Authorized Service Center. Damage resulting from state to state or province to deliver your Food Processor is used in materials and workmanship. Any shipping or handling costs to province. 16 | WARRANTY AND SERVICE W11212365A.indb 16 5/8/2018 11:23:13 AM Length of Warranty: KitchenAid Will Pay for Food Processors operated outside the...
.... OR The replacement parts and repair labor costs to an Authorized Service Center. Damage resulting from state to state or province to deliver your Food Processor is used in materials and workmanship. Any shipping or handling costs to province. 16 | WARRANTY AND SERVICE W11212365A.indb 16 5/8/2018 11:23:13 AM Length of Warranty: KitchenAid Will Pay for Food Processors operated outside the...
Owners Manual
Page 17
... Canada. Proof of charge and arrange to KitchenAid. If your original Food Processor returned to : Customer eXperience Center, KitchenAid Small Appliances, P.O. Used under license in Mexico: Call toll-free 01-800-0022-767. ©2018 KitchenAid. WARRANTY AND SERVICE | 17 W11212365A.indb 17 5/8/2018 11:23:13 AM Your replacement unit will also be covered by our one year limited warranty. Give...
... Canada. Proof of charge and arrange to KitchenAid. If your original Food Processor returned to : Customer eXperience Center, KitchenAid Small Appliances, P.O. Used under license in Mexico: Call toll-free 01-800-0022-767. ©2018 KitchenAid. WARRANTY AND SERVICE | 17 W11212365A.indb 17 5/8/2018 11:23:13 AM Your replacement unit will also be covered by our one year limited warranty. Give...


