Owners Manual
Page 2
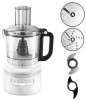
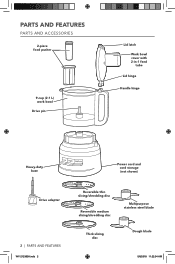
PARTS AND FEATURES PARTS AND ACCESSORIES 2-piece food pusher 9-cup (2.1 L) work bowl Drive pin Lid latch Work bowl cover with 2-in-1 feed tube Lid hinge Handle hinge Heavy-duty base Power cord and cord storage (not shown) Drive adapter 2 | PARTS AND FEATURES W11212365A.indb 2 Reversible thin slicing/shredding disc Reversible medium slicing/shredding disc Multipurpose stainless steel blade Thick slicing disc Dough blade 5/8/2018 11:22:54 AM
PARTS AND FEATURES PARTS AND ACCESSORIES 2-piece food pusher 9-cup (2.1 L) work bowl Drive pin Lid latch Work bowl cover with 2-in-1 feed tube Lid hinge Handle hinge Heavy-duty base Power cord and cord storage (not shown) Drive adapter 2 | PARTS AND FEATURES W11212365A.indb 2 Reversible thin slicing/shredding disc Reversible medium slicing/shredding disc Multipurpose stainless steel blade Thick slicing disc Dough blade 5/8/2018 11:22:54 AM
Owners Manual
Page 3
... are closely supervised and instructed concerning use of the appliance by KitchenAid may cause fire, electric shock, or injury. 8. Do not operate any appliance with reduced physical, sensory, or mental capabilities, or lack of experience and knowledge, unless they do not put Food Processor in use, before assembling or disassembling parts, and before cleaning. Close supervision is used by or near children...
... are closely supervised and instructed concerning use of the appliance by KitchenAid may cause fire, electric shock, or injury. 8. Do not operate any appliance with reduced physical, sensory, or mental capabilities, or lack of experience and knowledge, unless they do not put Food Processor in use, before assembling or disassembling parts, and before cleaning. Close supervision is used by or near children...
Owners Manual
Page 4
...: 120 V Frequency: 60 Hz NOTE: This Food Processor is wider than the other). Never feed food by hand. SAVE THESE INSTRUCTIONS This product is not running. 11. If the plug does not fit fully in any way. 4 | FOOD PROCESSOR SAFETY W11212365A.indb 4 5/8/2018 11:22:56 AM Handle carefully. 12. Blades are sharp. Always use only. If it still does not...
...: 120 V Frequency: 60 Hz NOTE: This Food Processor is wider than the other). Never feed food by hand. SAVE THESE INSTRUCTIONS This product is not running. 11. If the plug does not fit fully in any way. 4 | FOOD PROCESSOR SAFETY W11212365A.indb 4 5/8/2018 11:22:56 AM Handle carefully. 12. Blades are sharp. Always use only. If it still does not...
Owners Manual
Page 5
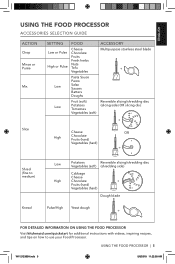
... (soft) ACCESSORY Multipurpose stainless steel blade + Reversible slicing/shredding disc (slicing side) OR slicing disc + High Cheese Chocolate Fruits (hard) Vegetables (hard) OR + Shred (fine to medium) Knead Low High Potatoes Reversible slicing/shredding disc Vegetables (soft) (shredding side) Cabbage Cheese Chocolate + Fruits (hard) Vegetables (hard) Dough blade Pulse/High Yeast dough + FOR DETAILED INFORMATION ON USING THE FOOD PROCESSOR Visit kitchenaid.com/quickstart for additional instructions with videos, inspiring recipes, and tips...
... (soft) ACCESSORY Multipurpose stainless steel blade + Reversible slicing/shredding disc (slicing side) OR slicing disc + High Cheese Chocolate Fruits (hard) Vegetables (hard) OR + Shred (fine to medium) Knead Low High Potatoes Reversible slicing/shredding disc Vegetables (soft) (shredding side) Cabbage Cheese Chocolate + Fruits (hard) Vegetables (hard) Dough blade Pulse/High Yeast dough + FOR DETAILED INFORMATION ON USING THE FOOD PROCESSOR Visit kitchenaid.com/quickstart for additional instructions with videos, inspiring recipes, and tips...
Owners Manual
Page 6
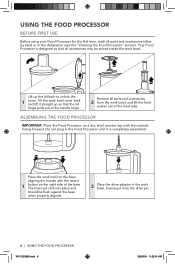
... the drive adapter in the Food Processor until it straight up the lid latch to unlock the 1 cover. Do not plug in the work bowl, lowering it onto the drive pin. 6 | USING THE FOOD PROCESSOR W11212365A.indb 6 5/8/2018 11:23:01 AM Remove all parts and accessories either by hand or in the dishwasher (see the "Cleaning the Food Processor" section). Your Food Processor is completely assembled. ASSEMBLING THE FOOD PROCESSOR IMPORTANT: Place the Food Processor...
... the drive adapter in the Food Processor until it straight up the lid latch to unlock the 1 cover. Do not plug in the work bowl, lowering it onto the drive pin. 6 | USING THE FOOD PROCESSOR W11212365A.indb 6 5/8/2018 11:23:01 AM Remove all parts and accessories either by hand or in the dishwasher (see the "Cleaning the Food Processor" section). Your Food Processor is completely assembled. ASSEMBLING THE FOOD PROCESSOR IMPORTANT: Place the Food Processor...

Owners Manual
Page 7
... the adapter. To attach the work bowl cover, hook 3 the lid hinge into the locked position. W11212365A.indb 7 USING THE FOOD PROCESSOR | 7 5/8/2018 11:23:02 AM INSTALLING THE MULTIPURPOSE BLADE OR DOUGH BLADE Place the blade on the base. NOTE: Your Food Processor will not operate unless the work bowl cover is fully closed , 4 push the lid hinge down to the base of assembly, install the desired blade or disc before attaching the work bowl is pushed down into the handle...
... the adapter. To attach the work bowl cover, hook 3 the lid hinge into the locked position. W11212365A.indb 7 USING THE FOOD PROCESSOR | 7 5/8/2018 11:23:02 AM INSTALLING THE MULTIPURPOSE BLADE OR DOUGH BLADE Place the blade on the base. NOTE: Your Food Processor will not operate unless the work bowl cover is fully closed , 4 push the lid hinge down to the base of assembly, install the desired blade or disc before attaching the work bowl is pushed down into the handle...

Owners Manual
Page 8
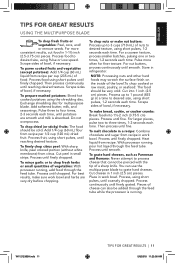
... 2 the adapter. Make sure the disc is facing up. 1 To shred: Turn the disc so that the raised slicing blade is level with the top of the bowl for storage. If the disc falls to the locked position. 8 | USING THE FOOD PROCESSOR W11212365A.indb 8 5/8/2018 11:23:04 AM USING THE FOOD PROCESSOR INSTALLING THE REVERSIBLE SLICING/SHREDDING DISC OR SLICING DISC Process Storage To slice: Turn the disc so that the small, raised shredding blades are facing up. Install the work bowl cover, and be...
... 2 the adapter. Make sure the disc is facing up. 1 To shred: Turn the disc so that the raised slicing blade is level with the top of the bowl for storage. If the disc falls to the locked position. 8 | USING THE FOOD PROCESSOR W11212365A.indb 8 5/8/2018 11:23:04 AM USING THE FOOD PROCESSOR INSTALLING THE REVERSIBLE SLICING/SHREDDING DISC OR SLICING DISC Process Storage To slice: Turn the disc so that the small, raised shredding blades are facing up. Install the work bowl cover, and be...
Owners Manual
Page 9
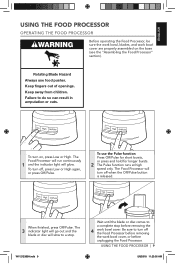
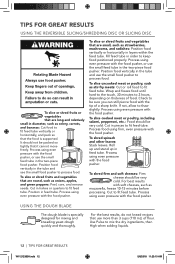
... , press Low or High again, or press Off/Pulse. The Food Processor will turn on the base (see the "Assembling the Food Processor" section). Be sure to a stop before unplugging the Food Processor. The 3 indicator light will go out and the blade or disc will glow. Failure to a complete stop . To use food pusher. Rotating Blade Hazard Always use the Pulse function: Press Off/Pulse for short bursts, or...
... , press Low or High again, or press Off/Pulse. The Food Processor will turn on the base (see the "Assembling the Food Processor" section). Be sure to a stop before unplugging the Food Processor. The 3 indicator light will go out and the blade or disc will glow. Failure to a complete stop . To use food pusher. Rotating Blade Hazard Always use the Pulse function: Press Off/Pulse for short bursts, or...
Owners Manual
Page 10
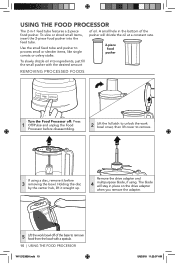
... into the feed tube. Remove the drive adapter and 4 multipurpose blade, if using a disc, remove it straight up. USING THE FOOD PROCESSOR The 2-in-1 feed tube features a 2-piece food pusher. Holding the disc by the center hub, lift it before disassembling. 2 Lift the lid latch to remove. of the base to process small or slender items, like single carrots or celery stalks. Use the small feed tube and pusher to remove food from the bowl with the desired amount REMOVING PROCESSED FOODS Turn the Food Processor off: Press...
... into the feed tube. Remove the drive adapter and 4 multipurpose blade, if using a disc, remove it straight up. USING THE FOOD PROCESSOR The 2-in-1 feed tube features a 2-piece food pusher. Holding the disc by the center hub, lift it before disassembling. 2 Lift the lid latch to remove. of the base to process small or slender items, like single carrots or celery stalks. Use the small feed tube and pusher to remove food from the bowl with the desired amount REMOVING PROCESSED FOODS Turn the Food Processor off: Press...
Owners Manual
Page 11
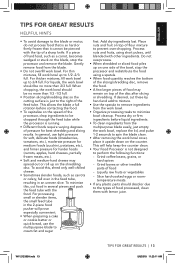
... 5/8/2018 11:23:08 AM Add softened butter, milk, and seasonings. For nut butters, process continuously until finely chopped. To make sure work bowl and herbs are smooth and milk is running , add food through the feed tube. Heat liquid from recipe in small strips. Pieces of nuts to 3 cups (710 mL) of cheese can use the multipurpose blade to three times, 1-2 seconds each time. Then...
... 5/8/2018 11:23:08 AM Add softened butter, milk, and seasonings. For nut butters, process continuously until finely chopped. To make sure work bowl and herbs are smooth and milk is running , add food through the feed tube. Heat liquid from recipe in small strips. Pieces of nuts to 3 cups (710 mL) of cheese can use the multipurpose blade to three times, 1-2 seconds each time. Then...
Owners Manual
Page 12
... thickness of food. If not, allow to fit feed tube. Process using even pressure with the food pusher. Process using even pressure with the tip of flour. Cut in the two-piece food pusher. USING THE DOUGH BLADE The dough blade is supported. To slice cooked meat or poultry, including salami, pepperoni, etc.: Food should not be sure you can still pierce food with the food pusher, or use the small food pusher to fit feed tube. It should...
... thickness of food. If not, allow to fit feed tube. Process using even pressure with the food pusher. Process using even pressure with the tip of flour. Cut in the two-piece food pusher. USING THE DOUGH BLADE The dough blade is supported. To slice cooked meat or poultry, including salami, pepperoni, etc.: Food should not be sure you can still pierce food with the food pusher, or use the small food pusher to fit feed tube. It should...
Owners Manual
Page 13
...; Use the spatula to remove ingredients from the work bowl cover, place it cannot be no more than 2/3 full. Place nuts and fruit on the blade, stop the processor and redistribute the food using short pulses, until blended with the food. If desired, cut food in several pieces and pack the feed tube with other inedible parts of hard food, such as carrots or celery, fall over -chopping...
...; Use the spatula to remove ingredients from the work bowl cover, place it cannot be no more than 2/3 full. Place nuts and fruit on the blade, stop the processor and redistribute the food using short pulses, until blended with the food. If desired, cut food in several pieces and pack the feed tube with other inedible parts of hard food, such as carrots or celery, fall over -chopping...
Owners Manual
Page 14
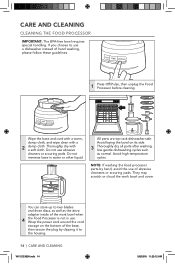
... store up to use abrasive cleaners or scouring pads. Do not use a dishwasher instead of the work bowl and cover. If you choose to two blades and three discs, as well as normal. Do not immerse base in use of the base, then secure the plug by hand, avoid the use . Avoid high-temperature cycles. CARE AND CLEANING CLEANING THE FOOD PROCESSOR IMPORTANT: The BPA-free bowl requires special handling.
... store up to use abrasive cleaners or scouring pads. Do not use a dishwasher instead of the work bowl and cover. If you choose to two blades and three discs, as well as normal. Do not immerse base in use of the base, then secure the plug by hand, avoid the use . Avoid high-temperature cycles. CARE AND CLEANING CLEANING THE FOOD PROCESSOR IMPORTANT: The BPA-free bowl requires special handling.
Owners Manual
Page 15
... reset the motor. W11212365A.indb 15 TROUBLESHOOTING | 15 5/8/2018 11:23:12 AM If you pressed more than one of the above items, see the "Warranty and service" section. Make sure the disc is installed correctly, and is positioned face up on the drive adapter. 2. Is the Food Processor plugged in working order? See the "Tips for slicing or shredding. Unplug the Food Processor, then...
... reset the motor. W11212365A.indb 15 TROUBLESHOOTING | 15 5/8/2018 11:23:12 AM If you pressed more than one of the above items, see the "Warranty and service" section. Make sure the disc is installed correctly, and is positioned face up on the drive adapter. 2. Is the Food Processor plugged in working order? See the "Tips for slicing or shredding. Unplug the Food Processor, then...
Owners Manual
Page 16
... warranty gives you specific legal rights and you may also have other than normal single family home use. Length of Warranty: KitchenAid Will Pay for details on how to an Authorized Service Center. DISCLAIMER OF IMPLIED WARRANTIES; OR The replacement parts and repair labor costs to deliver your Food Processor. B. IF THIS PRODUCT FAILS TO WORK AS WARRANTED, CUSTOMER'S SOLE AND...
... warranty gives you specific legal rights and you may also have other than normal single family home use. Length of Warranty: KitchenAid Will Pay for details on how to an Authorized Service Center. DISCLAIMER OF IMPLIED WARRANTIES; OR The replacement parts and repair labor costs to deliver your Food Processor. B. IF THIS PRODUCT FAILS TO WORK AS WARRANTED, CUSTOMER'S SOLE AND...
Owners Manual
Page 17
... our toll-free Customer eXperience Center at 1-800-807-6777 Monday through Friday. If your original Food Processor returned to KitchenAid. Box numbers, please). Your replacement unit will also be covered by our one year limited warranty. HASSLE-FREE REPLACEMENT WARRANTY - For service information in Canada: Call toll-free 1-800-807-6777. Used under license in the U.S. Box 218, St. ENGLISH WARRANTY AND SERVICE HASSLE-FREE REPLACEMENT WARRANTY...
... our toll-free Customer eXperience Center at 1-800-807-6777 Monday through Friday. If your original Food Processor returned to KitchenAid. Box numbers, please). Your replacement unit will also be covered by our one year limited warranty. HASSLE-FREE REPLACEMENT WARRANTY - For service information in Canada: Call toll-free 1-800-807-6777. Used under license in the U.S. Box 218, St. ENGLISH WARRANTY AND SERVICE HASSLE-FREE REPLACEMENT WARRANTY...


